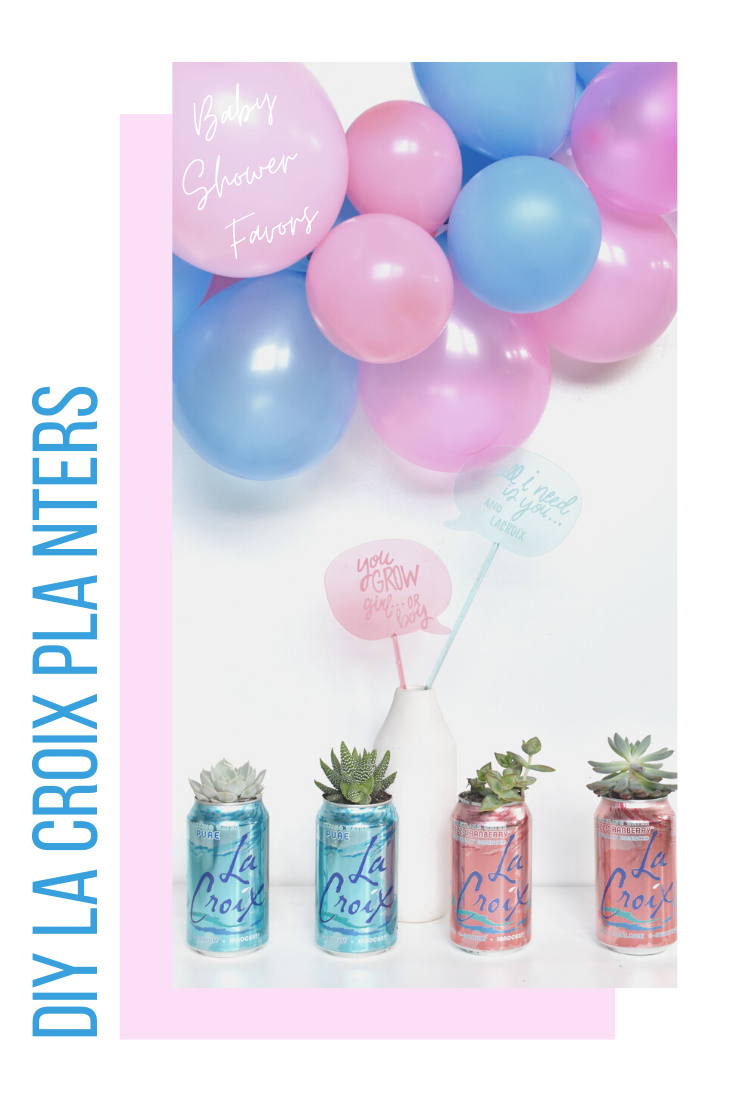
Amazing Queso Dip for Super Bowl Sunday

queso dip for super bowl sunday

Jessica is probably the only football fan among us. She may be the one watching (along with the men in our lives), but there’s one thing we are all doing during the games…eating. Never underestimate the power of good snacks during a football game, whether your a fan or not.

We shared one of our favorite queso recipes on Momtastic just in time for Super Bowl Sunday. The house is divided on who is going to win the game this year. But, we do know we’ll be winning in the food department as we watch the team go head to head on Sunday for the ultimate victory.

Side note: serve it in a small crock pot so it stays warm, and you don’t have to reheat it a hundred times. This queso is oh so good!

Christmas Home Decor: Mini Gingerbread House Village

diy bird house gingerbread houses (2)

I’m not only in a bell phase this Christmas season, I’m having a gingerbread moment, too. First it was our DIY gingerbread paper bag advent calendar, and now it’s a cute mini DIY gingerbread village made from tiny wood bird houses. I’ve never made homemade gingerbread, and I actually don’t like the taste of it. But, I love how festive the houses are, and can’t resist a homemade gingerbread house. This gingerbread house village is so easy, and so cute. You don’t need to worry about candy getting stale, because nothing is edible on these tiny houses. You can give these as gifts, or set them up year after year with your holiday decor. Plus, you can do it this weekend with the kids. It would be really fun to see all the colors and designs the kids come up with.

Stick around for the bottom of the post if REAL gingerbread houses are more your jam. Some really talented pastry chefs, and members of the Vail community displayed some amazing Gingerbread Houses at the Vail Library in November as part of Revely Vail

gingerbread house- christmas decor

DIY Gingerbread House Village Made With Mini Wood Birdhouses

Materials:

  • mini wood bird houses, Walmart or Amazon
  • acrylic paint
  • paint brush
  • Elmer’s white paint pens, fine tip
  • glass cookie jars, Walmart
  • mini bottle brush Christmas trees

Instructions:

Step 1: Paint the houses. I had to do two coats of paint per house. I used a two different colors of brown paint to get a “gingerbread” color.

mini wood gingerbread houses for christmas decor

Step 2: Once the paint is dry, begin to draw/doodle decorations on the house with the paint pen. I drew it free-hand, and it worked out great. Draw swirls, icicles, windows, doors, hearts, candy canes, etc. on the front, back and top of the house. Make each house different.

gingerbread house- christmas decor

gingerbread house- christmas decor

Step 3: Set the houses on a cake stand with bottle brush trees, twinkle lights and fake snow. Or, make a pretty glass jar display with all the fun winter accessories, and twinkle lights, too.

gingerbread house display

gingerbread house display


Revely Vail Gingerbread House Competition (just a small snippet of the 30+ entries):


Hovey & Harrison

Hovey & Harrison


The Arrabelle at Vail

The Arrabelle at Vail


The Sebastian Hotel

The Sebastian Hotel


Gru's Christmas House, 3rd graders

Gru’s Christmas House, 3rd graders


age 6-10 entry, Sweet As Can Be

age 6-10 entry, Sweet As Can Be


affiliate disclosure

DIY Winter Wreath With Bells

diy modern wreath with bells

If you didn’t pick up on from a recent post, I’m having a bell obsession. Yes, I want them everywhere. I like to hear them, I like to see them – on place cards, garlands, doors and wreaths. So, it’s no surprise I made a trio of DIY winter wreaths with bells to decorate an empty wall in my house. I actually made the wreaths last year, and upgraded them this year with the bells. After I made them, I saw them on sale at a boutique store for $65-$85 per wreath. I like to think I saved money with this craft (it’s what I’m telling myself for yet another Amazon order at my doorstep) since these wreaths cost less than $10 each, and I made a chic new addition to my holiday home decor.

diy winter wreath with bells

DIY Winter Christmas Wreath With Bells

You’ll Need:

Here’s How To Do It:

Step 1: Buy 3 different size metal loop from Michaels. I spray painted mine copper, but any color will work.

Step 2: Next, buy faux greenery, (such as pine or any other winter greenery) and floral wire. Cut and add pieces of the greenery on the wreath, and wrap the stems in wire around the metal hoop. It’s that easy!

As for the bell, wrap twine through the bell, and then around the hoop. Listen for the sound of bells all season. It will make you smile. I know just looking at the bell decor makes me smile. Jingle all the way this Christmas season!

diy modern wreath with bells

diy modern wreath with bells

affiliate disclosure

Christmas Craft for Kids and Tweens: DIY Glitter Snow Globe

DIY glitter globe-holiday-craft-and-tween-gift

My son’s teacher has a DIY calm down jar in the classroom for kids to play with, or to shake when they need to calm down. Something about the way the glitter falls in the liquid is mesmerizing, and calming for kids. Like T. Swift says, “You need to calm down.” Now, there’s a jar for that. Haha.

Glitter is fun, especially when it’s contained, and there’s something magical about snow globes this time of year. So we combined the two for the cutest DIY glitter snow globe. This time of year is crazy, so if anything, no matter how simple, can help kids (or adults) calm down, it’s worth trying. Plus, these make adorable gifts for friends for kids and tweens. Let’s get this glitter party started.

DIY glitter globe-holiday-craft-and-tween-gift

DIY Glitter Snow Globes

Materials: 

Instructions:

Step 1: Fill the snow globe about 1/2 full with warm water.

Step 2: Add the glitter glue. I used 1 bottle for all three snow globes, and all got equal amounts. So, 4 tablespoons of glue per snow globe is a good start. In a mason jar, which is larger, you can use 1/2 cup glue.

Step 3: Add 2-3 drops food coloring. I used similar color glitter glue, food coloring, and glitter – all green tones. But, you could see how it turns out with multi-color glitter and glue. Don’t use more than 3 drops food coloring with these smaller globes, or you won’t be able to see the glitter.

Step 4: Add the glitter. I added about 2 tablespoons glitter per snow globe. You can add more or less if you want. There wasn’t much of an exact science to this. I used fine glitter in all of them, and added star glitter in some as well.

Step 5: Fill the remaining space in the snow globe with warm water, until it’s almost fill (leave a small space at the top so you can still shake it). Push in the inner seal in the globe insert, and then add super glue to the inner rim of the screw top, and then screw it on.

DIY glitter globe-holiday-craft-and-tween-gift

Step 6: This is optional, but you can customize each snow globe you make for friends with vinyl or stickers. We used our Silhouette Cameo to make vinyl words and mini stars for an extra magical touch.

Finally, shake and watch that glitter swirl, and then fall. Merry Christmas, everyone!

DIY glitter globe-holiday-craft-and-tween-gift

DIY glitter globe-holiday-craft-and-tween-gift


affiliate disclosure

Gather & Being Grateful + DIY Thanksgiving Place Card

bell place card for thanksgiving This time of year, the word gather and thankful are top of mind for us. They are simple words with great importance in our lives.

We have so much to be grateful for. We’ve been blessed with lots of love, good people, beautiful children, family, faith, health and ample opportunities to name a few. Even on the bad days, we remind ourselves to try to find small moments or people to be thankful for. It’s in those moments we can find a bit of peace, and/or perspective. On Thanksgiving, a tradition Jessica loves most (she learned it from her in-laws) is listening to people around the table say what they are most grateful for. It brings out all the emotions, but it really makes everyone think about what they are most grateful for that year. Plus, it keeps that gratitude at the forefront of the day, which is what it’s all about.

And, gather. We gather together with friends and family to eat, drink, be merry (or be dramatic if your family is so inclined :)), laugh, talk, cry and share moments together. Even if you are a homebody like us, it feels good to gather with the ones we love most to get recharged, and feel connected. Our large Italian family always seems to gather around the kitchen, where we bake, cook, chop and stir while we catch up. Then, once the food is prepared, we feast! We found a way to incorporate the word gather in the table setting with these charming and vintage-looking bells. I think I’m in a bell phase because this year, I want them everywhere. It’s Vail’s new tradition, and it seems it’s contagious. We made a DIY bell garland, too. If bells don’t intrigue you, wood wreaths might. It’s simple, and a touch of handmade which people love. If you don’t want to use the word gather, you can use grateful, guest names or even something funny.

bell with gather tag for thanksgiving table setting

We used our custom Silhouette Mint stamp maker for this project, and if you don’t have one, you should invest. The starter kit is just $40. It makes a great gift! We use ours all the time, and since we don’t know calligraphy (or need something stamped over and over again), this has been our go-to machine. We used it to create a gather stamp, and stamped it on tiny tags from the office section at Walmart. You can use these or these, too. We cut off the sides of the rectangle to make a skinnier rectangle, and swapped the white string with black and white twine.

diy mini wreath with gather tag

The wreaths are from Oriental Trading or you get them on Amazon. The bells are from Amazon. Hurry before I buy ALL THE BELLS.

gather wreaths and bells for holiday decor

antique bell with gather tag for holiday decor

We hope you take time to gather with the loved ones in your life this holiday season. And, we hope you find something to be grateful for each and every day. Today, for me (Jessica) it was a snuggle with my son before the chaos of the morning. I was tired, and didn’t necessarily want to be up so early, but it was a priceless moment, and I don’t know how many of those are mornings are left as they grow older everyday.


affiliate disclosure