{wedding diy} cruiser bike escort card

INphotography-cruiser bike escort card table

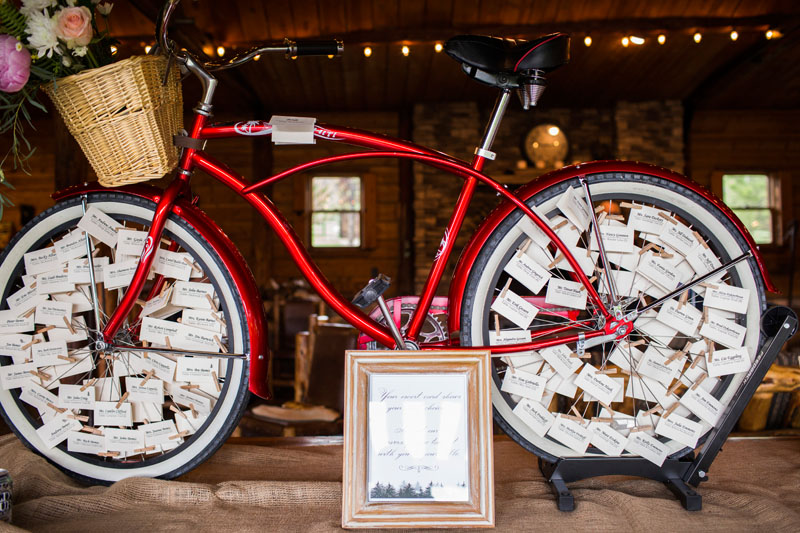
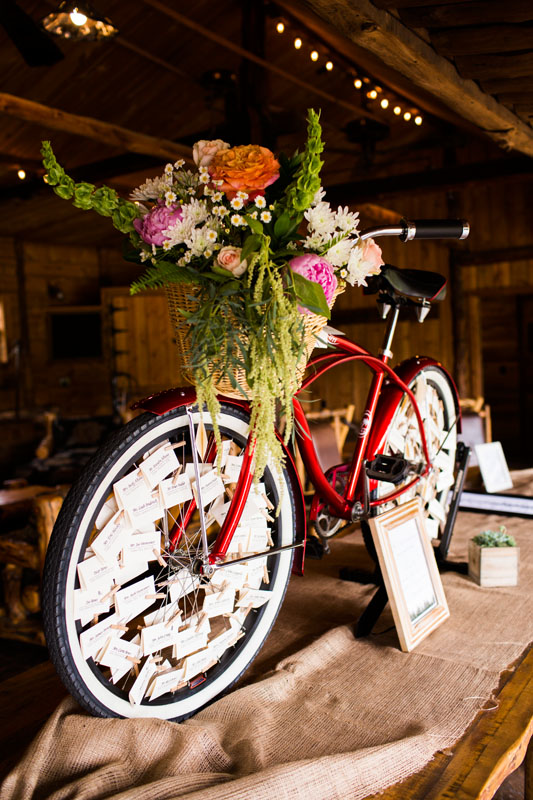
Yesterday you saw Sara and Jed’s gorgeous wedding, and if your like us, your heart swooned with the red cruiser bike escort card table. Today Sara is sharing her tips on how to re-create for your own wedding or party.

In Sara’s words…Jed and I together own seven bikes (I know, a bit excessive!). Two of them are cruiser bikes..mine of course being the pretty red one we used. 🙂  For someone who likes the place card idea, but doesn’t own a cruiser bike, I’d recommend that they ask around among their friends to see if they could borrow one or perhaps try calling a bike shop as there are some that will rent them (a tandem bike would also be cute).  had purchased a wicker basket for my cruiser bike a long time ago and thought that would be a great option for a floral display, so I dropped the basket off to my florist, Bella Lu Floral, a few weeks before the wedding and she put together something pretty!  Adding some greenery or additional flowers around the base of the bike would also be nice, we just opted against that.

INphotography-cruiser bike escort card table

How To

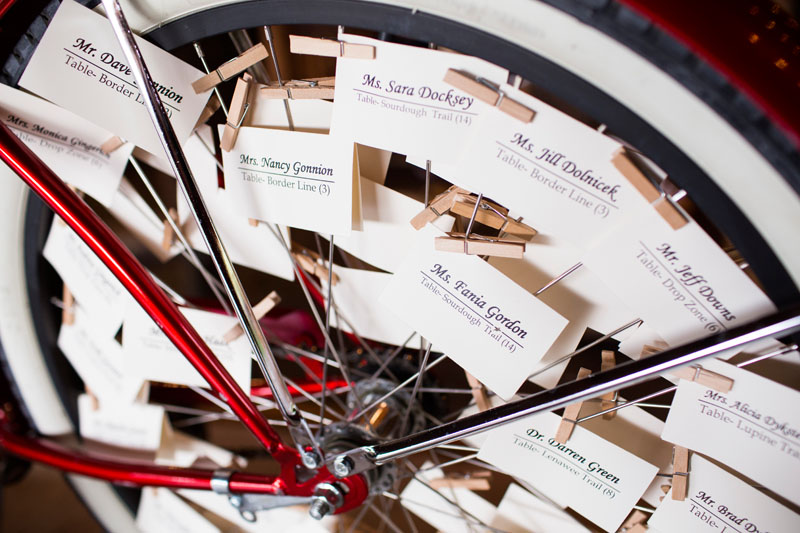
  • Give the bike a good wash, design and print all the place cards and start clothes pinning.  
  • Clothes pin sized 1 7/8″ worked best with paper thickness and spoke size.  
  • Also, depending upon how many place cards you have, you’ll need to be mindful of their size as well.  We had 110 place cards which were 3.5″ X 4 1/4″ and this was about the max of how many we could fit on two wheels without it looking stuffed. 
  • Divide the place cards evenly in to four groups to how many to affix to both sides of the front and back wheels. 
  • We decided to run things alphabetically by last name with A starting in the 12pm position on the front wheel and then spiraling inward (clockwise) as we went down the alphabet.  Grouping by table didn’t seem like it would work very well for something like this.

Other Important Tips

  • Do the arranging prior to the wedding.  Don’t leave this for the day of as it takes a little bit of work to make everything fit and look pretty.
  • Once done, you’ll need to find a way to keep things stuck in place so place cards don’t fall off or move during transport to your venue.  Our day of planner suggested Saran wrap and it worked out perfectly!  So after we were done, each wheel was heavily wrapped!
  • Find a nice friend with a large SUV to fit the bike in the back of their car and drive it to your wedding venue!
  • After cocktail hour was over, asked your planner to move the bike over to the dinner/dancing space. It made for a fun decor item and the beautiful flower arrangement that could still be enjoyed!

INphotography_cruiser bike diy

Thanks to IN Photography for the beautiful photos!

emily + randy

We love pretty weddings. And, we really love pretty weddings with a DIY touch. Emily and Randy’s wedding had it all – a pretty bride and handsome groom, a lovely setting, creative DIY’s, a yummy dessert table, a gorgeous ceremony backdrop and an amazing photographer to capture it all, Connie Dai Photography.

Today, Emily, the bride {and now happy newlywed} shares her tips for how she added personal DIY touches to her wedding day, and why you should try it too.

In Emily’s words…I definitely recommend DIYing as much as you can. It adds such a personal touch to your big day, and including those items as decorations in your home after the wedding are awesome reminders of the day. Honestly, putting on some tunes and creating beautiful things is great therapy during an often stressful time!

After you read about the easy DIY’s, please visit Connie Dai Photography to see more gorgeous photos for this beautiful couple’s special day. You won’t regret it – they are stunning. And it’s not just us that thinks so – Style Me Pretty thought so too.

DESSERT TABLE
Emily_Randy_Chatfield_Botanic_Gardens_Web_369

Glass Cake Stands
Find glass plates and glass candlesticks from a dollar store and E-6000 glue from a craft store such as Hobby Lobby or Michaels.
Glue a candlestick to the center of the bottom of a plate.
Let dry.
Leave as a single plate for small cakes, or add a couple of layers for a unique cupcake stand.

The other cake table pieces, the green box chalkboard and the compartment stand, were both from World Market.
Emily_Randy_Chatfield_Botanic_Gardens_Web_372

Emily_Randy_Chatfield_Botanic_Gardens_Web_371

Chatfield_Botanic_Gardens_Web_370

ESCORT CARD FRAME
Emily_Randy_Chatfield_Botanic_Gardens

Find an empty frame (Hobby Lobby had a perfect wooden frame to go well with our details)
Buy chicken wire at a home-improvement store {hopefully your handy husband has a staple gun. If not, buy one or thumb tacks or something similar should work}!
Stretch chicken wire over the back of the frame and staple periodically around the frame.
Trim excess chicken-wire with wire cutters and bend any sharp edges.

WOODEN RING BOX
Emily_Randy_Chatfield_Botanic_Gardens_Conniedaiphotography

Check the wooden crafts aisle at Hobby Lobby or Michaels for inspiration for easy decoration projects.
Find a small box to hold rings.
Stain the pre-made wooden crafts. I bought one brown stain and one grey stain. For some projects I used only one color, and for others, I mixed the two colors together for variety and a nice rustic color.
Paint on your new initial by hand or with a stencil in a contrasting color of paint.
Voilà! Cheap, simple, and fun wedding projects!

Emily_Randy_Chatfield_Botanic_Gardens_


Emily_Randy_Chatfield_Botanic_Gardens_Web_007

Thanks Emily and Randy. And, thank you Connie Dai Photography.

{images via Connie Dai Photography}

erin + andy

Laura Murray Photography, an incredibly talented photographer based in Colorado, played two big roles in this stunning wedding. Not only was she the bride’s sister and maid of honor, she was also one of the photographers {2nd photographer was talented Sara Hasstedt} responsible for capturing the beauty and emotion of the day. Job well done Laura. The setting is breathtaking, the details are lovely and the bride and groom radiate with pure joy. Thanks for sharing this charming mountain wedding with us Laura Murray.

VENDOR LOVE
Photography: Laura Murray Photography and Sara Hasstedt
Wedding Coordinator: pink champagne events
Floral Design: lauryl lane
Dress: Claire Pettibone ’Constance’ from little white dress
Bowties: Made by bride
Hairpiece: tessa kim
Makeup: nicole soukup
Hair: salon rua
Venue: t lazy 7 ranch, Aspen CO
Photobooth – magbooth
Umbrella Rentals: splendor for your guests
Catering: hickory house
Invitations: flourish letterpress

sweet peony

We’re obsessed with peonies, so when we saw these pretty images by Becky Young Photography from her sister’s bridal shower, and peonies were in the details, we were in love.

The soft colors, ribbon backdrop, sweet peony arrangements by the one and only Cori Cook and desserts made for one lovely bridal shower. And according to Cori, the bride, Jenny, is as sweet as pie. We want to meet her…and see her August wedding!


VENDOR LOVE
photography: Becky Young Photography
florist: Cori Cook 

{images via Becky Young Photography}

susan + michael

We love this wedding for it’s pretty simplicity, but also its DIY touches, lovely lace, vintage accessories and the most stunning floral bouquets and arrangements! Tables were set with burlap runners lined with lace borders. Such a pretty combo.  Centerpieces by one of our faves, Cori Cook, were a mix of old wooden planter boxes with beautiful arrangements of juliet garden roses, succulents, roses, veronica, cafe au lait dahlias, scabiosa pods, astible, sweet pea, lavender and seeded eucalyptus. The details and the setting made for a beautiful garden wedding.

Thanks for Harper Point for sharing the amazing photos with us. Ya’ll are good!

VENDOR LOVE
Photography: Harper Point Photography
Flowers: Cori Cook Floral Design
Paperware: Paper + Ink
Rentals/Vintage Props: A Vintage Affair Rentals
Venue: The Tapestry House

{images via Harper Point Photography}