Celebrate Mom This Mother’s Day With A Sweet DIY Paper Cake

diy-paper-cakes-boy-mom-paper-flowers-rainbow-cake

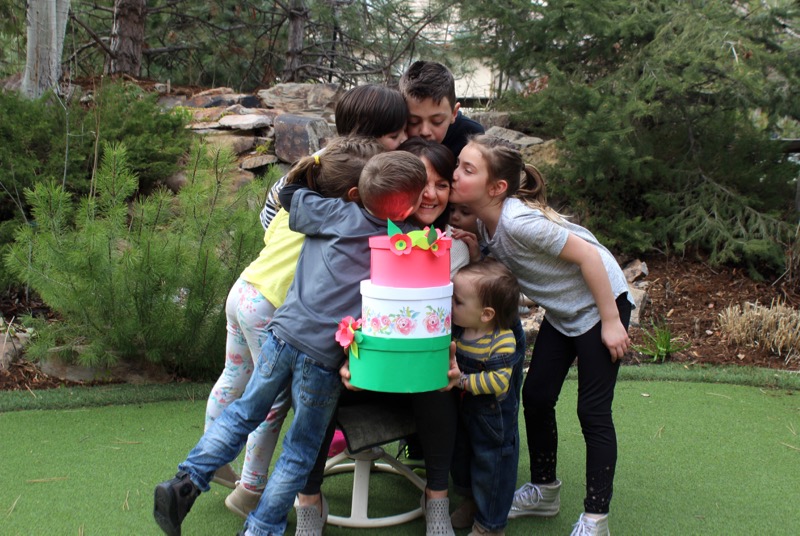
Being a mom is one of the hardest, and most rewarding jobs in the world. Between the three of us, we have 8 children, ranging from 9-years-old to 2-years-old. Nothing could have prepared us for the ups and downs of motherhood (and all the priceless memories in between), but one thing’s for sure – we had the best mom growing up. She was the greatest example for us to learn what it means to be a mother, and how impactful a mother’s love can be. Our mom, without a doubt, takes the cake as the best mom (and now Nani to 8 grandkids) ever!

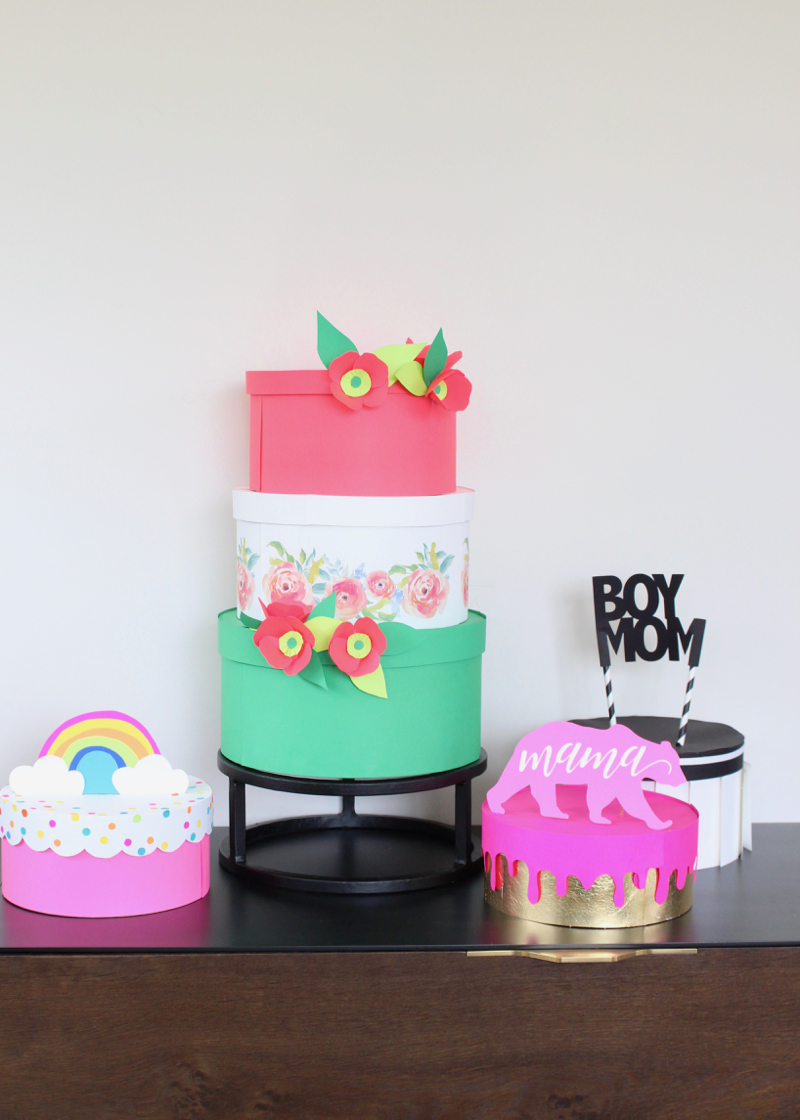
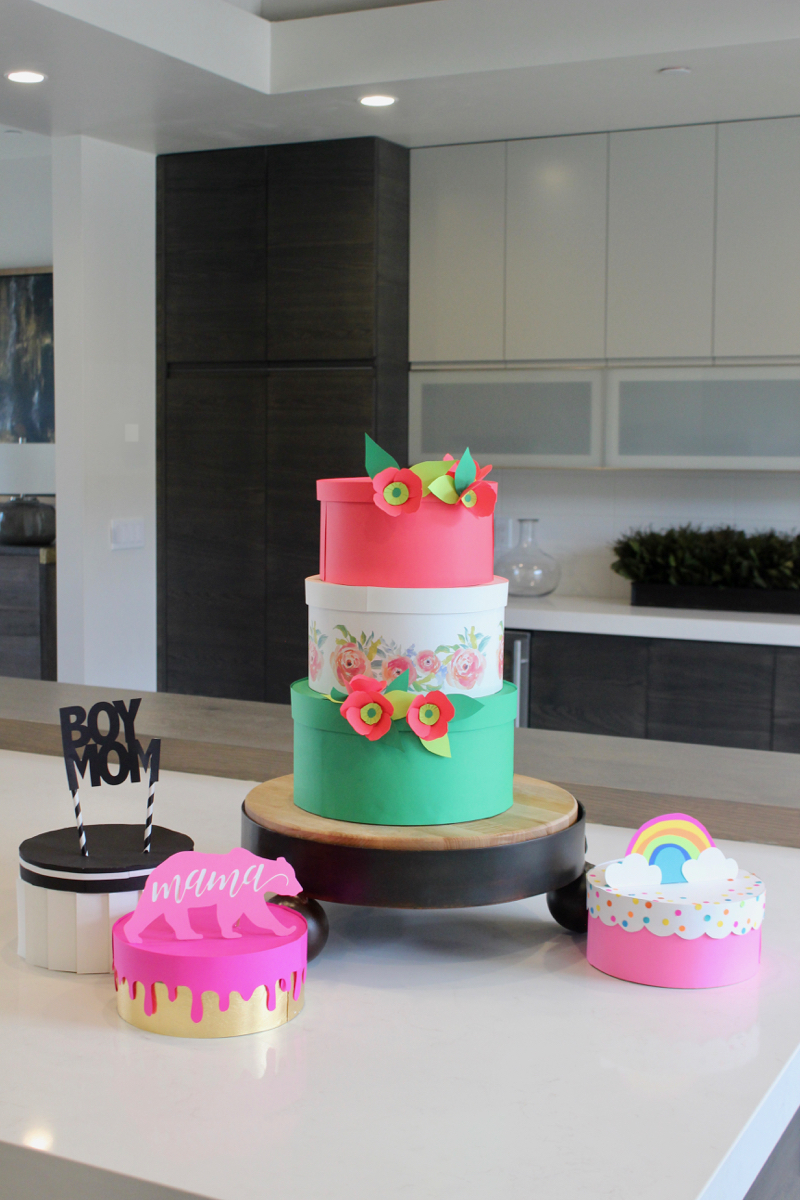
This year, we’re treating our mom to a sweet slice of cake, a beautiful DIY layered cake. This cake won’t cause any cavities
though, because it’s inedible. It’s made of paper, and decorated with the best, most colorful paper, ASTROBRIGHTS®  Papers.

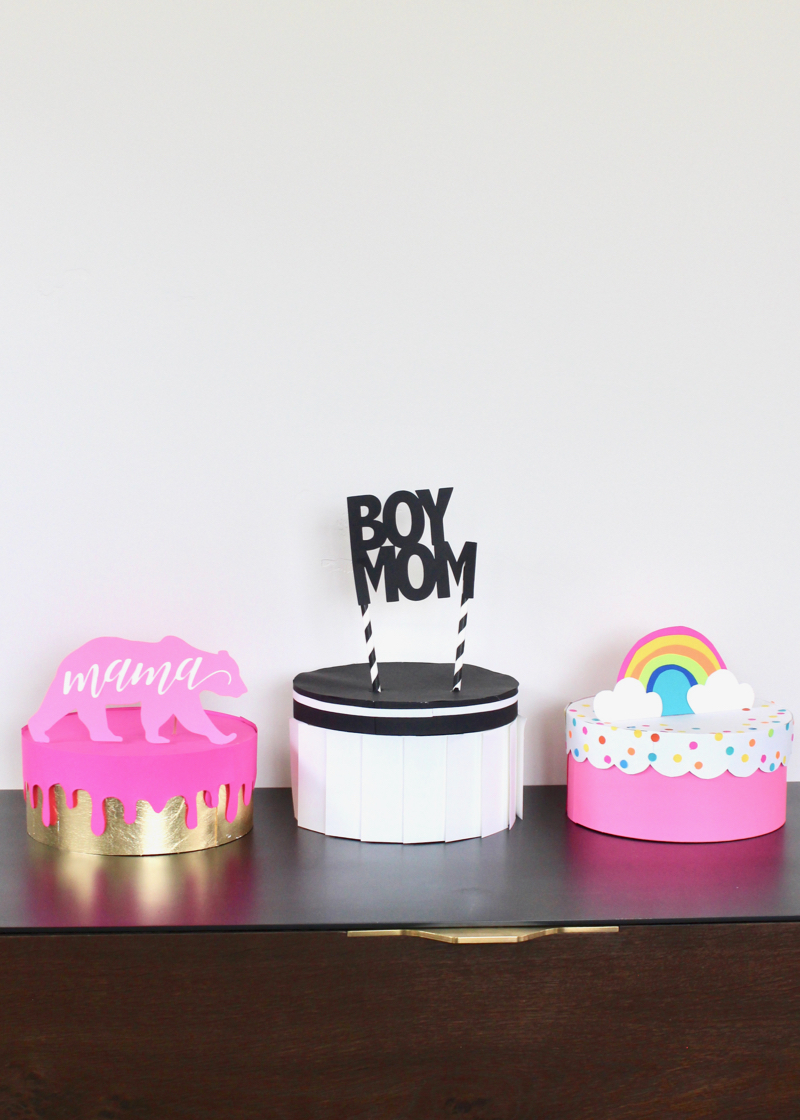
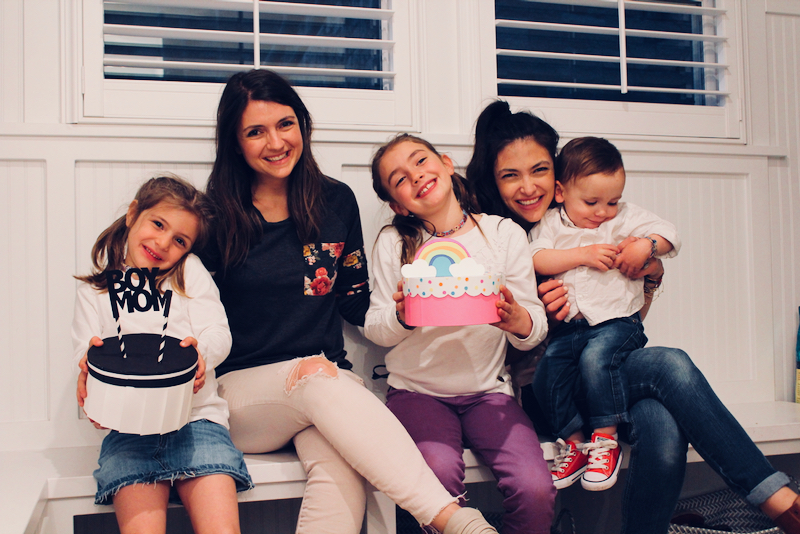
We like to do most everything as a family, so we didn’t just stop at just one cake. Our mom gets the grand, three-layer cake, and we made three additional “baby cakes” to celebrate our own motherhood. Just like our personalities, they are all vibrant, but different and one-of-a-kind. All the how-to details for the 3-tier cake is available at Astrobrights.com. It’s worth checking out!

We hope you COLORIZE your Mother’s Day as you celebrate your own Mom, you, or any special Mother’s in your life, this year.

boy-mom-black-and-white-paper-cake-mama-bear-rainbow-cake

Materials:

  • Astrobrights Papers, see colors below
  • Scissors
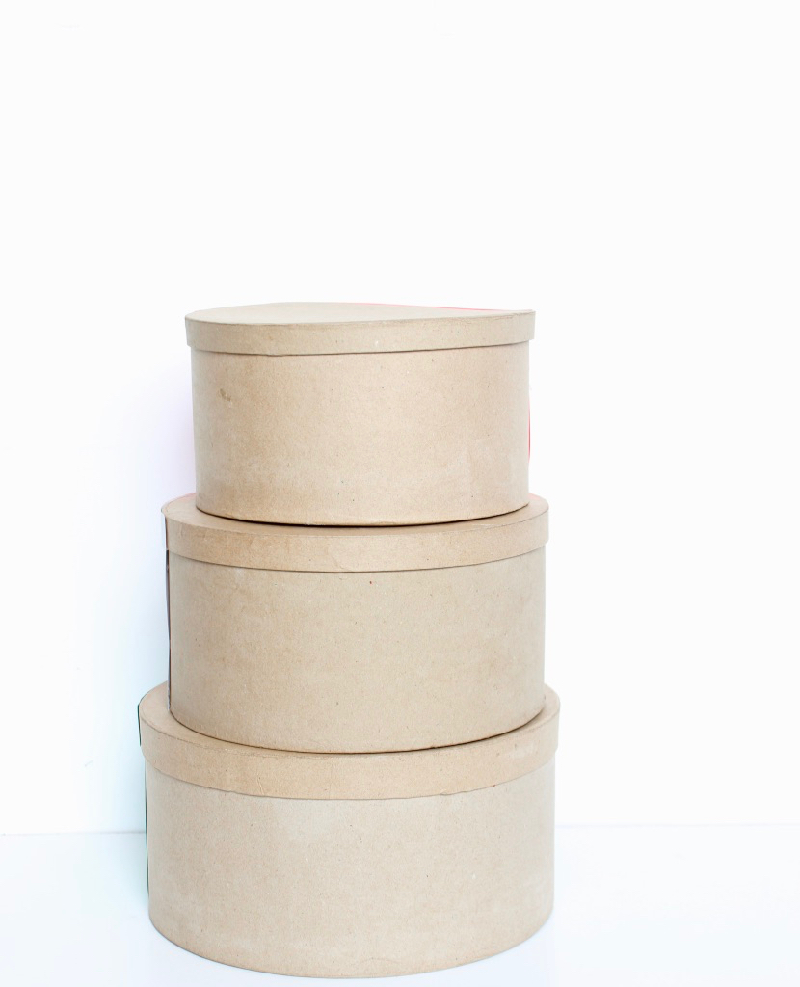
  • Paper mache boxes (found here or here)
  • Glue dots, mini and regular
  • Glue stick
  • Ruler
  • Pencil
  • Hot glue gun and hot glue

Directions:

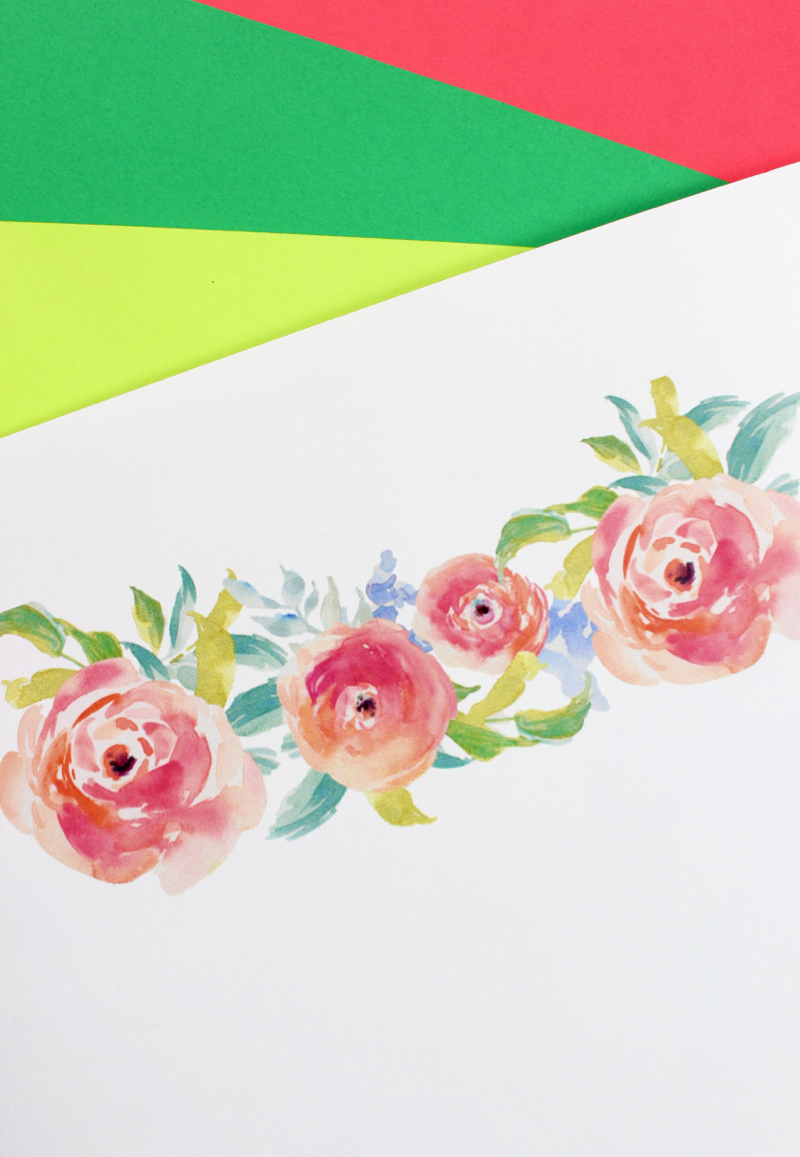
Step 1: Determine the colors of the cakes.  For the three-tier cake, we used Rocket Red™, Gamma Green™, Solar White (found in the Spectrum Pack) and Terra Green™ cardstock. You can use the text weight instead of the cardstock weight, but we found that the cardstock weight was more durable when opening and closing the box. For the middle layer, we printed a free watercolor printable on the Solar White paper. To get the size you need, re-size as needed in Microsoft Word.

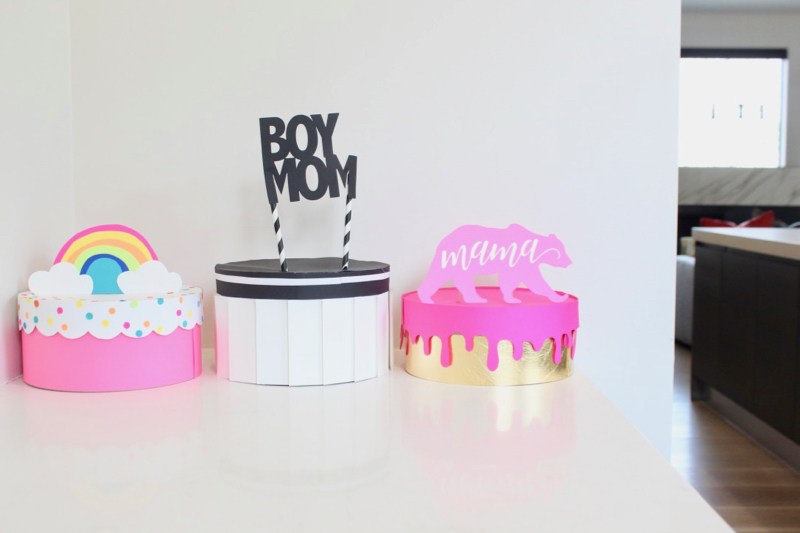
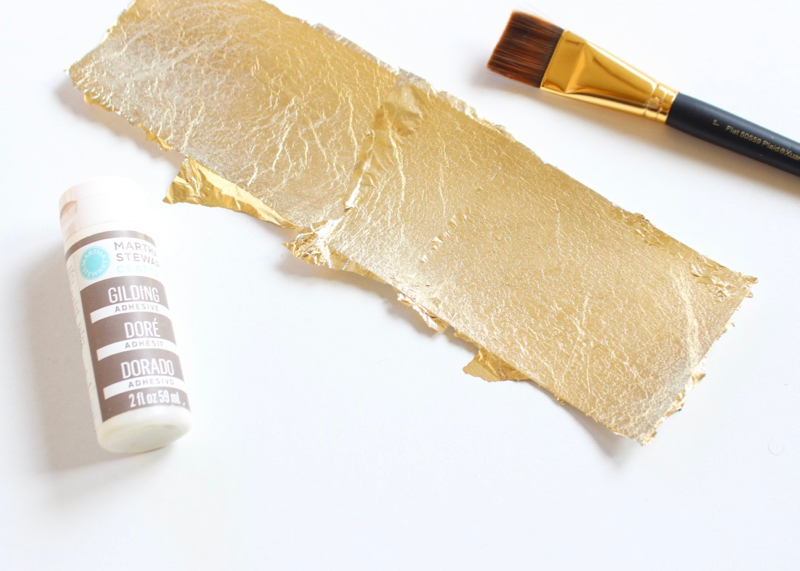
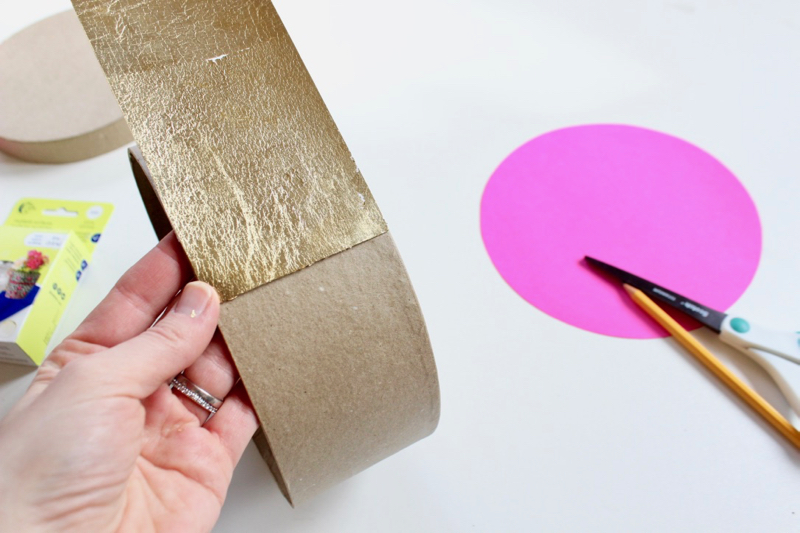
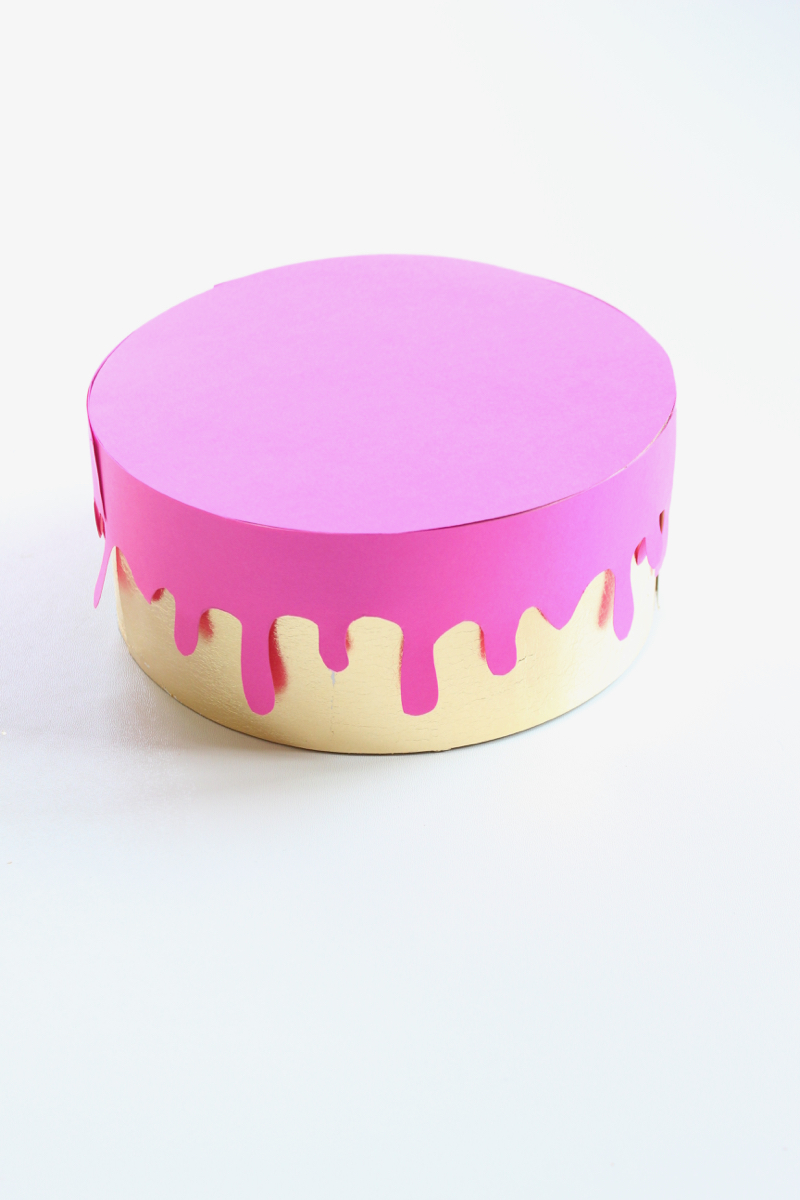
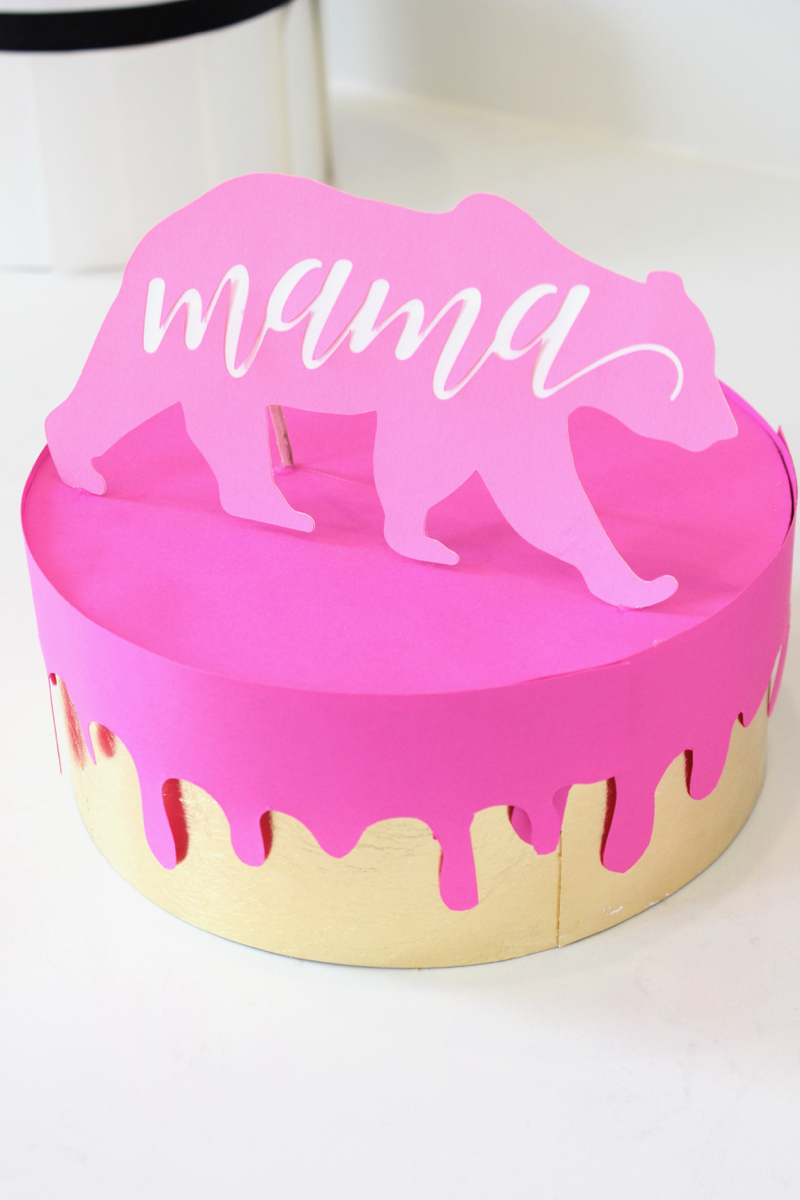
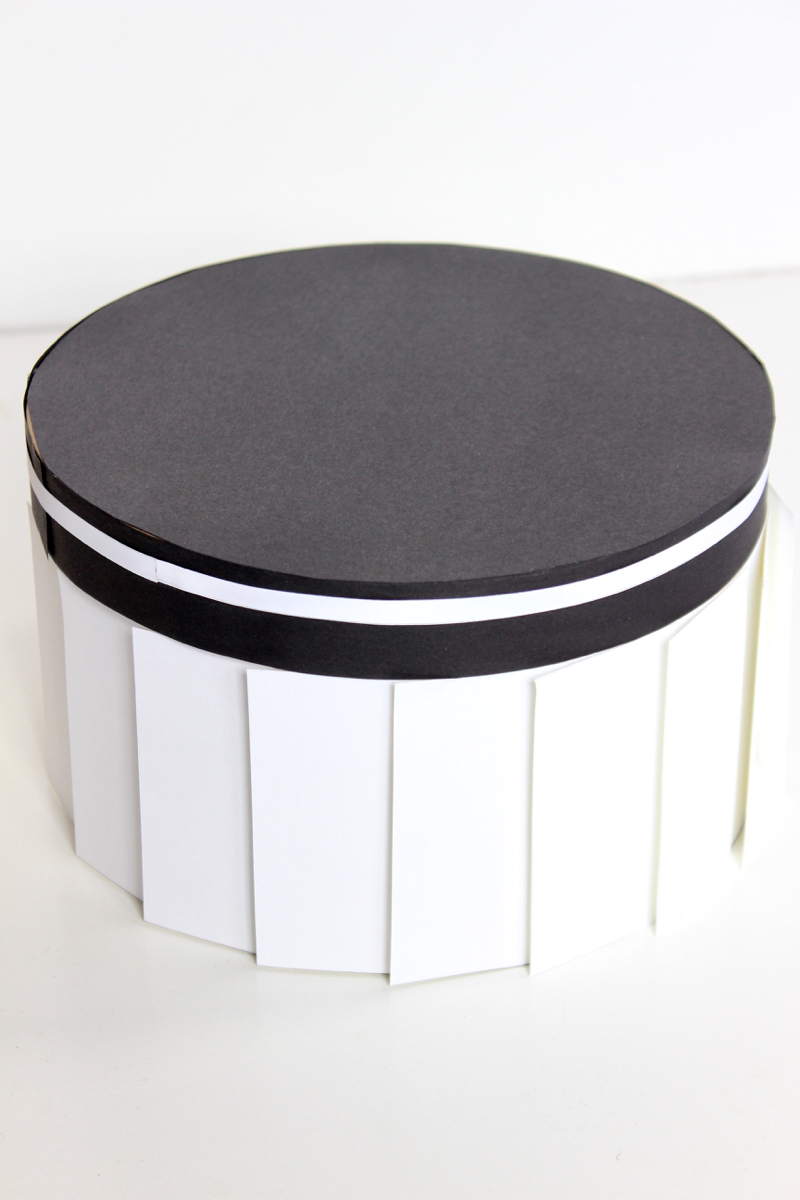
For the black and white baby cake, we used Eclipse Black™ and Solar White. For the confetti and rainbow baby cake, we used Plasma Pink™, Pulsar Pink™, Solar Yellow™, Cosmic Orange™, Blast-Off Blue™, Lunar Blue™Stardust™ White, Terrestrial Teal™, and Terra Green™. For the mama bear cake, we used Fireball Fuchsia™ for the melted frosting on top, and we painted Stardust™ White with gold leaf paper for the base of the cake. Follow directions on the gold leaf packaging to add this fun touch of glam to any paper.

watercolor-flowers-paper

gold-leaf-paper

Step 2: Measure the size of the box, as well as the lid.

mache-boxes

mache-box-ruler

Step 3: Cut the paper according to box measurements. Important note: add 1-2 cm. to the lid width measurements, because you will want it a bit higher than the actual lid to cover the edges of the lid.

lid-scalloped-white-edge

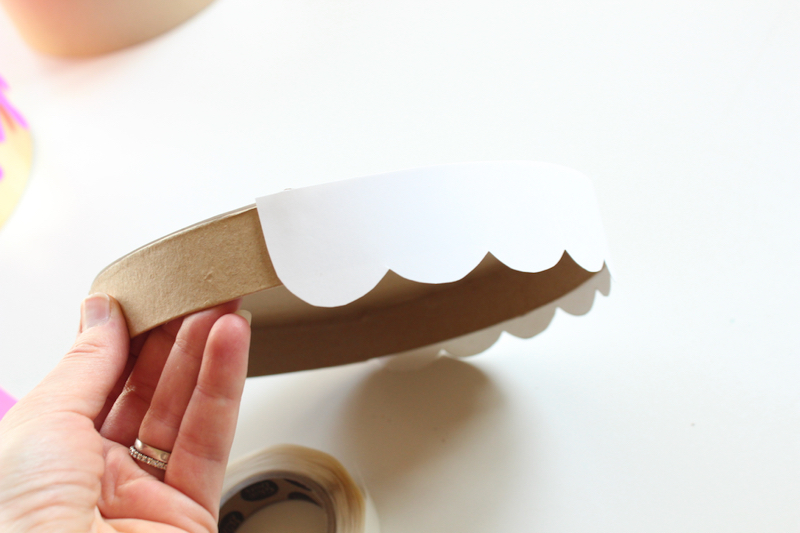
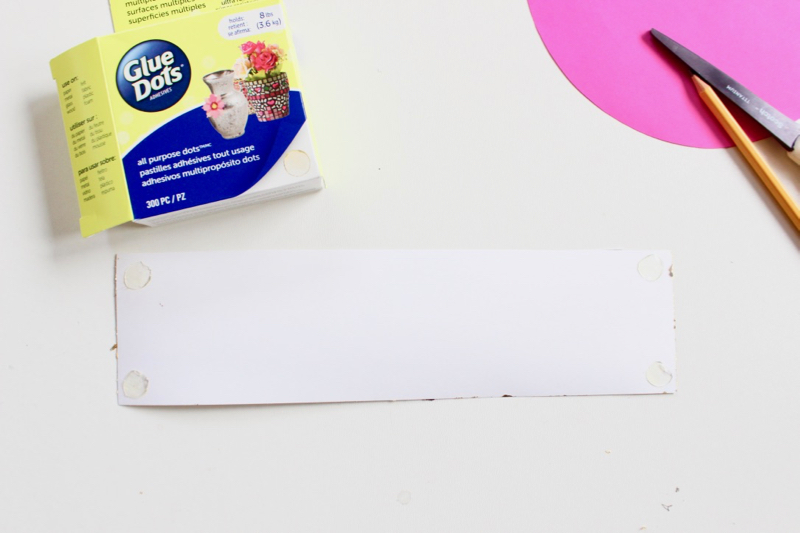
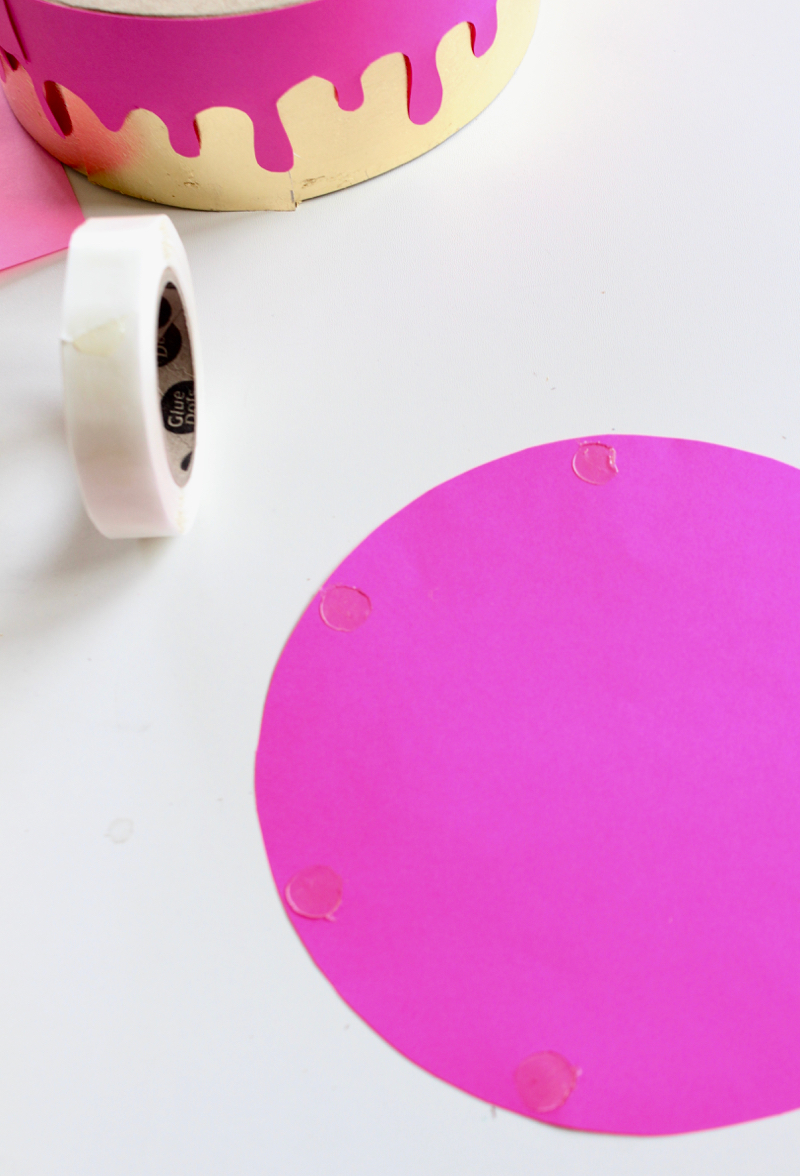
Step 4: Add glue dots to the edges and corners of the paper, and begin to wrap the box with paper. It’s best to leave the lid trim for last, so you can make sure the entire rim of the box is covered.

glue-dots-paper-crafts

gold-on-brown-paper-mache-box

pink-melted-frosting-paper

brown-paper-mache-box-with-pink-paper-around-it

pink-lid-glue-dots

paper-cake-pink-

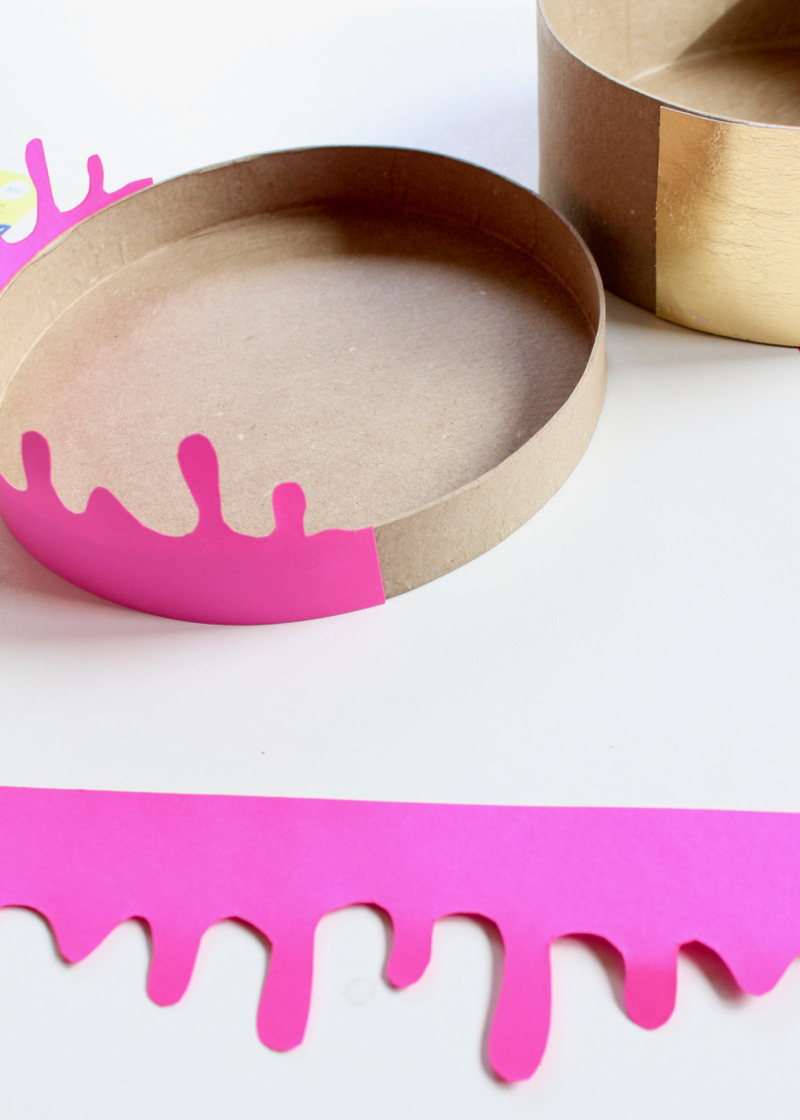
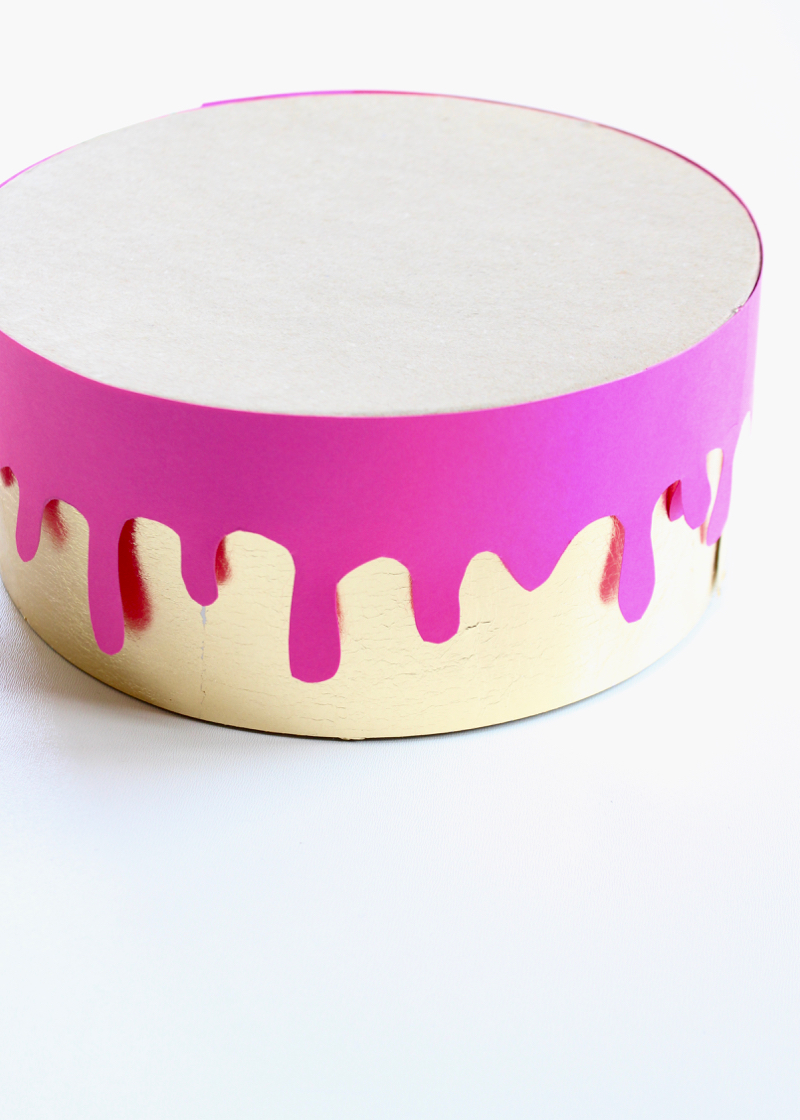
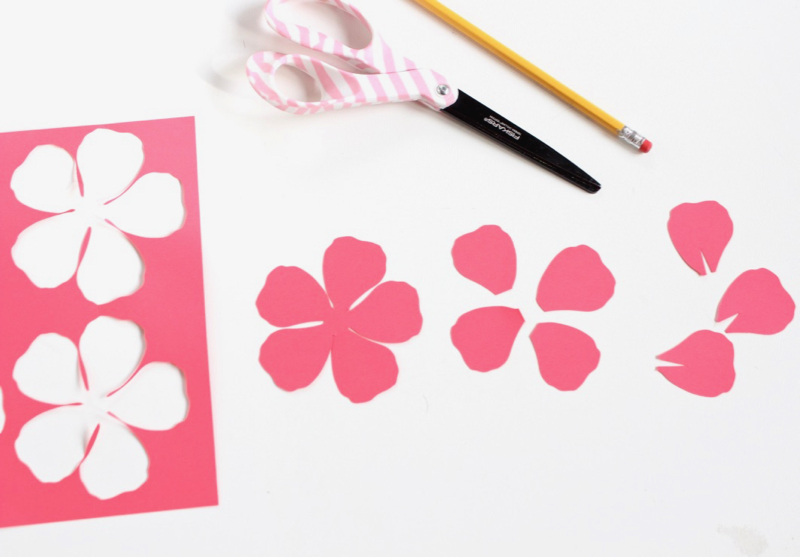
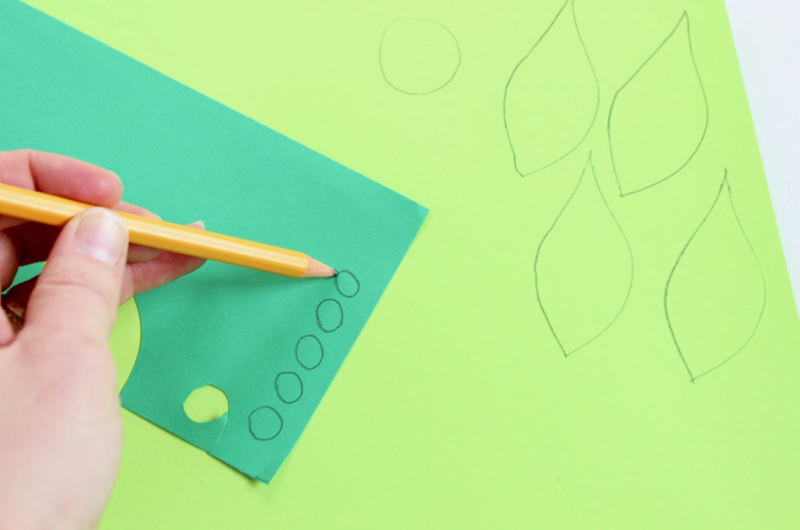
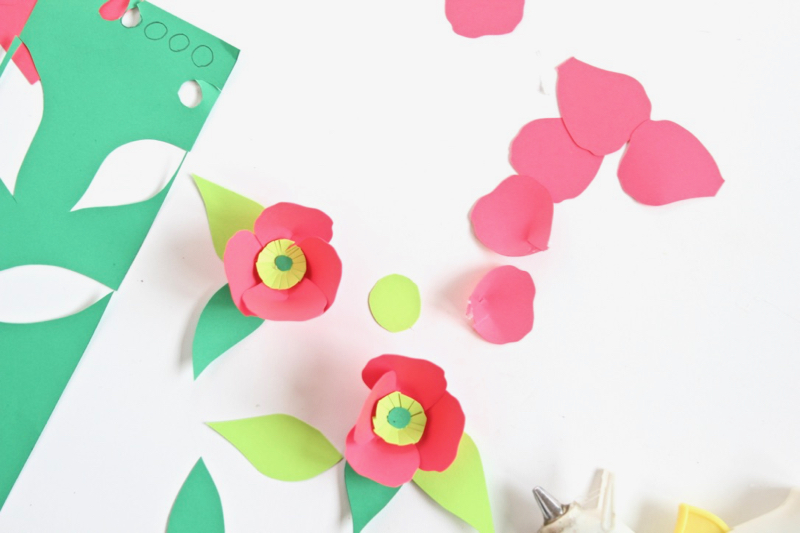
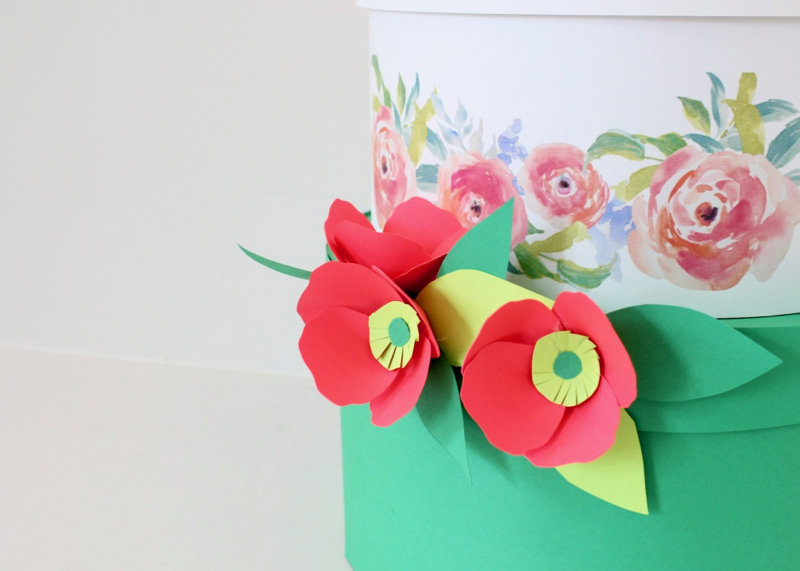
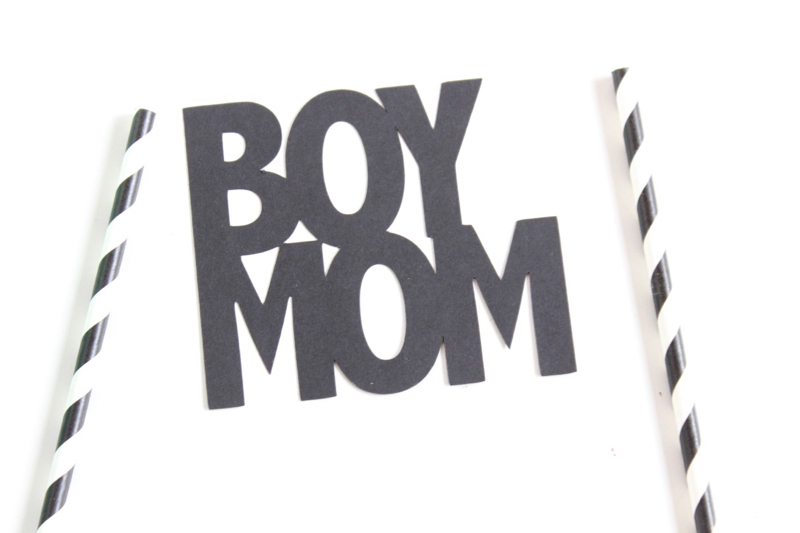
Step 5: Cut any embellishments, or designs you choose to add. Our cakes are pretty and somewhat simple, which best suits us. The embellishments worth noting are the DIY paper flowers, the Boy Mom topper (and the classic white “pleats” on the cake), the mama bear and rainbow.

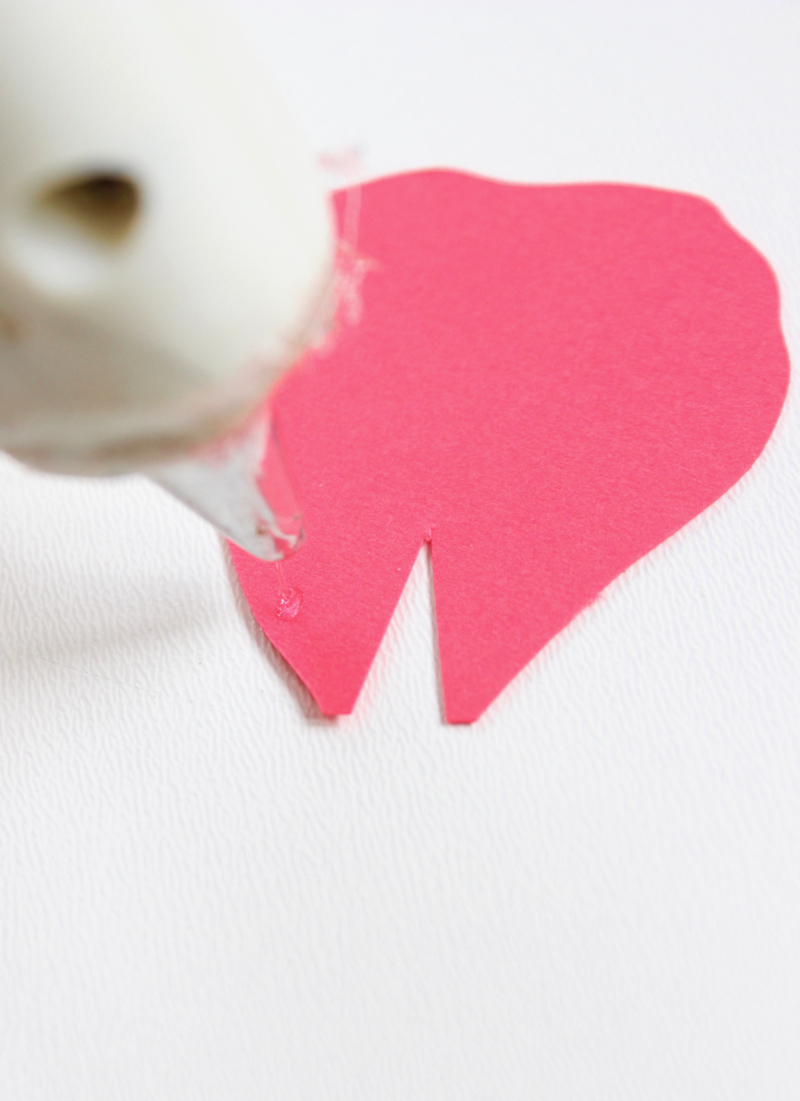
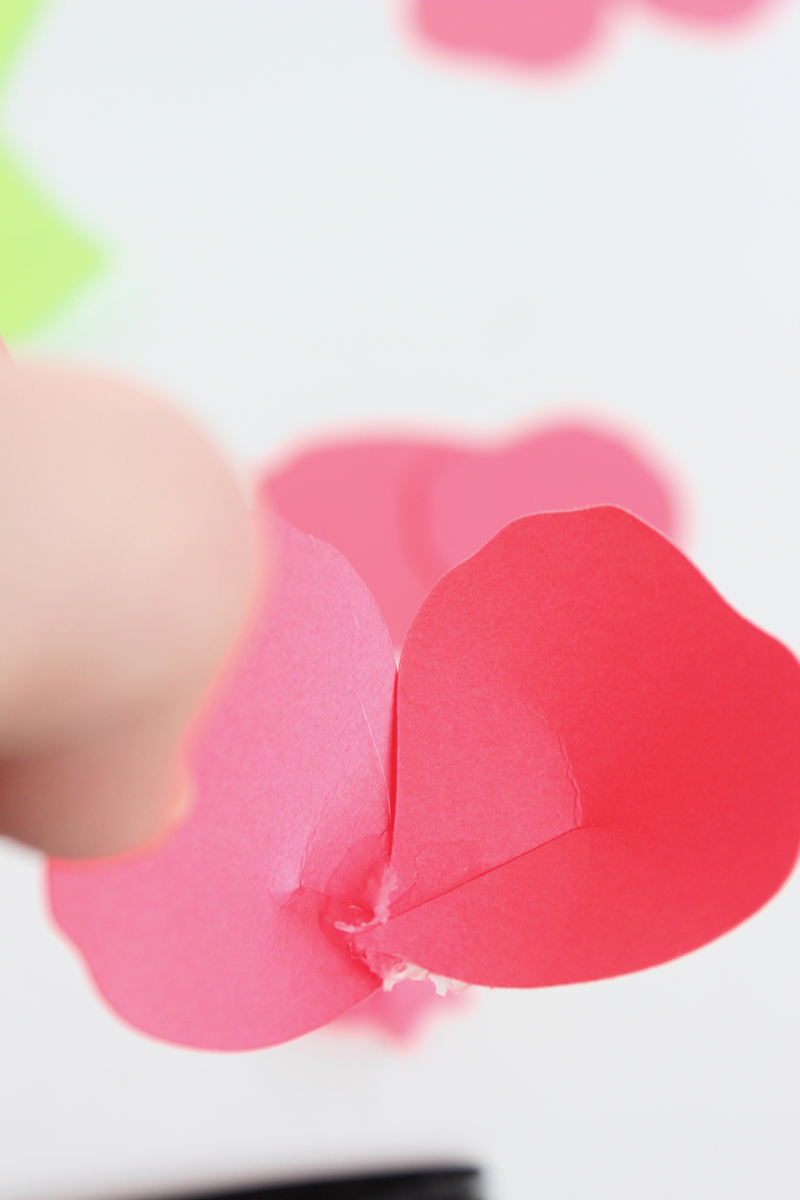
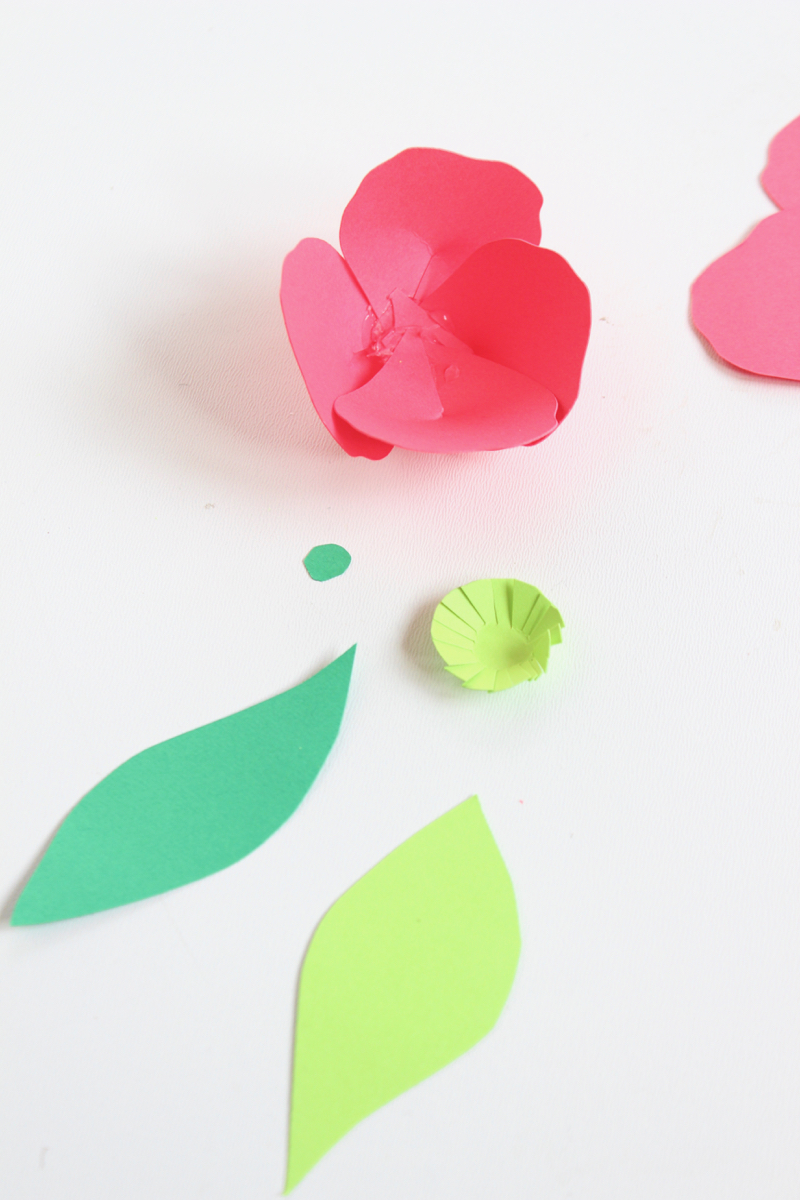
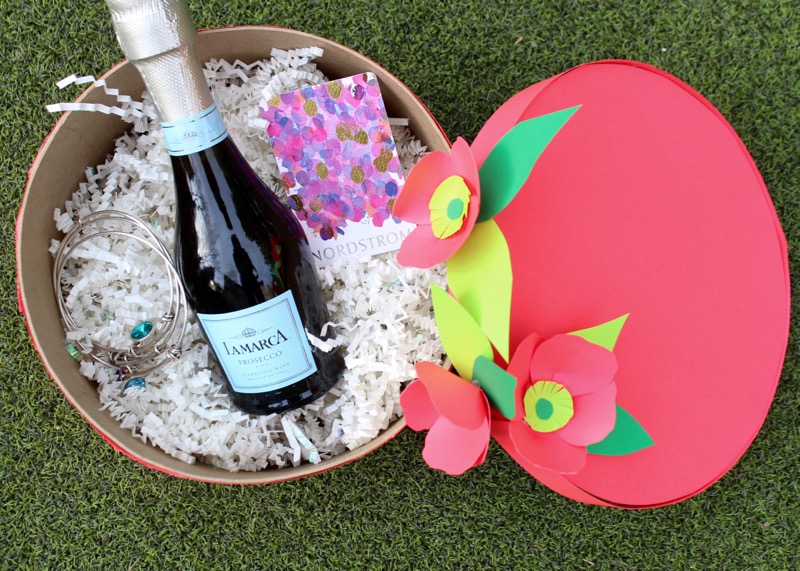
To make the flowers, first print flower petals from a template you can find online. Trace onto Rocket Red paper, and then cut. We used a Poppy flower template through our Silhouette Cameo software. But, most petals you find online will work. Next, cut a small triangle on the bottom, center of the petal. This is where you need your hot glue gun. Press hot glue on one side, and gently place the bottom side of the other piece of the petal on top. Continue to do this until you have four petals. Now, just glue each petal on top of each other. Once you have the petals, begin to create the center. We free-handed one small circle in Terra Green, one mini circle in Gamma Green and then leaves in both greens. For extra texture, cut slits in the larger Terra Green circle. Glue that textured circle in the middle of the flower, and then glue the mini Gamma Green circle in the center. Finally, glue the leaves on the bottom of the flower. You can place these all over the cake, or use a couple – it’s up to you!

coral-paper-flower-petals

paper-flower-petal-and-hot-glue-gun

coral-paper-flower-petal

gamma-green-paper-circles-leaves

paper-flowers-and-green-leaves

paper-flowers-coral-green-craft-paper-cake-details

paper-flowers

To make the bear, trace and cut the image of a bear onto card stock paper. For the words, you can use an electronic cutting machine to cut the words Mama Bear inside the bear. If you don’t have a cutting machine, you can use an X-acto knife to cut the words, or use a Sharpie to write them.

mama-bear-paper-cake-topper-pink-

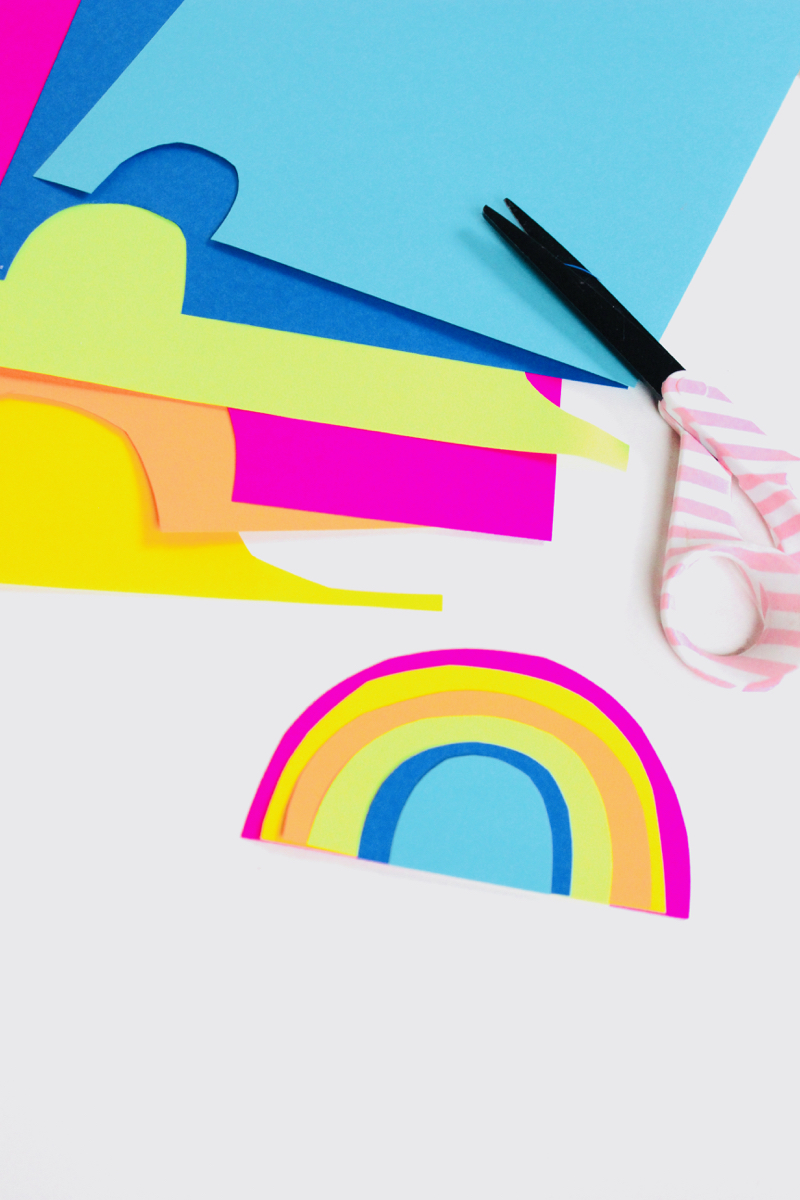
To create the rainbow, free hand one small arch (the last layer of the rainbow) with a pencil on the bottom of Astrobrights cardstock paper, and then cut five additional arches, each other larger in size than the one before it. Glue each layer on top of each other, beginning with the largest. Next, free hand cut clouds, and glue them to the end of each rainbow.

confetti-diy-paper-cake

rainbow-paper-craft-project-diy-paper-cake-topper

rainbow-made-from-pink-orange-green-and-blue-paper-diy-paper-cake-topper

confetti-diy-paper-cake-with-rainbow-topper

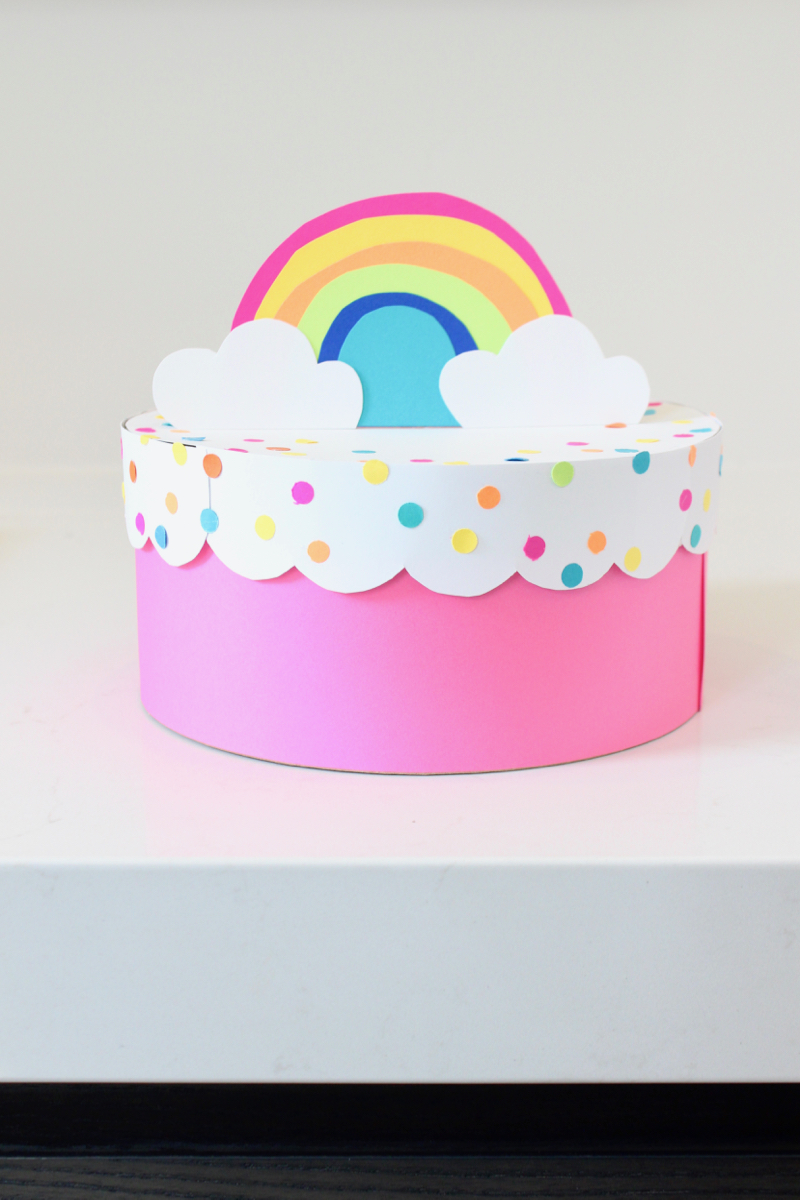
To stand the bear and the rainbow on the cake, use small wooden toothpicks (with square ends, not pointed) to create mini DIY easels. Dab hot glue on the ends of the wooden toothpicks to keep them in place on top of the cake. You will need 2 toothpicks per “cake topper.”

Finally, to make the black and white cake, cut small pieces of Solar White paper (2 inches wide by the length of the mache box), and glue one end of them on the box one by one (sliding each one under the one before it) until the entire box is covered. Because we only glued one end of the white paper on the cake, it left the other end open, which created a  beautiful pleat effect. As for the Boy Mom words, we used an electronic cutting machine to cut the words (you could easily cut the letters with stencils, or use sticker letters) and glued the back of the letters to two black and white straws. We punctured two small holes in the top of the mache box to stick the straws inside. Voila!

black-white-pleat-box-memories-box-diy-paper-cake

black-paper-boy-mom-black-white-striped-straws

boy-mom-black-white-cake

diy-paper-cakes-boy-mom-paper-flowers-rainbow-cake

diy-colorful-paper-cakes-mothers-day-gift-wrap-mama-bear-rainbow-cake-topper

three-tier-paper-cake-on-a-cake-stand

Step 6: Fill with gifts, and give to Mom (or yourself).

box-filled-with-gifts

kids-kissing-mom

family-with-diy-paper-cakes

Our family of cakes will make for one sweet Mother’s Day. Happy Mother’s Day to all you amazing, hard-working moms out there!

This post is in partnership with Astrobrights. We were crafting with and coloring on Astrobrights paper long before this post. It’s always been a fave product of ours. Thank you for supporting the brands that support j. sorelle. Astrobrights was one of the first, so we are very grateful. 

Affiliate Disclosure: This post contains affiliate links, which means j. sorelle receives a small commission from the sale of certain items; however, the price is the same for you, whether it’s an affiliate link or not. 

DIY Woodland Winter Cake Topper

chocolate-cake-wood-slice-rabbit-tree-white-joy-sign-diy-cake-topper

We are experiencing a love affair with bottle brush trees and wood slices this winter. And, as usual, crushing on white and gold, too. Our kids think Christmas is tomorrow with all the holiday blog projects lying around the house – it’s a tease for them, and almost an overwhelming reminder of the upcoming holidays for us. At least they get to enjoy some of the benefits of shooting a DIY winter cake topper – shoot the cake, and eat it too.

chocolate-cake-wood-slice-rabbit-tree-white-joy-sign-diy-cake-topper

If you’re celebrating a winter birthday, or want to impress guests this holiday season with an adorable DIY winter cake or pie topper, just go out and chop a tree {you can buy them already cut from Michael’s if a lumberjack isn’t in your repertoire}, bust out the gold leaf paint, and glue.

Materials You’ll Need:
Wood slices
Cake pop sticks
Mini woodland animal figures – deer, rabbit, bear, squirrel
Thin popsicle sticks
Mini banner flags
Gold leaf paint
Hot glue gun

Directions:

Dab the ends of the  bottle brush tree with gold leaf paint. You can’t mess this up – just dab here, and there and everywhere.

Write a word, name or phrase on the paper banner.

Use a hot glue gun to glue the tree, animal and popsicle stick with paper banner on the wood slice. I cut the popsicle stick in half to make it shorter.

white-tree-rabbit-joy-sign-gold

Glue ‘legs’ on the bottom-side of the wood slice with the cake pop sticks that will stick into the cupcake, cake or pie.

rabbit-wood-slice-diy-cake-topper-tree-joy

chocolate-cake-wood-slice-rabbit-tree-white-joy-sign-diy-cake-topper


Sheep Baby Shower

baby-shower-lantern-sheep-picnic-table-wine-barrel-turqouise_lizellephotography

This baby shower is so adorable, it made us want to count sheep all night.  Then, after a night of no sleep, we want to get on a plane to visit Kyburg farm in Stellenbosch, South Africa…and take those sheep lanterns home with us as a souvenir. Oh, we’re not leaving without a bottle {or two} of wine, too.

big-tree-baby-shower-farm-house_lizellephotography

The gorgeous DIY details at this sheep-themed shower were made by the talented, Tanya Murray.

Lizelle Lotter Photography, thank you for sharing the beautiful images with us.

outdoor-party-entertaining-blanket-picnic-blanket-vineyard_lizellephotography


fabric-banner-baby-shower-decor_lizellephotography

sheep-mobile-baby-shower_lizellephotography

sheep_lizellephotography


chandelier_paper-doily-baby-shower_lizellephotography

paper-doily-baby-shower-wall-decor_lizellephotography

paper-tags-baby-shower_lizellephotography


clouds-wish-tree-baby-shower-activity_lizellephotography

drinks at sheep baby shower_lizellephotography

pregnant mom_lizellephotography

mini-diy-sheep-glass-milk-jars_lizellephotography

sheep-cocktails-cotton-balls-baby-shower-drink_lizellephotography


To make the cute hanging sheep lanterns like Tanya did, simply cut out hands and feet from black paper, add google eyes to the head and glue them to white chinese paper lanterns,

baby-shower-lizelle-photography-sheep-lantern

sheep-white-lantern-diy-baby-shower_lizellephotography

bud-vases-flowers-turqouise_lizellephotography

sheep-cake-cupcakes-baby-shower-dessert

pregnant-moms-baby-shower_lizellephotography

VENDOR LOVE:

Photography: Lizelle Lotter Photography | DIY details: Tanya Murray | Sheep Cake: Whoopeedoo | Rentals: Special Events | Venue: Kyberg Boutique Wine Estate

sweet peony

We’re obsessed with peonies, so when we saw these pretty images by Becky Young Photography from her sister’s bridal shower, and peonies were in the details, we were in love.

The soft colors, ribbon backdrop, sweet peony arrangements by the one and only Cori Cook and desserts made for one lovely bridal shower. And according to Cori, the bride, Jenny, is as sweet as pie. We want to meet her…and see her August wedding!


VENDOR LOVE
photography: Becky Young Photography
florist: Cori Cook 

{images via Becky Young Photography}

Grey and Pink Summer Wedding

In high school, I never imagined Shannon, my BFF, would be celebrating her marriage at her family’s home {which I once considered my second home in my teenage years} in the midst of tennis lessons, sleepovers, prom pictures and parties. I did, however, imagine {and knew}, she would marry her high school love, Bryan.

These two met so young, but grew as individuals and a couple throughout the years, traveled the world, made long distance work and waited until the time was right for them…and their wedding day was so magical.

I was lucky enough to stand by Shannon’s side as her maid of honor for her summer wedding. She planned a clean, modern and elegant wedding that was simply stunning…and so much fun for the nearly 300 guests.

The reception at Shannon’s parents home was the perfect setting. The fountain lit in pink and purple lights made for a grandiose entrance, the white draped, and carpeted tent was absolutely gorgeous, the color scheme of white, bright fuchsia and purple, and grey was eye-catching and sparkling crystal chandeliers were timeless and glamorous. Not to mention the beautiful Irish couple radiating love…and partying all night long {at their own barn-turned-Irish Pub post reception party}

Shannon and Bryan made their wedding day their own, and I was so honored to be a part of it…and share it with you today. Enjoy.

Yes, I was a nervous wreck for my MOH speech. Yes, I cried.

And, yes, I made them cry too.

The Best Men {brothers of the groom} followed my act, and were fantastic – both funny and emotional.

VENDOR LOVE
Photographer: Andrew Clark Photography
Ceremony Site: Holy Ghost Catholic Church
Reception Site: Private Residence
Reception Music: Heartbeat Band/Starkey Productions
Lighting: LMD Productions
Draping, Bar and Pub Decor: DesignWorks by Dave and Mike
Rentals: Butler Rents
Transportation: Fox Limousine
Flowers:  Cori Cook Floral Design
Invitations, Programs and Menu Cards: The Paper Guppy
Hair: Andy Mendoza, The SideDoor Salon
MakeUp: Jessica Shinyeda, The Face Lab
Veil: Felice Bridal Salon
Dress: Romona Keveza, Felice Bridal Salon
Shoes: Christian Louboutin
Formalwear: JoS. A. Bank
Catering: Continental Divine Catering
Cake: Intricate Icings Cake Design
Escort Cards: Weddingpaperdivas.com

{images via Andrew Clark Photography}