DIY Word Bead Bracelet


diy perler bead bracelets (1)

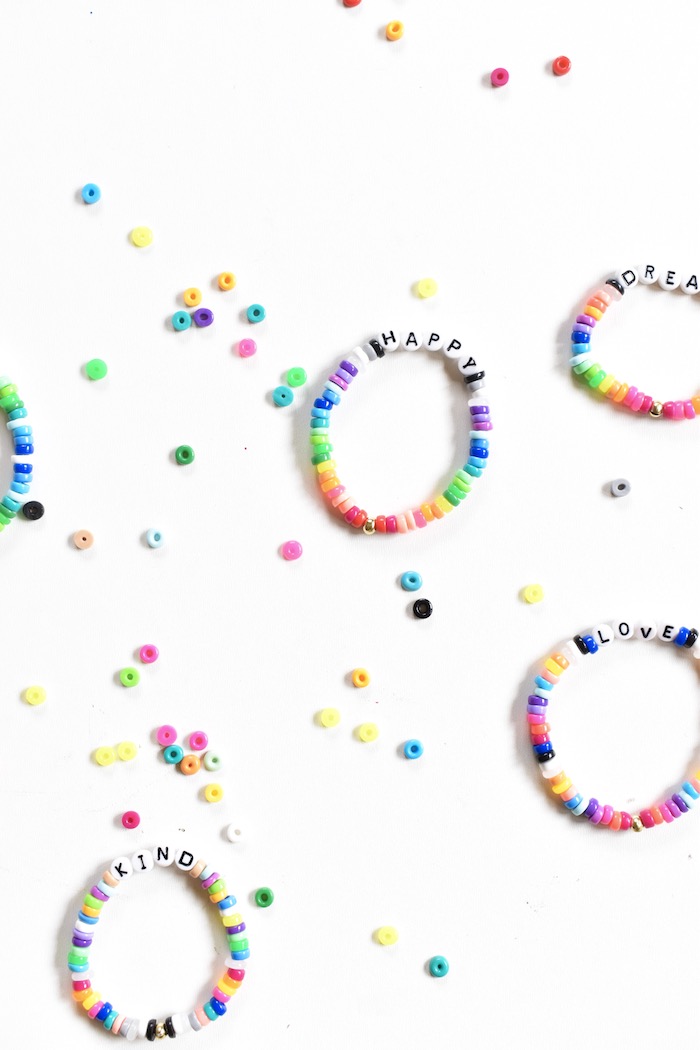
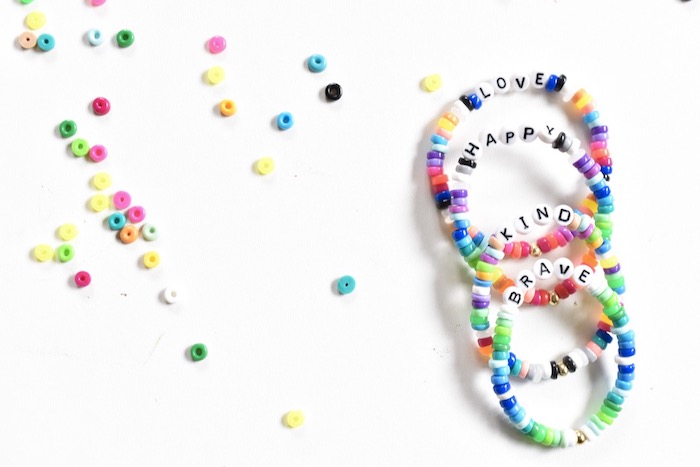
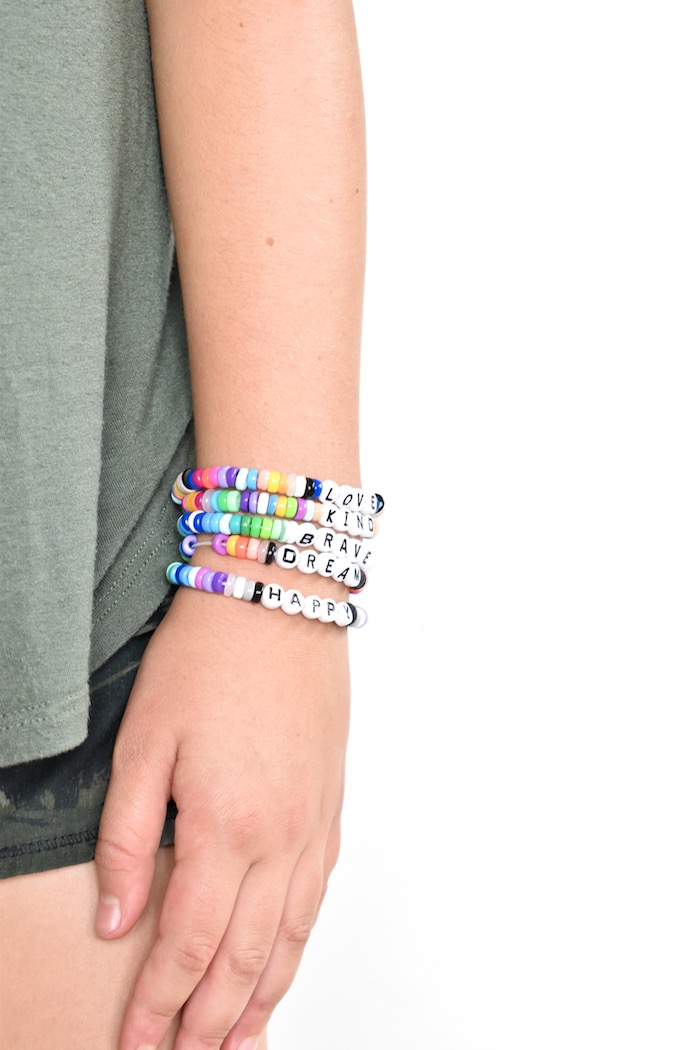
Word bead bracelets are so trendy right now. The best part about them is anyone can make them, and you can customize them with whatever words you want for whoever you want. The ideas are endless; mama, friend, good vibes, hope, fearless, star, stay strong, bestie, rad, happy, etc. Make them all, and stack them! Kids will love to make them for their friends. In fact, Jessica’s daughter can’t get enough of the colorful, inspirational bracelets, and spend hours crafting them for friends.

We made them with perler beads that we melted. You can buy beads, or melt them like we did for flatter beads. Instructions below.

diy word bead bracelet

If you don’t want to make them, there are affordable options for gifts you can buy like this and this.

Materials:

Directions:

melted perler beads for diy word bead bracelets

Step 1: Shrink, or flatten, the beads in the oven. Cook them on parchment paper on 400 for 2-3 minutes. Every bead need to be upright when you put them in the oven, and then they will flatten like tiny round donuts. Keep an eye on them. You want them flat, but not so flat the hole is melted.

diy word bead bracelet - melted perler beads

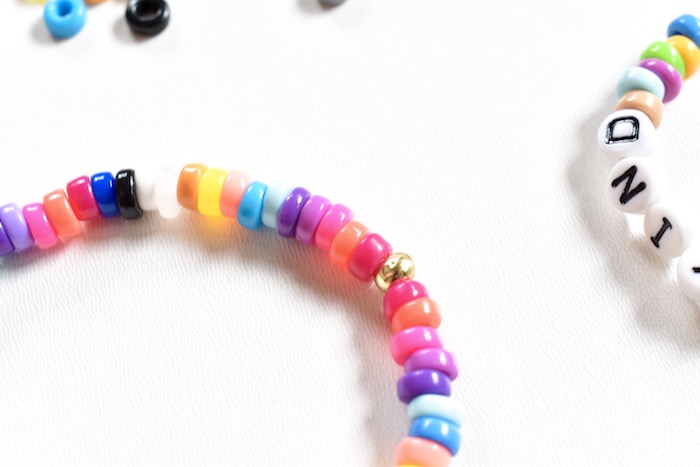
Step 2: Once they are cool, you can begin to create. Tie a knot at the end of the string, and tape that end to a table. Slide the beads onto the string. When it’s complete, tie a double or triple knot. Cut the excess string. Add a dab of super glue on the knot and wait for it to dry (hold the beads separated from the knot with you hands while it dries). With pliers, tighten a gold crimp bead around the triple knot and glue (so it’s hidden).

diy perler bead bracelet

diy word bead bracelet

diy word bead bracelet


* this post contains affiliate links

Celebrate Mom This Mother’s Day With A Sweet DIY Paper Cake

diy-paper-cakes-boy-mom-paper-flowers-rainbow-cake

Being a mom is one of the hardest, and most rewarding jobs in the world. Between the three of us, we have 8 children, ranging from 9-years-old to 2-years-old. Nothing could have prepared us for the ups and downs of motherhood (and all the priceless memories in between), but one thing’s for sure – we had the best mom growing up. She was the greatest example for us to learn what it means to be a mother, and how impactful a mother’s love can be. Our mom, without a doubt, takes the cake as the best mom (and now Nani to 8 grandkids) ever!

This year, we’re treating our mom to a sweet slice of cake, a beautiful DIY layered cake. This cake won’t cause any cavities
though, because it’s inedible. It’s made of paper, and decorated with the best, most colorful paper, ASTROBRIGHTS®  Papers.

We like to do most everything as a family, so we didn’t just stop at just one cake. Our mom gets the grand, three-layer cake, and we made three additional “baby cakes” to celebrate our own motherhood. Just like our personalities, they are all vibrant, but different and one-of-a-kind. All the how-to details for the 3-tier cake is available at Astrobrights.com. It’s worth checking out!

We hope you COLORIZE your Mother’s Day as you celebrate your own Mom, you, or any special Mother’s in your life, this year.

boy-mom-black-and-white-paper-cake-mama-bear-rainbow-cake

Materials:

  • Astrobrights Papers, see colors below
  • Scissors
  • Paper mache boxes (found here or here)
  • Glue dots, mini and regular
  • Glue stick
  • Ruler
  • Pencil
  • Hot glue gun and hot glue

Directions:

Step 1: Determine the colors of the cakes.  For the three-tier cake, we used Rocket Red™, Gamma Green™, Solar White (found in the Spectrum Pack) and Terra Green™ cardstock. You can use the text weight instead of the cardstock weight, but we found that the cardstock weight was more durable when opening and closing the box. For the middle layer, we printed a free watercolor printable on the Solar White paper. To get the size you need, re-size as needed in Microsoft Word.

For the black and white baby cake, we used Eclipse Black™ and Solar White. For the confetti and rainbow baby cake, we used Plasma Pink™, Pulsar Pink™, Solar Yellow™, Cosmic Orange™, Blast-Off Blue™, Lunar Blue™Stardust™ White, Terrestrial Teal™, and Terra Green™. For the mama bear cake, we used Fireball Fuchsia™ for the melted frosting on top, and we painted Stardust™ White with gold leaf paper for the base of the cake. Follow directions on the gold leaf packaging to add this fun touch of glam to any paper.

watercolor-flowers-paper

gold-leaf-paper

Step 2: Measure the size of the box, as well as the lid.

mache-boxes

mache-box-ruler

Step 3: Cut the paper according to box measurements. Important note: add 1-2 cm. to the lid width measurements, because you will want it a bit higher than the actual lid to cover the edges of the lid.

lid-scalloped-white-edge

Step 4: Add glue dots to the edges and corners of the paper, and begin to wrap the box with paper. It’s best to leave the lid trim for last, so you can make sure the entire rim of the box is covered.

glue-dots-paper-crafts

gold-on-brown-paper-mache-box

pink-melted-frosting-paper

brown-paper-mache-box-with-pink-paper-around-it

pink-lid-glue-dots

paper-cake-pink-

Step 5: Cut any embellishments, or designs you choose to add. Our cakes are pretty and somewhat simple, which best suits us. The embellishments worth noting are the DIY paper flowers, the Boy Mom topper (and the classic white “pleats” on the cake), the mama bear and rainbow.

To make the flowers, first print flower petals from a template you can find online. Trace onto Rocket Red paper, and then cut. We used a Poppy flower template through our Silhouette Cameo software. But, most petals you find online will work. Next, cut a small triangle on the bottom, center of the petal. This is where you need your hot glue gun. Press hot glue on one side, and gently place the bottom side of the other piece of the petal on top. Continue to do this until you have four petals. Now, just glue each petal on top of each other. Once you have the petals, begin to create the center. We free-handed one small circle in Terra Green, one mini circle in Gamma Green and then leaves in both greens. For extra texture, cut slits in the larger Terra Green circle. Glue that textured circle in the middle of the flower, and then glue the mini Gamma Green circle in the center. Finally, glue the leaves on the bottom of the flower. You can place these all over the cake, or use a couple – it’s up to you!

coral-paper-flower-petals

paper-flower-petal-and-hot-glue-gun

coral-paper-flower-petal

gamma-green-paper-circles-leaves

paper-flowers-and-green-leaves

paper-flowers-coral-green-craft-paper-cake-details

paper-flowers

To make the bear, trace and cut the image of a bear onto card stock paper. For the words, you can use an electronic cutting machine to cut the words Mama Bear inside the bear. If you don’t have a cutting machine, you can use an X-acto knife to cut the words, or use a Sharpie to write them.

mama-bear-paper-cake-topper-pink-

To create the rainbow, free hand one small arch (the last layer of the rainbow) with a pencil on the bottom of Astrobrights cardstock paper, and then cut five additional arches, each other larger in size than the one before it. Glue each layer on top of each other, beginning with the largest. Next, free hand cut clouds, and glue them to the end of each rainbow.

confetti-diy-paper-cake

rainbow-paper-craft-project-diy-paper-cake-topper

rainbow-made-from-pink-orange-green-and-blue-paper-diy-paper-cake-topper

confetti-diy-paper-cake-with-rainbow-topper

To stand the bear and the rainbow on the cake, use small wooden toothpicks (with square ends, not pointed) to create mini DIY easels. Dab hot glue on the ends of the wooden toothpicks to keep them in place on top of the cake. You will need 2 toothpicks per “cake topper.”

Finally, to make the black and white cake, cut small pieces of Solar White paper (2 inches wide by the length of the mache box), and glue one end of them on the box one by one (sliding each one under the one before it) until the entire box is covered. Because we only glued one end of the white paper on the cake, it left the other end open, which created a  beautiful pleat effect. As for the Boy Mom words, we used an electronic cutting machine to cut the words (you could easily cut the letters with stencils, or use sticker letters) and glued the back of the letters to two black and white straws. We punctured two small holes in the top of the mache box to stick the straws inside. Voila!

black-white-pleat-box-memories-box-diy-paper-cake

black-paper-boy-mom-black-white-striped-straws

boy-mom-black-white-cake

diy-paper-cakes-boy-mom-paper-flowers-rainbow-cake

diy-colorful-paper-cakes-mothers-day-gift-wrap-mama-bear-rainbow-cake-topper

three-tier-paper-cake-on-a-cake-stand

Step 6: Fill with gifts, and give to Mom (or yourself).

box-filled-with-gifts

kids-kissing-mom

family-with-diy-paper-cakes

Our family of cakes will make for one sweet Mother’s Day. Happy Mother’s Day to all you amazing, hard-working moms out there!

This post is in partnership with Astrobrights. We were crafting with and coloring on Astrobrights paper long before this post. It’s always been a fave product of ours. Thank you for supporting the brands that support j. sorelle. Astrobrights was one of the first, so we are very grateful. 

Affiliate Disclosure: This post contains affiliate links, which means j. sorelle receives a small commission from the sale of certain items; however, the price is the same for you, whether it’s an affiliate link or not. 

DIY Pineapple Fingerprint Easter Eggs

easter-eggs-in-a-basket-with-colorful-pineapples-and-green-grass

We’ve feeling the Easter vibes today with a recent DIY Easter egg craft. These cuties were inspired by a pattern we saw in Target’s Bullseye’s Playground. You will literally make your mark with these eggs because the adorable pineapples on the eggs are made with fingerprints. Yes, adult or child fingerprints are all you need to make these colorful eggs. They are easy and quick, adorable, family-friendly and cute as can be.

easter-eggs-in-a-basket-with-colorful-pineapples-and-green-grass

Materials:

  • Acrylic paint, Michaels
  • Sharpie marker, black and green
  • Eggs, we prefer the faux eggs that can be used year after year, but real, hard-boiled ones work too

Directions:

Step 1: Dab your (or your kids) pointer finger in paint, and then press firmly on the egg. Your fingerprints will make the perfect shaped pineapple.

easter-eggs-in-a-basket-with-colorful-pineapples-and-green-grass

Step 2: Repeat step 1 until the eggs is covered in fingerprints. Let dry.

easter-eggs-in-a-basket-with-colorful-pineapples-and-green-grass

Step 3: With a Sharpie, add black lines on the pineapples – diagonals, waves and small v’s all work for pineapples marks. Don’t forget to draw the top of the pineapple. Fill in the leaves with a green Sharpie.

easter-eggs-in-a-basket-with-colorful-pineapples-and-green-grass

All this pineapple talk has us in the mood for a cocktail. Who’s ready for a pina colada?

easter-eggs-in-a-basket-with-colorful-pineapples-and-green-grass

DIY Mason Jar Night Light That Glows Bright

mason-jar-night-light-with-a-white-unicorn-on-top-rainbow-twinkle-lights-inside

If you have kids who are afraid of the dark (like we do), add this DIY night light to your DIY list. It’s ridiculously easy with a mason jar and twinkle lights. Plus, it has magical unicorn powers during the day, and then at night, all will be calm and bright (not too bright, but bright enough to put your little ones at ease).

See the full tutorial at Momtastic.

IMG_9171

DIY Gift: Custom Candles

diy-crayon-candle-black-white-gift

Not only can our kids make DIY crayon candles covered with rainbows, hearts and crayon splatter. We can make DIY candles too, but more sophisticated ones. I can see more melted crayons and candles in our near future for DIY holiday gifts. It’s a gift that’s sure to SHINE!

To see how we made the crayons with the kids, see the full tutorial on Momtastic. But basically, all you have to do is heat the crayon with a blow dryer (continuously} and draw. We found that black crayons worked the best to write words and monograms.

diy-crayon-candle-black-white-gift


diy-crayon-candle-black-white-gift

diy-crayon-candle-black-white-gift


diy-crayon-candle-black-white-gift