DIY Pineapple Fingerprint Easter Eggs

easter-eggs-in-a-basket-with-colorful-pineapples-and-green-grass

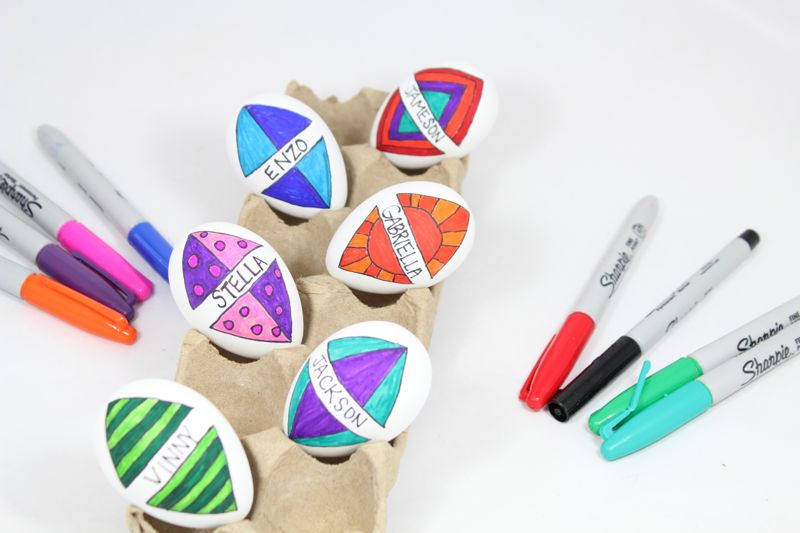
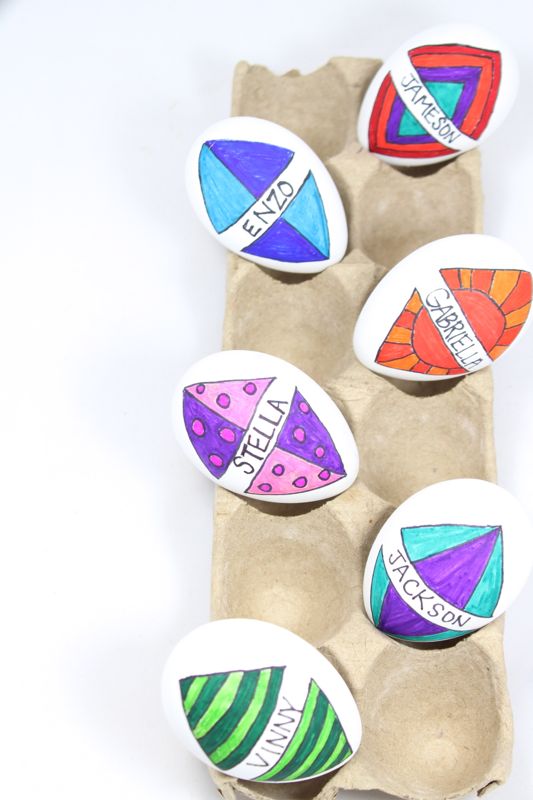
We’ve feeling the Easter vibes today with a recent DIY Easter egg craft. These cuties were inspired by a pattern we saw in Target’s Bullseye’s Playground. You will literally make your mark with these eggs because the adorable pineapples on the eggs are made with fingerprints. Yes, adult or child fingerprints are all you need to make these colorful eggs. They are easy and quick, adorable, family-friendly and cute as can be.
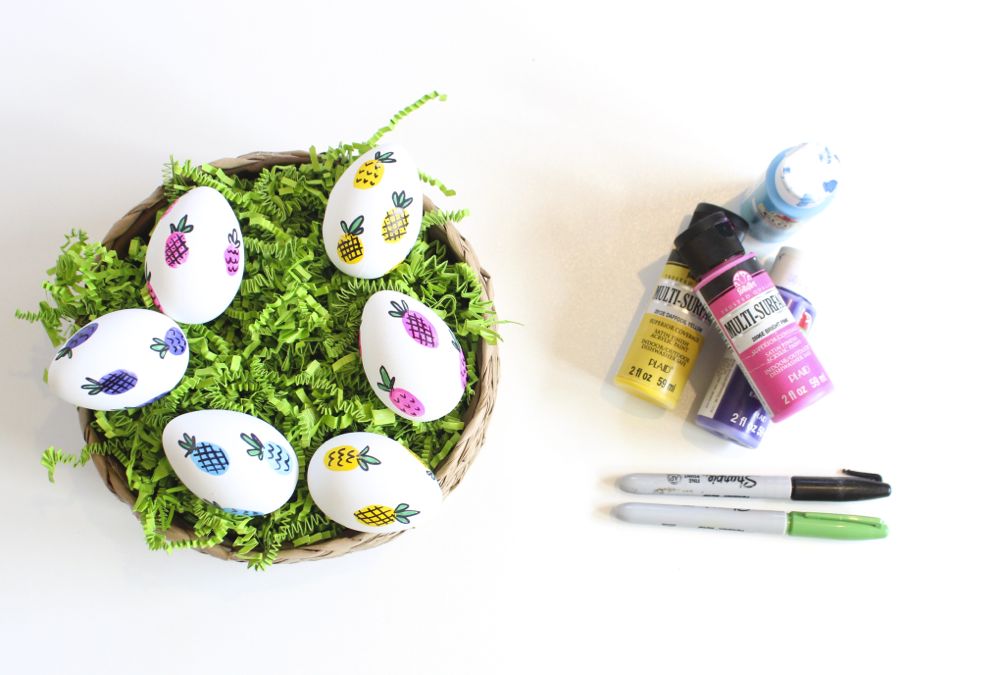
easter-eggs-in-a-basket-with-colorful-pineapples-and-green-grass

Materials:

  • Acrylic paint, Michaels
  • Sharpie marker, black and green
  • Eggs, we prefer the faux eggs that can be used year after year, but real, hard-boiled ones work too

Directions:

Step 1: Dab your (or your kids) pointer finger in paint, and then press firmly on the egg. Your fingerprints will make the perfect shaped pineapple.

easter-eggs-in-a-basket-with-colorful-pineapples-and-green-grass

Step 2: Repeat step 1 until the eggs is covered in fingerprints. Let dry.

easter-eggs-in-a-basket-with-colorful-pineapples-and-green-grass

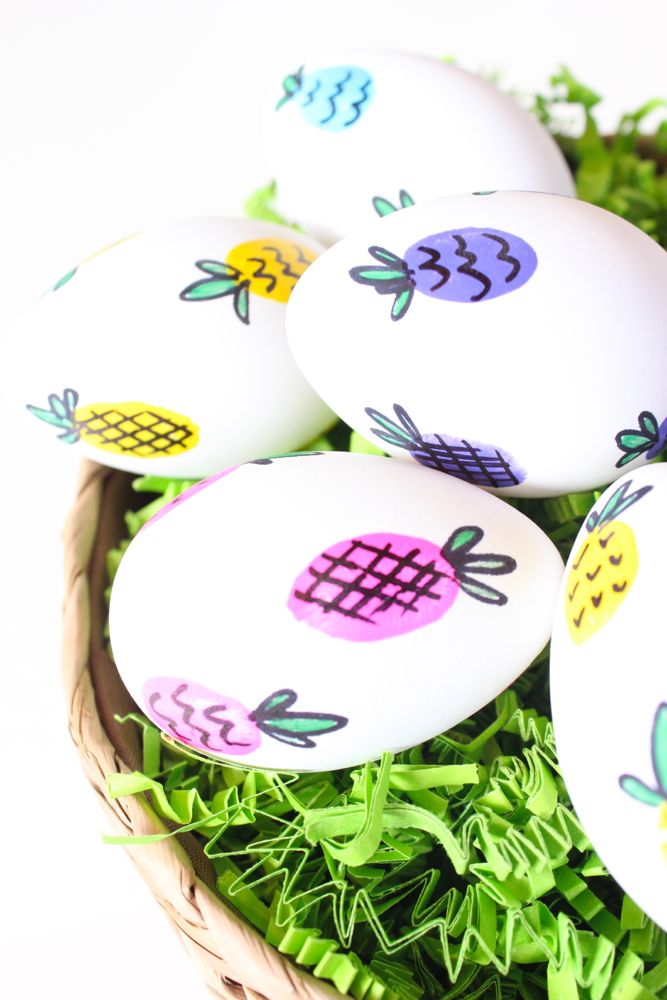
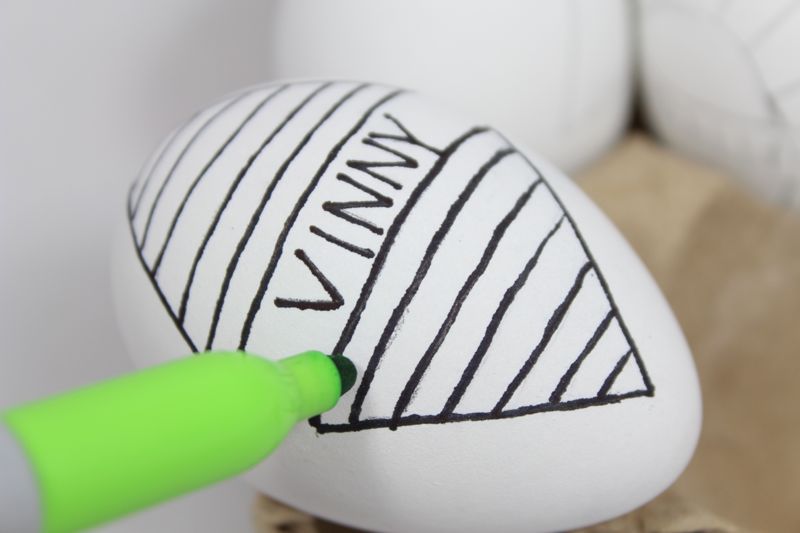
Step 3: With a Sharpie, add black lines on the pineapples – diagonals, waves and small v’s all work for pineapples marks. Don’t forget to draw the top of the pineapple. Fill in the leaves with a green Sharpie.

easter-eggs-in-a-basket-with-colorful-pineapples-and-green-grass

All this pineapple talk has us in the mood for a cocktail. Who’s ready for a pina colada?

easter-eggs-in-a-basket-with-colorful-pineapples-and-green-grass

Personalized Book Giveaway and DIY Kite Easter Eggs

kite-easter-eggs-marker-stripes-bows-diy-

We are flying high with today’s post. Literally, we are as high as a kite in the sky! We love our newest DIY Kite Easter Eggs, and they were inspired by an I See Me! book, My Little Book of Blessings. We have always loved I See Me! products, and they remain one of our favorite newborn gifts. Recently we opened up the blessings book and found the graphics to be magical, and the words to be meaningful. A book that teaches children the golden rule, the importance of friendship and how to lend a helping hand is a book we want on our bookshelves. Plus, every page is customized with a child’s name, and a special note and photo on the front and back pages.

kite-book-i-see-me-books

The page about friendship has kite illustrations, and thus our DIY easter eggs were born. Please keep reading for a tutorial on the eggs, as well as a giveaway for a I See Me! book of your choice, just in time for Easter. The books are amazing, and the gift of reading is priceless.

diy-kite-easter-eggs-marker-coloring-bow-diy

Materials:

Directions:

Draw the kite designs with a pencil. If you mess up, you can erase it. We used free-hand to draw our designs.

pencil-egg-drawings-kite-easter

Outline the egg with a thin black Sharpie marker. Once the design is outlined, erase any pencil marks that remain on the egg.

vinny-diy-easter-eggs-black-lines

Begin to color inside the lines with Sharpie colorful markers. Continue until all kites are brightly colored.

diy-kites-easter-eggs-coloring-markers

diy-kites-easter-eggs-coloring-markers

To begin to make the kite tails, cut strands of embroidery string and cut mini bows from the card stock. You can find a template for mini bows online.

bow-string

Add glue to one side of the bow, and quickly place the string in the middle, and then cover with another bow.

glue-bow-string

string-bow

Once all the bows are in place, dab a tiny amount of glue to the bottom of the kite, and press the end of the string down on the glue.

diy-kite-easter-eggs-rainbow-markers

You’re done!

diy-kite-easter-eggs-rainbow-markers

easter-egg-kite-place-setting

Now, it’s giveaway time. Entry info below. Please make sure to leave your Instagram account name, because we will check the winner’s account. Good luck! The giveaway ends March 10, 2016.

a Rafflecopter giveaway

We received a product from I See Me! in conjunction with this post, but we would love I See Me! even if we didn’t. Thanks for supporting the companies that support our blog.

DIY Beach Ball Easter Eggs

easter eggs-diy-beach-ball-red-yellow-blue

It’s spring break week, so we’re dreaming of spring and the beach…and the sand between our toes. Since snow is still in our forecast, we settled for DIY beach ball Easter eggs. Next year, our goal is to play with the real thing.

beach balls-diy-easter-eggs-red-yellow-blue

You’ll Need:

  • Eggs {real white eggs or plastic fake eggs from Hobby Lobby or Amazon}
  • Red, yellow and blue acrylic paint
  • Paintbrush
  • Pencil

How To:

  • If you’re using real eggs, boil them and let cool.
  • Use a pencil to draw semi-curved lines that resemble a beach ball.
  • Paint the ‘lines’ red, yellow and blue.

beach ball-easter-eggs-diy-red-yellow-blue-sand

beach ball-easter-eggs-diy-red-yellow-blue

dig-beach balls-easter-eggs-red-yellow-blue

{photos via j. sorelle}

15 tips for a egg-tacular easter

Here’s some tips and ideas to make your Easter celebration memorable, beautiful and fun.

1. How Does She has some great non-candy Easter egg fillers the kids are sure to love, without missing the candy too much.

2. Kick up your hard-boiled egg up a cute notch with these adorable chick eggs on HGTV.

3. Give the most adorable favors we’ve ever seen with these ‘grown up’ easter baskets featured at Elizabeth Anne Designs.

4. At the end of the Easter egg hunt, have an egg popsicle treat ready for the kids to devour after all their hard hunting. Full tutorial found at Kailo Chic.

5. These would make adorable and healthy place cards for the kids, or a cute snack to bring to the kid’s school this week. Pottery Barn Kids has a full recipe and tutorial here.

6. Wants and Wishes created a fresh carrot centerpiece, and we couldn’t think of a better holiday for this look 

7. Don’t forget to decorate the outside of your house when your PEEPS arrive for the Easter celebration. Fill an up cycled window box with your favorite flowers. For a tutorial on how to create a beautiful window box, visit Hostess with the Mostess here.

8. Go one step further with your outdoor decor with a GORGEOUS wreath like this made at Laughing with Angels.

9. Find spring floral and brightly colored fabric and cut into triangles to make a spring bunting banner to add inside the house, or outside in the yard.

10. Everyone is talking about the color mint for this spring. So light, airy and refreshing. Add Essie’s Mint Candy Apple {available at Nordstrom} to the tips of your fingers for this Sunday’s celebration. If you really want to be trendy, make it a diagonal stripe with the other half of your nail being a nude color.

11. Make a refreshing spring cocktail your guests will love like this Ginger Goddess, made with SKYY Infusions Ginger Vodka, Kiwi Juice, Pear and Champagne

12. Set your table pretty in pink with a large vase of pink tulips in the center on top of a white table linen and crisp white, modern plates.

13. Think outside the egg when decorating this year’s batch and create Subway Art eggs like Lil Luna did. So creative! Full tutorial here.

14. Add a vintage touch to your table setting – we love all things vintage, so whether is an old birdcage, burlap bags, old wood boxes, antique vases, etc. –  make it happen. Our Vintage Home set a beautiful, simple table with a vintage vibe. Burlap bags found here.

15. I’m a DIY addict, so at least one thing on Sunday has to be DIY. I made Easter eggs with flower petals – and it was SO easy and I think they turned out pretty cute.

You Need:
Hydrangea {or flower with many petals}
Styrofoam easter egg {I found some at Hobby Lobby}
Push pins with a color ball at the end {in my case, I like yellow}

How To:
Pull petals off the flower and the hard small piece of plastic binding it together
Grab a pin, find a spot on the egg and push the pin in.
Continue until the egg is fully covered.


{images via HGTV, Elizabeth Anne Designs, Kailo Chic, Pottery Barn Kids, Wants and WishesBar None DrinksEpicurious, NordstromHostess with the Mostess, Laughing with Angels, spring banner: One Wed, Lil Luna, Our Vintage Home, Tutto Bella}

dinosaurs and divas

Dinosaur and Diva – two simple d-words that sum up my children’s interests at this point in their lives PERFECTLY. My son does not do anything throughout the day without a dinosaur in hand, and my daughter has a purse hung on her shoulder, glasses on her head and sparkly shoes on her feet all hours of the day.

Being 9 months preggo made this year’s party planning more exhausting than most years, but I LOVE parties, details and DIY projects, and swollen feet and Braxton Hicks contractions weren’t going to stop me from throwing a cute and fun party.

I was on a budget as always, but with some creativity, the help of good ole’ Pinterest, hot glue, friends and family and food and drink, the party was a success.

ON THE MENU
Apps
Mexican 7 layer dip
Artichoke dip with chips and veggies
Queso and chips

Dinner
Taco bar
Fruit skewers
Smothered burritos

Dessert
Homemade dinosaur and flower shortbread cookies partly covered with Ghiradelli chocolate
Candy bar with my kids favorite candy: Red vines, Cinnamon bears, DumDum suckers, Starburst and Ring Pops
Chocolate and vanilla cupcakes topped off with toy dinosaurs and tiaras

DIY PROJECTS
{All DIY tutorials to follow in the coming weeks}

Turquoise-dyed Coffee filter #2
I wanted to create a fun background for the dessert table. Something different, affordable and eye-catching. I’ve seen coffee filters added to lamp shades, and they looked great with their ruffly effect. So, I tried color dying coffee filters for the first time, and creating an ombre, floral-esque #2 for my daughter}. Check back in for the DIY tutorial…

{p.s. if your interested in purchasing the #2 made of coffee filters or the #4 made of twigs below, please email me at trejsorelle@gmail.com…I no longer need and will sell for cheap}.

Tree branch #4
While playing outside with the kiddos and noticing a lot of dead branches on a nearby bush, I broke off about 50 branches from the bush with the creation of a #4 in mind. With a foam board, burlap, wire and hot glue, here’s how my #4 turned out.  

Dinosaur eggs made of yarn
I saw a lot of yarn eggs around Easter time, so I decided to use the same idea, only to create dinosaur eggs in green and orange. Stay tuned for a DIY tutorial…

Paint chip place cards
I gathered paint chips that coordinated with party colors from my local Home Depot, and within 10 minutes, I had place cards. I used Microsoft Word to type the names of the kids friends, and manually fed the paint chips into the printer. Once all names were printed, I used a blade to cut a slit above and below the names to create the perfect napkin holder.

Plate and utensil place setting
I used Kraft paper as a table linen, and used a sharpie marker to trace the kids’ place settings. This was a great linen for the kids table because they could get it dirty and once they were done with it I could throw it away, they could draw on it and it was affordable. 
For the rest of the kids table, I spray painted terra-cotta pots orange and filled with plants made to look like trees, and I spray painted olive oil glass containers pink for the white hydrangeas….something for the boys, and something for the girls! Each child had a mason jar with a curly and colorful straw too!

For the adults table, I kept it simple. I bought tiny twig wreaths {to appear like a dino nest} from Wal-Mart for $2, and put a mason jar and hydrangea in it. Then, for a more rustic touch, I lined up the three mason jars along a 6 ft antique piece of wood.

Another notably cute table setting was Jameson’s drink and volcano table because for a unique and free table setting, I used extra grass turf sitting in the garage from my parents putting green in their backyard.

Dumdum tree for candy bar
Living in the mountains, my staples for DIY projects, like Michael’s and Hobby Lobby are not an option, so good ole’ Walmart had to do. But….no styrafoam balls! What? Who doesn’t carry those? So, my dreams and love for a Dum Dum topiary will be made a reality at the next party maybe.

Plan B…a Dum Dum tree. Walmart had adorable turquoise and pink striped buckets and a florists green tree-shaped Styrofoam, so I went with it…

Volcano
I remember building a volcano for a grade school science project, so my mom, Jameson and I went to work on creating one for his big party. Stay tuned for a tutorial…


D
uct tape water bottle label
My sister {also my own personal graphic designer} just had a baby, so instead of adding another thing to her already busy plate of running an adorable boutique and being an awesome momma, I tried to find another creative water bottle labels not requiring graphic design}. I removed the labels and added pink and orange duct tape around the water bottles. Then, while playing outside with the kiddos I found small twigs that were damp and easy to bend, which made for the perfect J for Jameson’s initial, then I found .29 cents turquoise necklaces from Party City that I cut and shaped into a G, and glued to water bottle.


Dinosaur and girl footprints
I found online photos of dinosaur footprints and toddler size footprints, print copies on color paper on my computer, printed and tape to the floor.

ACTIVITIES
Dino-fabulous egg hunt: the boys hunted for eggs in  the backyard filled with dinosaurs and the girls hunted for eggs filled with rings, bracelets and candy. The kids used their Ikea favor bags as baskets for their hunt.

Erupting volcano

Manicure and pedicure station and Dress-Up Station
The girls could dress like divas from head to toe, and get their nails painted to match their dress-up outfits.

FAVORS
Ikea bags {orange for boys and pink for girls…75 cents each} at each place setting with custom thank you labels filled with: dinosaur noses, dinosaur egg gumballs and dinosaur figurines for the boys and comb and mirror set, white sunglasses, mini-size nail polish and chapstick rings for the girls.
 
Invites and Labels
Done by none other than my fabulous sister at Fleur de Lis, a paperie, Jenna.
The invite is now available in our etsy shop, click here.
VENDOR LOVE

Cupcakes: Mountain Cupcakes, Vail, Colorado
Photography: Meredith Moran Photography
Frames: Ikea
Favor Bags: Ikea
Invitation and paper accessories: Fleur de Lis, a paperie {online Etsy store available here}