Try This Delicious “Fried” Ice Cream

fried ice cream with sprinkles

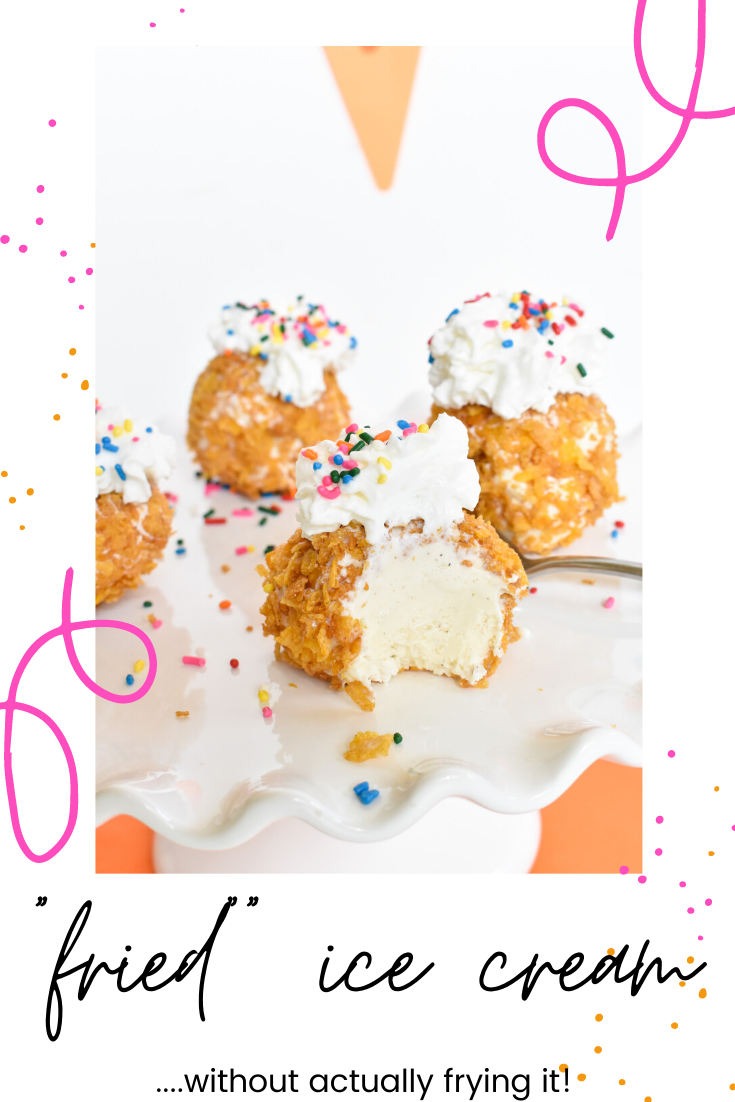
OMG, I made “fried” ice cream, and it’s so yummy. Honestly, I didn’t think I would like it because I don’t love cinnamon, and let’s get real, anything that pretends to be fried and isn’t genuinely fried can’t be that good, right? Wrong. I loved it. The crunch of the buttery corn flakes with the fluffy white whipping cream and the cold vanilla ice cream in every bite is dreamy. The good news for us gluten free people is that these ice cream bites can be made gluten-free as well! Yay!

I shared all the details at Momtastic, so look here to get the ice cream party started.

fried vanilla ice cream with sprinkles

fried vanilla ice cream with sprinkles

Shark and Mermaid Party

IMG_6597

It’s that time of year again for Jessica’s family – that time when it feels like Christmas in July. All three kids celebrate birthdays in July, so not only is the month busy, but it’s really fun. She’s going to take us back to her Shark and Mermaid party, and the details she created…

Every year I to find a theme that will work for boys and girls, and this year, our trip to Florida inspired our fin and tail celebration.

Note: It wasn’t until shortly after we took photos of the party, when we realized the t and h were mixed up in the word birthday on the mermaid side. And, well, when guests arrived, we partied! We were so focused on details, we forgot to spell. The mistake was quickly fixed and the party went on.

Supplies: 

Directions:

Step 1: Create a shark backdrop. During a recent trip to Florida, the kids took photos in front of a cool Megalodon. Print the photo on an engineering print from Staples. Glue the photo on one of the large wood boards with the multi-purpose spray adhesive.

Think again before you order plates from Oriental Trading for just food, because they make the perfect waves for an ocean backdrop. Use a hot glue gun to glue plates on the bottom of the photo for an ocean wave effect. Start with the dark blue and then glue light blue plates on top of it. Layer until you reach the bottom of the photo.

shark-party-wall-mural-kids-swim-

shark-party-wall-mural-kids-swim-

Step 2: Create a mermaid backdrop. Draw and cut a mermaid tail on foam core, and then cover it with paint chips. I love these paint chips from Oriental Trading because there is a wide variety of colors, and no circle cutter necessary – they are perfect circles when they arrive. Once all the chips are glued in place, flip it over and use an X-acto knife to cut the edges of the paint chips along the fin tail shape. Glue the tail to the other piece of thin white wood board. Just like the shark backdrop, glue paper plates to make waves. Start at the top, and work your way down.

mermaid-tail-colorful-seashell-crowns-doll-girl-party

mermaid-birthday-party-coloful-tail

Step 3: Add tablecloths to each table. Layer three tablecloths on each side. Cut the bottom of each layer in waves, or scallops. Each layer should be visible.

party-mermaid-shark-under-the-sea-boy-girl-party-diy

Step 4: Accessorize the tables. Shark koozies and bubbles made for the perfect shark table accessories, plus they doubled as great party favors. Another fun detail on the table was a pint container filled with a t-shirt, and topped with a blue paper shark. The shark’s edges were sealed with hot glue, but before it was totally sealed, it was filled with swedish fish. All boys had to do was rip, eat and enjoy!

For the mermaids, the table was set with pink cups with shells glued in the center, DIY seashell crowns (also a party favor), DIY shell and bead necklaces, a plush mermaid and cupcakes with tails. To make the DIY seashells crowns, use a hot glue gun to glue shells on crowns from Oriental Trading. Play with the shells and design the crowns of your mermaid dreams.

shark-koozie-blue-striped-straws-cups

shark-bubbles-blue-ocean-party

shark-party-favor

pink-cups-with-shells-striped-straws

seashell-crowns-girls-mermaid-party

seashell-crowns-diy-mermaid-gifts

seashell-necklace-beads

mermaid-party-girl-smiling-diy-crown

Step 5: Decorate the entire party area. Hang pom poms, fish nets and happy birthday banners.

shark-party-mermaid

Step 6: Play games. Aside from all the pool fun, set up a fishbowl game. Set up plastic cups in cascading order, 8, 7, 6, 5 and so on. Fill them with water, and then set a prize inside each cup. The cups at our party were filled with seashells and mini shark toys. Draw a line on the ground several feet away from the table, and get the kids throwing for some fun prizes.

pool-party-floatie

game

ping-pong-ball-game

Step 7: Send friends off with favors. Every family went home with a special bag of Shark vs. Mermaid Tic Tac Toe. The shark photo prop at Oriental Trading inspired me to paint DIY shark rocks, and well we didn’t have to paint the shells because they were so pretty. The game packaged in drawstring bags with the Tic Tac Toe lines drawn on top with a Sharpie marker. This game is so much fun, and can be easily brought to church or dinner out to keep the kids occupied.

shark-painted-rocks

shark-mermaid-tic-tac-toe-diy-party-favor

shark-mermaid-tic-tac-toe-seashells-party-favor-drawstring-bag-diy-kids-game

shark-mermaid-tic-tac-toe-diy-party-favor

shark-mermaid-tic-tac-toe-diy-kids-game

Oriental Trading sent us some items of our choosing for this party, free of charge. All opinions are honest, and our own. No other type of compensation was received. Thanks for supporting the companies that support j. sorelle. We love Oriental Trading, even before this post.


Coloring Outside the Lines

color-outside-the-lines-diy-coffee-mug-marbled-cup-pink-rainbow

We are big fans of Sex and the City. We remember so many lines and favorites scenes from the sexual and charming sitcom. One in particular made us laugh, and inspired today’s DIY project.

In the first Sex and the City movie, while at lunch, the ladies were talking about sex, as a result of Miranda’s dry spell with Steve. Charlotte’s daughter was at lunch, so the ladies had to use code for the word sex. Remember this scene?

It went a little something like this…

Miranda: How often do you guys…
Carrie: “color”?
Samantha: Well, I can’t color enough. I would color all day, everyday if I had my way. I’d use every crayon in my box. 
Carrie: We get it, you love to color. 

When asked how often she and Big colors, Carrie replied: But I will tell you this. When Big colors, he rarely stays inside the lines.

So, naturally we made translated this scene into a DIY project. An ordinary white mug was transformed into a DIY black and white heart mug with a colorful, marbled handle, and filled with bright markers!

The message here is either a PG-13/R rated version about sex and coloring outside the lines in bed. If this is your goal, this DIY black and white heart mug is a funny gift to give girlfriends about “coloring” with their man, in a #howoftendoyoucolor kind of way.

sex-and-the-city-black-white-heart-mug-diy-marbled-cup-gift

sex-and-the-city-how-often-do-you-color-black-white-heart-mug

The G rated message of this DIY black and white heart mug can be more inspirational – in a black and white world, be the person who adds color. Be bold. Be yourself. Color the world with bright colors, happiness and kindness. Color the world pretty.

diy-black-white-heart-vinyl-marbled-mug-markers-color-outside-the-lines

Even if you’re not a Sex and the City fan, coloring is all the rage for kids and adults these days, so this would make for a great Valentine’s Day gift, birthday gift, or overall fun gift for a friend. Combine it with a pretty notebook, and write your message inside the notebook. #coloroutsidethelines #howoftendoyoucolor #sexandthecityforever #takethetimetocolor #colortheworldpretty #nevertoooldtocolor

Materials:

Directions:

Design a small heart with the Silhouette editing software. Print the mini hearts on the vinyl, following instructions provided by Silhouette.

Cut the hearts individually while they are still on the Silhouette vinyl backing. Use a small strip of Frog’s Tape on top of each heart to remove it from the vinyl backing. Place it on the mug. Use a credit card or straight-edge to smooth it out.

diy-white-black-heart-mug

Remove the tape. The heart should stay in place on the mug.

black-white-heart-mug-diy-vinyl

IMG_3991

Continue to add all the hearts in a scattered or organized manner on the mug.

black-white-heart-diy-mug-gift

Tape off the handle of the mug with Frog Tape.

white-black-heart-mug-diy-project-vinyl

Pour really warm water into your disposable container. Drop 4 drops of each nail color inside the water. Swirl the colors around quickly {really quickly} with a toothpick. Insert the handle of the mug inside the water till its fully covered and then lift it out. Let the handle dry. Once dry, remove the Frog Tape. If the nail polish gets on the mug, remove it immediately with nail polish remover.

marbled-diy-mug-black-white-hearts-markers

Fill the mug with markers.

diy-black-white-heart-mug-markers-marbled-nail-polish

DIY Woodland Winter Cake Topper

chocolate-cake-wood-slice-rabbit-tree-white-joy-sign-diy-cake-topper

We are experiencing a love affair with bottle brush trees and wood slices this winter. And, as usual, crushing on white and gold, too. Our kids think Christmas is tomorrow with all the holiday blog projects lying around the house – it’s a tease for them, and almost an overwhelming reminder of the upcoming holidays for us. At least they get to enjoy some of the benefits of shooting a DIY winter cake topper – shoot the cake, and eat it too.

chocolate-cake-wood-slice-rabbit-tree-white-joy-sign-diy-cake-topper

If you’re celebrating a winter birthday, or want to impress guests this holiday season with an adorable DIY winter cake or pie topper, just go out and chop a tree {you can buy them already cut from Michael’s if a lumberjack isn’t in your repertoire}, bust out the gold leaf paint, and glue.

Materials You’ll Need:
Wood slices
Cake pop sticks
Mini woodland animal figures – deer, rabbit, bear, squirrel
Thin popsicle sticks
Mini banner flags
Gold leaf paint
Hot glue gun

Directions:

Dab the ends of the  bottle brush tree with gold leaf paint. You can’t mess this up – just dab here, and there and everywhere.

Write a word, name or phrase on the paper banner.

Use a hot glue gun to glue the tree, animal and popsicle stick with paper banner on the wood slice. I cut the popsicle stick in half to make it shorter.

white-tree-rabbit-joy-sign-gold

Glue ‘legs’ on the bottom-side of the wood slice with the cake pop sticks that will stick into the cupcake, cake or pie.

rabbit-wood-slice-diy-cake-topper-tree-joy

chocolate-cake-wood-slice-rabbit-tree-white-joy-sign-diy-cake-topper


Big Hero 6 Party

baymax-shirt-big-hero-6-party-balloons

Just in case it wasn’t obvious to you, the 3 kiddos above are superheroes. They are smaller in size than their favorite Big Hero 6 characters – Wasabi, Baymax and Honey Lemon – and they don’t have the ability to fly on an armed marshmallow man, but they are brave, kind, smart and amazing kids who possess their own superhero powers.

We celebrated the superhero in them, and all their friends at a Big Hero 6 party this summer. After all, it is one of our favorite animated movies. Even Jessica’s girly, sparkle-loving, princess-adoring daughter loves the kids superhero action film.

So, we invited family and close friends to join us for outside, yard games and a special drive-in movie showing for a Big Hero celebration.

It’s all in the details, so here they are…

DIY Honey Lemon-ade Stand

While Gabriella was all-in for a Big Hero 6 theme, something had to be pink and colorful, and well, girly. She wanted to dress like the scientist character, Honey Lemon and host her own Honey Lemon-ade Stand. Jessica created her stand with a DIY balloon arch made with a Balloon Time helium tank above her new, red Wayfair table adorned with ribbon.

balloon-arch-diy-lemonade-stand-honey-lemon-big-hero-6-party-ribbon

IMG_9821

Drive-In Movie with DIY Cardboard Box Cars

The DIY cardboard box cars were the hit of the party. Each kid had his/her own car at the Big Hero 6 drive-in, along with a ledge to hold their popcorn and candy. Since the party was in the daylight, we opted for a drive-in movie theatre in the garage. There was a bonus we hadn’t even considered – while the kids were at the DIY drive-in movie, the adults enjoyed some kid-free time upstairs.

The cardboard cars were made with cardboard boxes, duct and packaging tape, white paper plates {wheels}, black paper {wheels and grill}, green paper {license plates} and red paper {break lights}.

diy-drive-in-movie-theatre-big-hero-6-movie-showing-cardboard-car

drive-in-movie-big-hero-6-cardboard-box-car

drive-in-movie-cardboard-car-big-hero-6-kid-party-diy

drive-in-movie-big-hero-6-cardboard-box-car

drive-in-movie-cardboard-car-big-hero-6-kid-party-diy

No drive-in movie is complete without a concession stand. We transformed packaging styrofoam into a backdrop with colorful wrapping paper and photos of the Big Hero 6 characters.

big-hero-6-party-backdrop-colorful-wrapping-paper-baymax-drive-in-concessions

big-hero-6-party-backdrop-colorful-wrapping-paper-baymax

baymax-big-hero-6-water-bottles

Yard Games

Before the kids sat to watch a movie, they played various yard games to release their boundless energy.

big-hero-6-party-diy-sign-yard-games

We transformed our favorite Bucket Ball game into Baymax Bucket Ball. The game was played with the same rules, but players tried to shoot the ball into Baymax buckets filled with water, instead of plain, white buckets. To make the Baymax buckets, we simply cut circles from black card stock, and taped them with a large piece of clear packaging tape. The tape also made the eyes waterproof.

big-hero-6-baymax-bucket-ball-kids-party

Another fun game was Go Go Tomago Disc Toss. We bought hoola hoops, and hung them with rope in-between large trees. Players tried to score points by throwing the ‘Go Go frisbee’ into the hoola hoops.

hoola-hoop-frisbee-toss-kids-game-big-hero-6-party

hoola-hoop-frisbee-toss-kids-game-big-hero-6-party

It’s not a party until you break open a piñata. Jessica bought a soccer ball piñata, and retrofitted it with red, fringe tissue paper and black eyes to make it a Baymax head.

baymax-big-hero-6-diy-pinata-kids-birthday-party

Favors/Details

Kids went home with white pint containers with DIY baymax shirts inside, balloons and their cardboard cars.

balloons-big-hero-6-party

baymax-shirt-red-balloon

Jessica’s hubby carved a DIY microbot for authentic Big Hero 6 decor. He made it from packaging styrofoam and the kids helped us by painting it black.

big-hero-6-party-microbot-diy-

Red lollipops were also a detail in the movie we re-created with wrapping paper sticks {spray painted white} and red plates glued to the top.

big-hero-6-party-baymax-diy-red-lollipop-balloons

Invitations were custom-made by Jenna, of course. We went with a modern, clean approach and added a playful Baymax balloon. You can buy the invites here.

big-hero-6-party-baymax-invitation-kids-birthday-cityscape-invite-fleurdelisapaperie-etsy

IMG_1813

VENDOR LOVE
Invites: Fleur de Lis, a paperie
Balloon arch: Balloon Time Helium Tank