Pucker Up: DIY Lip Balm with Essential Oils Just in Time for Valentine’s Day

DIY-essential-oils-lipbalm-peppermint-beeswax-pellets-yellow
We have a drawer full of essential oils. The more we learn about the uses of the oils, the more we love. The more we love, the more we want to make. The more we make, the more we want to share.

This post was inspired by Gabriella’s (Jessica’s daughter) lip-making kit she got for Christmas (if a 6-year-old can make DIY lip balm with the help of a kit, we could surely make it, too), as well as Valentine’s Day. We made DIY lip balms with essential oils that not only smell amazing, but feel soft and smooth on lips too! These make awesome gifts for girlfriends and loved ones. It was so easy, and so fun.

DIY-essential-oils-lipbalm-peppermint-beeswax-pellets-yellow

DIY Lip Balm with Essential Oils
makes 6 lip balm tubes

Ingredients:

Directions:

Step 1: Add 2 inches of water to a saucepan on the stove. Put on high for boiling water.

Step 2: Add shea butter, beeswax pellets and coconut butter to a glass measuring cup.

diy-lip-balm-ingredients-beeswax-pellets-essential-oils-coconut-oil

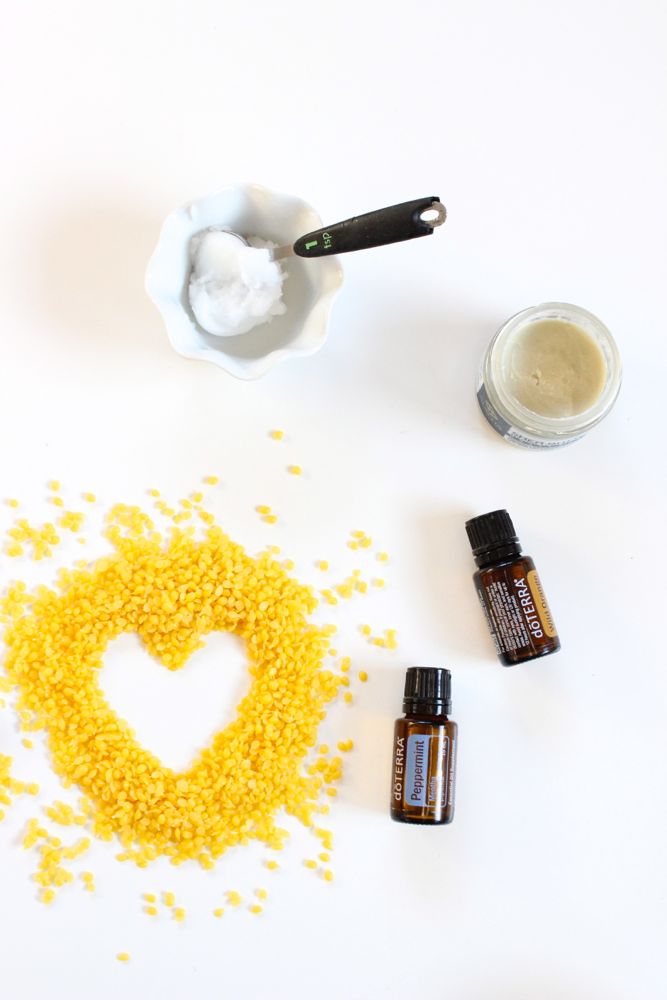
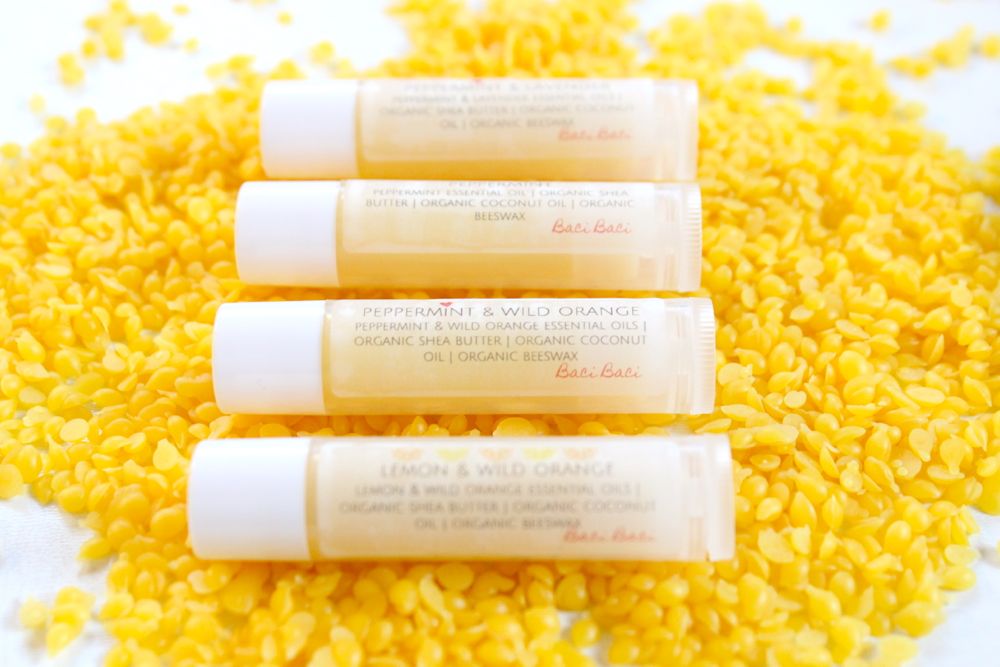
Step 3: Place the glass measuring cup in the pan on the stove, and occasionally stir the mixture with a wood popsicle stick until all pellets are melted. Once they are melted, remove the cup from the stove, wait about 30 seconds, then add the essential oils. The combinations we chose are:
Peppermint: 30 drops
Peppermint and Lavender: 15 drops Peppermint and 10 drops Lavender
Peppermint and Wild Orange: 15 drops of each
Lemon and Wild Orange: 15 drops of each

Step 4: Stir the essentials oils in the oil. Quickly pour into the lip balm tubes before it hardens.

Step 5: Print labels. We made our labels for our lip balms using Avery labels. Free PDF file here. The Avery label you need to purchase is 5195. There are 60 labels per sheet.

Step 6: Once the lip balm is set (about 3 hours), stick the labels on.

diy-lip-balm

diy-lavender-and-peppermint-wild-orange-lip-balms

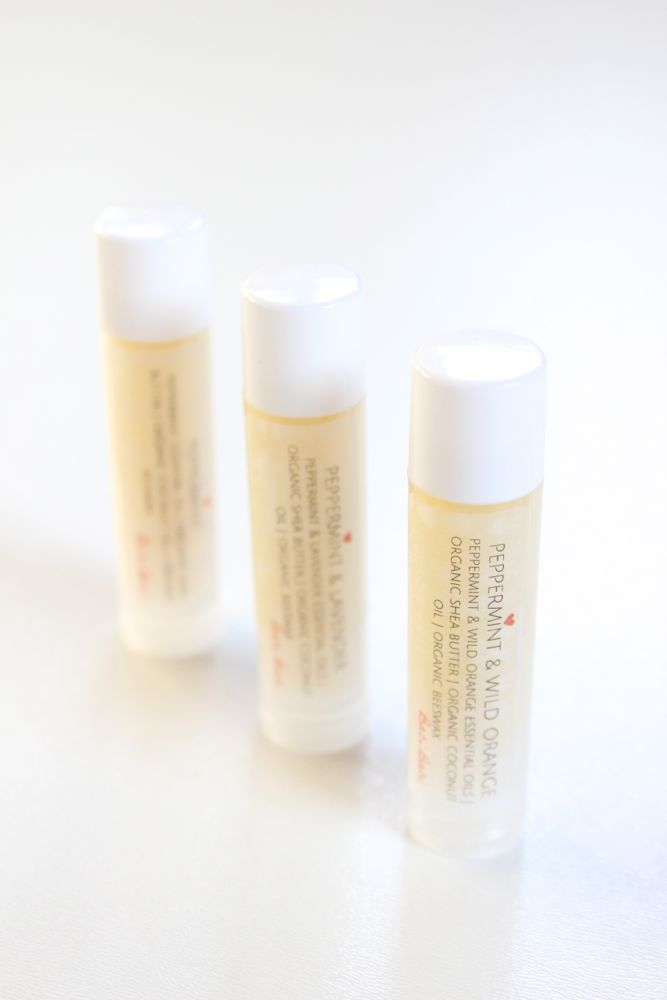
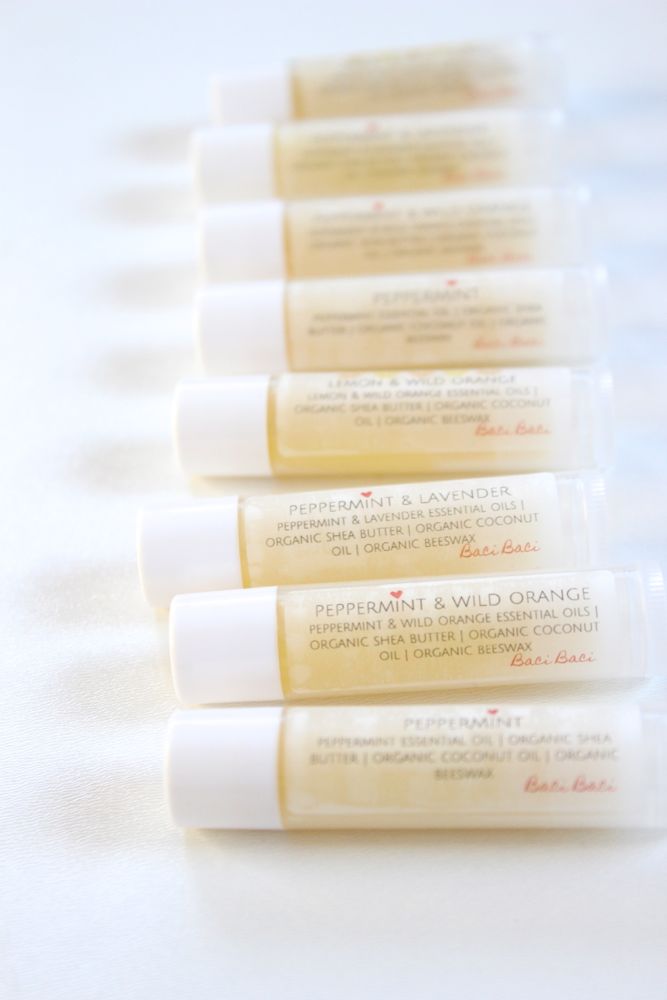
Share the lip balm love, and give to friends! Baci, Baci (kisses, kisses).

diy-lip-balm-with-yellow-beeswax-pellets


Shark and Mermaid Party

IMG_6597

It’s that time of year again for Jessica’s family – that time when it feels like Christmas in July. All three kids celebrate birthdays in July, so not only is the month busy, but it’s really fun. She’s going to take us back to her Shark and Mermaid party, and the details she created…

Every year I to find a theme that will work for boys and girls, and this year, our trip to Florida inspired our fin and tail celebration.

Note: It wasn’t until shortly after we took photos of the party, when we realized the t and h were mixed up in the word birthday on the mermaid side. And, well, when guests arrived, we partied! We were so focused on details, we forgot to spell. The mistake was quickly fixed and the party went on.

Supplies: 

Directions:

Step 1: Create a shark backdrop. During a recent trip to Florida, the kids took photos in front of a cool Megalodon. Print the photo on an engineering print from Staples. Glue the photo on one of the large wood boards with the multi-purpose spray adhesive.

Think again before you order plates from Oriental Trading for just food, because they make the perfect waves for an ocean backdrop. Use a hot glue gun to glue plates on the bottom of the photo for an ocean wave effect. Start with the dark blue and then glue light blue plates on top of it. Layer until you reach the bottom of the photo.

shark-party-wall-mural-kids-swim-

shark-party-wall-mural-kids-swim-

Step 2: Create a mermaid backdrop. Draw and cut a mermaid tail on foam core, and then cover it with paint chips. I love these paint chips from Oriental Trading because there is a wide variety of colors, and no circle cutter necessary – they are perfect circles when they arrive. Once all the chips are glued in place, flip it over and use an X-acto knife to cut the edges of the paint chips along the fin tail shape. Glue the tail to the other piece of thin white wood board. Just like the shark backdrop, glue paper plates to make waves. Start at the top, and work your way down.

mermaid-tail-colorful-seashell-crowns-doll-girl-party

mermaid-birthday-party-coloful-tail

Step 3: Add tablecloths to each table. Layer three tablecloths on each side. Cut the bottom of each layer in waves, or scallops. Each layer should be visible.

party-mermaid-shark-under-the-sea-boy-girl-party-diy

Step 4: Accessorize the tables. Shark koozies and bubbles made for the perfect shark table accessories, plus they doubled as great party favors. Another fun detail on the table was a pint container filled with a t-shirt, and topped with a blue paper shark. The shark’s edges were sealed with hot glue, but before it was totally sealed, it was filled with swedish fish. All boys had to do was rip, eat and enjoy!

For the mermaids, the table was set with pink cups with shells glued in the center, DIY seashell crowns (also a party favor), DIY shell and bead necklaces, a plush mermaid and cupcakes with tails. To make the DIY seashells crowns, use a hot glue gun to glue shells on crowns from Oriental Trading. Play with the shells and design the crowns of your mermaid dreams.

shark-koozie-blue-striped-straws-cups

shark-bubbles-blue-ocean-party

shark-party-favor

pink-cups-with-shells-striped-straws

seashell-crowns-girls-mermaid-party

seashell-crowns-diy-mermaid-gifts

seashell-necklace-beads

mermaid-party-girl-smiling-diy-crown

Step 5: Decorate the entire party area. Hang pom poms, fish nets and happy birthday banners.

shark-party-mermaid

Step 6: Play games. Aside from all the pool fun, set up a fishbowl game. Set up plastic cups in cascading order, 8, 7, 6, 5 and so on. Fill them with water, and then set a prize inside each cup. The cups at our party were filled with seashells and mini shark toys. Draw a line on the ground several feet away from the table, and get the kids throwing for some fun prizes.

pool-party-floatie

game

ping-pong-ball-game

Step 7: Send friends off with favors. Every family went home with a special bag of Shark vs. Mermaid Tic Tac Toe. The shark photo prop at Oriental Trading inspired me to paint DIY shark rocks, and well we didn’t have to paint the shells because they were so pretty. The game packaged in drawstring bags with the Tic Tac Toe lines drawn on top with a Sharpie marker. This game is so much fun, and can be easily brought to church or dinner out to keep the kids occupied.

shark-painted-rocks

shark-mermaid-tic-tac-toe-diy-party-favor

shark-mermaid-tic-tac-toe-seashells-party-favor-drawstring-bag-diy-kids-game

shark-mermaid-tic-tac-toe-diy-party-favor

shark-mermaid-tic-tac-toe-diy-kids-game

Oriental Trading sent us some items of our choosing for this party, free of charge. All opinions are honest, and our own. No other type of compensation was received. Thanks for supporting the companies that support j. sorelle. We love Oriental Trading, even before this post.


A Little Star Baby Shower

little-star-custom-button-pregnancy-belly

When one of my besties is in town for the inaugural Reintoberfest, and she is preggers, a baby shower is certainly in order. My girlfriends and I hosted a small, fabulous group of women for a Little Star baby shower. It was a surprise…and I think we pulled if off, even with a few slips.

© 2015 Meredith Moran Photography

The shower was designed after one of my most favorite art prints by The First Snow. Beautiful, isn’t it?

© 2015 Meredith Moran Photography

© 2015 Meredith Moran Photography

We re-created the art print with an antique ladder, ribbons and fresh flowers by Vail Vintage Magnolia and DIY hanging stars that were spray painted gold and white. It worked our perfectly because it’s a gender-neutral theme, and the nursery is also star themed.

white-ladder-baby-shower-flowers

© 2015 Meredith Moran Photography

baby-shower-ladder-star-lights-white-gold-flowers

© 2015 Meredith Moran Photography

Our menu consisted of homemade French Toast casserole, egg casserole, yogurt bar with fruit and granola, fresh spinach salad and for dessert we devoured mini bundt cakes. The backdrop for our Champagne and Bundt bar was a DIY Kimi’s Little Star sign. We sipped on mimosas with DIY star gummy drink stirrer and oh my goodness they were good!

© 2015 Meredith Moran Photography

© 2015 Meredith Moran Photography

© 2015 Meredith Moran Photography

I made DIY star napkin rings that also served as ornament favors guests could take home. DIY tutorial to come.

© 2015 Meredith Moran Photography

© 2015 Meredith Moran Photography

Meredith made DIY star headbands we all adorned on our heads to represent the “bouquet of stars to place around your sleeping heads” like the art print said.

© 2015 Meredith Moran Photography

© 2015 Meredith Moran Photography

© 2015 Meredith Moran Photography

© 2015 Meredith Moran Photography

© 2015 Meredith Moran Photography

© 2015 Meredith Moran Photography

In our family, we say Aunt, pronounced ‘ant.’ In MN, Kimi says Auntie, pronounced ‘on-tee,’ with a bit of a flair, of course. For the shower, we wanted to emphasize her auntie ‘thing’ with custom buttons for each guest. When baby G is born, we will all be proud aunties with gifts of our own to offer him/her. It was a good laugh for everyone. I gave myself the title of auntie of crafts. Jenna was crowned the auntie of shoes. And, Jodi proudly accepted her role of auntie of reality tv. We will take our roles seriously, Kimi!

© 2015 Meredith Moran Photography

We played a fun, non-cheesy game that I highly recommend for a smaller sized baby shower – Who’s That Baby? I asked guests to send me a baby photo under 6 months old prior to the shower, and I had the photos printed for a photo display. Everyone had to guess each sweet baby face, and the winner was awarded a prize.

© 2015 Meredith Moran Photography

© 2015 Meredith Moran Photography

Another ‘activity’ and decoration was the DIY Due Date Chalkboard. Everyone had a chance to guess baby G’s due date, and whether it was a boy or girl. If you really want to make it a game, bet $ to get a pool going. To learn how to make the DIY chalkboard, read this.

© 2015 Meredith Moran Photography

© 2015 Meredith Moran Photography

We sent the beautiful mama home with Dear Baby, often called Wishes for Baby cards. We all wrote down our hopes and dreams for baby G, which was a great baby shower activity and keepsake for Kimi. You can purchase the Little Star cards and here and the Little Star invitation here.

© 2015 Meredith Moran Photography

© 2015 Meredith Moran Photography

star baby shower-invitation

Finally, what’s a shower without a posed shot, and a tassel banner?!

© 2015 Meredith Moran Photography

© 2015 Meredith Moran Photography

Thanks to all the Vendors We Love from this Shower
Photographer: Meredith Moran Photography
Flowers: Vail Vintage Magnolia
Invitation and Dear Baby Cards: Fleur de Lis, a paperie
Mini Bundt Cakes: The Bundt Shoppe
Art Print: The First Snow
Auntie Buttons: Share Denver


DIY Witch and Mummy Halloween Nail Polish

mummy-witch-halloween-nail-polish-diy-holiday-gift

We typically opt for a cute and fun Halloween, instead of a scary and creepy one. We’ve never loved haunted houses or frightening people. We like costumes and carving pumpkins, apple cider and trick or treating with our large Italian family.

Since we were babies our mom and aunt made our ‘themed’ Halloween costumes, and every year we celebrate together. Following the annual chaos of hello hugs, oooh’s and ahhhs over costumes and hundreds of flashing camera lights, the men grab a cigar and take the kids trick or treating. The women stay inside where its warm to chat, eat chili and hot dogs and drink our wine. It’s a special tradition, and we are grateful to share it with our own kiddos.

Being into the cute part of Halloween, this DIY is so us!

These DIY witch and mummy Halloween nail polish bottles would make for a great, non-candy Halloween party favor or a unique Halloween gift.

Witch color are you going to pick for this year’s Halloween nails? We’re going with Essie Bahama Mama.

If your rainbow-loving self is admiring the DIY spider web in the background, you can see how we did it here.

halloween-nail-polish-favor-witch-broom-mummy-spider-web-rainbow-hat-white-party-diy

You’ll Need:

  • Nail Polish
  • Paper, Astrobrights
  • White rafia paper ribbon
  • Googly eyes
  • Hot Glue
  • Nail File
  • Rafia
  • Twine

How To:

For the mummy, glue two eyes on the nail polish bottle. Dab a small amount of hot glue on the top of the bottle, then add white rafia ribbon, and start to wrap. You can do one continuous wrap, or cut, add a dab of glue and continue to wrap. When the entire bottle is covered, dab another small amount of hot glue, so the mummy’s wrap stays in place.

mummy-nail-polish-diy-halloween-favor-gift-ribbon-white-googly-eyes

mummy-nail-polish-diy-halloween-favor-gift-ribbon-white-googly-eyes

For the witch, make a small witches hat with a free mini-hat template online {or free-hand} and glue it to a black, doughnut-cut circle. Slide it over the nail polish handle. For the witches broom, place a handful of rafia around one end of the nail file, and tie twine around it to keep it in place. Use a tiny dab of hot glue to keep the twine in place.

witch-nail-polish-diy-halloween-gift-black-hat-orange-nail-file-broom-favor


witch-nail-polish-diy-halloween-gift-black-hat-orange-nail-file-broom-favor


witch-nail-polish-diy-halloween-gift-black-hat-orange-nail-file-broom-favor

Bloom into Spring with DIY Watercolor Flower Cups + Giveaway

watercolor-flower-cups-diy-poppy-spring-placecards-easter-brunch

Clearly, Jessica is in the mood for paper cups and watercolor this spring. Jenna was described as the ‘flower child’ growing up, but it seems Jessica’s inner flower child is coming out now. First came the bunnies, and then came the flowers.

Our Nani, fabulous as ever at age 79, is a proper lady that loves to entertain and host. She’s good at it, too. Amazingly, she has more energy then we do. Just like mother’s do, she will still walk up to us at a party {even in our 20’s and 30’s}and remind us to say hi to Mr. and Mrs. so and so, and congratulate them on their recent successes. We never understood it until we became mothers. Being the hostess with the mostess that she is, the thought of using plastic and paper glassware and flatware at a party is unbearable. It must always be china or glassware.

But, these DIY watercolor flower cups got the seal of approval from good ‘ole Nani P. They are paper, but they look lovely, and they don’t look cheap. You can fill them with water, juice or a fave cocktail, or fill them with a favor. They make for a great place card, too, with custom names painted on them. Use them for Easter, a spring brunch, bridal shower or baby shower.

floral-wreath-diy-watercolor-cup-easter-brunch-table-setting-placecard-flowers-watercolor


If you like them, and think they would be a great fit for your next event, follow us on instagram, then tag a friend in comments under the photo of these cups. Those who follow and tag will be entered to win a set of 30 of these watercolor cups for FREE – you can choose to receive a variety, or pick your faves. We are not professional artists, and what you see is what you get. But, for free, they are darn adorable. Giveaway starts March 25 and ends March 31, 2015. Giveaway is not sponsored by Instagram. Names are NOT included on cups for giveaway. Good luck.

Questions? Email us at hello@jsorelle.com.

watercolor-spring-cups-poppy-flowers-easter-brunch-table-setting-place-cards-diy-paint

To make them, you’ll need:

  • Paper Cups {$1 for a pack of 10}
  • Watercolor paints
  • Brush
  • Water

The amazing one step tutorial is…explore floral inspiration in your head, online or on a print, experiment with watercolor paint.

diy-paper-cups-flower-wreath-spring-brunch-table-setting-watercolor-art-bridal-shower-favors

{images via j. sorelle}