A Colorful Summer Party with Sunglasses and Ice Cream

summer-vibes-girl-with-sun-sunglasses-colorful-rainbow-of-sunglasses

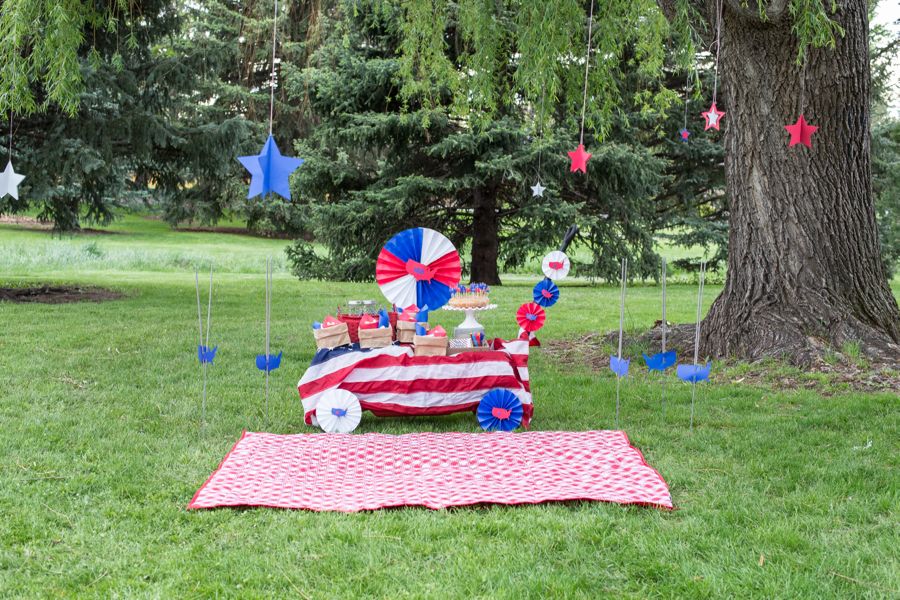
Summer vibes are strong in our houses right now, and it feels so good! It’s so close we can practically taste and smell all the wonderful things about summer – watermelon, cocktails on the porch, pool days and fun in the sun. The 2016/2017 school year is almost over, so we’re celebrating all the vibrant shades of summer. Nothing is brighter than ASTROBRIGHTS® Papers. Nothing is cooler than a stylish pair of sunglasses. And, nothing is sweeter than ice cream cones. All together they make one heck of a School’s Out For Summer party.

The most amazing thing about this party is that paper is the main component for all the décor. In fact, not just the décor is made of paper, the activities are primarily paper, too. Everything else – the bubbles, chalk, juice, music, candy and ice cream (the real deal, non-paper version) is just an added (but not necessary) bonus, and most can be found around the house.

It’s time to COLORIZE the start of summer, ya’ll. Here’s how to kick it off bright!

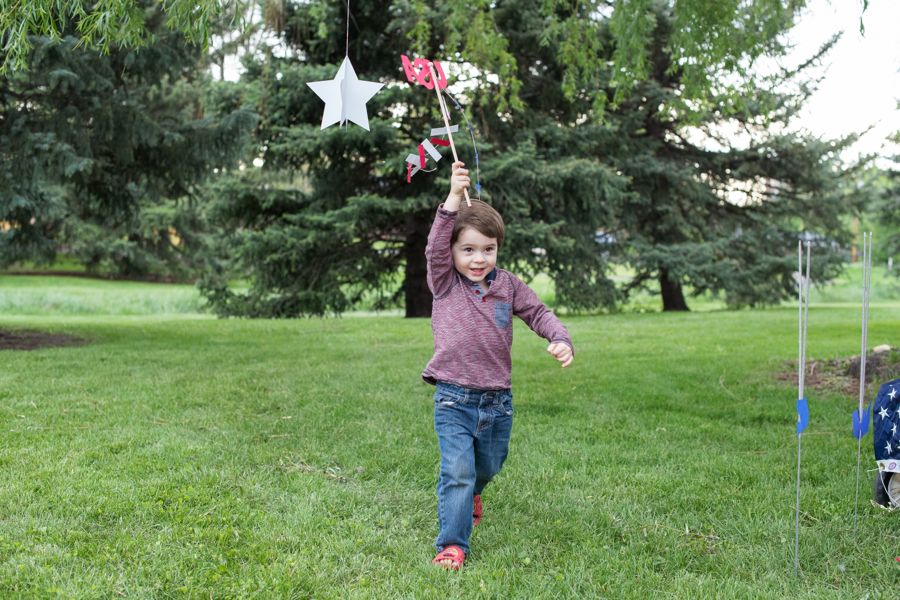
DIY Sunglasses Piñata

diy-sunglasses-pinata-black-and-bright-coral-gigantic-sunglasses

Parties are just more fun with a piñata. If we had nothing but a piñata at our kid’s birthday, they would be thrilled and not notice anything else was missing. But, they can be expensive, and if you do things last-minute like us (actually, just Jessica and Jodi procrastinate, not Jenna), it costs too much to overnight ship a piñata. Luckily, we had cardboard, duct tape and ASTROBRIGHTS paper on hand to help me make the coolest piñata around town – a pair of sunglasses.

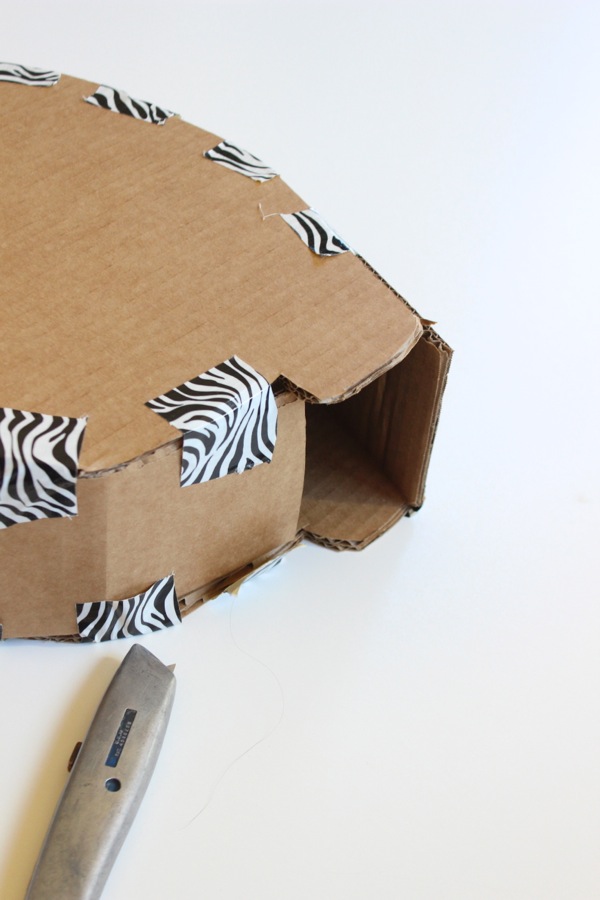
First, draw the shape of the glasses on cardboard. We used an 8×10 cut out of each lens and drew a larger tracing around it. Once everything is drawn, use an X-acto knife to cut the cardboard glasses shape. You will need a front and back, so once one pair of glasses is done, trace it on another piece of cardboard and cut it to create a second pair. Next, cut 3-inch wide strips of cardboard for the sides. Carefully bend the strips to fit the curves of the glasses.  Use small strips of duct tape (or masking tape) to secure the strip in between both pieces of cardboard glasses. We only had zebra print duct tape in our crafting bin, but we suggest using clear tape, or brown masking tape for this step. Before the entire thing is bordered, leave a small opening large enough to fit your hand in it. Drill (or punch with scissors) two small holes on top of the piñata. Insert the rope into one hole and use your hand to pull it along the inside so it can go up and out the other hole. Also, at this time, stuff the piñata with small toys and candy. Once it’s filled and the rope is attached for hanging, close up the last part of the piñata with a strip of the 3-inch cardboard and duct tape it.

IMG_9856

cardboard-sunglasses-cut-out-with-zebra-duct-tape

Once all the edges are securely taped, begin to cut 1.5-inch to 2 inch wide strips of paper. Use scissors to fringe the strips. Start to glue (Elmer’s Glue works here) each strip on the cardboard glasses. One crucial tip is to begin at the bottom and work your way up.

diy-sunglasses-pinata-black-and-bright-coral-gigantic-sunglasses

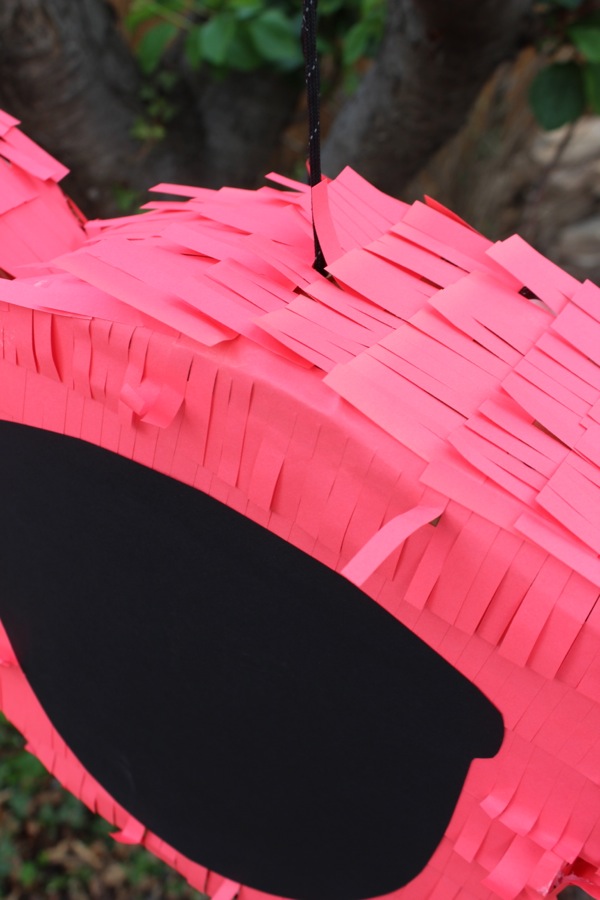
Once the entire thing has strips of fringe, cut out two large (8×10 size each) lenses for the glasses. Add glue to the back of them, and add them to the sunglasses frame.

We used Rocket Red™ colored paper, not card stock weight, for fringe around the piñata and Eclipse Black™ for the shades. How cool are those shades? Plus, it was pure entertainment for the kids as they hit it to find the goodies inside.

diy-sunglasses-pinata-black-and-bright-coral-gigantic-sunglasses-boy-hitting-pinata

diy-sunglasses-pinata-black-and-bright-coral-gigantic-sunglasses-girl-hitting-pinata

diy-sunglasses-pinata-black-and-bright-coral-gigantic-sunglasses

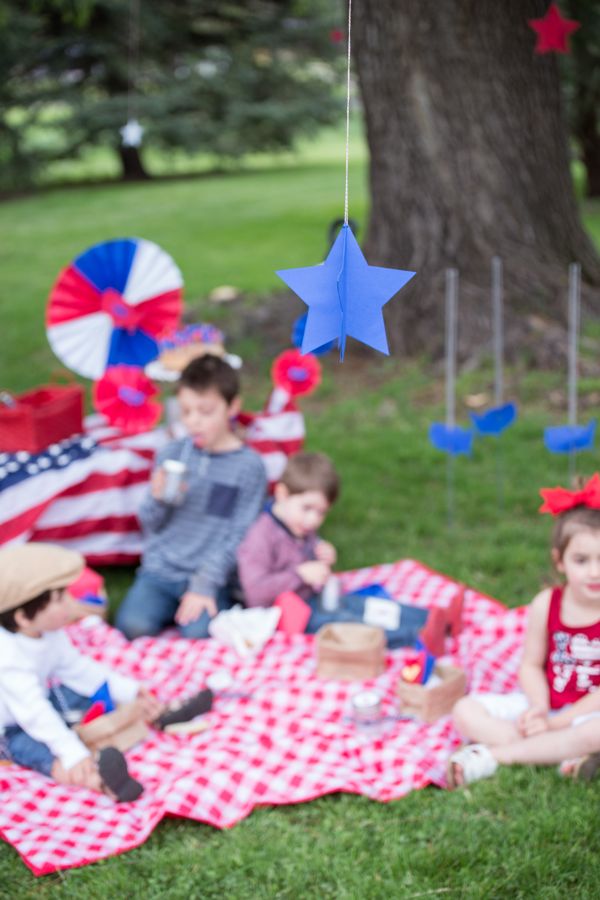
DIY Summer Vibes & Rays of Sunshine

summer-vibes-paper-backdrop-colorful-sunnglasses-arched-like-a-rainbow

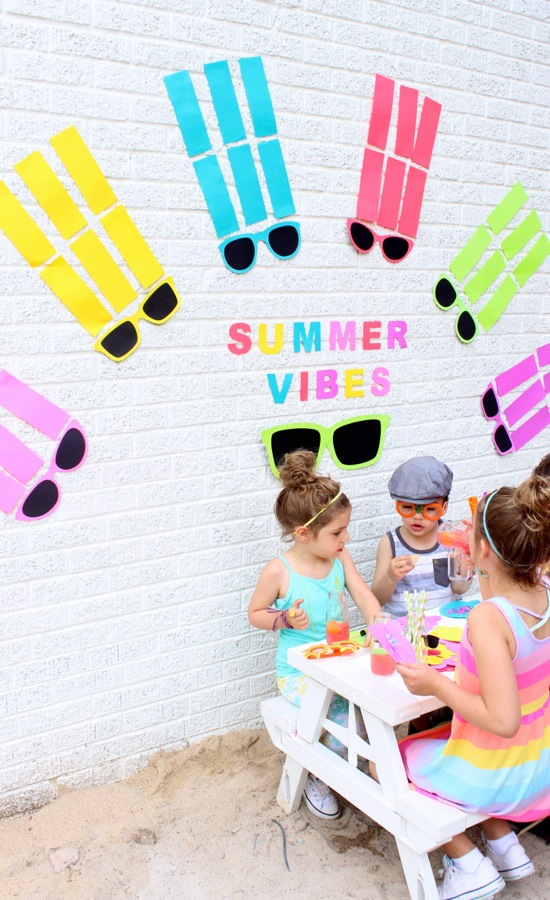
We don’t know about you, but we can’t get through summer without our most favorite accessory, sunglasses. Thus, those little round (or square, oval, butterfly, oblong or aviator) must-have frames were the source of inspiration for our main backdrop, the rainbow of sunglasses.

The first step is to cut out colorful frames for all the glasses. You can use an electronic cutting machine like Silhouette America Cameo to cut the glasses, or trace and cut one you find online. We used Terrestrial Teal™, Outrageous Orchid™, Sunburst Yellow™, Rocket Red™ and Martian Green™. Add Eclipse Black™ lenses behind each frame. For the rays of sunshine radiating from the sunglasses, cut 3.5 inch strips of paper. Add them to a wall, and you’ve got yourself a pretty rainbow of sunglasses. To save the wall from any paint removal, use 3M Removable Putty. It worked great.

summer-vibes-paper-backdrop-colorful-sunnglasses-arched-like-a-rainbow-kids-playing-and-crafting-on-a-white-picnic-bench

summer-vibes-paper-backdrop-colorful-sunnglasses-arched-like-a-rainbow-kids-playing-and-crafting-on-a-white-picnic-bench

summer-vibes-paper-backdrop-colorful-sunnglasses-arched-like-a-rainbow-kids-playing-and-crafting-on-a-white-picnic-bench-and-blowing-bubbles

girl-wearing-black-paper-sunglasses

colorful-summer-vibes-paper-wall-decor-and-a-giant-pair-of-green-paper-sunglasses

summer-fun-bubbles-chalk-glasses-for-kids

DIY Mini Ice Cream Parlor

ice-cream-as-tall-as-me-diy-paper-ice-cream-awning

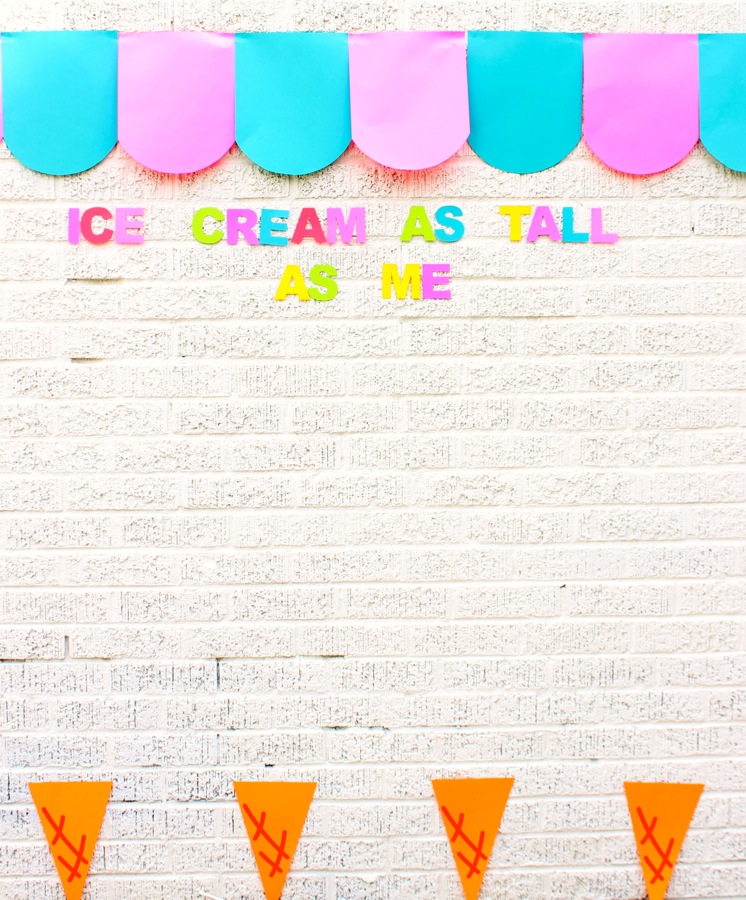
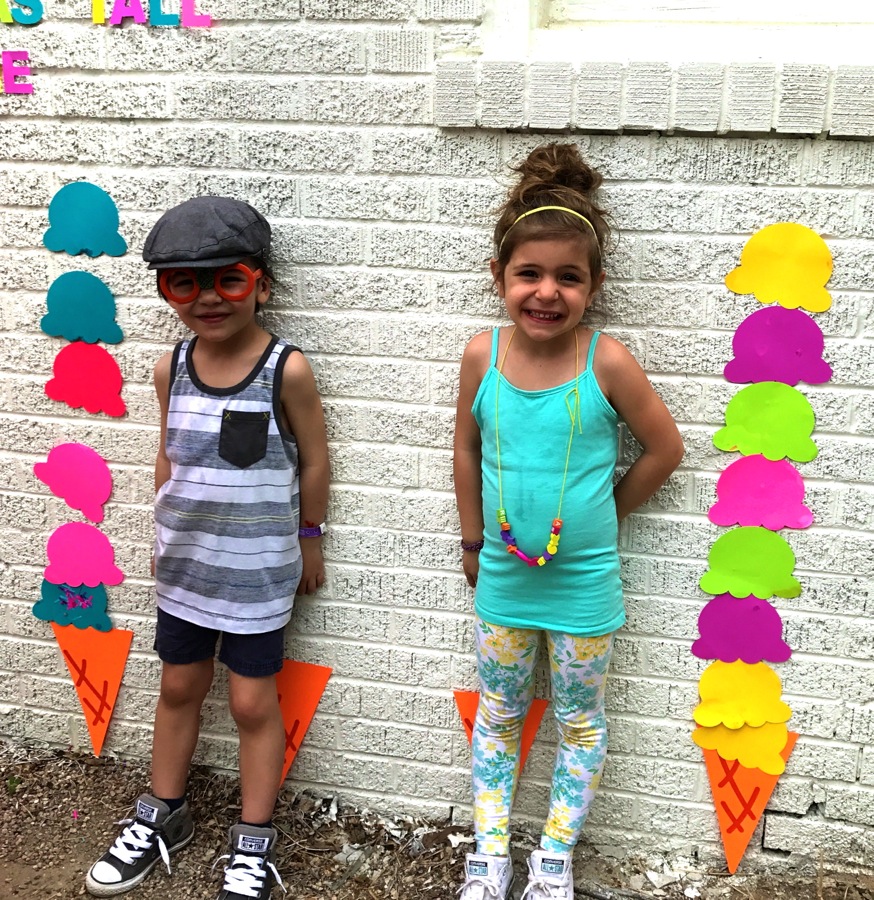
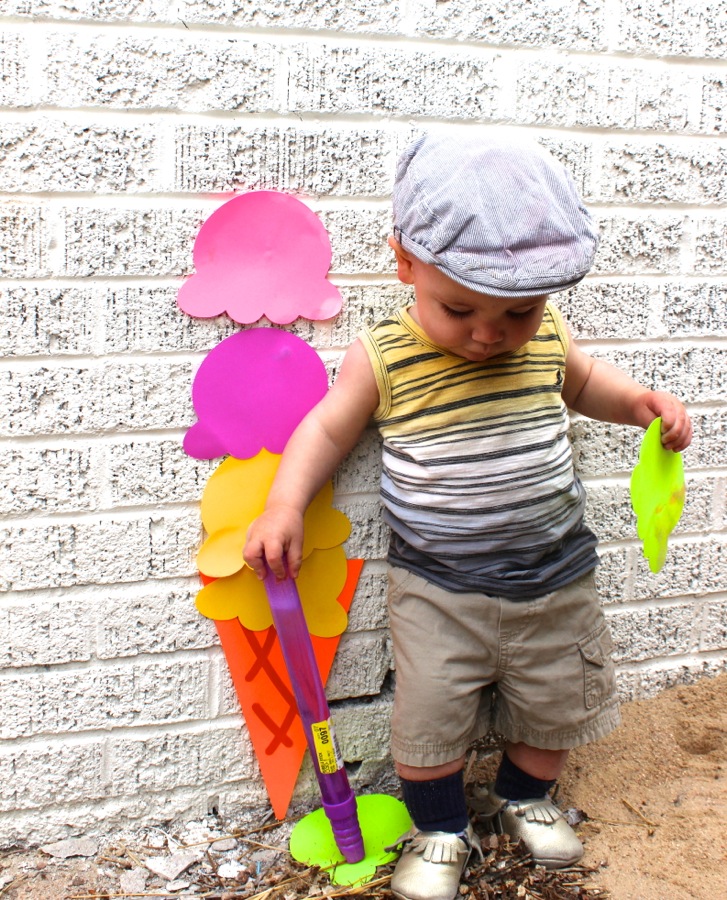
Ice cream on a hot summer day is just pure joy. Our goal was to re-create that feeling of an ice cream parlor and happiness on a summer day with an ice cream activity for the kids. We all know how quickly our children grow. We mark their height at the beginning of the school year, or when they are young, but we don’t do it at the beginning and end of the summer. We’ve never marked their height with ice cream before. Why not start now? It was a huge success – like creamy, vanilla ice cream combined with gooey, chocolaty brownies, drizzled with caramel and topped with a cherry success. Yes, it was that good, and fun!

To make the DIY paper ice cream awning, use scissors to round one side of the paper. Line them up along the wall, and use 3M Putty to hang them along the top, straight-edge part. For the awning, we used Pulsar Pink™ and Celestial Blue® colored paper.

ice-cream-as-tall-as-me-diy-paper-ice-cream-awning

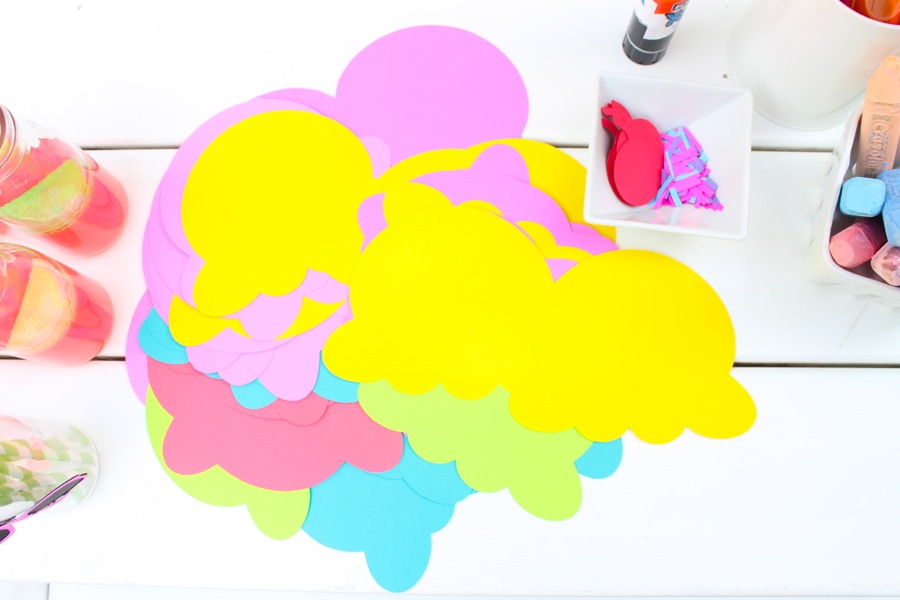
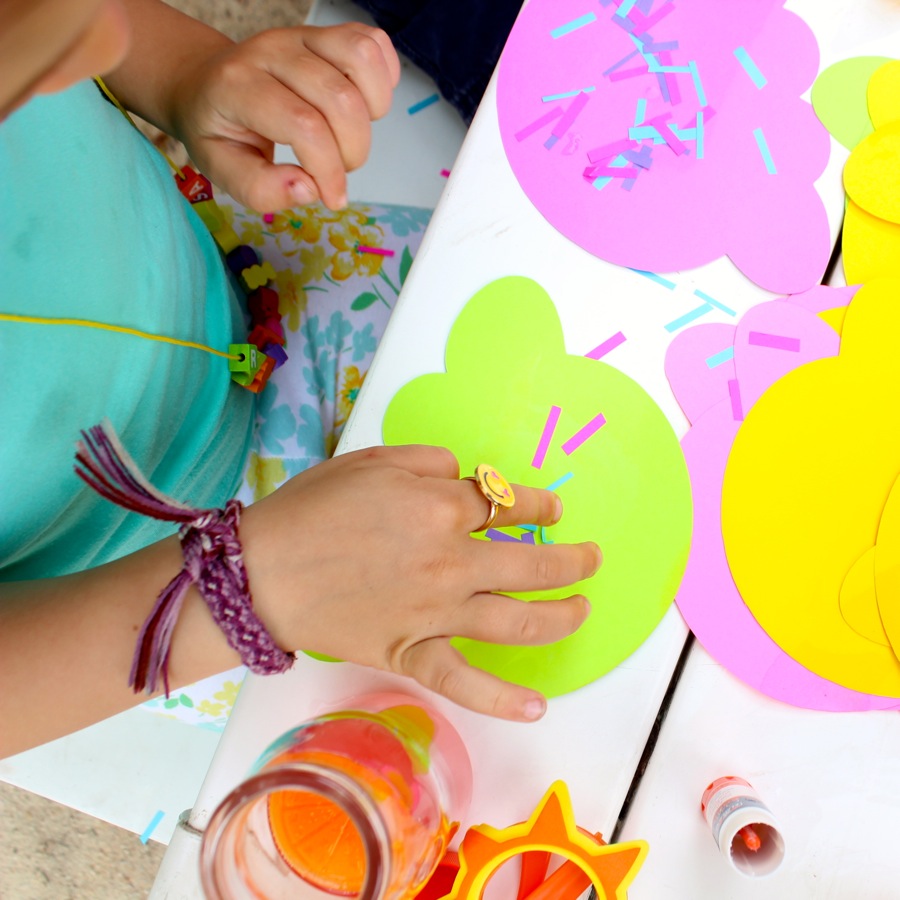
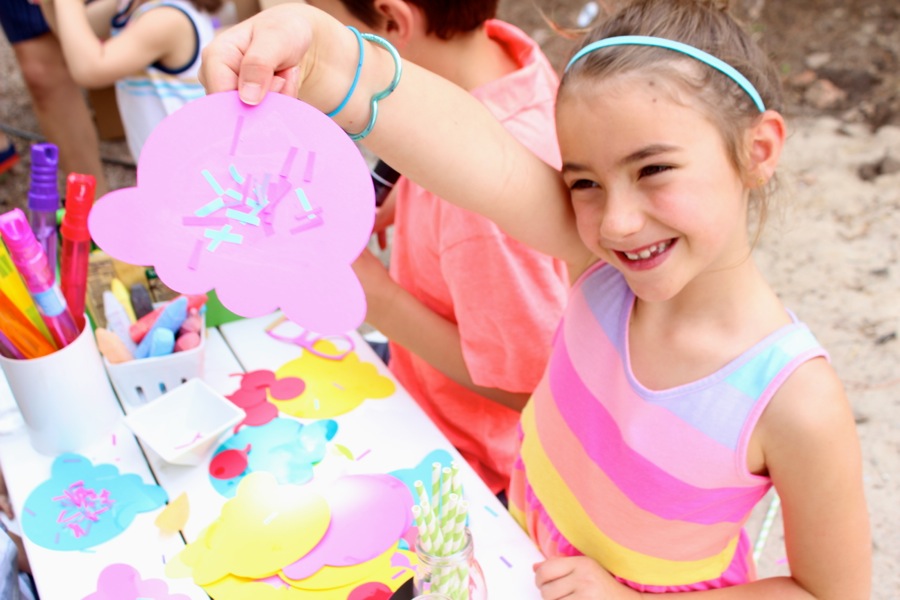
Trace and cut letters for the phrase, “Ice Cream As Tall As Me,” and add it to the wall under the awning. If you have a Silhouette electronic cutting machine, that will save you time, but it’s not a deal breaker for this project. Next, cut out triangles in the shape of ice cream cones. Tape the cones to the bottom of the wall. Cut out ice cream scoops 6 inches tall, which will help you give a “more accurate” estimate of each child’s height. Next, cut out sprinkles and cherries, so the kids can decorate their ice cream scoops with sprinkles, and finish their tall ice cream with a cherry on top. This was our kid’s favorite part.

paper-ice-cream-scoops-and-colorful-paper-sunglasses

paper-ice-cream-scoops-and-colorful-paper-sunglasses

paper-ice-cream-scoops-and-colorful-paper-sunglasses

paper-ice-cream-scoops-and-colorful-paper-sunglasses

One by one the kids ran over to their cone and stacked their ice cream. If only they could actually order an ice cream this tall. One can dream, right?

kids-taping-ice-cream-scoops-on-a-wall

boy-standing-in-front-of-paper-ice-cream-awning-and-ice-cream-scoops-as-tall-as-him

ice-cream-as-tall-as-me-stacked-colorful-ice-cream

baby-boy-standing-next-to-ice-cream-scoops-and-holding-bubbles

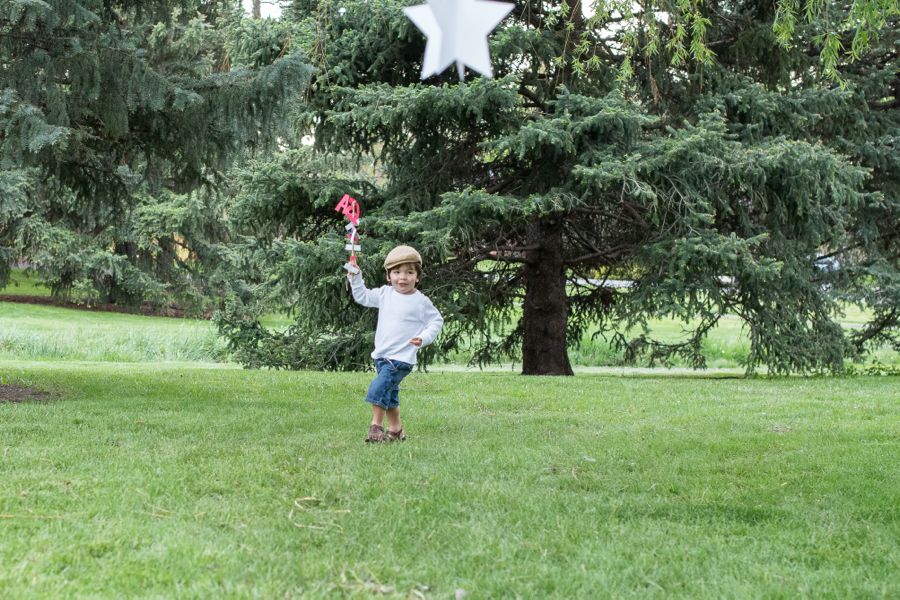
We enjoyed real ice cream shortly after the breaking of the piñata, and it was oh so yummy. The countdown is on – 17 more days of school, and then school’s out for summer! You can bet we will have our shades on!

baby-boy-with-sunglasses-on-his-back-and-a-newsboy-hat

This post is in partnership with ASTROBRIGHTS. We were crafting with and coloring on ASTROBRIGHTS paper long before this post. It’s always been a fave product of ours. Thank you for supporting the brands that support j. sorelle. ASTROBRIGHTS was one of the first, so we are very grateful.

Affiliate Disclosure: This post contains affiliate links, which means j. sorelle receives a small commission from the sale of certain items; however, the price is the same for you, whether it’s an affiliate link or not. 

DIY Witch and Mummy Halloween Nail Polish

mummy-witch-halloween-nail-polish-diy-holiday-gift

We typically opt for a cute and fun Halloween, instead of a scary and creepy one. We’ve never loved haunted houses or frightening people. We like costumes and carving pumpkins, apple cider and trick or treating with our large Italian family.

Since we were babies our mom and aunt made our ‘themed’ Halloween costumes, and every year we celebrate together. Following the annual chaos of hello hugs, oooh’s and ahhhs over costumes and hundreds of flashing camera lights, the men grab a cigar and take the kids trick or treating. The women stay inside where its warm to chat, eat chili and hot dogs and drink our wine. It’s a special tradition, and we are grateful to share it with our own kiddos.

Being into the cute part of Halloween, this DIY is so us!

These DIY witch and mummy Halloween nail polish bottles would make for a great, non-candy Halloween party favor or a unique Halloween gift.

Witch color are you going to pick for this year’s Halloween nails? We’re going with Essie Bahama Mama.

If your rainbow-loving self is admiring the DIY spider web in the background, you can see how we did it here.

halloween-nail-polish-favor-witch-broom-mummy-spider-web-rainbow-hat-white-party-diy

You’ll Need:

  • Nail Polish
  • Paper, Astrobrights
  • White rafia paper ribbon
  • Googly eyes
  • Hot Glue
  • Nail File
  • Rafia
  • Twine

How To:

For the mummy, glue two eyes on the nail polish bottle. Dab a small amount of hot glue on the top of the bottle, then add white rafia ribbon, and start to wrap. You can do one continuous wrap, or cut, add a dab of glue and continue to wrap. When the entire bottle is covered, dab another small amount of hot glue, so the mummy’s wrap stays in place.

mummy-nail-polish-diy-halloween-favor-gift-ribbon-white-googly-eyes

mummy-nail-polish-diy-halloween-favor-gift-ribbon-white-googly-eyes

For the witch, make a small witches hat with a free mini-hat template online {or free-hand} and glue it to a black, doughnut-cut circle. Slide it over the nail polish handle. For the witches broom, place a handful of rafia around one end of the nail file, and tie twine around it to keep it in place. Use a tiny dab of hot glue to keep the twine in place.

witch-nail-polish-diy-halloween-gift-black-hat-orange-nail-file-broom-favor


witch-nail-polish-diy-halloween-gift-black-hat-orange-nail-file-broom-favor


witch-nail-polish-diy-halloween-gift-black-hat-orange-nail-file-broom-favor

DIY Thank You Note

thank-you-crossword-puzzle-red-letters-diy-note

Thank you. Grazie. Merci. Danke. Gracias.

No matter how you say it, ‘thank you’ is such a beautiful and powerful word.

Jenna is always early, or on time with her thank you notes. Jodi’s speed runs about average. Jessica is always late. Typical.

thank-you-crossword-puzzle-red-letters-diy-note

Now, you can say thank you with a lot of letters in a DIY word search, and a red Sharpie to help those special words stand out. Here’s how…

You’ll Need:

  • Red Sharpie
  • Blank fold-over note
  • Access to a computer and printer
  • Washi tape

Directions: 

  • Create a table/chart {with invisible lines} on Microsoft Word, and add random letters inside each box. Make sure and add Thank You letters in there somewhere. Click here for our DIY Word Search Thank You file.
  • Print a copy of your word search on regular printer paper.
  • Trace your fold over note on the copy of the word search. This will help you determine the placement of the note on the paper when you need to print the actual note.
  • Tape the fold over note onto a piece of printer paper with your washi tape. Make sure you align it with the lines you traced. Load your tape note into the printer, and print.

thank-you-crossword-puzzle-red-letters-diy-note-washi-tape

  • Remove the tape.
  • Circle the thank you letters with a bright, colored Sharpie.
  • Write your note.

thank-you-crossword-puzzle-red-letters-diy-note

thank-you-crossword-puzzle-red-letters-diy-note


DIY Paper Stars and Fans to Decorate for the 4th of July

july-4th-red-white-blue-kid-family-picnic-astrobrights-paper-hanging-stars-diy

We had a blast at our #Colorize picnic with ASTROBRIGHTS® Papers, and really want you to have some red, white and blue fun under a willow tree, too, so here’s a couple DIY tutorials from the July 4th picnic. They are big impact, little effort, which means you have to do it.

Thanks to our friend and photographer, Meredith Moran Photography, for playing with us, and capturing great moments.

july-4th-red-white-blue-kid-family-picnic-astrobrights-paper-hanging-stars-diy

DIY 3D Paper Stars

Materials Needed:

Directions:

  1. Cut out 4 stars the same size.
  2. Fold each star in half.
  3. Add glue dots or dabs of glue to one folded side on the top, middle and bottom.
  4. Stack another folded star on top, and press to secure.
  5. Repeat step 4 until all stars form one, large 3D star.
  6. Punch a small hole on top of the star.
  7. Push red and white striped twine through the hole and make a hoop, then hang.

july-4th-red-white-blue-kid-family-picnic-astrobrights-paper-hanging-stars-diy

july-4th-red-white-blue-kid-family-picnic-astrobrights-paper-hanging-stars-diy

DIY Paper Fan

Materials Needed:

  • Double-sided tape
  • Hot glue gun
  • Paper
  • Cut out shape of U.S.A

Directions:

paper-fan-tutorial-red-white-blue-diy

  1. Cut out all your paper squares. For the large fan, we used 6, 8×8 inch paper squares. For the smaller ones, we cut 4, 6×6 and 3, 4×4 squares. Fold the paper like a paper fan.
  2. Use double-sided tape to tape the edges of the fans together.
  3. Once all the squares are glued you will have a long stretch of ‘fanned’ or accordion paper.
  4. Glue the first and last piece of the paper together so it forms a circle.
  5. Press the circle down so it creates a fan. Add a large dab of hot glue to the middle of the fan, and press down for several minutes until it dries. Make sure the glue touches all parts of the paper.
  6. Use your Silhouette or print and hand-cut a cut out of the U.S.A. Use your hot glue gun to glue the U.S.A. outline in the middle of the fan.

july-4th-red-white-blue-kid-family-picnic-astrobrights-paper-fans-diy

july-4th-red-white-blue-kid-family-picnic-astrobrights-paper-fans-diy

Instagram media links to follow from this post:
@jsorelle3
@astrobrights
@meredithmoranphoto

4th of July Picnic with Astrobrights Papers

july-4th-red-white-blue-kid-family-picnic-astrobrights-paper-

Growing up with sisters, we shared many experiences together. We shared closets and fought about clothing daily. We shared cars as we made the 45-minute commute back and forth to school. We shared a bed every Christmas Eve before we awoke to presents under the tree. We lived and studied abroad in Florence, Italy. We were teammates on our High School tennis team. We stood next to each other at each other’s weddings.

But, our most recent endeavor is our most favorite. We became moms…together. Our children span from 6-years-old down to 7-months-old, and our children now have the amazing gift of growing up with their cousins.

Now, we text and talk in the wee hours of the morning as we breastfeed our babies. We share photos and videos as our kids take their first steps. We relate to being totally and utterly exhausted, yet blissfully happy when we see our children smile. And, we are overcome with joy when we see our children playing together.

Our children are blessed to spend every holiday together. Watching the fireworks together on July 4th is one of our favorites. So, when presented with an opportunity to plan a 4th of July picnic with ASTROBRIGHTS® Papers, a line of vibrant color paper, we were delighted to bring our families together to celebrate. Armed with a stack of red, white and blue paper, sharp scissors and a really big donut, an Independence Day picnic can be really fun, inexpensive and absolutely adorable.

july-4th-red-white-blue-kid-family-picnic-astrobrights-paper-

Here are some of the details we used to #Colorize our red, white and blue picnic!

INCORPORATE FUN FACTS

We wanted to educate our children, and talk about the history of our fine country. So, we incorporated facts about the U.S.A into our picnic. We used the round labels on top of the mason jars, and to seal our peanut butter and jelly sandwiches.

The round labels with interesting facts are available for FREE. Click here for the free printable.

july-4th-red-white-blue-kid-family-picnic-astrobrights-paper-america-facts

july-4th-red-white-blue-kid-family-picnic-astrobrights-paper-water-labels-fun-facts

july-4th-printable-round-water-labels-usa-fun-facts-star

LEARN ABOUT AMERICAN GEOGRAPHY AND ALL 50 STATES

We learned a little geography 101 prepping for this picnic. We wanted to incorporate the shape of good ‘ole U.S.A and all the states that make up this fine country in our picnic. So, we cut, and cut, and cut some more. You can find the shape of the U.S.A, as well as all 50 states for free online. Our Silhouette electronic cutter came to the rescue when our eyes were blurry at 1 a.m.

Who doesn’t love a gigantic donut?! Cut outs of the 50 states on toothpicks were positioned all over the donut. So, as the kids devoured, we talked about the shape of the states.

july-4th-red-white-blue-kid-family-picnic-astrobrights-paper-big-donut-50-states-toothpicks-diy

4thofJuly-6july-4th-red-white-blue-kid-family-picnic-astrobrights-paper-big-donut-50-states-toothpicks-diy

july-4th-red-white-blue-kid-family-picnic-astrobrights-paper-big-donut-50-states-toothpicks-diy

We made DIY patriotic paper fans, both large and small, with ASTROBRIGHTS® Papers. Click here for the full tutorial. We used the fans to cover the wagon wheels, and decorate the wagon handle. Each fan represented the U.S.A with a cut out of the country in the center.

july-4th-red-white-blue-kid-family-picnic-astrobrights-paper-stars-flag-willow-tree

july-4th-red-white-blue-kid-family-picnic-astrobrights-paper-fans-diy

july-4th-red-white-blue-kid-family-picnic-astrobrights-paper-fans-diy-usa

All the picnic essentials were made of paper, of course. Follow this tutorial to make a DIY paper chip bag {we used 8×8 paper}. We sealed the chip bag with a cut out of the USA. The blueberries were propped up in a paper cone, and each child had their own brown paper bag with their name stamped at the bottom of it. Everyone was happy!

july-4th-red-white-blue-kid-family-picnic-astrobrights-paper-usa-chip-bags-diy

july-4th-red-white-blue-kid-family-picnic-astrobrights-paper-hanging-stars-diy

A paper cut out of the U.S.A served as our sparklers sleeve, and the perfect decorative stakes around our picnic site. We covered match boxes with red, white and blue stars and stripes because you can’t light a sparkler without a flame, and a matchbox on July 4th isn’t a matchbox unless it’s red, white and blue.

4thofJuly-1july-4th-red-white-blue-kid-family-picnic-astrobrights-paper-diy-usa-sparklers

july-4th-red-white-blue-kid-family-picnic-astrobrights-paper-diy-matchbox-sparklers-stars-stripes

PLAN AN ACTIVITY

The most important part of our country’s Independence Day is to remember, honor and thank the men and women that serve our country. Their sacrifice is more than we can imagine, and our children may not know first-hand what it’s like to live in a military family, but they do need to understand that we always need to take the time to thank our military, no matter how big or small our thank you may be. With this free printable from Fleur de Lis, you can print these postcards, draw a photo on the back and mail them to someone in service. Or, they can be dropped off at a military establishment. Click here for the free printable.

july-4th-red-white-blue-kid-family-picnic-astrobrights-paper-diy-matchbox-stars-stripes-military-postcard

july-4th-red-white-blue-kid-family-picnic-astrobrights-paper-diy-military-postcard-stars-stripes

july-4th-red-white-blue-kid-family-picnic-astrobrights-paper-diy-matchbox-sparklers-stars-stripes-military-postcards
CELEBRATE WITH STARS & STRIPES

No 4th of July picnic is complete without our flag’s stars and stripes. We covered a Radio Flyer wagon with the American flag, then accessorized with paper.

We had the perfect setting under a large Willow tree, and our hanging stars made it all the more festive. The stars are easy to make. Learn how to make them here.

july-4th-red-white-blue-kid-family-picnic-astrobrights-paper-hanging-stars-diy

july-4th-red-white-blue-kid-family-picnic-astrobrights-paper-hanging-stars-diy

We created DIY flags for the kids with a large USA on top and flowing strings of red and white paper stripes below. The kids loved to run around with their flag banners.

4th-of-july-usa-diy-flag-banner-red-white-blue-picnic-kids

4th-of-july-usa-diy-flag-banner-red-white-blue-picnic-kids

4th-of-july-usa-diy-flag-banner-red-white-blue-picnic-kids

May the stars and stripes forever fly, and may you have a wonderful, sparkling July 4th!

july-4th-red-white-blue-kid-family-picnic-astrobrights-paper-hanging-stars-diy-sparkler

You can find more inspiration and ideas to COLORIZE your life at COLORIZE.tumblr.com and the following social feeds.

Facebook | PinterestInstagram

Thanks to Meredith Moran Photography for spending the evening with us and our crazy families to capture these photos.