Gluten Free Pancakes {recipe}

gluten-free-pancakes-july-4th-firework-breakfast-blueberry-strawberryThis 4th of July firework pancake breakfast will be enjoyed by those who are GF, and those who are not. We have found some gluten free store-bought pancake mixes to be decent. Some are better than others. This homemade, gluten free pancake recipe is easy to make, and our favorite thus far on our gluten-free venture.

gluten-free-pancakes-july-4th-firework-breakfast-blueberry-strawberry

Gluten Free Pancakes

Ingredients:

  • 2% milk {almond milk can be substituted}
  • 1/4 cup butter {4 tablespoons}
  • 2 eggs
  • 1 cup gluten free quick cooking oats, ground {we use a Magic Bullet to grind it}
  • 1/2 cup Pamela’s gluten free flour
  • 4 teaspoons baking powder
  • pinch of salt
  • 1 tablespoon sugar
  • 1 tablespoon ground flax seeds

Directions:

  1. In a medium bowl, add the dry ingredients, including flour, ground up oats, baking powder, salt, sugar and flax seeds.
  2. In a separate medium bowl, add two eggs and whisk.
  3. Melt the butter in a pan on the stove with the milk until butter melts.
  4. Stir the milk and butter into the eggs and whisk.
  5. Slowly whisk the wet ingredients into the bowl with dry ingredients.
  6. If the mixture is too thick, add more milk to make it a consistency you like.
  7. Pour and flip.
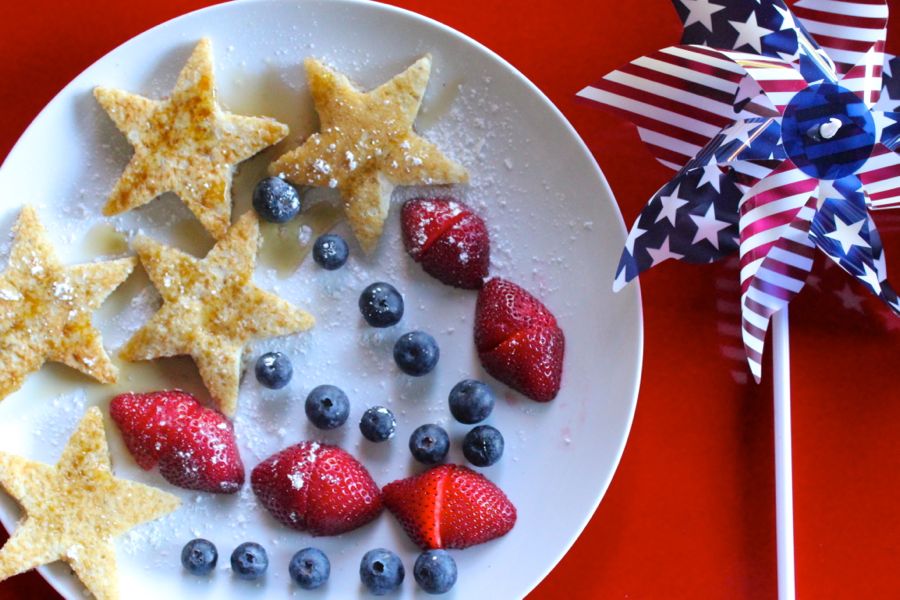
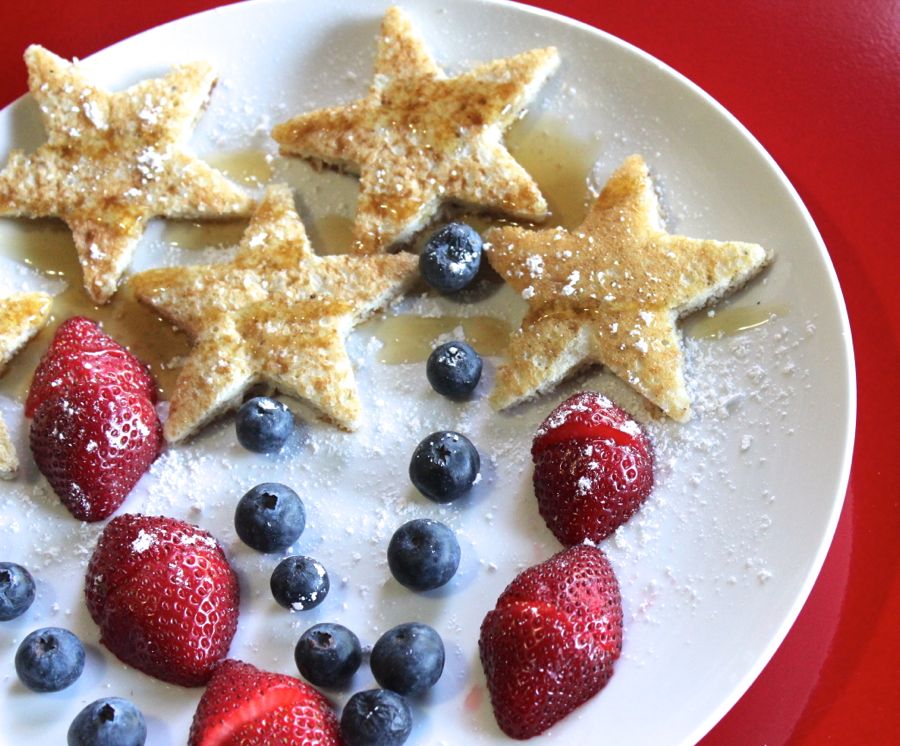
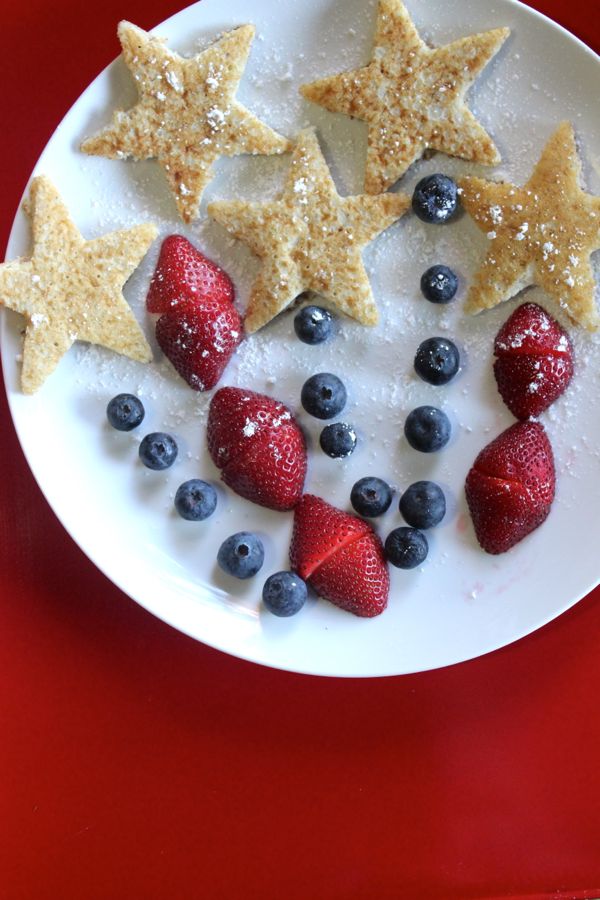
  8. To make the pancakes festive for July 4th, use a star cookie cutter to create star pancakes that can resemble fireworks.
  9. Spread butter on top, decorate your plate with blueberries and strawberries to make the stars look like fireworks, sprinkle powdered sugar on top and then pour maple syrup over the pancakes.

gluten-free-pancakes-july-4th-firework-breakfast-blueberry-strawberry

How to Make a DIY Cinnamon Bear Drink Stirrer

cinnamon-bears-july-4th-diy-drink-stirrer-red-party

Our grandma, also known as Nani to 14 grandkids and Great Nani to 16 great-grandchildren, is one amazing woman. Since we were toddlers, we made monthly trips to grandma and grandpa’s house for sleepovers, homemade biscuits and gravy, hair cuts in Louise’s Beauty Salon {her basement salon}…and artificially-flavored treats.

One thing we could always count on, in addition to all the hugs and kisses, was a full pot of coffee brewing {she loved to spoon-feed us coffee in the mornings}, a bag of Twizzlers in the upstairs cabinet, and a glass jar filled with cinnamon bears in her salon.

To this day, she keeps her treats in the same spot, and everyone makes a beeline straight to the cabinet and glass jar for a sugar fix.

As silly as it may be, we have a special history with cinnamon bears. Even if the memories did not exist, we could not resist the chewy, spicy and sweet goodness of cinnamon bears.

This July 4th, after half the bag makes its way into our bellies, the other half will make its way into our party decor.

First, we made them into place cards. Success!

Now, we transformed them into a DIY edible drink stirrer. We think we can mark this one as a success, too.

cinnamon-bears-july-4th-diy-drink-stirrer-red-party

Materials:

  • Cinnamon bears
  • Red, white or blue card stock
  • Mini red pom poms
  • Toothpicks
  • Drink Stir Sticks
  • Sharpie marker
  • Hot glue gun

Directions: 

  1. Cut out mini flags and punch 2 small holes at the top.
  2. Write a name {for a drink tag}, or fun words on the flag, such as cheers! and yay!
  3. Break a toothpick in half, and then insert the toothpick through the two flag holes.
  4. Cut a mini ‘rolled out cone’ shape from the card stock.
  5. Roll the paper into a cone, and use a hot glue gun to glue the seam together.
  6. Glue a pom-pom on top.
  7. Gently push the hat into the cinnamon bears head until it’s stable.
  8. Push the toothpick with the flag into the hands of the cinnamon bear.
  9. Push the cinnamon bear onto a drink stirrer.

cinnamon-bears-july-4th-diy-drink-stirrer-red-party

cinnamon-bears-july-4th-diy-drink-stirrer-red-party

cinnamon-bears-july-4th-diy-drink-stirrer-red-party


DIY Paper Stars and Fans to Decorate for the 4th of July

july-4th-red-white-blue-kid-family-picnic-astrobrights-paper-hanging-stars-diy

We had a blast at our #Colorize picnic with ASTROBRIGHTS® Papers, and really want you to have some red, white and blue fun under a willow tree, too, so here’s a couple DIY tutorials from the July 4th picnic. They are big impact, little effort, which means you have to do it.

Thanks to our friend and photographer, Meredith Moran Photography, for playing with us, and capturing great moments.

july-4th-red-white-blue-kid-family-picnic-astrobrights-paper-hanging-stars-diy

DIY 3D Paper Stars

Materials Needed:

Directions:

  1. Cut out 4 stars the same size.
  2. Fold each star in half.
  3. Add glue dots or dabs of glue to one folded side on the top, middle and bottom.
  4. Stack another folded star on top, and press to secure.
  5. Repeat step 4 until all stars form one, large 3D star.
  6. Punch a small hole on top of the star.
  7. Push red and white striped twine through the hole and make a hoop, then hang.

july-4th-red-white-blue-kid-family-picnic-astrobrights-paper-hanging-stars-diy

july-4th-red-white-blue-kid-family-picnic-astrobrights-paper-hanging-stars-diy

DIY Paper Fan

Materials Needed:

  • Double-sided tape
  • Hot glue gun
  • Paper
  • Cut out shape of U.S.A

Directions:

paper-fan-tutorial-red-white-blue-diy

  1. Cut out all your paper squares. For the large fan, we used 6, 8×8 inch paper squares. For the smaller ones, we cut 4, 6×6 and 3, 4×4 squares. Fold the paper like a paper fan.
  2. Use double-sided tape to tape the edges of the fans together.
  3. Once all the squares are glued you will have a long stretch of ‘fanned’ or accordion paper.
  4. Glue the first and last piece of the paper together so it forms a circle.
  5. Press the circle down so it creates a fan. Add a large dab of hot glue to the middle of the fan, and press down for several minutes until it dries. Make sure the glue touches all parts of the paper.
  6. Use your Silhouette or print and hand-cut a cut out of the U.S.A. Use your hot glue gun to glue the U.S.A. outline in the middle of the fan.

july-4th-red-white-blue-kid-family-picnic-astrobrights-paper-fans-diy

july-4th-red-white-blue-kid-family-picnic-astrobrights-paper-fans-diy

Instagram media links to follow from this post:
@jsorelle3
@astrobrights
@meredithmoranphoto

4th of July Picnic with Astrobrights Papers

july-4th-red-white-blue-kid-family-picnic-astrobrights-paper-

Growing up with sisters, we shared many experiences together. We shared closets and fought about clothing daily. We shared cars as we made the 45-minute commute back and forth to school. We shared a bed every Christmas Eve before we awoke to presents under the tree. We lived and studied abroad in Florence, Italy. We were teammates on our High School tennis team. We stood next to each other at each other’s weddings.

But, our most recent endeavor is our most favorite. We became moms…together. Our children span from 6-years-old down to 7-months-old, and our children now have the amazing gift of growing up with their cousins.

Now, we text and talk in the wee hours of the morning as we breastfeed our babies. We share photos and videos as our kids take their first steps. We relate to being totally and utterly exhausted, yet blissfully happy when we see our children smile. And, we are overcome with joy when we see our children playing together.

Our children are blessed to spend every holiday together. Watching the fireworks together on July 4th is one of our favorites. So, when presented with an opportunity to plan a 4th of July picnic with ASTROBRIGHTS® Papers, a line of vibrant color paper, we were delighted to bring our families together to celebrate. Armed with a stack of red, white and blue paper, sharp scissors and a really big donut, an Independence Day picnic can be really fun, inexpensive and absolutely adorable.

july-4th-red-white-blue-kid-family-picnic-astrobrights-paper-

Here are some of the details we used to #Colorize our red, white and blue picnic!

INCORPORATE FUN FACTS

We wanted to educate our children, and talk about the history of our fine country. So, we incorporated facts about the U.S.A into our picnic. We used the round labels on top of the mason jars, and to seal our peanut butter and jelly sandwiches.

The round labels with interesting facts are available for FREE. Click here for the free printable.

july-4th-red-white-blue-kid-family-picnic-astrobrights-paper-america-facts

july-4th-red-white-blue-kid-family-picnic-astrobrights-paper-water-labels-fun-facts

july-4th-printable-round-water-labels-usa-fun-facts-star

LEARN ABOUT AMERICAN GEOGRAPHY AND ALL 50 STATES

We learned a little geography 101 prepping for this picnic. We wanted to incorporate the shape of good ‘ole U.S.A and all the states that make up this fine country in our picnic. So, we cut, and cut, and cut some more. You can find the shape of the U.S.A, as well as all 50 states for free online. Our Silhouette electronic cutter came to the rescue when our eyes were blurry at 1 a.m.

Who doesn’t love a gigantic donut?! Cut outs of the 50 states on toothpicks were positioned all over the donut. So, as the kids devoured, we talked about the shape of the states.

july-4th-red-white-blue-kid-family-picnic-astrobrights-paper-big-donut-50-states-toothpicks-diy

4thofJuly-6july-4th-red-white-blue-kid-family-picnic-astrobrights-paper-big-donut-50-states-toothpicks-diy

july-4th-red-white-blue-kid-family-picnic-astrobrights-paper-big-donut-50-states-toothpicks-diy

We made DIY patriotic paper fans, both large and small, with ASTROBRIGHTS® Papers. Click here for the full tutorial. We used the fans to cover the wagon wheels, and decorate the wagon handle. Each fan represented the U.S.A with a cut out of the country in the center.

july-4th-red-white-blue-kid-family-picnic-astrobrights-paper-stars-flag-willow-tree

july-4th-red-white-blue-kid-family-picnic-astrobrights-paper-fans-diy

july-4th-red-white-blue-kid-family-picnic-astrobrights-paper-fans-diy-usa

All the picnic essentials were made of paper, of course. Follow this tutorial to make a DIY paper chip bag {we used 8×8 paper}. We sealed the chip bag with a cut out of the USA. The blueberries were propped up in a paper cone, and each child had their own brown paper bag with their name stamped at the bottom of it. Everyone was happy!

july-4th-red-white-blue-kid-family-picnic-astrobrights-paper-usa-chip-bags-diy

july-4th-red-white-blue-kid-family-picnic-astrobrights-paper-hanging-stars-diy

A paper cut out of the U.S.A served as our sparklers sleeve, and the perfect decorative stakes around our picnic site. We covered match boxes with red, white and blue stars and stripes because you can’t light a sparkler without a flame, and a matchbox on July 4th isn’t a matchbox unless it’s red, white and blue.

4thofJuly-1july-4th-red-white-blue-kid-family-picnic-astrobrights-paper-diy-usa-sparklers

july-4th-red-white-blue-kid-family-picnic-astrobrights-paper-diy-matchbox-sparklers-stars-stripes

PLAN AN ACTIVITY

The most important part of our country’s Independence Day is to remember, honor and thank the men and women that serve our country. Their sacrifice is more than we can imagine, and our children may not know first-hand what it’s like to live in a military family, but they do need to understand that we always need to take the time to thank our military, no matter how big or small our thank you may be. With this free printable from Fleur de Lis, you can print these postcards, draw a photo on the back and mail them to someone in service. Or, they can be dropped off at a military establishment. Click here for the free printable.

july-4th-red-white-blue-kid-family-picnic-astrobrights-paper-diy-matchbox-stars-stripes-military-postcard

july-4th-red-white-blue-kid-family-picnic-astrobrights-paper-diy-military-postcard-stars-stripes

july-4th-red-white-blue-kid-family-picnic-astrobrights-paper-diy-matchbox-sparklers-stars-stripes-military-postcards
CELEBRATE WITH STARS & STRIPES

No 4th of July picnic is complete without our flag’s stars and stripes. We covered a Radio Flyer wagon with the American flag, then accessorized with paper.

We had the perfect setting under a large Willow tree, and our hanging stars made it all the more festive. The stars are easy to make. Learn how to make them here.

july-4th-red-white-blue-kid-family-picnic-astrobrights-paper-hanging-stars-diy

july-4th-red-white-blue-kid-family-picnic-astrobrights-paper-hanging-stars-diy

We created DIY flags for the kids with a large USA on top and flowing strings of red and white paper stripes below. The kids loved to run around with their flag banners.

4th-of-july-usa-diy-flag-banner-red-white-blue-picnic-kids

4th-of-july-usa-diy-flag-banner-red-white-blue-picnic-kids

4th-of-july-usa-diy-flag-banner-red-white-blue-picnic-kids

May the stars and stripes forever fly, and may you have a wonderful, sparkling July 4th!

july-4th-red-white-blue-kid-family-picnic-astrobrights-paper-hanging-stars-diy-sparkler

You can find more inspiration and ideas to COLORIZE your life at COLORIZE.tumblr.com and the following social feeds.

Facebook | PinterestInstagram

Thanks to Meredith Moran Photography for spending the evening with us and our crazy families to capture these photos.

DIY Balloons to Celebrate the 4th of July

july-4th-red-white-blue-balloon-backdrop-stars-stripes-paint-fireworks

Up, up and away! Wouldn’t it be fun if we could travel via balloons just like Carl did in Disney | Pixar’s Up? We’re not saying our fear of heights would totally subside, but the joy, color and adventure that a balloon adventure would bring could be worth all the helium and panic attacks.

Balloons are just all-around happy. Wouldn’t you agree? They make our kids smile. They embody childhood. Plus, they symbolize the word celebrate.

We recently had fun inside creating a simple balloon backdrop for the 4th of July during a rainy day. Kids explored their creativity with paint, and balloons as their canvas. And, we got some good photos for the memory books.

july-4th-red-white-blue-balloon-backdrop-stars-stripes-paint-fireworks

Materials Needed:

  • Acrylic paint {red, white and blue}
  • Paintbrushes and roll brushes
  • Martha Stewart glitter
  • Tape
  • Balloons {helium or non-helium}

Directions:

  • Blow up balloons {of if you purchased helium balloon, pick up from the store}.
  • Paint. We painted our balloons with hand-drawn stars, fireworks and stripes.
  • For the stripes, we used a roll-on pattern brush. And, for the fireworks, we sprinkled glitter on the fireworks while the paint was still wet.
  • Add red and white striped twine to the balloons.
  • Tape to the wall. If your balloons have helium, tape them on the bottom of the wall so they don’t fly away.
  • Snap all the fun photos of your kids pretending to float up, up and away!

july-4th-red-white-blue-balloon-backdrop-stars-stripes-paint-fireworks

july-4th-red-white-blue-balloon-backdrop-stars-stripes-paint-fireworks