How To Make A Giant Pizookie (Chocolate Chip Cookie) At Home

giant pizookie

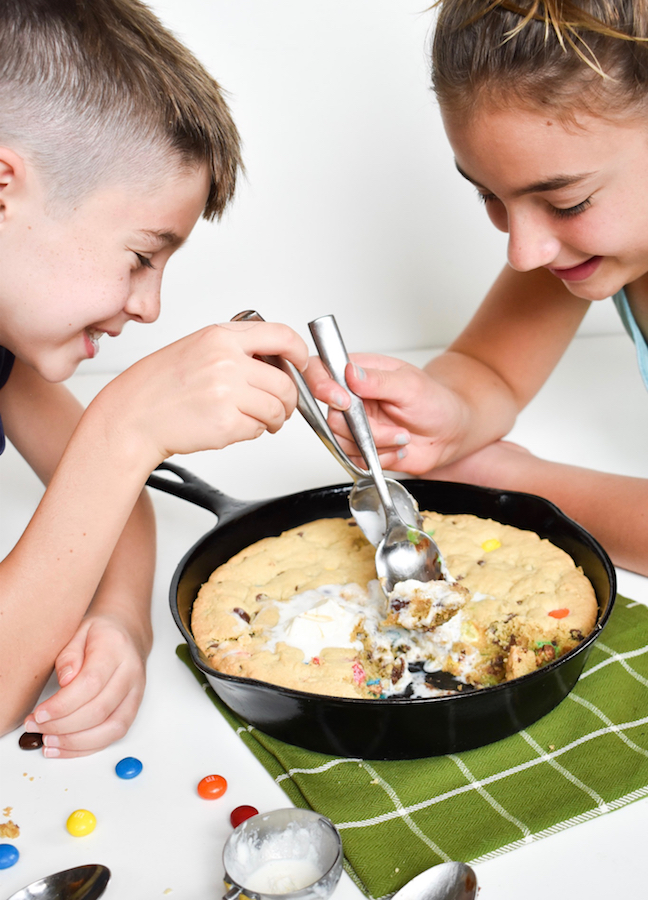
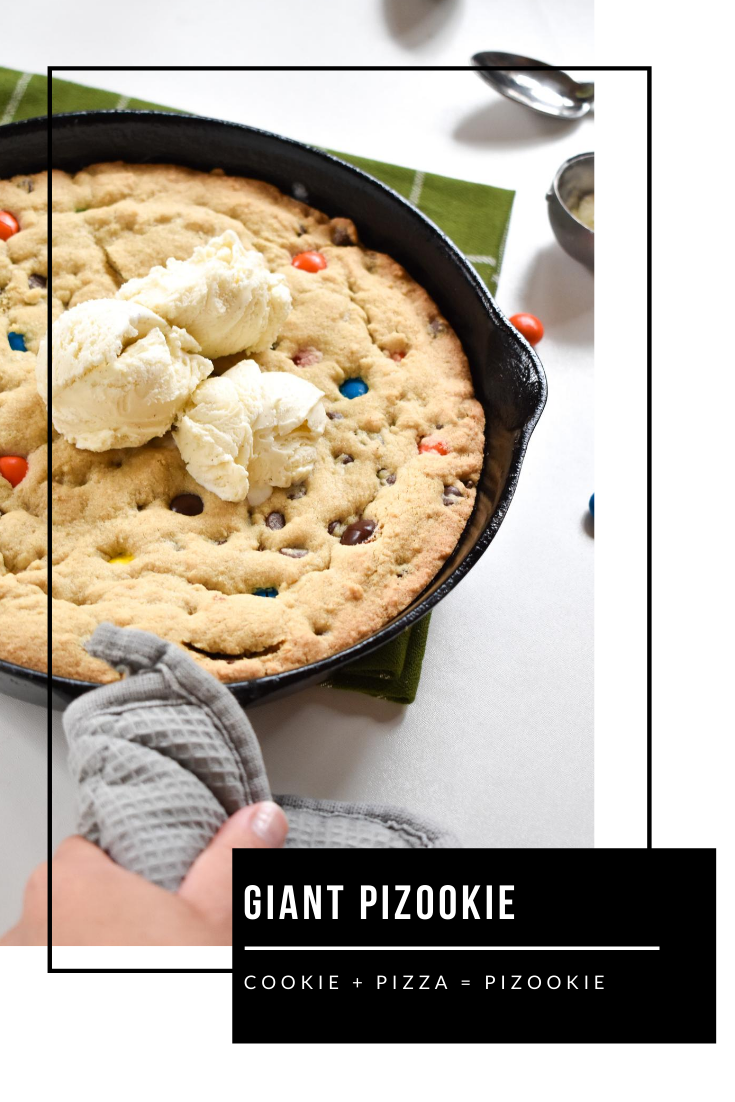
We didn’t know what a Pizookie was until recently, so now it’s a term everyone in the house knows and loves. It’s a combo of two of our favorite things, a pizza + a cookie, which makes a warm, gooey and delicious pizookie!

Read all the sugary details on how you can make this family-style dessert at home at Momtastic.

giant homemade chocolate chip cookie - pizookie


Try This Delicious “Fried” Ice Cream

fried ice cream with sprinkles

OMG, I made “fried” ice cream, and it’s so yummy. Honestly, I didn’t think I would like it because I don’t love cinnamon, and let’s get real, anything that pretends to be fried and isn’t genuinely fried can’t be that good, right? Wrong. I loved it. The crunch of the buttery corn flakes with the fluffy white whipping cream and the cold vanilla ice cream in every bite is dreamy. The good news for us gluten free people is that these ice cream bites can be made gluten-free as well! Yay!

I shared all the details at Momtastic, so look here to get the ice cream party started.

fried vanilla ice cream with sprinkles

fried vanilla ice cream with sprinkles

A Colorful Summer Party with Sunglasses and Ice Cream

summer-vibes-girl-with-sun-sunglasses-colorful-rainbow-of-sunglasses

Summer vibes are strong in our houses right now, and it feels so good! It’s so close we can practically taste and smell all the wonderful things about summer – watermelon, cocktails on the porch, pool days and fun in the sun. The 2016/2017 school year is almost over, so we’re celebrating all the vibrant shades of summer. Nothing is brighter than ASTROBRIGHTS® Papers. Nothing is cooler than a stylish pair of sunglasses. And, nothing is sweeter than ice cream cones. All together they make one heck of a School’s Out For Summer party.

The most amazing thing about this party is that paper is the main component for all the décor. In fact, not just the décor is made of paper, the activities are primarily paper, too. Everything else – the bubbles, chalk, juice, music, candy and ice cream (the real deal, non-paper version) is just an added (but not necessary) bonus, and most can be found around the house.

It’s time to COLORIZE the start of summer, ya’ll. Here’s how to kick it off bright!

DIY Sunglasses Piñata

diy-sunglasses-pinata-black-and-bright-coral-gigantic-sunglasses

Parties are just more fun with a piñata. If we had nothing but a piñata at our kid’s birthday, they would be thrilled and not notice anything else was missing. But, they can be expensive, and if you do things last-minute like us (actually, just Jessica and Jodi procrastinate, not Jenna), it costs too much to overnight ship a piñata. Luckily, we had cardboard, duct tape and ASTROBRIGHTS paper on hand to help me make the coolest piñata around town – a pair of sunglasses.

First, draw the shape of the glasses on cardboard. We used an 8×10 cut out of each lens and drew a larger tracing around it. Once everything is drawn, use an X-acto knife to cut the cardboard glasses shape. You will need a front and back, so once one pair of glasses is done, trace it on another piece of cardboard and cut it to create a second pair. Next, cut 3-inch wide strips of cardboard for the sides. Carefully bend the strips to fit the curves of the glasses.  Use small strips of duct tape (or masking tape) to secure the strip in between both pieces of cardboard glasses. We only had zebra print duct tape in our crafting bin, but we suggest using clear tape, or brown masking tape for this step. Before the entire thing is bordered, leave a small opening large enough to fit your hand in it. Drill (or punch with scissors) two small holes on top of the piñata. Insert the rope into one hole and use your hand to pull it along the inside so it can go up and out the other hole. Also, at this time, stuff the piñata with small toys and candy. Once it’s filled and the rope is attached for hanging, close up the last part of the piñata with a strip of the 3-inch cardboard and duct tape it.

IMG_9856

cardboard-sunglasses-cut-out-with-zebra-duct-tape

Once all the edges are securely taped, begin to cut 1.5-inch to 2 inch wide strips of paper. Use scissors to fringe the strips. Start to glue (Elmer’s Glue works here) each strip on the cardboard glasses. One crucial tip is to begin at the bottom and work your way up.

diy-sunglasses-pinata-black-and-bright-coral-gigantic-sunglasses

Once the entire thing has strips of fringe, cut out two large (8×10 size each) lenses for the glasses. Add glue to the back of them, and add them to the sunglasses frame.

We used Rocket Red™ colored paper, not card stock weight, for fringe around the piñata and Eclipse Black™ for the shades. How cool are those shades? Plus, it was pure entertainment for the kids as they hit it to find the goodies inside.

diy-sunglasses-pinata-black-and-bright-coral-gigantic-sunglasses-boy-hitting-pinata

diy-sunglasses-pinata-black-and-bright-coral-gigantic-sunglasses-girl-hitting-pinata

diy-sunglasses-pinata-black-and-bright-coral-gigantic-sunglasses

DIY Summer Vibes & Rays of Sunshine

summer-vibes-paper-backdrop-colorful-sunnglasses-arched-like-a-rainbow

We don’t know about you, but we can’t get through summer without our most favorite accessory, sunglasses. Thus, those little round (or square, oval, butterfly, oblong or aviator) must-have frames were the source of inspiration for our main backdrop, the rainbow of sunglasses.

The first step is to cut out colorful frames for all the glasses. You can use an electronic cutting machine like Silhouette America Cameo to cut the glasses, or trace and cut one you find online. We used Terrestrial Teal™, Outrageous Orchid™, Sunburst Yellow™, Rocket Red™ and Martian Green™. Add Eclipse Black™ lenses behind each frame. For the rays of sunshine radiating from the sunglasses, cut 3.5 inch strips of paper. Add them to a wall, and you’ve got yourself a pretty rainbow of sunglasses. To save the wall from any paint removal, use 3M Removable Putty. It worked great.

summer-vibes-paper-backdrop-colorful-sunnglasses-arched-like-a-rainbow-kids-playing-and-crafting-on-a-white-picnic-bench

summer-vibes-paper-backdrop-colorful-sunnglasses-arched-like-a-rainbow-kids-playing-and-crafting-on-a-white-picnic-bench

summer-vibes-paper-backdrop-colorful-sunnglasses-arched-like-a-rainbow-kids-playing-and-crafting-on-a-white-picnic-bench-and-blowing-bubbles

girl-wearing-black-paper-sunglasses

colorful-summer-vibes-paper-wall-decor-and-a-giant-pair-of-green-paper-sunglasses

summer-fun-bubbles-chalk-glasses-for-kids

DIY Mini Ice Cream Parlor

ice-cream-as-tall-as-me-diy-paper-ice-cream-awning

Ice cream on a hot summer day is just pure joy. Our goal was to re-create that feeling of an ice cream parlor and happiness on a summer day with an ice cream activity for the kids. We all know how quickly our children grow. We mark their height at the beginning of the school year, or when they are young, but we don’t do it at the beginning and end of the summer. We’ve never marked their height with ice cream before. Why not start now? It was a huge success – like creamy, vanilla ice cream combined with gooey, chocolaty brownies, drizzled with caramel and topped with a cherry success. Yes, it was that good, and fun!

To make the DIY paper ice cream awning, use scissors to round one side of the paper. Line them up along the wall, and use 3M Putty to hang them along the top, straight-edge part. For the awning, we used Pulsar Pink™ and Celestial Blue® colored paper.

ice-cream-as-tall-as-me-diy-paper-ice-cream-awning

Trace and cut letters for the phrase, “Ice Cream As Tall As Me,” and add it to the wall under the awning. If you have a Silhouette electronic cutting machine, that will save you time, but it’s not a deal breaker for this project. Next, cut out triangles in the shape of ice cream cones. Tape the cones to the bottom of the wall. Cut out ice cream scoops 6 inches tall, which will help you give a “more accurate” estimate of each child’s height. Next, cut out sprinkles and cherries, so the kids can decorate their ice cream scoops with sprinkles, and finish their tall ice cream with a cherry on top. This was our kid’s favorite part.

paper-ice-cream-scoops-and-colorful-paper-sunglasses

paper-ice-cream-scoops-and-colorful-paper-sunglasses

paper-ice-cream-scoops-and-colorful-paper-sunglasses

paper-ice-cream-scoops-and-colorful-paper-sunglasses

One by one the kids ran over to their cone and stacked their ice cream. If only they could actually order an ice cream this tall. One can dream, right?

kids-taping-ice-cream-scoops-on-a-wall

boy-standing-in-front-of-paper-ice-cream-awning-and-ice-cream-scoops-as-tall-as-him

ice-cream-as-tall-as-me-stacked-colorful-ice-cream

baby-boy-standing-next-to-ice-cream-scoops-and-holding-bubbles

We enjoyed real ice cream shortly after the breaking of the piñata, and it was oh so yummy. The countdown is on – 17 more days of school, and then school’s out for summer! You can bet we will have our shades on!

baby-boy-with-sunglasses-on-his-back-and-a-newsboy-hat

This post is in partnership with ASTROBRIGHTS. We were crafting with and coloring on ASTROBRIGHTS paper long before this post. It’s always been a fave product of ours. Thank you for supporting the brands that support j. sorelle. ASTROBRIGHTS was one of the first, so we are very grateful.

Affiliate Disclosure: This post contains affiliate links, which means j. sorelle receives a small commission from the sale of certain items; however, the price is the same for you, whether it’s an affiliate link or not. 

Valentine’s Day Party for Kids

bananas-for-you-yellow-valentines-day-party-kid-birthday-hearts

This Valentine’s Day party is simple, and a bright dose of yellow sunshine in the middle of a snowy, cold winter. It’s just what we needed, and it’s just what our kids needed to celebrate love this Valentine’s Day. Love comes in all shapes and forms, and we try to teach and show them what love means everyday. Love for themselves and love for others.

As you know, it’s wonderful when the sibling bickering subsides and they can hug, kiss and play with one another. We captured it on camera, so next time they are fighting, we can remind them how much they love each other.

Banana’s For You stemmed from a recent find similar to those Silly Bandz we were obsessed with in 2010. The tiny banana bracelets are going to be our kids Valentine’s this year, but we wanted to have a little extra fun at home, too. It was an everything banana party, including the color yellow, banana ice cream, banana cut-out details, and banana bracelets.

bananas-for-you-yellow-valentines-day-party-kid-birthday-silly-bandz

Materials:

Directions:

  • Cut out the letters for Banana’s For You. We used our amazing Silhouette to cut out the letters, bananas, hearts and arrows.

bananas-for-you-yellow-valentines-day-party-kid-birthday-hearts This Valentine's Day party is simple, and a bright dose of yellow sunshine in the middle of a snowy, cold winter. It's just what we needed, and it's just what our kids needed to celebrate love this Valentine's Day. Love comes in all shapes and forms, and we try to teach them what love means everyday. Love for themselves and love for others. It's wonderful when the sibling bickering subsides and they can hug, kiss and play with one another.  We captured it on camera, so next time they are fighting, we can remind them how much they love each other.  Banana's For You stemmed from a recent find similar to those Silly Bandz we were obsessed with. The tiny banana bracelets are going to be our kids Valentine's this year, but we wanted to have a little extra fun at home, too. It was everything banana, including the color yellow, banana ice cream, banana cut-out details, and banana bracelets.  bananas-for-you-yellow-valentines-day-party-kid-birthday-silly-bandz  Materials:  Astrobrights Paper, yellow and pink yellow washi tape banana bracelets X-acto knife Double-sided tape bowls or ice cream pint containers Directions:  Cut out the letters for Banana's For You. We used our amazing Silhouette Electronic cutting tool to cut out the letters, bananas, hearts and arrows. bananas-for-you-yellow-valentines-day-party-kid-birthday-hearts  Find a wall and use washi tape to hang the letter and bananas. bananas-for-you-yellow-valentines-day-party-kid-birthday-hearts-cupids-arrow     bananas-for-you-kid-party-valentines-day-diy-yellow-banana-pink-hearts  For the placemats, trace a banana on yellow paper with a black sharpie. Fill in the ends and lines in the middle with black marker. Use an X-acto knife to cut the side of the top-half of the banana and the line down the middle, half-way down. This will be the 'peel' effect. Place double-sided tape on all 4 corners and tape to a sheet of pink paper. Draw the name of the child on the pink paper under the banana peel, and add the words PEEL ME on top of the banana peel. banana-peel-me-placemat-kid-party  banana-peel-me-placemat-kid-party  banana-peel-me-placemat-kid-party-ice-cream-pint  banana-peel-me-placemat-kid-party  Glue or tape the small size bananas and mini hearts on the lid of the pint container. banana-peel-me-placemat-kid-party-silly-bandz-banana-ice-cream-pint  Make banana ice cream. Follow this recipe. It's amazing - frozen banana's blended in a food processor literally makes ice cream. Fill a bowl with toppings so the kids can their chocolate fix. banana-chocolate-ice-cream-party-yellow-bananas-for-you  Serve and par-tay. ice-cream-valentines-party-bananas-for-you-yellow-hearts  ice-cream-valentines-party-bananas-for-you-yellow-hearts  ice-cream-valentines-party-bananas-for-you-yellow-hearts  ice-cream-valentines-party-bananas-for-you-yellow-heartsice-cream-valentines-party-bananas-for-you-yellow-hearts

  • Find a wall and use washi tape to hang the letter and bananas.

bananas-for-you-yellow-valentines-day-party-kid-birthday-hearts-cupids-arrow


bananas-for-you-kid-party-valentines-day-diy-yellow-banana-pink-hearts

  • For the placemats, trace a banana on yellow paper with a black sharpie. Fill in the ends and lines in the middle with black marker. Use an X-acto knife to cut the side of the top-half of the banana and the line down the middle, half-way down. This will be the ‘peel’ effect. Place double-sided tape on all 4 corners and tape to a sheet of pink paper. Draw the name of the child on the pink paper under the banana peel, and add the words PEEL ME on top of the banana peel.

banana-peel-me-placemat-kid-party

banana-peel-me-placemat-kid-party

banana-peel-me-placemat-kid-party-ice-cream-pint

banana-peel-me-placemat-kid-party

  • Glue or tape the small bananas and mini hearts on the lid of the pint container.

banana-peel-me-placemat-kid-party-silly-bandz-banana-ice-cream-pint

  • Make banana ice cream. Follow this recipe. It’s amazing – frozen banana’s blended in a food processor literally makes ice cream.
  • Fill a bowl with yummy toppings so the kids can their chocolate fix.

banana-chocolate-ice-cream-party-yellow-bananas-for-you

  • Serve and par-tay.

ice-cream-valentines-party-bananas-for-you-yellow-hearts

ice-cream-valentines-party-bananas-for-you-yellow-hearts

ice-cream-valentines-party-bananas-for-you-yellow-hearts

ice-cream-valentines-party-bananas-for-you-yellow-hearts

If you loved this, you’re going to love these IG feeds:
@astrobrights
@silhouetteamerica
@jsorelle3
@mustardgifts


Look…It’s Ice Cream Shaped Like an Avocado for Dessert!

avocado-ice-cream-balloon-dessert-diy-mexican-pistacio-chocolate-bowl

Avocado + ice cream.

It’s not an everyday pairing. At first thought, it sounds creamy, slightly odd and interesting.

Well, after experimenting a bit in the kitchen, we can tell you that the combination of an avocado + ice cream dessert is delicious.

We wish we could take total credit for this idea. However, if there are any Triple D {Diners, Drive-Ins and Dives} fans out there like Jessica’s hubby, you may have seen an episode where a Mexican restaurant made an exact replica of an avocado for dessert; except instead of an avocado, it was homemade avocado ice cream in a chocolate shell, and a homemade caramel and chocolate ball inside. Yum!

We would have attempted actual avocado ice cream, but we went with something easier to make {just buy and scoop}, and sweeter {not as healthy}. Plus, the gelato had the word Sicilian in it, and being of Sicilian heritage, it was a no-brainer.

At your next party, surprise guests with an avocado dessert…or at least Avocado shaped ice cream for dessert. It will be a hit!

avocado-ice-cream-balloon-dessert-diy-mexican-pistacio-chocolate-bowl

You’ll Need:

Directions:

Make the Chocolate Avocado Shell

  • Step 1: Melt the chocolate wafers. We melted it via microwave in 30-second intervals until it was melted. Stir until smooth.
  • Step 2: Blow up a balloon about the size of an avocado.

avocado-ice-cream-balloon-dessert-diy-mexican-pistacio-chocolate-bowl

  • Step 3: Prepare a baking sheet with wax paper or parchment paper.
  • Step 4: Make sure the chocolate is slightly cool.
  • Step 5: Gently dip the balloon in the chocolate, coating the bottom half of the balloon.

avocado-ice-cream-balloon-dessert-diy-mexican-pistacio-chocolate-bowl

  • Step 6: Place on the baking sheet. Repeat for as many bowls as you want to make. Place the baking sheet in the refrigerator for about 10 minutes.

avocado-ice-cream-balloon-dessert-diy-mexican-pistacio-chocolate-bowl

  • Step 7: To release the air from the balloon, pinch the balloon and use a tack or knife to puncture a small hole.

avocado-ice-cream-balloon-dessert-diy-mexican-pistacio-chocolate-bowl

  • Step 8: Release the air gradually. If the air is released too fast, the bowl will be more likely to break.
  • Step 9: Carefully peel the deflated balloons from the bowl, trying not to press down or squeezing the bowl.

avocado-ice-cream-balloon-dessert-diy-mexican-pistacio-chocolate-bowl

avocado-ice-cream-balloon-dessert-diy-mexican-pistacio-chocolate-bowl

Add Ice Cream to the Shell

  • Step 1: Remove the ice cream from the freezer, and let it thaw slightly so it’s easier to mold without breaking the shell.
  • Step 2: Gently add spoonful’s of ice cream into the chocolate ‘avocado shell’ until it’s full.
  • Step 3: Press a Lindt chocolate truffle into the ice cream so it looks just like the nut inside an avocado.

avocado-ice-cream-balloon-dessert-diy-mexican-pistacio-chocolate-bowl

  • Step 4: Place the sweet DIY ice cream avocados into the freezer until you are ready to serve.

avocado-ice-cream-balloon-dessert-diy-mexican-pistacio-chocolate-bowl

avocado-ice-cream-balloon-dessert-diy-mexican-pistacio-chocolate-bowl