DIY Jenga Game on Thanksgiving

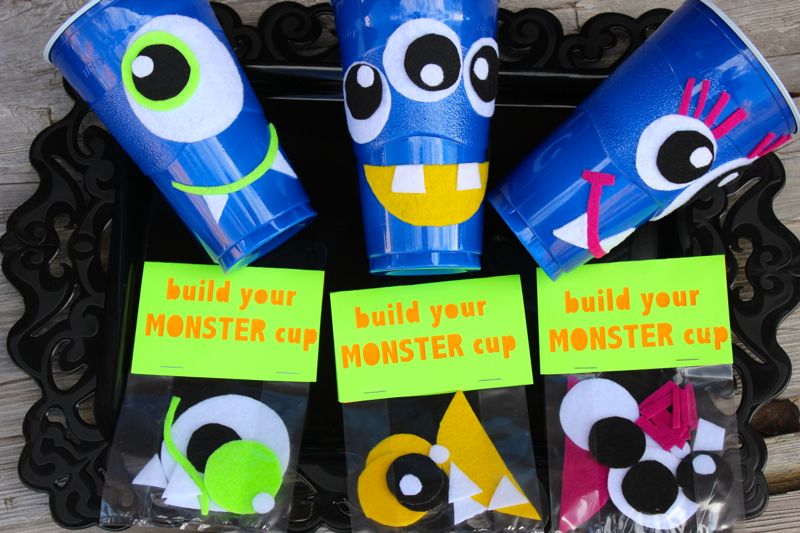
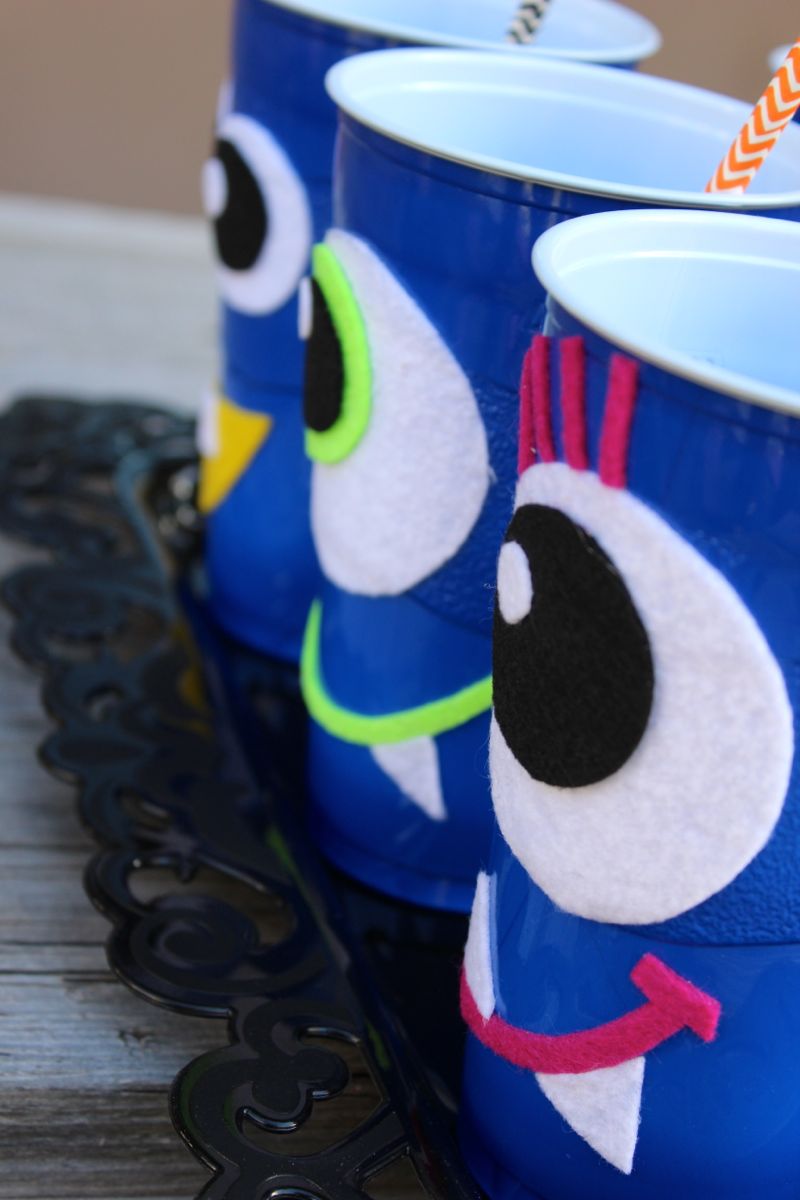
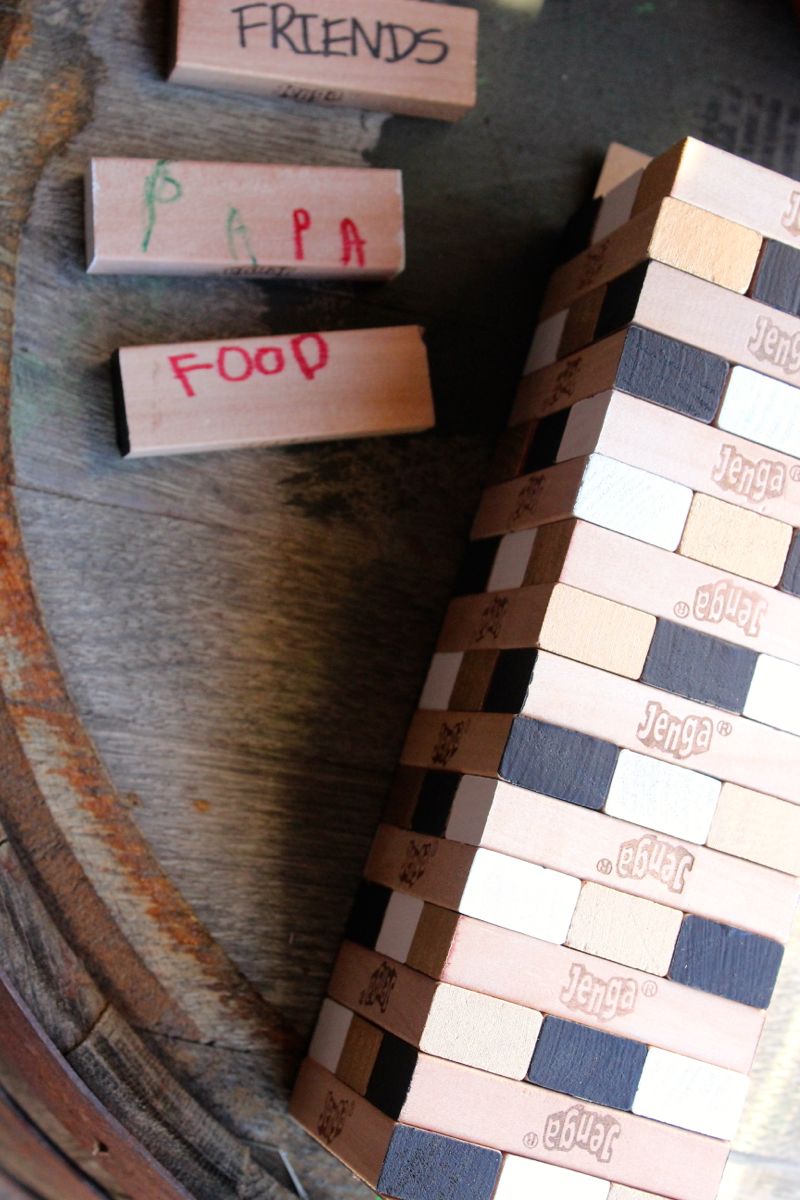
Get your game face ready {with a grateful heart, of course} for a fun game we call DIY Jenga Game of Gratitude. It’s a game the whole family can play together on Thanksgiving. Visit Momtastic to see how we added our own special, Thanksgiving-twist to the classic game.

The memories you will create with your family while ‘prepping’ the game, and listening to what your kids have to say, is reason enough to do it.

jenga game of gratitude

{images via j. sorelle}

Winter Open House Tips

the entertaining shoppe_winter open house

Winter has officially arrived in Colorado with chilly temps and snow. So, the fire is blazing, we’re sipping hot chocolate and the holiday season is finally on our minds {and less than 7 weeks away}. Whether you like it or not, the holiday season is here, and it’s time to start thinking about holiday parties, sparkly accessories, holiday shopping and holly music.

The Winter Open House we’re sharing with you today really lifts our holiday spirits and will give you great inspiration for your own beautiful, holiday party. The fabulous team at The Entertaining Shoppe {remember Kerri Cole and her amazing DIY book page wall} set up a classic open house that would make for a heart-warming family reunion or neighborhood gathering…and the good news is, once you set up the decorations for the party, you can leave the classic decorations up for the entire winter.

As Hayley from The Entertaining Shoppe said, ” The combination of Basics and hand-crafted party products make this an event to remember (and host) again and again.”

 We love the creative way they incorporated pinecones throughout the decor and details {after all, pinecones hold a meaning of rebirth}, created a contemporary cocoa bar and signature cocktail bar and infused pops of red and white color in every room.

Some of our faves from the party that you can purchase include the Red Ribbon & Pinecone Swags {window ornaments}, Red Ribbon & Pinecone Garland  and the Winter House Party Go To Kit.

Cheers to the upcoming holidays…and Pomegranate Champagne Punch. Yum.

the enteraining shoppe_winter open house

the entertaining shoppe_winter open house

the entertaining shoppe_winter open house

the entertaining shoppe_winter open house

the entertaining shoppe_winter open house

the entertaining shoppe_winter open house

the entertaining shoppe_winter open house

the entertaining shoppe_winter open house

the entertaining shoppe_winter open house

the entertaining shoppe_winter open house

the entertaining shoppe_winter open house

the entertaining shoppe_winter open house

the entertaining shoppe_winter open house

the entertaining shoppe_winter open house

the entertaining shoppe_winter open house

The Entertaining Shoppe is a Denver-based company that makes party planning easier for everyone. It’s a one-stop-shoppe for the host/hostess looking to gather inspiration for party decor, menu tips and games, as well as purchase party basics such as glassware, napkins and straws and all the handmade and unique essentials for a special party. Some of our favorite parties their site features include a winter skate party, children’s birthdays, and baby and bridal showers.

{images via The Entertaining Shoppe}

How to Make a DIY Batman Bat Signal

We are proud to say that we are members of Wayfair Homemakers! We became big fans of Wayfair after we learned about the large online destination for a zillion things home at Alt. Wayfair has a beautiful and gigantic selection of furniture, home decor and goods for every shape and style home, and there’s fabulous ideas, projects and inspiration by Wayfair Homemakers you will find there too.

Just in time for Halloween, yours truly makes an appearance on Wayfair Homemakers to share how you can create and call for Batman to rescue you this Halloween with your own DIY Bat Signal.

Our signal is up…fingers crossed Christian Bale stops by.

DIY bat signal

You can find more amazing Halloween ideas on the Wayfair Housewarming Party Linkup that Mary Beth of Cupcakes & Crinoline is hosting. Our DIY Monster Cups are featured, and we couldn’t be more thrilled, so make sure to stop by.

{image via j. sorelle}

DIY Witches Brew Halloween Gift and Favor

witches brew_jsorelle

We have exciting news…Jessica is a contributor to Momtastic. So, if you haven’t visited Momtastic already, make it a point to stop by. Whether you’re in the mood for Hollywood’s latest entertainment news, snack and dinner ideas, family and relationship advice, decor and entertaining tips, DIY ideas or the latest fashion trends, you will find Momtastic to be an amazing resource.

Yesterday, Jessica shared a fabulous, brewtastic Halloween favor idea and FREE PRINTABLE {by Jenna at Fleur de Lis} with an adorable poem, so don’t wait any longer and click here.

{image via j. sorelle}

DIY Halloween Monster Cups with Solo Cups

diy monster halloween cups_jsorelle

Sully and Mike Wazowski made their way into our homes as our kids watched Monsters Inc., but these DIY Monsters Cups will make their way into our kids hands and hearts this Halloween with this easy, DIY tutorial. Our kiddos loved it!

You and your kiddos can make 1-eyed, 2-eyed and 3-eyed monster cups this Halloween with minimal supplies and lots of creativity. This would also make for a fun ‘favor’ to bring to school, or a creative activity for the kiddos at a Halloween party. Each cup comes pre-packaged for each child with pre-cut eyes, mouths, teeth, etc in a cellophane bag attached to a blue Solo cup.

monster cups before and after_WITHTEXT

You’ll Need

  • Blue Solo Cups
  • Colorful Craft Felt Stickers
  • Scissors
  • Cellophane Bags
  • Clothes pin
  • Colorful cardstock

Here’s How

  • Use everyday household items to trace different size circles onto the Felt. We used a mason jar lid, a paint lid and a spice bottle for our circles. As for the lips, mouths, teeth, etc, we did it free-hand.
  • Cut the shapes from the felt.
  • Place shapes inside cellophane bags, and make sure each bag has monster ‘parts,’ including eyes, teeth, mouth, etc
  • For the labels, we used our amazing Silhouette Electronic Cutting Tool to cut out the letters. If you don’t have a Silhouette, you can print labels by hand or use stamps on the cardstock. Fold the cardstock and use a stapler to attach your labels to the cellophane bags.
  • Attach to the cup with a clothes pin.
  • For assembly of the cups, just peel the sticker paper off the back of the felt, and stick to the cup where your little monster heart desires. For the eyes, where there are layers of felt, we needed a tiny bit of hot glue to adhere.

DIY halloween monster cups_jsorelle

DIY halloween monster cups


DIY halloween monster cups

DIY halloween monster cups