Halloween Decor: DIY Googly Eye Wax Candles

DIY eyeball candles

We’ve got major heart eyes for these DIY eyeball candles. It’s subtle, but an amazing DIY candle upgrade for Halloween. The candle is store-bought, but the DIY eyeballs take less then 30 minutes to add, and the supplies needed are minimal. These are not traditional plastic eyeballs, because that would be a fire hazard…instead, these googly eyes are made from wax.

Once Halloween is over, you can store the candles as-is, or scrape off the eyes, and you have your standard black candles back!

DIY Eyeball Candles for Halloween 

Materials:

  • Soy candle wax, white
  • Crayon, black
  • Black taper candles
  • Heat-safe glass with spout (glass measuring cup works great)
  • Pot with about 2 cups water on the stove
  • Bamboo skewer, 2 for each color wax

Directions:

Step 1: Pour about 2 tablespoons candle wax flakes in the glass measuring cup. Set the cup in a pot with water on the stove. Set heat to high and watch it melt. You will not even use it all the wax for these DIY eyeballs, but you can add more if needed. We didn’t use a white crayon with this project because we couldn’t find one. We have 5 of every other crayon, but not white. You can try to use a crayon instead of the soy wax. The black crayon we used for the eyeball was easy to melt and use; however it was somewhat fickle attaching to the white eyeball. By fickle, we mean, the wax had to be very hot and sometimes it would take a second try to stick to the white eyeball (so not THAT fickle). So, we are not sure if this was due to the fact that they are two different kinds of wax, or if the crayons are slightly different to work with.

halloween candles

Step 2: Use the end of the bamboo skewer (the round, flat end, NOT the pointy end) to dab into the hot white wax, and then dab onto the candlestick. You can let the wax cool a bit, so it hardens faster on the candle. As you know a candlestick is round, so if you tilt, the eyeball will be a little deformed. We dabbed a couple drops of wax along one “side” of the candle, and once they turned white and hardened, we would rotate the candle and dab along another edge. The wax takes about 30 seconds to harden, so this is not too time consuming.

diy googly eye halloween candles-halloween crafts

diy googly eye halloween candles-halloween crafts

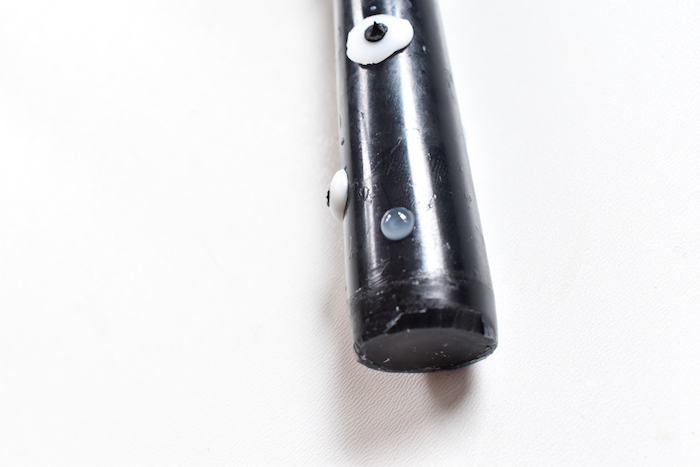
Step 3: Once you have all the white eyeballs, now it’s time to melt the black crayon. It’s easier to melt the black crayon if you use a knife to cut it into little shavings. When it’s melted, time to dip the skewer (you can try either end of the skewer, depending on the size of the white eye) and dab gently on each eye. If the black doesn’t attach right away, like we mentioned above, dip it into the melted crayon wax again (make sure it’s hot) and try again. It should work, even if it takes a try or two.

diy googly eye halloween candles-halloween crafts

diy googly eye halloween candles-halloween crafts


Step 4: Step them in a safe taper candle holder, and watch them glow as Halloween nears. As always, with any kind of candle or candle-related project, please be careful. Don’t ever leave candles unattended, or within close reach of children. Keep flammables away from open flames. Be smart.

diy googly eye halloween candles-halloween crafts

diy googly eye halloween candles-halloween crafts

diy googly eye halloween candles-halloween crafts

Note: This post contains affiliate links. We may make a small commission if you purchase any of the items, at NO extra cost to you. Thanks for supporting our family blog. 


Make Blow Paint Art With A Straw With Kids

DIY blow art with a straw-googly eye monsters art for kids

Well, we love straws in our drinks, but we never knew we would like them so much for art. We recently blew our way to colorful art with paint and, yes, a straw. Our kids loved this project. It’s fun year-round; on sunny days, and on cold days too, when the kids need to get creative, and off the screens. Since Halloween is around the corner, we made the colorful blown art into cute, adorable monsters. Get those straws out, and those lungs ready to blow.

Blow Art With A Straw

Materials:

  • Watercolor paper
  • Crayola washable paint (watered down with drops of water)
  • Straws (we used paper, but plastic would work, too)
  • Dropper
  • Sharpie
  • Googly Eyes

Directions:

Step 1: Get a paint tray, or tiny cups. Pour about 1/2 tablespoon paint into a cup, along with 1/2 tsp – 1 tsp water. If it’s too watery, the paint will run off the pages too quickly. If it’s too thick, it will not move much at all. Try to find the right consistency that makes drops when placed on paper, and moves well with some wind.

DIY blow art with a straw-googly eye monsters art for kids

Step 2: Use the dropper to drop “blobs” or dots of paint onto the paper. You can place them wherever you want – some close, some far, some big, some little, etc.

DIY blow art with a straw-googly eye monsters art for kids

Step 3: Now, it’s time to blow. Use the straw to create one-of-a-kind art. As you will discover, the art changes with the direction of the straw and wind. If you blow from the top, it’s a different effect if you blow from the side. We made tiny dots of color, big blended works of art, and medium sized ones, too! It was a lot of fun.

DIY blow art with a straw-googly eye monsters art for kids

DIY blow art with a straw-googly eye monsters art for kids


Step 4: Add googly eyes, and use a Sharpie to draw arms, legs and any monster-like accessory or body part you want. How cute are they?

DIY blow art with a straw-googly eye monsters art for kids

DIY blow art with a straw-googly eye monsters art for kids


DIY blow art with a straw-googly eye monsters art for kids

DIY blow art with a straw-googly eye monsters art for kids


A Corona-Era Back To School Supply Item: DIY Mask Lanyards For Kids (Adults Can Use, Too)

diy no-sew mask lanyard for kids

The kids started school this week. It’s so bittersweet. Summer is the best, and we hate to see it near it’s end. Plus, we love hanging out with our kids. But, we’re happy they get to see classmates again, get into a routine again (that went out the window in March, thanks COVID) and learn, learn, learn. We know it’s been a challenging time for everyone. Some people are choosing to homeschool, some are heading back into the classroom, and others are doing distance learning at home. We hope your navigating this new “norm” the best you can. We are rooting for you, and sending good (and patient) vibes to everyone.

We know the mask topic brings out everyone’s STRONG opinions. We should be able to listen to others opinions, and not hate one another for them. So, here it goes. We don’t think the kids should have to wear masks all day at school. It makes us incredibly sad and mad they have to try to connect to others (and learn) when their precious faces are covered up all day. We also believe masks should be a personal decision for individuals and businesses, not a government mandate. So, it was really hard for us to accept the fact that if we wanted our kids back in school, it meant they had to wear masks all day. We’ve done all we can to keep the kids outside all summer, where they don’t have to wear them. Now, it’s a huge reality check for us. Since masks are a giant pain in the ass, and the kids are likely to lose them, we made some last minute accessories to keep the masks around their neck and not on the floor, on their desk, on someone else’s mouth, or who knows where. They are so easy with absolutely no sewing skills or tools required (and a huge life-saver), so we just had to share!

We can’t take credit for the shoelace idea. Our family friends (shout out to Karen and Bill) came up with this simple, genius idea. They took it one step further, and added a bead in the middle of the shoelace (back of the head), so it fit like a glove around the head, and you don’t even have to use the mask ear straps. We didn’t make it that far yet, but it’s on our list of things to do.

diy mask lanyards for kids

DIY No-Sew Mask Lanyard with Shoelaces

diy mask lanyard with shoelaces for kids

Materials:

  • Shoe lace, flat (make sure the width of the lace is large enough for the snap closures. We found ours at Walmart, and also used the waist tie from an old pair of shorts.
  • Dritz Snap Fastener Kit
  • Hammer
  • Masks – we bought some from Target (Cat & Jack brand) and also supported a local company we love, Aksels

Directions:

Step 1: Cut the ends off the laces. My laces were long enough, that I cut the entire lace in half for two mask straps. The length you want is a personal preference, but mine were about 17 inches.

Step 2: Carefully burn the ends of the laces so they don’t fringe.

Step 3: Add the fasteners on each end, and hammer in place. You will create two little loop on each side of the lace that snaps, and you will put the mask straps inside each loop.  These can be easily removed when you need to wash the mask, and it’s comfortable on your neck.

diy mask lanyard with shoelaces for kids

diy mask lanyard with shoelaces for kids

diy denver broncos mask lanyard for kids

If you have a child that likes to craft, or wants a really colorful DIY mask lanyard, he or she might want to try the following method, a DIY Loom Mask Lanyard.

diy mask lanyard for kids

DIY Loom Band Mask Lanyard

Materials:

Directions:

The one and only step: Make a standard loom bracelet, except longer, about 17 inches. Then, add the key ring clasp on each end, and then attach to the ear straps for the mask. Voila. So easy to put on and take off.

diy loom band mask bracelet for kids

DIY loom band mask lanyard for kids

diy mask lanyard for kids


SHOP THIS POST:


This post contains affiliate links, which mean we may receive a small commission from your purchase; however, it is at NO additional cost to you. Thanks for supporting our blog. It means the world to us. 

Stock Up On Pool Noodles Now To Make These DIY Giant Flowers

DIY giant pool noodle flower

We know school is in limbo, and our world has been rocked with the arrival and contagion of COVID-19. Spring plays were cancelled, graduations were virtual, and birthday parties became drive-by, honking car parades. Although you may not have a large school play or birthday party in the very near future, it will happen again. In fact, small, safer gatherings are happening now. When the time is right (even if it’s next spring) we have the cutest decoration, DIY giant flowers, that costs less than $5 each. We are sharing this spring and summer DIY craft now, so you remember to stock up while they are “in season,” (and store the ones you have) to make these large DIY flowers. It’s easy to do, and adds a dose of sunshine to any space, or party.

Sorry about the ‘non-professional’ photos. This was a quick project in spring 2019, and didn’t think it would be such a hit, so cell phone photos have to do.

DIY Giant Flowers Made With Pool Noodles

Materials:

  • Giant tissue paper flowers
  • Pool noodles, green
  • Industrial buckets, Walmart (they were about $2.97)
  • Cardboard
  • X-acto knife
  • Acrylic paint, green
  • Rock
  • Card stock, green
  • Wood skewer, thin
  • Glue, glue stick works fine
  • Packaging tape

walmart buckets

walmart pool noodles

Step 1: Buy stems, or the pool noodles, from Walmart. Also at Walmart, find the colors buckets that will serve as the “pots” or “planter” for the flowers.

cardboard cut out and pool noodle stem

Step 2: Cut left over cardboard packages from all those Amazon packages you’ve been buying. Trace the opening of the bucket on the cardboard, and cut it slightly inside the pencil outline. I find that an X-acto knife works better than scissors when working with cardboard. Also, trace the outline of the noodle in the center of the cardboard circle. This will be where the stems fits inside, so cut it slightly inside the pencil outline as well, so the pool noodle fits nice and snug.

green cardboard cut out

Step 3: Paint the cardboard with acrylic green paint.

diy pool noodle flower

Step 4: Add heavy rocks to the bottom of the buckets. We know it’s just a pool noodle and a tissue flower, but it’s somewhat heavy, so you will need something to stabilize them so they are not top-heavy.

diy pool noodle flowers


giant DIY flower

Step 5: Cut leaves from green paper (we love Astrobrights Paper), and glue two stems with a large thin wood skewer in the middle. This will look like a “leaf vein”, and also makes it easy to just stick inside the noodle so it will stay in place.

diy pool noodle flowers

Step 6: Insert the stems inside cardboard cut-outs, and then insert it inside the buckets. They fit nice and snug in the buckets. Fluff some pre-made tissue flowers from Amazon. They come with a string attached, so I wrapped it around the top of the noodle and also secured it with a piece of packaging tape.

Here are a couple flowers “on set” for a spring singing pageant.
spring school play DIY decor

Kids Boredum Buster: DIY Salad Spinner Art

diy salad spinner art - kids craft

Well, it looks like some of us may or may not be home with the kids again this fall due to COVID-19. So, we need to start pinning and saving art ideas in case we’re the art teacher this year. This DIY salad spinner art is fun for kids of all ages, so we definitely plan to re-visit this art project again this fall and winter. The best part is if you use washable paint, it can entertain the kids for hours, and then you still use it to clean lettuce for dinner. Mom win!

We shared all the details at Momtastic here.

DSC_1655