Our Favorite Sandals From Target

arrow-summer-sandals-target-sandal-roundup
Hooray, it’s sandal season! We better get those toenails painted after their long winter slumber. Jessica bought these studded sandals for her recent trip to Florida, and we are obsessed! Target does it again with their summer sandal selection, so we gathered our favorites (yes, we have some in our shopping cart, too). Whether you’re headed to the market, pool or a party, there’s a cute sandal for you!

Happy shopping.


Note: this post contains affiliate links. 

The Cutest DIY Easter Eggs, Ready For Spring Storms

diy easter eggs-spring eggs-diy beanie hats with yarn-fun family crafts for easter

We made DIY easter eggs with beanie hats, and they are the cutest! This no-sew, no-dye, really easy Easter egg tutorial is fun for all ages. The eggs are not edible, so no boiling needed and you can reuse them yearly. The DIY yarn beanie does not require sewing or crocheting of any kind. We made DIY beanie ornaments and wine toppers this winter, so we improvised and made more this Spring.

You may think these are eggs are experiencing some seasonal confusion, but it’s actually quite accurate. We know Spring means snowmelt, new beginnings, sprouting seeds and warmer weather; however, we live in Colorado, so while it may be Spring (thank the Lord), that doesn’t mean the snow is gone for good. It likes to linger and March is often the most snowy month of the year. It is not uncommon to have Easter eggs hunts in the snow or to see a winter jacket over spring dresses. In fact, the weather this week is cold and snowy.

We hope to make some bright eggs with flowers and things that represent all-things-Spring, too. But, if you’re not ready to say goodbye to the snow, you’re looking for a fun craft that doesn’t require dye, or can’t resist that cozy beanie feeling, these DIY easter eggs are for you.  These eggs are ready for rain, snow or sunshine – whatever Easter Sunday may bring.

diy easter egg-diy yarn beanie-spring-happy egg

Materials:

  • Eggs, plastic (like this)
  • yarn (any spring color, but the thicker the better)
  • Sharpie (thin tip)
  • Pink colored pencil
  • Toilet paper roll
  • Hot glue gun
  • X-acto knife or scissors

Directions:

diy easter eggs with diy beanies, happy eggs, crafts for kids, spring craft

Step 1: Use scissors or an Xacto knife to cut a toilet paper roll about 1 inch wide. Cut several of these. You need to make the roll a little wider to fit around the circumference of the egg, so we cut one of the rolls, and added it to another one (to make it 1 inch bigger) with hot glue.

toilet paper roll

Step 2: Cut the yarn about 12 inches long. Fold the yarn in half, loop the “loop end” through the toilet paper roll, and pull the strings through the loop so it creates a knot. Continue this with the yarn until the entire roll is covered. It should look like a squid with long tentacles.

yarn craft

yarn crafts-diy yarn beanie hat

yarn beanie craft

Step 3: Push the “tentacles” all the way back through the inside of the toiler paper roll.

diy beanie-yarn craft

Step 4: Grab the bunch of yarn and tie another small piece of yarn tight around it.

diy beanie-yarn craft

Step 5: Next, cut the yarn ends to make a small pom pom.

diy easter egg-diy yarn beanie-spring-happy egg

Step 6: Add a dab of glue on the eggs (try on the hat first to make sure where you want to glue it) and place the beanie on top. Finally add a cute face with a Sharpie and pink cheeks with the colored pencil.

diy easter egg-diy yarn beanie-spring-happy egg

Oh my goodness, they are so adorable.

Here’s more of our egg-traordinary spring and Easter egg favorites:

DIY Easter Eggs

Happy Spring!


*this post contains affiliate links. thanks for supporting our blog.

Stock Up On Pool Noodles Now To Make These DIY Giant Flowers

DIY giant pool noodle flower

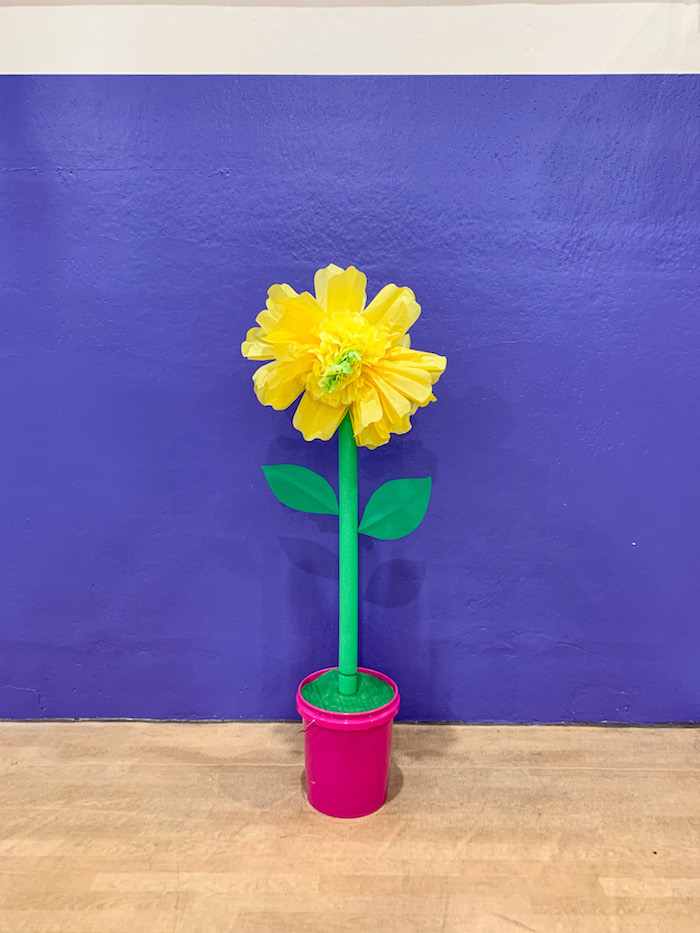
We know school is in limbo, and our world has been rocked with the arrival and contagion of COVID-19. Spring plays were cancelled, graduations were virtual, and birthday parties became drive-by, honking car parades. Although you may not have a large school play or birthday party in the very near future, it will happen again. In fact, small, safer gatherings are happening now. When the time is right (even if it’s next spring) we have the cutest decoration, DIY giant flowers, that costs less than $5 each. We are sharing this spring and summer DIY craft now, so you remember to stock up while they are “in season,” (and store the ones you have) to make these large DIY flowers. It’s easy to do, and adds a dose of sunshine to any space, or party.

Sorry about the ‘non-professional’ photos. This was a quick project in spring 2019, and didn’t think it would be such a hit, so cell phone photos have to do.

DIY Giant Flowers Made With Pool Noodles

Materials:

  • Giant tissue paper flowers
  • Pool noodles, green
  • Industrial buckets, Walmart (they were about $2.97)
  • Cardboard
  • X-acto knife
  • Acrylic paint, green
  • Rock
  • Card stock, green
  • Wood skewer, thin
  • Glue, glue stick works fine
  • Packaging tape

walmart buckets

walmart pool noodles

Step 1: Buy stems, or the pool noodles, from Walmart. Also at Walmart, find the colors buckets that will serve as the “pots” or “planter” for the flowers.

cardboard cut out and pool noodle stem

Step 2: Cut left over cardboard packages from all those Amazon packages you’ve been buying. Trace the opening of the bucket on the cardboard, and cut it slightly inside the pencil outline. I find that an X-acto knife works better than scissors when working with cardboard. Also, trace the outline of the noodle in the center of the cardboard circle. This will be where the stems fits inside, so cut it slightly inside the pencil outline as well, so the pool noodle fits nice and snug.

green cardboard cut out

Step 3: Paint the cardboard with acrylic green paint.

diy pool noodle flower

Step 4: Add heavy rocks to the bottom of the buckets. We know it’s just a pool noodle and a tissue flower, but it’s somewhat heavy, so you will need something to stabilize them so they are not top-heavy.

diy pool noodle flowers


giant DIY flower

Step 5: Cut leaves from green paper (we love Astrobrights Paper), and glue two stems with a large thin wood skewer in the middle. This will look like a “leaf vein”, and also makes it easy to just stick inside the noodle so it will stay in place.

diy pool noodle flowers

Step 6: Insert the stems inside cardboard cut-outs, and then insert it inside the buckets. They fit nice and snug in the buckets. Fluff some pre-made tissue flowers from Amazon. They come with a string attached, so I wrapped it around the top of the noodle and also secured it with a piece of packaging tape.

Here are a couple flowers “on set” for a spring singing pageant.
spring school play DIY decor

DIY Surprise Ball Twist: DIY Surprise Carrots With Trolls

diy surprise ball carrot-spring-and-easter-craftWe just can’t stop that happy feeling when we think of Trolls. We loved those crazy and colorful-haired toys when we were younger, and then a couple years ago, Dreamworks introduced a whole new family of Trolls, and our kids fell in love, too. The happy, glittery and music-loving Trolls are the source of inspiration for our latest DIY spring project, DIY surprise carrots with Trolls.

We’ve seen creative DIY surprise balls where kids unwrap, unwrap and then unwrap some more to unveil a special gift in the center of the ball. We made a modern and spring (Easter) twist on the DIY surprise balls with these DIY surprise carrots. The stem of a carrot has never looked for bright with hues of pink, teal and black Troll hair; however, the fun of unwrapping remains solid!

We can’t wait to see Trolls World Tour. And, we’re thrilled it’s (almost) Spring! Celebrate with these surprise gifts.

DIY Surprise Carrots with Trolls

Materials:

  • Orange crepe paper streamer, WalMart
  • mini Trolls (these, or these)
  • Mod Podge
  • Paintbrush

Directions:

Step 1: Begin by unraveling a bit of the orange crepe paper streamer. Place the mini Troll on the end of the orange paper, and begin to roll and wrap, and wrap and wrap.

DIY trolls surprise carrots with crepe paper

DIY trolls surprise carrots with crepe paper


Step 2: Continue to wrap tightly (don’t pull too tight to rip the crepe streamer), as you form the shape of a carrot. No carrot is perfect, so there will be lumps and bumps. Wrap the crepe paper around the Troll, and then wrap it below the Troll. Make this part thicker since there is no “base”.

DIY trolls surprise carrots with crepe paper

DIY trolls surprise carrots with crepe paper-dreamworks trolls world tour

Step 3: Once the crepe paper looks like a carrot, cut the end, add a dab of Mod Podge, and stick it to the bottom of the carrot. Then, top it off with a brush of Mod Podge, so it stays in place.

DIY trolls surprise carrots with crepe paper-dreamworks trolls world tour

DIY trolls surprise carrots with crepe paper-dreamworks trolls world tour

DIY trolls surprise carrots with crepe paper-dreamworks trolls world tour

Step 4: You now have the cutest little garden of DIY carrots that have a surprise inside!

DIY trolls surprise carrots with crepe paper-dreamworks trolls world tour

DIY trolls surprise carrots with crepe paper-dreamworks trolls world tour


*This post contains affiliate links.

DIY Rainbow Soap To Brighten Your Day

DIY RAINBOW SOAP for St. Patrick's Day

One of our favorite new crafts around here is making DIY soap. Jessica’s 8-year-old daughter can’t get enough, so we may have enough soap to keep our hands clean for years and years. At least it’s colorful, and useful! The variations are endless with this DIY, and anyone can do it. It’s really fun. We made soap inspired by St. Patrick’s Day and Spring, but who doesn’t love rainbows year-round?

You can get all the details on Momtastic here.