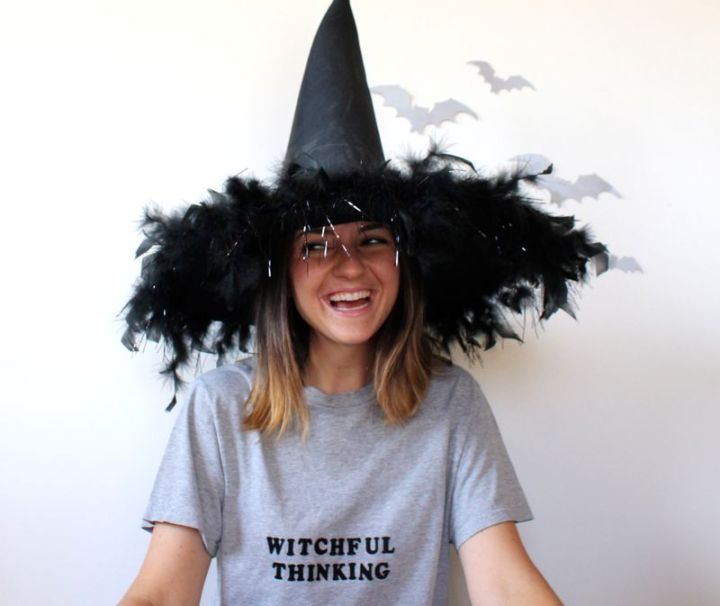
DIY Halloween Tee: Witchful Thinking

witchful-thinking-tee-diy-grey-shirt-witch-hat

It’s wishful thinking to think that we will dress up every year on Halloween. It can be fun, but it’s not our most favorite holiday to celebrate, so we typically don’t dress up. We dress the kids cute and call it good. Our favorite part about the holiday is celebrating at our aunt and uncle’s house. The party is loud, the food is good, the homemade costumes rock and the laughter echoes throughout the house. We love a good tradition that is carried on for generations…don’t you?

If you semi-like Halloween, don’t care for it at all, or have a party to go to but don’t want to dress up, this DIY semi-costume is for you. It’s a last-minute, really easy DIY tee that can be made in less than 10 minutes. Procrastinators, you got this!

This Witchful Thinking tee is cute, and you won’t be totally lame at this year’s party with black pants and a witches hat to fancy it up a bit.

Where our witches at?

witchful-thinking-tee-diy-grey-shirt-witch-hat

Materials:

  • Cotton t-shirt
  • Iron-on letters
  • Iron

Directions:

Step 1: Cut out letters for WITCHFUL THINKING.

Step 2: Follow iron-on letter package instructions.

witchful-thinking-tee-black-witch-hat-halloween-diy-costume

Step 3: Wear it and have fun!

witchful-thinking-tee-diy-halloween-costume-black-witch-hat

witchful-thinking-tee-diy-grey-shirt-witch-hat

DIY Trolls Halloween Costume

trolls-halloween-costume-wig-kids-leaves

Can’t Stop This Feeling by Justin Timberlake is a song that’s been on repeat in our home all summer. Now with the anticipation of the movie Trolls {in theaters November 4), the song is being played even louder while simultaneously having a dance party! We’re so excited about the movie. Jessica’s kids wanted to be Poppy and Branch, two characters from the movie Trolls. Today she’s telling us how she made one Poppy costume and two Branch no-sew DIY Halloween costumes.  You still have one week to make this costume before Halloween – you can do it!

Materials:

  • Felt, 23 green sheets {about .25 cents each), 1 light green sheet, 3 white sheets
  • White acrylic paint, Plaid Crafts
  • Peel-n-Stick permanent fabric fuse tape {this worked well for me, but Hello Wonderful made amazing felt costumes with a hot glue gun, so that’s an option, too}
  • khaki pants, cut like shorts
  • Turquoise sweatshirt, Wal-Mart
  • Pink pants and long sleeve shirt, Wal-Mart
  • Pink glitter boots, The Children’s Place
  • Grey long underwear, Costco
  • Troll wigs, Wal-Mart or Amazon
  • Black spray paint
  • Vests, Carters
  • Velcro
  • Faux flowers
  • Scissors {good for fabric}

Directions:

Branch Costume

Cut out felt leaves. I used a leaf cut out as my template, and then I cut, cut and cut some more.

green-leaves

Add Peel-n-Stick to the back of the leaves, and begin to layer the leaves on the vest, from the bottom-up.

img_7469

green-leaves

img_7472

img_7479 img_7482

Cut the khaki pants to be shorts.

Cut green felt squares and rectangles to place on shorts to look like patches.

green-leaf-vest

For Branch, I needed a black wig, but couldn’t find one, so I spray painted a purple wig black.

The grey clothes underneath not only keep the kids warm, but it’s the color of the Trolls skin. Win-win!

trolls-costume-branch-leaf-vest

trolls-costume-branch-leaf-vest

Poppy Costume

Cut the sleeves off a turquoise sweatshirt. I used the Peel-n-Stick tape to ‘hem’ the cut seams.

Cut petals with white felt. I used a cut-out petal, similar to the leaf vest process. Add Peel-n-Stick to the back of the petals and add the petals to the bottom of the dress to match Poppy’s design.

Paint the bottom of Poppy’s dress to look like the real thing. I free-handed the design on the bottom.

trolls-poppy-dress

Use scraps from the sweatshirt sleeves to make Poppy’s headband. I used the Peel-n-Stick tape to make the headband edges more seamless.

Paint faux flowers turquoise and hot glue them to the headband. Cut small felt petals to glue behind the flowers.

poppy-troll

Poppy’s dress has a little wrap around the neck, so I used the hood of the sweatshirt to wrap around the neck. To keep it in place, I added a small strip of velcro to the hood and sweatshirt.

poppy-halloween-costume-pink-hair

trolls-halloween-costumes

GIMME’ MORE!
Check out all these other amazing no-sew costumes!

Fairy Costume | Design Dazzle
Bumble Bee | Sugar Bee Crafts
Cat | Paging Supermom
No Sew Ideas | Rachel Teodoro
Moana | Houseful of Homemade
Alice in Wonderland | Polka Dot Chair
Rain Cloud | Make It Love It
Dinosaur | Ginger Snap Crafts
Bubble Bath | Giggles Galore
Hades | House Wife Eclectic 

DIY Halloween Costume Contest Award

diy-halloween-best-costume-award-caution-tape-bat

And the best costume goes to……{insert drum roll}

The best Halloween costume award is always a big deal. The friendly competition among our kids and their peers is something they look forward to every year. The best costume, the cutest costume, the scariest costume, the funniest costume and the most original costume are awarded to kids in every grade. To properly reward them, they receive a small gift or acknowledgement. The DIY Halloween award that we are sharing today is not only affordable and adorable, but it is an edible {who doesn’t love a giant Hershey’s chocolate bar} medal that can be worn with pride, it can be customized with names and any costume category, plus it’s a favor bag so gift cards and notes can be easily inserted.

We can’t take full credit for this idea. Jessica’s friend Atlanta introduced us to this idea last year, and we loved it so much, we decided to make our own version. Thanks, girl.

diy-halloween-best-costume-award-caution-tape-bat

Materials:

  • Caution tape, Oriental Trading
  • Hershey’s Chocolate Bar, giant
  • Masking tape
  • Scissors
  • Double-sided tape
  • Bat cut-outs, we used our Silhouette electronic cutting machine
  • Black card stock {we used Astrobrights Papers} and gold spray paint if you want the bat to be gold
  • Chalkboard favor bag, Target $1 and $3 section
  • Chalkboard marker

Directions:

Step 1: Gather materials.

diy-halloween-best-costume-award-caution-tape-bat-chocolate-bar

Step 2: Use Silhouette software to design the bat, and then use the machine to cut out the bat, or use a template online. Spray paint the bottom of the bat {optional}.

diy-halloween-best-costume-award-caution-tape-bat-best-costume

Step 3: Write the award on the envelope with a chalkboard marker.

diy-halloween-best-costume-award-caution-tape-bat-pencil-chocolate-bar

diy-halloween-best-costume-award-caution-tape-bat-marker

diy-halloween-best-costume-award-caution-tape-bat-cutest-costume

Step 4: Use the double-sided tape to tape the bat to the envelope {above the text}.

tape-bat

Step 5: Cut the caution tape to the size you want.

zombie-caution-tape

Step 6: Flip the chocolate bar face down. Line up the caution tape evenly on each side. Use masking tape to tape the caution tape to the chocolate bar. We used two strips on each bar.

diy-halloween-best-costume-award-caution-tape-bat-scissors

diy-halloween-best-costume-award-caution-tape-bat-tape-chocolate-bar

Step 7: Insert a gift card to a favorite local spot for kids {optional}. Get a panel of judges, and once all the votes have been tallied, reward the best dressed with their DIY giant chocolate bar medal.

diy-halloween-best-costume-award-caution-tape-bat

diy-halloween-best-costume-award-caution-tape-bat

Note: When no one is home but kids during the day, and a project must get done, the kid becomes the photographer. These last two photos are property of Jessica’s youngest, Jackson {age 4}. He loved every second playing ‘photographer’ of the day. And, since no one is around or organized enough to have an actual costume ready, the plaid shirt totally plays off as the best lumberjack ever, right?!

diy-halloween-best-costume-award-caution-tape-bat-medal

diy-halloween-best-costume-award-caution-tape-bat


DIY Halloween Lights

img_7381

We really don’t like spiders. We scream when we see them in our homes, and fear them crawling on us. We have recurring nightmares after a villa experience in Tuscany {which was amazing, and we would do it all over again}. Along with the wonderful grapes, vines, greenery, olive trees and an old villa came spiders…big ones! To this day, we still dream that spiders are crawling on us, or people next to us, and although we seem to be ‘awake’ and we think we really see them, they are just a bad dream.

Despite our fears, spiders crawled their way onto our DIY Halloween balloons, and now they are shining bright for our DIY Halloween lights. The creepy spider tattoos from Oriental Trading were our source of inspiration, once again. Tis the season of Halloween.

DIY-ping-pong-ball-diy-halloween-lights-spider

Materials:

Directions:

Step 1: Gather ping-pong balls. Remove the piece of plastic from the tattoo and cut the spider tattoos into individuals spiders.

white-ping-pong-balls

halloween-spider-tattoos

Step 2: Place the spider tattoo face down onto the ping-pong ball, press down and apply water all over the back of the tattoos with a wet sponge or wash cloth. Apply it just the way you would on skin.

halloween-spider-tattoos

halloween-spider-tattoos

halloween-spider-tattoos-ping-pong-balls

halloween-spider-tattoos-ping-pong-balls

Step 3: Insert a sharp knife into the back-side of the ping-pong ball {opposite of the spider}. Make an X or a T with the knife.

halloween-spider-tattoos-ping-pong-balls

Step 4: Insert the light into each ping-pong balls.

halloween-spider-tattoos-ping-pong-balls

DIY-ping-pong-ball-diy-halloween-lights-spider

DIY-ping-pong-ball-diy-halloween-lights-spider

Step 5: Find the closest outlet, and let the spiders hang.

DIY-ping-pong-ball-diy-halloween-lights-spider

DIY-ping-pong-ball-spider-halloween-lights

DIY-ping-pong-ball-diy-halloween-lights-spider

DIY-ping-pong-ball-diy-halloween-lights-spider

DIY Backyard Jungle Obstacle Course for Momtastic

the-jungle-book

Jessica was lucky enough to work with Momtastic for a DIY Jungle Obstacle Course in celebration of Disney’s The Jungle Book release on Blu-Ray Aug. 30. The Jungle Book was one of our kid’s favorite movies this year, so it was really fun to transform our backyard into a jungle adventure.

One bonus obstacle (only seen here) for the course was our DIY honeycomb climb. In the movie, Mowgli had to climb a tall cliff side to get honey, nature’s ointment, for Baloo. Since honey is a bear necessity, we made our little man cub’s climb a diy rope to reach our 3D paper hive.

Here’s how we made it.

diy-rope-climb-for-kids-honeycomb-bee-hive-paper-craft

Materials:

Directions:

Step 1: Design and cut 3D honeycombs using a template online, or via Silhouette cutting machine (like we did). If 3D is too labor intensive for you, we get it – just cut standard honeycombs. Use different shades of yellow for texture.

Step 2: Glue all the sides of the hexagon together with a glue stick (if you opted for the 3D design).

Step 3: Draw a honeycomb shape similar to the hives in The Jungle Book on a foam core board and cut it out with an X-acto knife.

Step 4: Glue the honeycombs (hexagons) on the board with a hot glue gun to fit like a puzzle. We glued some facing forward and others flipped for some added texture.

Step 5: Cut out mini bees using a template online or an electronic cutting machine.

Step 6: Glue the bees onto the hive. For an added 3D effect, we glued one end of a small piece of wire onto the foam core and then a bee on the other end of the wire.

Step 7: Poke two holes on the top corners of the hive and hang with string from a tree.

As we mentioned, this was a bonus obstacle for the course – don’t miss the main DIY Jungle Obstacle Course here.

diy-rope-climb-for-kids-honeycomb-bee-hive-paper-craft

honeycomb-craft-rope-climb-for-kids

honeycomb-craft-rope-climb-for-kids

Photography by Pure Lee Photography