sugar cookie cup {recipe}

sugar cookie cups_jsorelle
I’ve been craving sugar cookies lately. And, when I crave something, I have to make it. I had absolutely no time today to make it and had way more important items on the to do list, but when a girl craves some sugar, a girl needs some sugar. So, the kids and I baked today…and I’m really glad I did because it was delicious. And, the perfect summer treat. The entire family loved it…and I still have 2 leftover for breakfast.
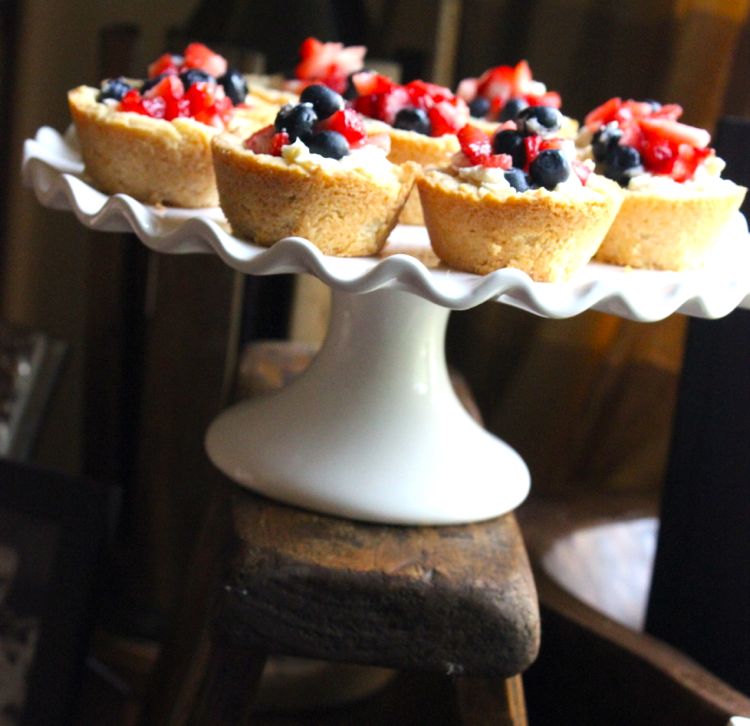
sugar cookie cups_jsorelle

Sugar Cookie Cups
yield about 14-16 cups

Sugar Cookie Ingredients
1 stick + 3 tablespoons butter
3/4 cup sugar
1/2 teaspoon vanilla
1 egg
4 teaspoons whole milk
2 cups all-purpose flour
1.5 teaspoons baking powder
1/4 teaspoons salt

Cheesecake Filling Ingredients
1 8oz package of softened cream cheese
1/2 cup powdered sugar
1 teaspoon vanilla

How To
Cream the butter, sugar and vanilla together in a medium bowl.
Then, add the egg and milk, and blend again.
In a separate bowl, add all the dry ingredients including flour, baking powder and salt.
Combine the dry ingredients with the creamed butter/sugar/vanilla/egg/milk mixture and blend until fully combined.
Form the dough into a large semi-flat pancake in between wax paper and freeze for 20 minutes.
Set the oven to 350 degrees.
Coat a cupcake pan with non-stick cooking spray.
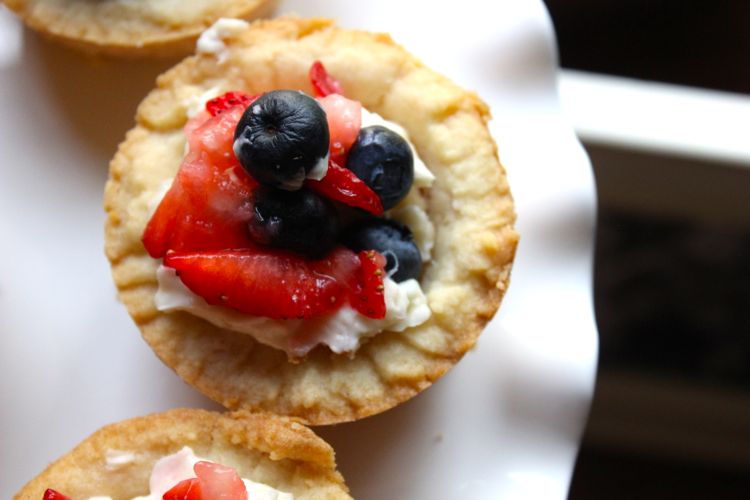
Grab a handful of dough {about 2 tablespoons} and press the dough in the bottom of each muffin cavity. Fill the cavity about 1/2 way up the sides, forming a cup shape. Make sure the sides are not too think, as it will begin to fill your ‘cup shape’
Bake for 12-15 minutes.
Remove from the oven and allow to cool. If the centers filled in too much, just use a spoon or the end of a tablespoon to press the center back down.
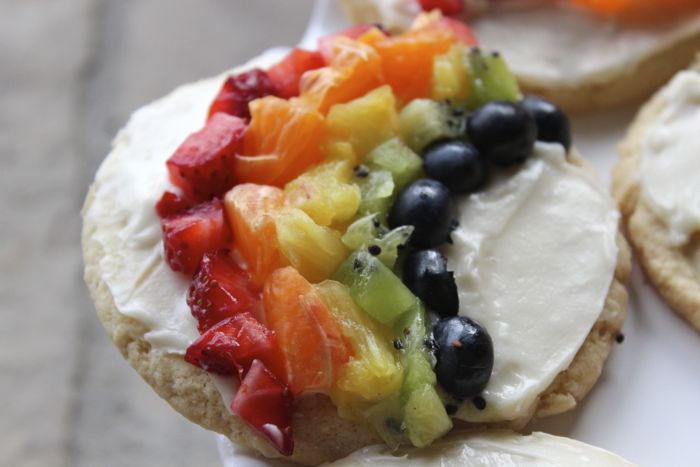
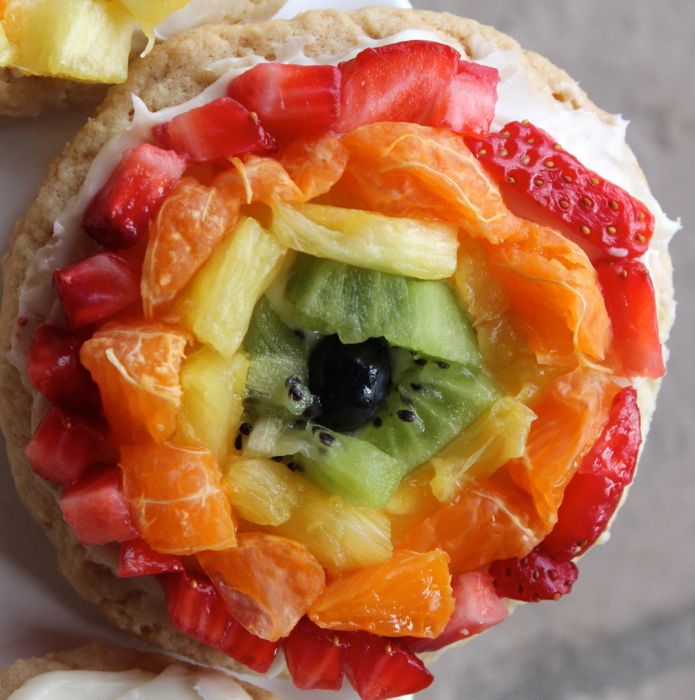
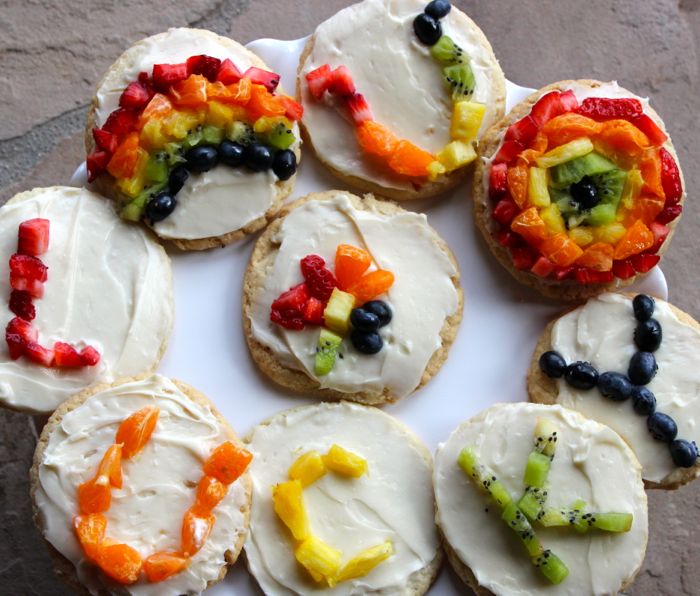
Add about a tablespoon of the yummy cheesecake filling to each cookie.
Top with bright and delicious fruit.

sugar cookie cups_jsorelle

sugar cookie cups_jsorelle
{images via j. sorelle}

worm pudding {recipe}

worm pudding_jsorelle

There is nothing my 6-year-old and 2-year-old son loves more this summer than worms, water and dirt {mud}.  And there is nothing my 4-year-old daughter loves more than sugar. So, for their recent birthday celebration at school, we made dirt pudding cups, which I lovingly call ‘worm pudding with a budding flower’ {my husband thinks the flower looks like the kind that opens up and eats people, but I was going for a tulip}. You decide for yourself, but whatever flower you think it is, make this dessert. So yummy.

chocolate mousse worm pudding for kids

Chocolate Mousse
{recipe by Kimi Hansen}
makes 13, 9 oz elegant plastic cups or more if you use smaller shot glasses

Ingredients
2 cups chocolate chips
2 cups whipping cream
2 egg yolks
2 tsp vanilla
Oreo cookies
13, 9 oz plastic cups
13 strawberries or other ‘flower’ fruit
13 gummy worms
Sharpie Oil-Based Paint Markers

How To
Use Sharpie Oil-Based Paint Markers {love these things} to draw grass on the outside of the cups. It dries almost immediately.
Add chocolate chips, vanilla extract and egg yolk to a blender.
Heat cream to a boil on the stove and then slowly add the cream to the other ingredients in blender.
Pulse ingredients together
Wait until it cools a bit before you pour in plastic cups.
Refrigerate for at least 3 hours. After the first hour or 2, stick a worm in the semi-hard pudding and continue to refrigerate.
Before serving, top with crushed Oreos
Use a straw or toothpick and add your ‘flower.’ It can be made with a strawberry like I did, with 4 slits on top and whipping cream on the inside, or even raspberries and blueberries.

worm pudding

worm pudding for kids

worm pudding with a flower

worm pudding with a flower

Just look at this chocolate, happy face. Pure joy.
chocolate mousse face

{images via j. sorelle}

Rainbow Fruit Sugar Cookies

rainbow-sugar-cookie-with-fruit

The colors of the rainbow are so pretty in the sky…and they are so pretty on a cookie too.

Instead of a giant sugar cookie covered in fruit like my mom use to make; this St. Patty’s Day, the kids and I made mini sugar cookies and decorated with rainbows and all things Irish. They are so yummy – anything with a cream cheese frosting is delicious in my book – and an adorable treat to celebrate the Irish in all of us.

Taste the Rainbow Sugar Cookies
family recipe
makes 12-13 cookies

Ingredients
Strawberries, 2 to 3
Blueberries, 5 to 10
Clementines aka Cuties, 1 to 2
Pineapple, not even half of one
Kiwi, 1
Pillsbury Sugar Cookie Dough or homemade recipe or make them gluten-free with this recipe.

Cream Cheese Frosting
1 tsp. vanilla
½ cup sugar
8 oz. bar of cream cheese, softened

How To:
Bake cookies according to package instructions. Allow them to cool.
Add all frosting ingredients in a bowl and blend with a mixer.
Slice all fruit into small pieces.
Use a knife to smooth frosting on the cookie, and then decorate.

rainbow-sugar-cookie-with-fruit

IMG_4212

{images via Tutto Bella}

Mini Bailey’s Irish Cream Cheesecakes Recipe

Tutto Bella is getting a makeover. Kind of like the kind all us ladies need…A new pair of heels, an afternoon at the nail salon, a new wardrobe and a visit to the stylist, just to name a few. So, please excuse us while we add a little pizzazz, more organization and even more fabulousness here at Tutto Bella.

WARNING: Colors, and design of site will change during this time.

Really exciting things to come, but while we do some behind the scenes work, we have some great posts that we just couldn’t help sharing.
With St. Patty’s day approaching, we have some rainbow and Irish love this week…and first up is Mini GF Bailey’s Cheesecakes.
We love Bailey’s Irish Cream. Love it in coffee, chilled over ice at the end of a long day and now in our cheesecakes. For all you gluten-free folk, this is a treat you can enjoy too, because we made it gluten-free. This is easy and so yummy. Make it for your friends and family as you celebrate the Irish in you on St. Patty’s Day, or just make it for yourself.
gf mini cheesecakes_tuttobellablog
gf baileys cheesecake_tuttobellablog
gf mini baileys irish cream cheesecakes_tuttobellablog
Gluten Free Mini Bailey’s Irish Cream Cheesecakes
serves 12

Crust
1.5 cups Glutino chocolate and vanilla crème oreo-style cookies
3 tablespoons melted butter

Filling
12 oz cream cheese, softened
½ cup sugar
½ tsp vanilla
1/8 tsp salt
2 tablespoons Bailey’s Irish Cream
1 egg

Topping
Preheat oven to 350 degrees. Fill muffin tin with cupcake liners.
Mix crust ingredients together in a food processor or blender. Add a full spoonful to each liner and then press down to create a packed bottom layer. Cook for 5 minutes.
In a medium bowl, beat together the cream cheese, vanilla and sugar until fully mixed. Add salt, Bailey’s, and an egg until the batter is smooth.
Add less than a ¼ cup to each cavity for an even layer of cheesecake on top of the cookie crust. Bake for 15-17 minutes. Once cool, place in refrigerator and chill for at least 4 hours or overnight.

Once you are ready to serve, or a couple of hours before you serve, it’s time to make the whipping cream. In a medium bowl, add the topping ingredients for whipped cream, blend until soft peaks form.

Take out of fridge before you serve, be generous with the whipping cream topping and serve! .

Devour!!

If your a chocolate lover like me, you’ll want to add an Udi’s Gluten Free Brownie in the middle. Follow all directions above, except add a tiny brownie {they are made and you can find in your local grocery store} on top of the cooked crust, and add cheesecake mixture around/on top of it. Cook for the same time, closer to just 15 minutes. It was also a delicious treat.
gf bailey's cheesecake with brownie_tuttobellabloggf baileys cheesecakes_tuttobellablog{images via Tutto Bella Blog}

Dates, Chocolate and Espresso Dessert and Recipe

Here’s a side note before I get into the chocolate goodness treat of the day – we are going through a fun revamp right now behind the scenes. All good, and really exciting news for our blog and business – it’s just taking all our non-existing free time, so thanks for hanging with us, and our lack of posts.

Now, back to food.

date and espresso brownies

IMG_4130

So, I thought I ate moderately healthy. As I learn more, I continue to eat healthier and I really try, but I have my good and bad days {the ones where I just want cheese, fries and cinnamon bears}. But, my neighbor {who’s fantastic} eats super healthy. I love it because she always surprises me with her yummy recipes and their ‘vegan’ ingredients. She made me some Fudge Babies for Christmas, and I couldn’t stop eating them…and now I can’t stop re-creating them for myself.

I’ve revamped the recipe from Chocolate Covered Katie and make it weekly. It’s so easy – 6 ingredients, no-bake, dairy-free and gluten-free! Don’t get me wrong – dates still have sugar, but its not refined sugar. And, this makes the perfect treat that satisfies my cravings. My kids LOVE, LOVE them too – I make them some without espresso.

I couldn’t resist shaping them into hearts with the upcoming Valentine’s Day holiday.

Espresso and Chocolate Bites
Recipe adapted from Chocolate Covered Katie

Ingredients
1 cup walnuts
1.5 cups pitted dates {if the mixture feels too dry and doesn’t ‘stick’ together well, add more dates, up to 1 and ¾ cups pitted dates total}
1 tsp. vanilla extract
1 tsp. ground espresso
A dash of sea salt
4 tablespoons unsweetened cocoa powder

How To
Blend all the ingredients together using a blender or food processor.
Line a loaf pan or small Pyrex with wax paper {this recipe fills a loaf pan and makes semi-thick bars. If you choose to use a small Pyrex, smaller than 9×13, it will fill about ¾ of it}.
Pour blended mixture into pan and press until flat with a spoon or spatula. It should be about 2 inches in thickness.
Cover with the sides of the wax paper and place in the freezer {it’s best when refrigerated or fresh out of the freezer}.
If you want to get festive like I did, use a heart shaped cookie cutter once the blended dates have been in freezer at least 2-3 hours. And, top with a toothpick decorated with a DIY washy tape flag.
Note: If you want to serve these for a party, make them ahead of time, and use your cookie cutter to shape them. Then place in freezer safe bag or container, and then bust them out once its time for desert.

Enjoy! It’s such a treat. I hope you make for a loved one this Valentine’s Day.

{images via Tutto Bella}