Christmas Home Decor: Mini Gingerbread House Village

diy bird house gingerbread houses (2)

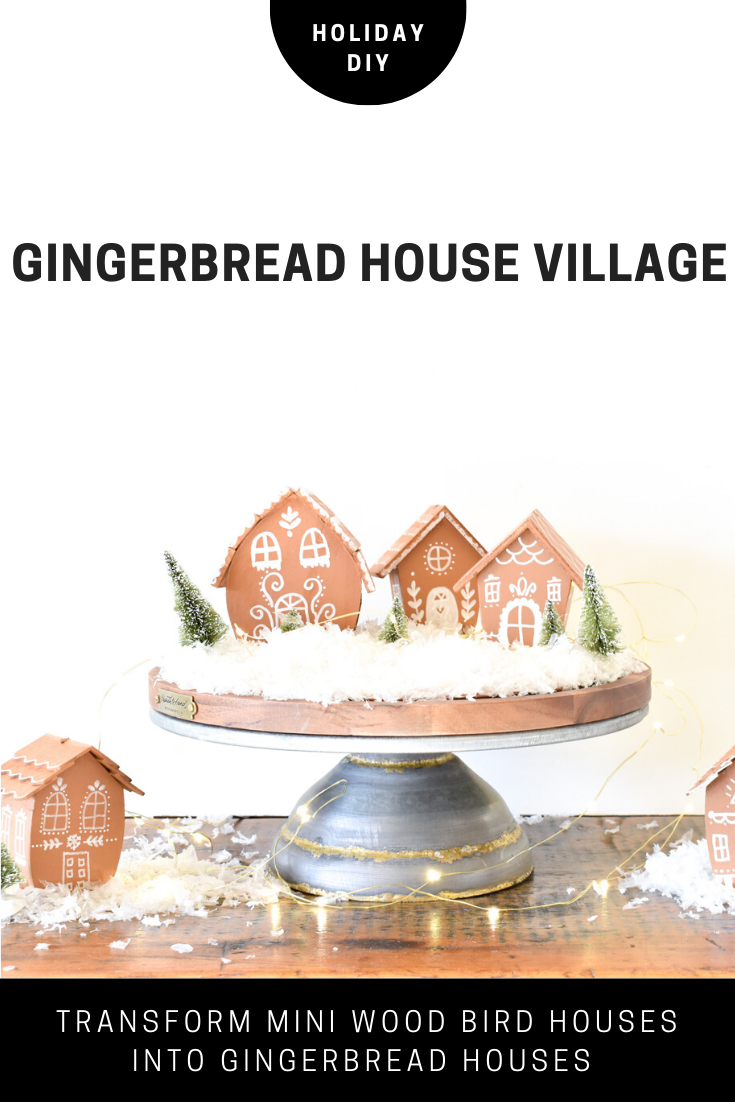
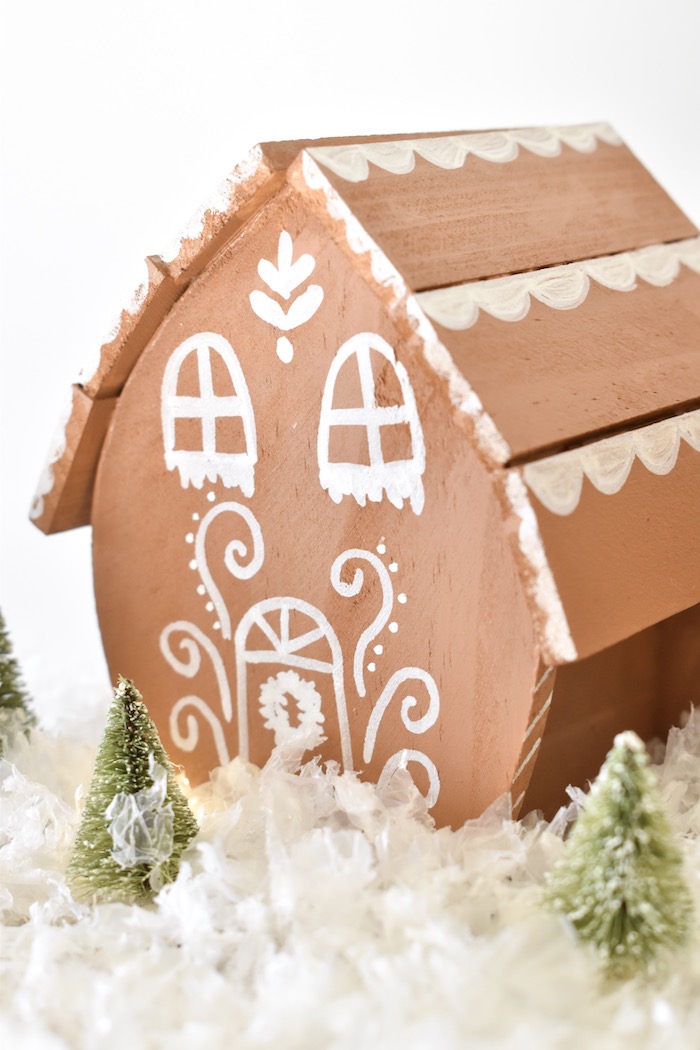
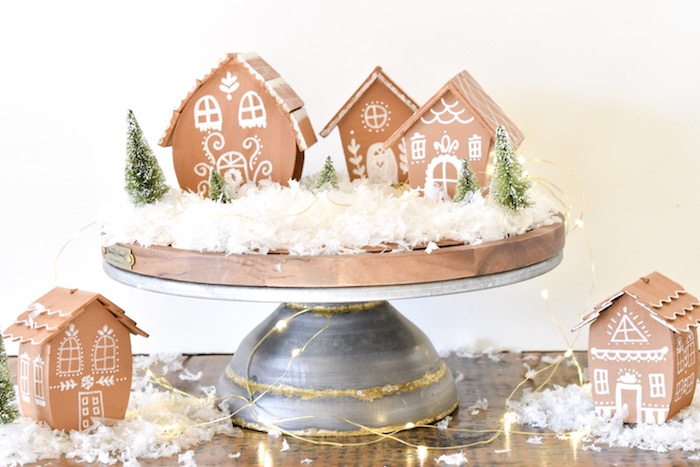
I’m not only in a bell phase this Christmas season, I’m having a gingerbread moment, too. First it was our DIY gingerbread paper bag advent calendar, and now it’s a cute mini DIY gingerbread village made from tiny wood bird houses. I’ve never made homemade gingerbread, and I actually don’t like the taste of it. But, I love how festive the houses are, and can’t resist a homemade gingerbread house. This gingerbread house village is so easy, and so cute. You don’t need to worry about candy getting stale, because nothing is edible on these tiny houses. You can give these as gifts, or set them up year after year with your holiday decor. Plus, you can do it this weekend with the kids. It would be really fun to see all the colors and designs the kids come up with.

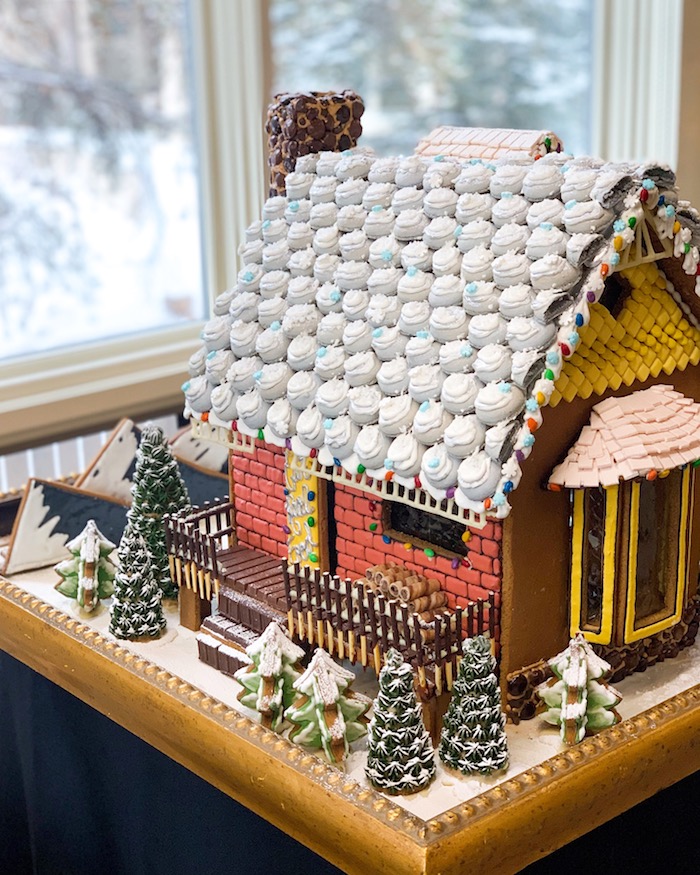
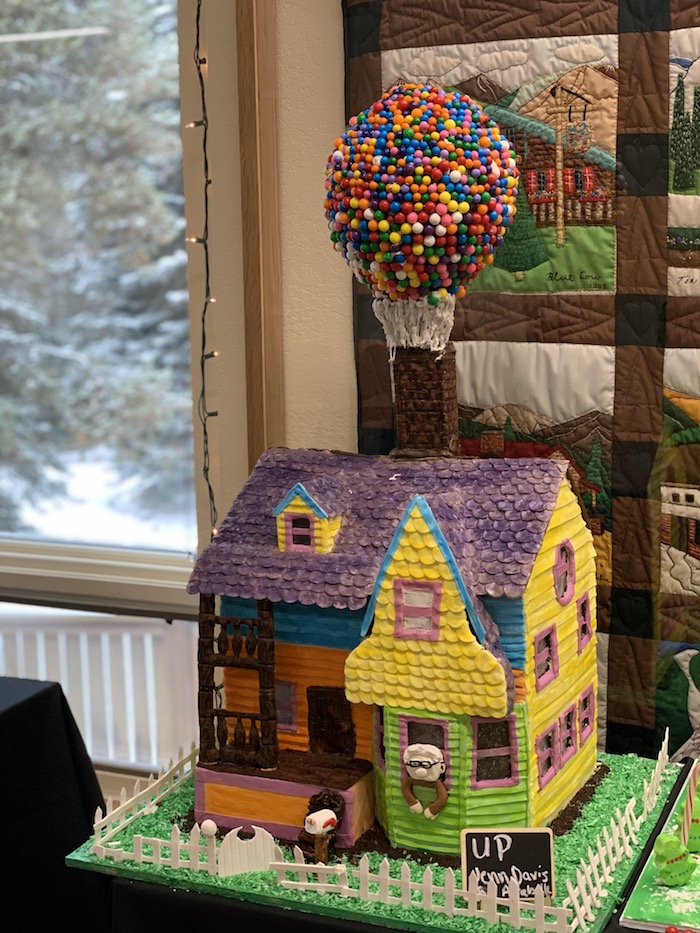
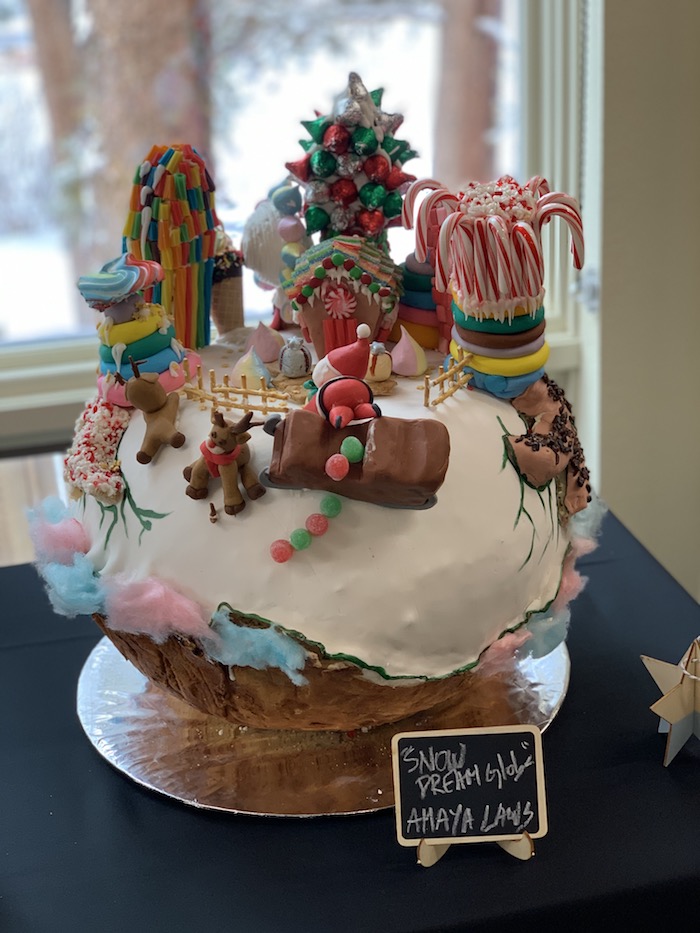
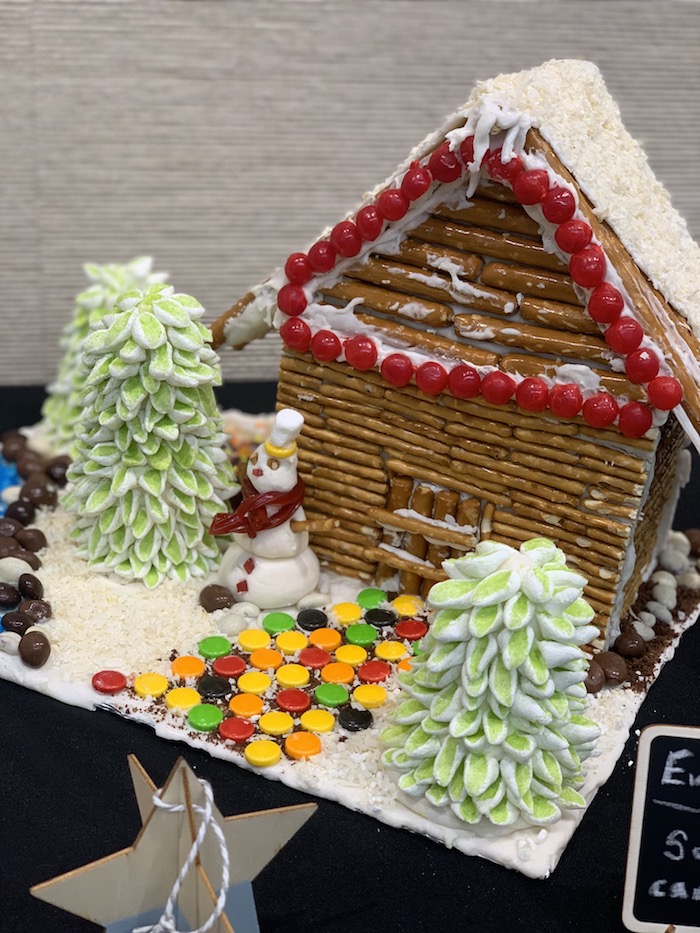
Stick around for the bottom of the post if REAL gingerbread houses are more your jam. Some really talented pastry chefs, and members of the Vail community displayed some amazing Gingerbread Houses at the Vail Library in November as part of Revely Vail

gingerbread house- christmas decor

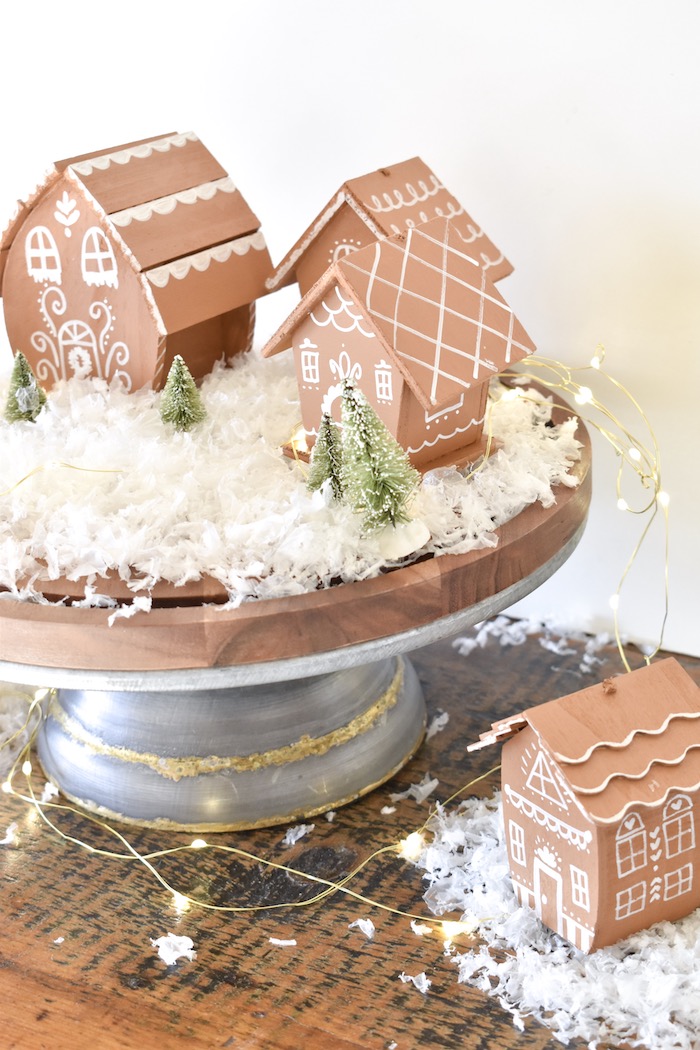
DIY Gingerbread House Village Made With Mini Wood Birdhouses

Materials:

  • mini wood bird houses, Walmart or Amazon
  • acrylic paint
  • paint brush
  • Elmer’s white paint pens, fine tip
  • glass cookie jars, Walmart
  • mini bottle brush Christmas trees

Instructions:

Step 1: Paint the houses. I had to do two coats of paint per house. I used a two different colors of brown paint to get a “gingerbread” color.

mini wood gingerbread houses for christmas decor

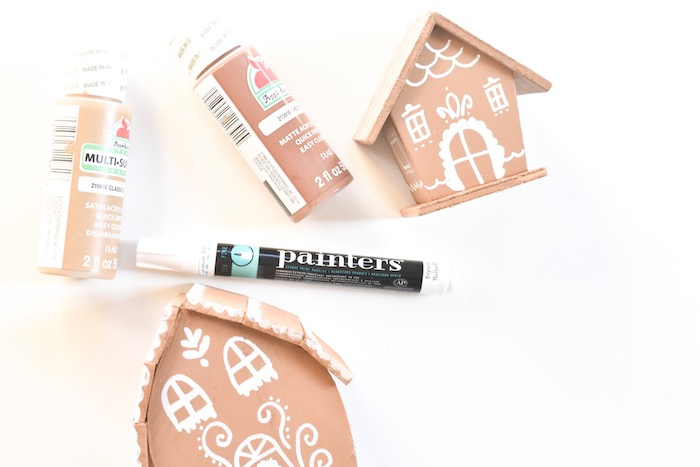
Step 2: Once the paint is dry, begin to draw/doodle decorations on the house with the paint pen. I drew it free-hand, and it worked out great. Draw swirls, icicles, windows, doors, hearts, candy canes, etc. on the front, back and top of the house. Make each house different.

gingerbread house- christmas decor

gingerbread house- christmas decor

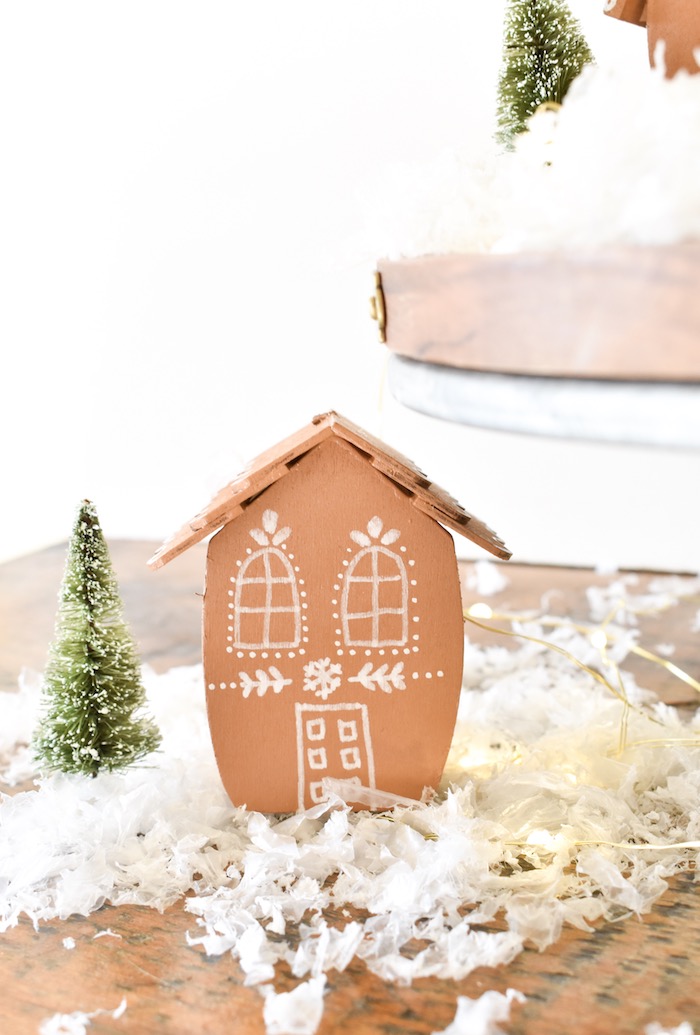
Step 3: Set the houses on a cake stand with bottle brush trees, twinkle lights and fake snow. Or, make a pretty glass jar display with all the fun winter accessories, and twinkle lights, too.

gingerbread house display

gingerbread house display


Revely Vail Gingerbread House Competition (just a small snippet of the 30+ entries):


Hovey & Harrison

Hovey & Harrison


The Arrabelle at Vail

The Arrabelle at Vail


The Sebastian Hotel

The Sebastian Hotel


Gru's Christmas House, 3rd graders

Gru’s Christmas House, 3rd graders


age 6-10 entry, Sweet As Can Be

age 6-10 entry, Sweet As Can Be


affiliate disclosure

DIY Winter Wreath With Bells

diy modern wreath with bells

If you didn’t pick up on from a recent post, I’m having a bell obsession. Yes, I want them everywhere. I like to hear them, I like to see them – on place cards, garlands, doors and wreaths. So, it’s no surprise I made a trio of DIY winter wreaths with bells to decorate an empty wall in my house. I actually made the wreaths last year, and upgraded them this year with the bells. After I made them, I saw them on sale at a boutique store for $65-$85 per wreath. I like to think I saved money with this craft (it’s what I’m telling myself for yet another Amazon order at my doorstep) since these wreaths cost less than $10 each, and I made a chic new addition to my holiday home decor.

diy winter wreath with bells

DIY Winter Christmas Wreath With Bells

You’ll Need:

Here’s How To Do It:

Step 1: Buy 3 different size metal loop from Michaels. I spray painted mine copper, but any color will work.

Step 2: Next, buy faux greenery, (such as pine or any other winter greenery) and floral wire. Cut and add pieces of the greenery on the wreath, and wrap the stems in wire around the metal hoop. It’s that easy!

As for the bell, wrap twine through the bell, and then around the hoop. Listen for the sound of bells all season. It will make you smile. I know just looking at the bell decor makes me smile. Jingle all the way this Christmas season!

diy modern wreath with bells

diy modern wreath with bells

affiliate disclosure

Christmas Craft for Kids and Tweens: DIY Glitter Snow Globe

DIY glitter globe-holiday-craft-and-tween-gift

My son’s teacher has a DIY calm down jar in the classroom for kids to play with, or to shake when they need to calm down. Something about the way the glitter falls in the liquid is mesmerizing, and calming for kids. Like T. Swift says, “You need to calm down.” Now, there’s a jar for that. Haha.

Glitter is fun, especially when it’s contained, and there’s something magical about snow globes this time of year. So we combined the two for the cutest DIY glitter snow globe. This time of year is crazy, so if anything, no matter how simple, can help kids (or adults) calm down, it’s worth trying. Plus, these make adorable gifts for friends for kids and tweens. Let’s get this glitter party started.

DIY glitter globe-holiday-craft-and-tween-gift

DIY Glitter Snow Globes

Materials: 

Instructions:

Step 1: Fill the snow globe about 1/2 full with warm water.

Step 2: Add the glitter glue. I used 1 bottle for all three snow globes, and all got equal amounts. So, 4 tablespoons of glue per snow globe is a good start. In a mason jar, which is larger, you can use 1/2 cup glue.

Step 3: Add 2-3 drops food coloring. I used similar color glitter glue, food coloring, and glitter – all green tones. But, you could see how it turns out with multi-color glitter and glue. Don’t use more than 3 drops food coloring with these smaller globes, or you won’t be able to see the glitter.

Step 4: Add the glitter. I added about 2 tablespoons glitter per snow globe. You can add more or less if you want. There wasn’t much of an exact science to this. I used fine glitter in all of them, and added star glitter in some as well.

Step 5: Fill the remaining space in the snow globe with warm water, until it’s almost fill (leave a small space at the top so you can still shake it). Push in the inner seal in the globe insert, and then add super glue to the inner rim of the screw top, and then screw it on.

DIY glitter globe-holiday-craft-and-tween-gift

Step 6: This is optional, but you can customize each snow globe you make for friends with vinyl or stickers. We used our Silhouette Cameo to make vinyl words and mini stars for an extra magical touch.

Finally, shake and watch that glitter swirl, and then fall. Merry Christmas, everyone!

DIY glitter globe-holiday-craft-and-tween-gift

DIY glitter globe-holiday-craft-and-tween-gift


affiliate disclosure

DIY Embroidery Sweatshirt: For The Homebody

diy embroidered sweatshirt-homebody-cozy-clothes

I saw this photo on instagram, and fell in love with the words, Homebody. The welcome mat is adorable, too! Anyone else a self-proclaimed homebody, like me? I love a great party and good people, and am definitely energized by them; however, 90% of the time, I am happiest at home with my family. I am a homebody at heart. Comfy clothes, a good movie, yummy pizza, snuggles with my husband and kids is the perfect night for me. I’ve been looking for ways to get in on the DIY embroidery trend, so this was the perfect opportunity to give my cozy sweatshirt a makeover.

Ladies, no sewing machine required. Let’s get this embroidery party started…

DIY Embroidery Sweatshirt

Materials:

Directions:

Step 1: Print out a copy of your favorite word the size of your sweatshirt tie on the Sticky Fabric paper. BTW, the wider the tie’s on the hoodie, the better. Cut out the word, remove the backing from the sticky paper, and stick it on the hoodie tie.

diy embroidered sweatshirt-homebody

Step 2: Thread the embroidery needle with black embroidery floss, and begin to embroider. To this this, you will tie a knot at the end of the string, and insert the needle through the back of the tie on the top point of the first letter. For me, it was the top of the H (the photo below shows how I did the letter Y for a visual). When you pull it all the way through, begin to insert it along the line of the letter a couple millimeters down, and back through the tie. Now, instead of coming back up through it like before directly next to the first stitch, you’re going to move it a couple millimeters down the letter, pull it through, and then go down in the middle of the first stitch.

diy embroidered sweatshirt-homebody


diy embroidered sweatshirt-homebody

diy embroidered sweatshirt-homebody

diy embroidered sweatshirt-homebody

Step 3: Continue this split stitch process until the word is done. When the word is complete, tie a knot with the embroidery string on the back of the tie. If you have to cut any of the embroidery string through the word (either you run out of string, or your word is not attached with script and you have to do each letter separately), be sure to start each strand the same way with a small knot at the end of the string.

diy embroidered sweatshirt-homebody

Step 4: Wash the sticky soluble fabric with water. It comes right off! Let it dry, and you have a cute custom embroidered hoodie sweatshirt to stay cozy in all year long! This would be a fun gift for friends – find their perfect word, and embroider a custom sweatshirt for them this holiday season.

diy embroidered sweatshirt-homebody


Gaga Over These DIY Diaper Babies

DIY diaper babies for baby shower idea

It’s been awhile since I have purchased, or changed a diaper. I don’t miss changing dirty diapers at all, but I do miss the days when my kids were tiny. The days of those precious newborn smells, first giggles, first steps and holding those tiny hands passed by in the blink of eye. Working with diapers again had me reminiscing on all those wonderful times.

Whether the days of diapers are in your past, present or future, these DIY diaper babies are worth making. They make the perfect gift for new moms, or a fun baby shower activity.

I shared all the details with Momtastic, so check it out here.