DIY I Believe in Pink Birthday Gift

i believe in pink birthday gift_jsorelle

We can never get enough Audrey Hepburn, and we can never get enough of the color pink {correction: Jodi and Jessica can never get enough pink}. So, the two combined just made perfect sense. We love the Audrey Hepburn quote, “I believe in pink. I believe that laughing is the best calorie burner. I believe in kissing, kissing a lot. I believe in being strong when everything seems to be going wrong. I believe that happy girls are the prettiest girls. I believe that tomorrow is another day and I believe in miracles.”

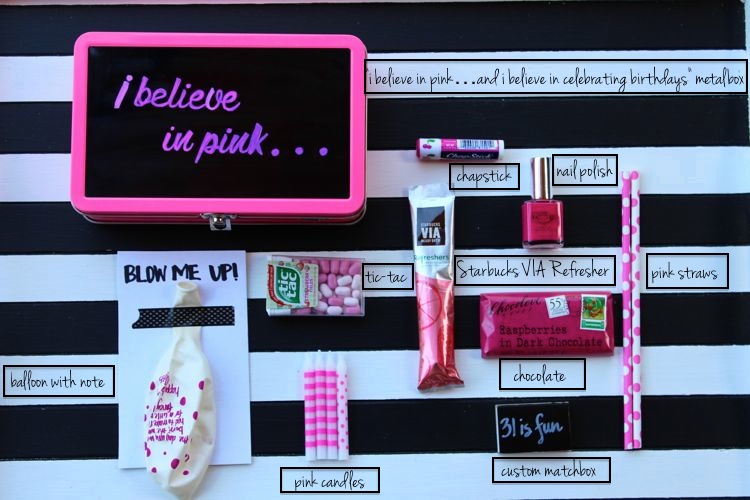
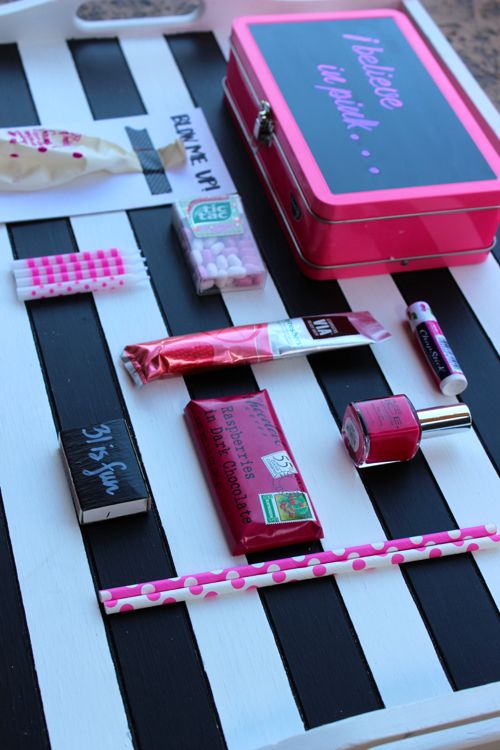
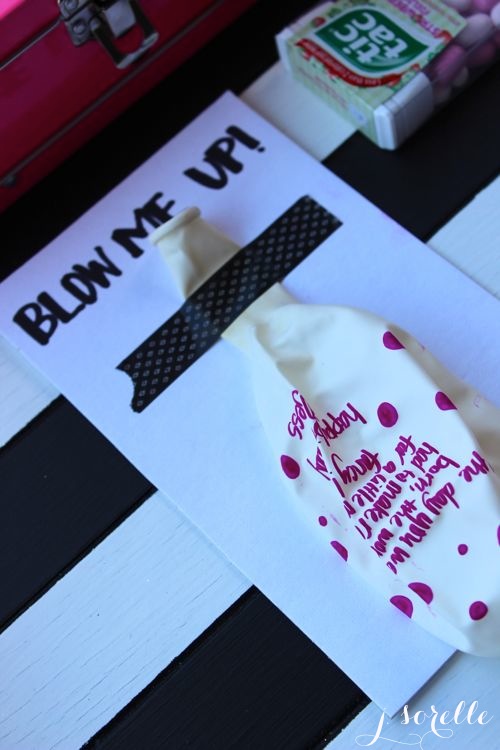
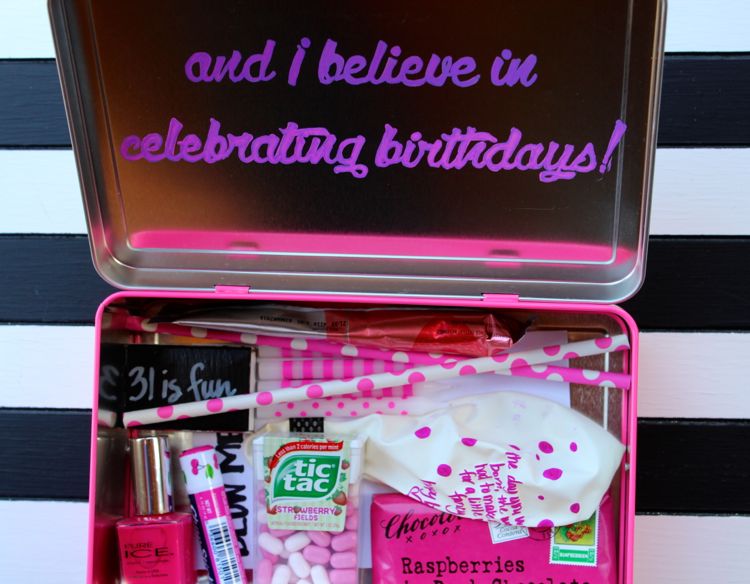
So, we revamped the quote for a recent birthday gift. I believe in pink…and I believe in celebrating birthdays. We filled a black and pink metal box with all things pink you can find at a local big-box retailer such as pink chapstick, pink nail polish, pink polka dot straws, pink tic-tacs, a balloon with pink note on it, pink candles, a custom chalkboard matchbox {standard matchbox painted with chalkboard paint}, a Via Starbucks Refresher packet and a Chocolove Raspberries in dark chocolate bar.

As for the quote, we used our new favorite find, Sharpie Oil-Based Paints to write on the metal box with the help of Chacopaper transfer paper.

I believe in pink_jsorelle

i believe in pink birthday gift_jsorelle

i believe in pink birthday gift_jsorelle

i believe in pink birthday gift_jsorelle

Whether it’s October, December, March or June, there’s always room for pink, which means you can give a gift like this year-round. We believe in pink! Do you?

{images via j. sorelle}

DIY Witches Brew Halloween Gift and Favor

witches brew_jsorelle

We have exciting news…Jessica is a contributor to Momtastic. So, if you haven’t visited Momtastic already, make it a point to stop by. Whether you’re in the mood for Hollywood’s latest entertainment news, snack and dinner ideas, family and relationship advice, decor and entertaining tips, DIY ideas or the latest fashion trends, you will find Momtastic to be an amazing resource.

Yesterday, Jessica shared a fabulous, brewtastic Halloween favor idea and FREE PRINTABLE {by Jenna at Fleur de Lis} with an adorable poem, so don’t wait any longer and click here.

{image via j. sorelle}

Fall in a Basket Ideas

fall in a basket_silhouette letters_jsorelle

When a Silhouette America Portrait electronic cutting machine arrived at our door step, we literally leaped with joy! We know, who seriously reacts in such a way when an electronic cutting machine arrives? US! And, for good reason – the Silhouette is amazing. It takes our projects to a whole new level of creativity and endless possibility, and it’s a major time saver since it so perfectly cuts everything for us! It’s been a dream come true for us. Honestly, it was on Jessica’s Christmas list – and she will argue it was a NEED, but it was a WANT, a desperate want.

We have found it to be very user-friendly, and we love it. We don’t know what we ever did without it. We’ve made thank you cards, and some other fun projects we will reveal soon, but with the changing colors and the crisp air, a Fall in a Basket seemed appropriate…and too cute not to do.

fall in a basket_silhouette_jsorelle

Fall in A Basket Ingredients
A fall-inspired basket
Pumpkin Mason Jar {spray paint a vintage green mason jar orange, buy green lids designed for mason jars, find a small branch, cut and glue, then add a raffia ribbon}
Starbucks Via Pumpkin Spice Latte individual packet
Essie “she’s pampered” nail polish
Apple, caramel and a stick – the essentials to make a delicious caramel apple
A cinnamon stick garland {tie cinnamon sticks to twine to create the cutest garland ever}

And, of course, buy or use your Silhouette to print letters, “Happy Fall Y’all,” then use a hot glue gun to glue tiny clothes pins and the letters to the basket handle.

fall in a basket_silhouette_jsorelle

fall in a basket_silhouette_jsorelle

fallin a basket_silhouette_jsorellefall in a basket_silhouette_jsorelle

Happy Fall Y’all!

j. sorelle received products for this post from Silhouette, however we love would Silhouette even if they didn’t send us product, and all opinions are ours, we promise. View all of Silhouette’s amazing products here

{images via j. sorelle}

Breastfeeding Support and Gift for New Moms {free printable and giveaway}

boob aid kit_jsorelle

We are talking boobs today ladies and gents. Yes, you heard us right…boobs! Get excited. And for all you soon to be mama’s and new mama’s, you have an opportunity to win some great goodies. Make sure to read below.

If you follow us, you know we have almost 7 children between us. What you may or may not know is that all 3 of us chose to breastfeed our babies, experiencing the gamut of emotions – from joy to pain.  We wrote a humorous poem about our breastfeeding experience, which you can see here.  Here’s what we know to be true about breastfeeding…Some love it, others don’t, and some can’t do it {and its all ok}. It’s a personal decision and a really hot topic! It’s a lot of work {and can be quite painful}. It’s an amazing bonding time only you and your baby can share. And, it’s an unbelievable power that women possess.

To celebrate World Breastfeeding Week, and mothers everywhere, we created the perfect gift to give to a new mom – to save her, and her boobies as they adjust to breastfeeding. Welcome, Boob-Aid. A ‘kit’ that includes all the necessities – soothies gel, nipple butter, nursing pads, a water bottle and our funny poem. You can buy the label and get the poem as a FREE bonus here.

boob aid_jsorelle

boob aid_jsorelle

boob aid_jsorelle

boob aid_jsorelle

In celebration of World Breastfeeding Week,  Nesting Days Newborn carriers are hosting an incredible giveaway with top brands and bloggers. One lucky winner will take it all! The prize is valued at over $300! Enter for yourself or for a friend and share the giveaway with all of the amazing mamas in your life!

Giveaway is open to US residents only and will end on August 10th at 12am.

One winner will receive :
(1) Nesting Days carrier in her choice of size and color
(1) Undercover Mama shirt in her choice of color
(1) Multi pack of Bamboobies nursing pads
(1) Teething Necklace from GumiGem
(1) Infinity Nursing Scarf from Abbie Grace Designs
(1) Bottle of Nipple Cream from MotherLove
(1) Hands Free Pumping/Nursing Bra from The Dairy Fairy (1) Sleep Nursing Bra from The Dairy Fairy

Estimated retail value : $330

world breastfeeding week giveaway

Enter the giveaway below and then click through to read stories, see photos, and enjoy other fun goodies from all of our partnering bloggers!

a Rafflecopter giveaway

{Boob Aid images via j. sorelle}


DIY Curly Girl Designs Coasters and Gift

DIY coasters

I think I am slightly obsessed with coasters! I want to make them for everyone. So, when I received DIY coasters from Kimi as a hostess gift, and she revealed how she and her mom {love you Barb} made them {the secret ingredient was napkins}, I knew I had to make some. They looked so good, I couldn’t believe it. Maybe I’m late in the game to discover this and this is so 90s or maybe they were on to something BIG…either way, I love it. I have so many fun napkins, always in need of a great gift…and who doesn’t need something to prevent a water ring from their cocktail?

DIY Napkin and Tile Coasters
{thanks Kimi and Barb}

You’ll Need:
Cute Napkins {mine were from Curly Girl}
4 white 4×4 tiles from Home Depot
Modge Podge {the regular kind you use with a brush, and also the spray…I used the spray this time to prevent streaks, and it worked, but you can definitely still use the regular kind}
Cork Board from Michaels

How To:
Peel all the layers of the napkin away from the top layer and cut it along its creases. With the Curly Girl napkins I used, 1 napkin gave me 4 perfect squares for 4 tiles.
Add about 1 tablespoon of Modge Podge to the tile and spread out with a foam brush.
Place the napkin on the tile and press down the sides along the sides of the tile. Careful not to pull as the napkin is thin and can tear.
Make sure all sides, corners and bubbles are pressed down.
Let dry for about an hour to two.
Gently tear the sides of the napkin ‘left over’ to the edge of the tile. It should tear easily. I didn’t need a scissors.
Spray the tiles with the Modge Podge and let dry for 20 minutes. Repeat the spray steps 2 more times. Don’t forget to spray the sides and corners. If you apply Modge Podge with a brush, I would apply at least 2 to 3 layers.
Cut the cork board into squares slightly smaller than 4×4.
Apply Gorilla Glue to the cork board and press down on tile. I applied a smaller square on the cork, as Gorilla Glue spreads 3-4 times as it adheres. If you over-apply, it will leak through the sides and will be really difficult to remove.
Place a heavy book on top of the cork board and tile, and in the morning {or 2 hours}, you will have a lovely set of coasters.

DIY napkin coasters

DIY coasters

DIY tile coasters

{images via j. sorelle}