Fall In The Kitchen: Baked Pumpkin Donuts

baked pumpkin donuts

It’s officially pumpkin season! I don’t know whether to rejoice because of all the cozy feels, or cry, because when falls arrives, winter is just around the corner. My daughter has been wanting to make donuts, so we spent some time in the kitchen, and used pumpkin as the main ingredient.

This recipe is really easy because it involves a box of cake mix. You donut want to miss this one – get the kids involved, too!

Recipe and directions for these Baked Pumpkin Donuts are at Momtastic.

baked pumpkin donuts


DIY Modern Fall Wreath

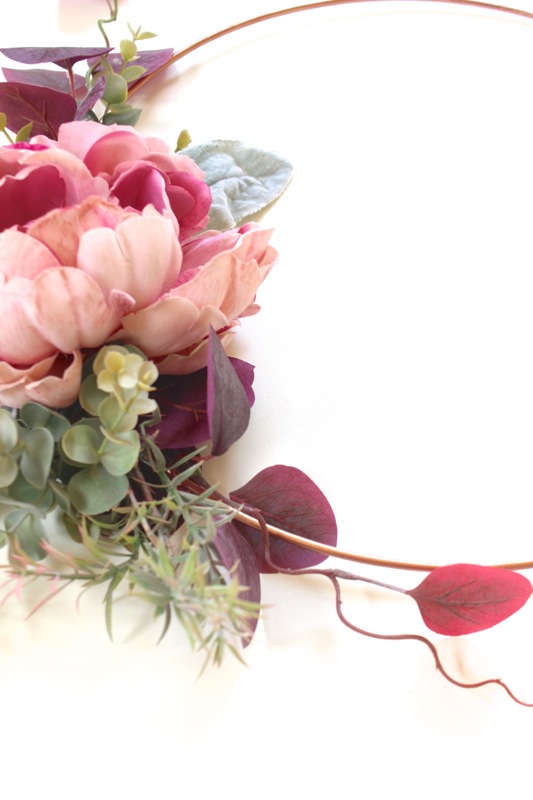
diy-fall-wreath-with-copper-ring-and-peony

As much as we tried to keep summer around as long as we could, it came and went. There’s no denying it’s fall. With some recent snowfall, it feels a lot like winter. When the air gets cold, and the leaves change color, we throw on the scarves, bust out the pumpkins and drink a lot more tea.

After a recent trip to Michael’s, Jessica was inspired to make a DIY fall wreath for her front door. It’s outside the traditional “orange fall” box for her. Though we love orange, there is no orange color on this wreath. It’s modern, and pretty. Here’s how she did it in less than 30 minutes (once the paint on the ring dried).

Materials:

  • Wire ring, 18″
  • Copper spray paint
  • Faux greenery, including lamb’s ear, eucalyptus, a fall-tone peony and burgundy leaves
  • Mini pumpkins, Pier 1
  • Copper floral wire
  • Hot glue gun and hot glue

Directions:

Step 1: Spray paint the ring copper.

Step 2: Cut stems from the faux greenery, and once the ring is dry begin to lay out the greenery along the ring. I wanted everything slightly off-center on the lower right corner.

faux-greenery-and-copper-wire-with-burgundy-leaves

Step 3: Hold stems on the ring and wrap with a 3-4 inch long piece of copper wire. Wrap it until it’s tight on the ring wreath. As you add stems, try to cover the copper wire.

copper-wire-for-a-faux-greenery-wreath

Step 4: Leave a small space in the center for the flower and pumpkin. Use hot glue to glue the flower.

faux-greenery-and-blush-peony

diy-fall-wreath-with-copper-ring-and-peony-on-a-copper-modern-wreath

Step 5: Drill two small holes on the bottom of the pumpkin at an angle where you can insert the copper wire through one hole, and push it out through the other hole. Once the wire is in, set on the copper wreath and wrap the wire around the wreath.

copper-pumpkin-with-two-small-holes-and-a-copper-wire

diy-modern-fall-wreath-with-copper-ring-and-peony

diy-modern-fall-wreath-with-copper-ring-and-peony

Step 6: If you need to hide the copper wire, glue leaves and stems here and there. Then, just hang.

diy-modern-fall-wreath-with-copper-ring-and-peony

diy-modern-fall-wreath-with-copper-ring-and-peony

diy-modern-fall-wreath-with-copper-ring-and-peony

DIY Pumpkin Succulent Planter

pumpkin-succulent-planters

Our love for succulents has never faded. We love them, year-round! So, recently when we took a trip to find pumpkins at a garden center and saw pumpkin planters with succulents, we were head-over-heels in love. We made our own versions of the pumpkin planter {we bought the one with the skeleton}. This no-carve Halloween arrangement can be made for friends and family this Halloween and Thanksgiving season, and when pumpkin season is over, transfer the arrangement to a more festive winter holiday base.

halloween-fall-pumpkin-succulent-planter

Materials:

  • Mini pumpkins, faux or real
  • Succulents, mini
  • Hot glue
  • Skulls and other fairy-size decorations
  • Moss, Spanish Moss
  • Glitter hairspray

Directions:

Step 1: Gather supplies.

pumpkin-plants-succulent-moss

Step 2: Glue a handful Spanish Moss to the top of the pumpkin.

pumpkin-glue

pumpkin-planter-with-moss

Step 3: Insert the small succulents into the moss. Use a little hot glue if you have to keep them in place.

pumpkin-planter-succulent

Step 4: Add any other types of moss and mini stems to the top of the pumpkin. Finally, glue a skull or fairy-garden accessory on top.

succulent-planter-skull-pumpkin

Step 5: Spray hair glitter on the arrangement. This can be wiped off later, but the sparkle is so cute!

glitter-spray-pumpkin

You’re done. To keep the succulents alive, spray them with water.

succulent-planters-pumpkin-arrangements-skull

pumpkin-succulent-planter-halloween

succulent-pumpkin-planter

pumpkin-succulent-planter

succulent-planter-pumpkin-halloween-centerpiece-diy

DIY No-Carve Pumpkin with Customized Jean Pocket

diy-jean-pocket-pumpkin-green-bandana-country-cowboy-boots

We can hardly believe the watermelons and pool bags are being replaced with pumpkins and scarves. But, the fall season is upon us, so we dove right in with a good ‘ole DIY country pumpkin. Maybe it’s our Colorado roots, but there is something nostalgic about farms this time of year for us. The beautiful changing leaves, campfires, pumpkin patches with the kids, corn fields, bales of hay, rustic farm houses and apple picking.

As we were going through our kids closets, we found old jeans with holes in the front. So, why not upcycle an old pair of jeans for a DIY pumpkin with a customized jean pocket? And, wait, the best part was that it didn’t entail any cutting or gut removal of the pumpkin. We’ll do that closer to Halloween, but for now this no-carve pumpkin was stress and mess free, which made us happy.

We tried our new Silhouette CAMEO 3 for this project, and we are so in love with the capabilities of it. This is just a blimp on its cutting radar. But, it’s a cute blimp, and a great way to welcome fall, that’s for sure!

This customized jean pocket pumpkin is so easy, you can do it within 30 minutes. If you really get into it, add a belt through the belt loops.

white-pumpkin-happy-fall-y'all-jean-pocket

Materials:

  • White pumpkin, faux {use a fake pumpkin for this, so you can re-use it year after year}
  • Silhouette Heat Transfer, yellow
  • Old pair of jeans
  • Scissors
  • Hot glue and glue gun
  • Bandana
  • Silhouette CAMEO 3 electronic cutting machine

Directions:

Step 1: Cut the pockets and belt loops from an old pair of jeans, or the kids jeans.

Step 2: Design a fall phrase on your Silhouette software. We bought the adorable Happy Fall Y’all for a whopping .99 cents. Cut the design according to Heat Transfer instructions on the packaging. Remove the yellow ’empty space’ from one side of the heat transfer material.

yellow heat transfer craft project

happy fall y'all

Step 3Press the design onto the jean pocket.

happy fall y'all-jean pocket

Step 4: Place a cloth over the pocket with the design, and use an iron to set it. We counted to 30, and then peeled up just a corner of the design to make sure it was set onto the pocket before removing the plastic entirely. Once the design is set, remove the plastic.

happy-fall-y'all-heat-iron-transfer

Step 5: Use a hot glue gun to glue the pocket onto the pumpkin. Glue the belt loops, too.

hot-glue-gun-pumpkin-fall-craft

Step 6: Insert a bandana, wheat, cotton or whatever ‘accessory’ you want into the pocket.

diy-punpkin-with-a-jean-pocket-bandana

Step 7: Use the Silhouette CAMEO 3 to cut colorful leaves you can stick to the wall. Dust off your cowboy boots, and a hat, and you have a lovely country fall scene.

Happy Fall Y’all!

fall-bench-with-cowboy-boots-hat-pumpkin-jean-pocket-leaves

happy-fall-y'all-pumpkin-with-jean-pockets

jean-pocket-happy-fall-y'all-diy-white-pumpkin

diy-white-pumpkin-happy-fall-y'all-custom-jean-pocket

Thanks to Silhouette America for making this post possible. We loved Silhouette America since the inception of our blog, and would love them even if we didn’t receive product from them. All opinions expressed are our own. Thanks for supporting the companies that support j. sorelle. 

DIY Marshmallow Roasting Stick for S’mores by the Fire

diy-marshmallow-roasting-stick-black-and-white-s'more-chocolate-graham-cracker-diy-smore-stick

We made DIY marshmallow roasting sticks with the kiddos, and then decided to pick up a paintbrush ourselves to make some of our own DIY s’more sticks. Can’t go wrong with a classic black and white s’more stick, right?

You’ll Need:

  • Metal Skewers
  • Wood dowel rods, at least ¾” thick
  • Drill
  • Hot glue
  • Paint
  • Styrofoam

Directions:

  • Step 1: Cut the dowel in half, or in thirds, depending on the length of the stick you want. You may also have to cut the end of the metal skewers with Tin Snips if you can only find the skewers with the loops at the end.

diy-marshmallow-roasting-sticks-wood-rods

  • Step 2: Drill a hole on one end, in the center of the dowel. Make sure the hole is large enough to fit your metal skewer.

wooden-dowel-rod-drill-diy-project

  • Step 3: Press the hot glue gun into the hole and fill the hole with the hot glue until it fills to the top, then quickly press the skewer into the hole. Promptly wipe away any excess glue.

wooden-dowel-rods-metal-skewer-diy-project

  • Step 4: Insert the skewer face down into a piece of Styrofoam, and start to paint!

white-paint-wood-dowel-metal-skewer-diy-project

black-white-diy-marshmallow-skewer-smore-diy-roasting-stick

black-and-white-diy-marshmallow-skewer-smore-project

  • Step 5: Enjoy and indulge!

diy-marshmallow-roasting-stick-black-and-white-diy-smore-stick

diy-marshmallow-roasting-stick-black-and-white-s'more-chocolate-graham-cracker-diy-s'more-stick