DIY Halloween Monster Cups with Solo Cups

diy monster halloween cups_jsorelle

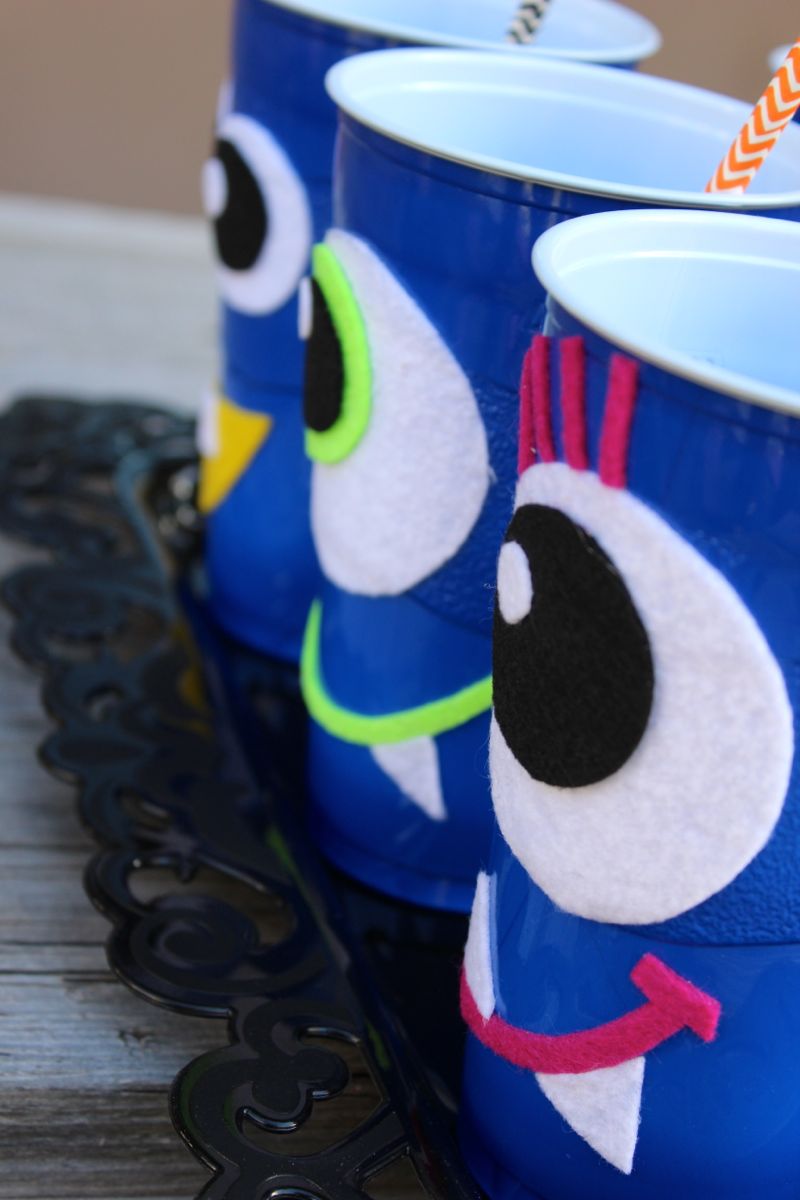
Sully and Mike Wazowski made their way into our homes as our kids watched Monsters Inc., but these DIY Monsters Cups will make their way into our kids hands and hearts this Halloween with this easy, DIY tutorial. Our kiddos loved it!

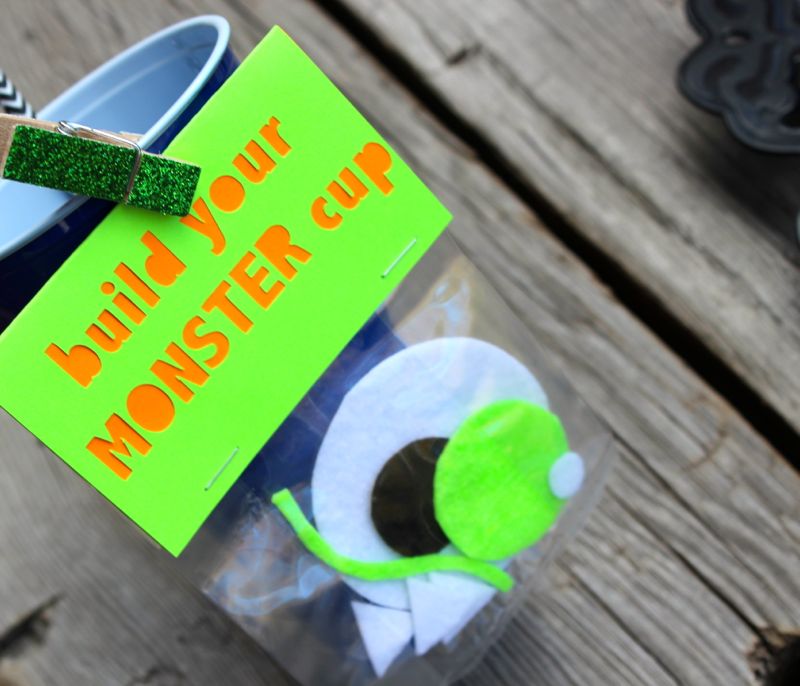
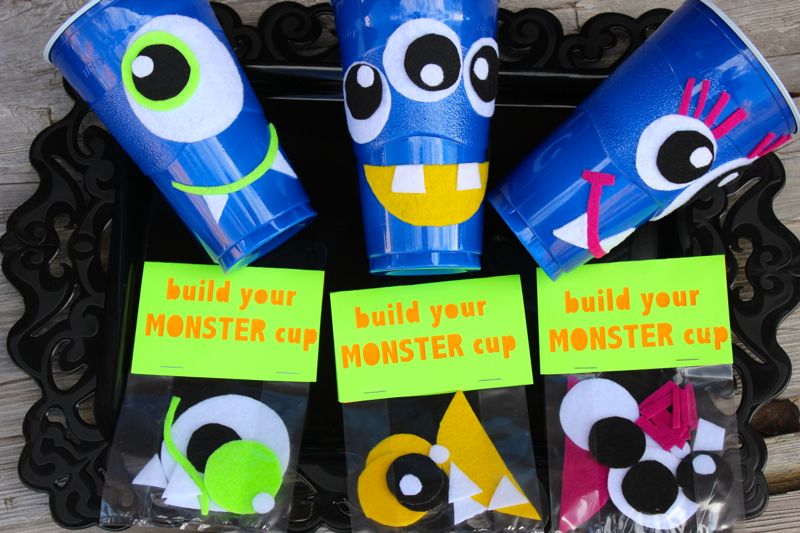
You and your kiddos can make 1-eyed, 2-eyed and 3-eyed monster cups this Halloween with minimal supplies and lots of creativity. This would also make for a fun ‘favor’ to bring to school, or a creative activity for the kiddos at a Halloween party. Each cup comes pre-packaged for each child with pre-cut eyes, mouths, teeth, etc in a cellophane bag attached to a blue Solo cup.

monster cups before and after_WITHTEXT

You’ll Need

  • Blue Solo Cups
  • Colorful Craft Felt Stickers
  • Scissors
  • Cellophane Bags
  • Clothes pin
  • Colorful cardstock

Here’s How

  • Use everyday household items to trace different size circles onto the Felt. We used a mason jar lid, a paint lid and a spice bottle for our circles. As for the lips, mouths, teeth, etc, we did it free-hand.
  • Cut the shapes from the felt.
  • Place shapes inside cellophane bags, and make sure each bag has monster ‘parts,’ including eyes, teeth, mouth, etc
  • For the labels, we used our amazing Silhouette Electronic Cutting Tool to cut out the letters. If you don’t have a Silhouette, you can print labels by hand or use stamps on the cardstock. Fold the cardstock and use a stapler to attach your labels to the cellophane bags.
  • Attach to the cup with a clothes pin.
  • For assembly of the cups, just peel the sticker paper off the back of the felt, and stick to the cup where your little monster heart desires. For the eyes, where there are layers of felt, we needed a tiny bit of hot glue to adhere.

DIY halloween monster cups_jsorelle

DIY halloween monster cups


DIY halloween monster cups

DIY halloween monster cups

DIY trick or treat bags

DIY halloween trick or treat bag

I’m not sure we could get our children to agree to floss, visit the dentist, go to bed early and eat their green leafy vegetables without some sweet and sugary bribery. Halloween is no exception – it s a sugar-high holiday for kiddos – so why not have ‘fun’ with the kids and talk to them about what you expect of them after they consume of all that addicting sugar…oh, and get their commitment in writing!

How To
Buy a monster or pumpkin tote bag from the Dollar Section at Target
Use the Silhouette Electronic Cutting Tool to create a fun contract. Be sure to mirror the image before printing.
Place the text face-up on the tote bag, and cover it with a thin cotton cloth.
Iron on the image with an iron on medium heat. Press down firmly for 45-60 seconds, let cool for about 30 seconds, and peel off. You will likely have repeat the iron step several times – I know I did for all the letters to stick.
If you don’t have a Silhouette, another option is to use Sharpies or even stencils.

target trick or treat bag

DIY trick or treat bag_jsorelle

diy halloween trick or treat bag

We shopped around for other fabulous DIY bags for you too!
1. Pillowcase Ghosts, Martha Stewart
2. Duct Tape Bag, Dukes and Duchesses
3. Silhouette Bag, Uncommon Designs
4. Witch Hat, So You Think You’re Crafty
5. Wild Things Tote, Bloesem Kids
6. Graphic Tote, Country Living

DIY halloween treat bags_jsorelle

{images via j. sorelle, Martha StewartUncommon Designs, Dukes and Duchesses, Country Living, So You Think Your Crafty, Bloesem Kids}

Fall in a Basket Ideas

fall in a basket_silhouette letters_jsorelle

When a Silhouette America Portrait electronic cutting machine arrived at our door step, we literally leaped with joy! We know, who seriously reacts in such a way when an electronic cutting machine arrives? US! And, for good reason – the Silhouette is amazing. It takes our projects to a whole new level of creativity and endless possibility, and it’s a major time saver since it so perfectly cuts everything for us! It’s been a dream come true for us. Honestly, it was on Jessica’s Christmas list – and she will argue it was a NEED, but it was a WANT, a desperate want.

We have found it to be very user-friendly, and we love it. We don’t know what we ever did without it. We’ve made thank you cards, and some other fun projects we will reveal soon, but with the changing colors and the crisp air, a Fall in a Basket seemed appropriate…and too cute not to do.

fall in a basket_silhouette_jsorelle

Fall in A Basket Ingredients
A fall-inspired basket
Pumpkin Mason Jar {spray paint a vintage green mason jar orange, buy green lids designed for mason jars, find a small branch, cut and glue, then add a raffia ribbon}
Starbucks Via Pumpkin Spice Latte individual packet
Essie “she’s pampered” nail polish
Apple, caramel and a stick – the essentials to make a delicious caramel apple
A cinnamon stick garland {tie cinnamon sticks to twine to create the cutest garland ever}

And, of course, buy or use your Silhouette to print letters, “Happy Fall Y’all,” then use a hot glue gun to glue tiny clothes pins and the letters to the basket handle.

fall in a basket_silhouette_jsorelle

fall in a basket_silhouette_jsorelle

fallin a basket_silhouette_jsorellefall in a basket_silhouette_jsorelle

Happy Fall Y’all!

j. sorelle received products for this post from Silhouette, however we love would Silhouette even if they didn’t send us product, and all opinions are ours, we promise. View all of Silhouette’s amazing products here

{images via j. sorelle}

DIY Succulent Planter to Celebrate Happy May Day

diy succulent_mayday_jsorelle On May 1, countries around the world celebrate a traditional springtime festival called May Day. In honor of May Day, and blooming buds and bright colors, I created a DIY Succulent gift to hang from my neighbor’s front door. I bought one for myself. I’m hoping I can keep it alive – I don’t have the best track record with indoor plants.

You’ll Need:
a small can {I used an old corn can}
a piece of fabric
modge podge
a drill
rope or twine

How To:
Remove the wrapper from the can.
Cut a small piece of fabric you can add to the can, leaving some space on the bottom for cutting with a sharp razor.
Apply Modge Podge all around the can.
Add the fabric to the can.
Once dry, use a sharp razor to carefully cut the extra fabric on the bottom of the can.
Apply Modge Podge to the entire outside of the can on top of the fabric to seal it.
Use a drill to drill two holes on the sides of the can for the rope, and one hole on the bottom for adequate drainage.
Add twine or rope into the holes and tie a knot on the inside so it stays in place.
Add porous soil and the succulent.

celebrated in many countries as a traditional springtime festival

celebrated in many countries as a traditional springtime festival

diy succulent_mayday_jsorelle

diy succulent_mayday_jsorelle

celebrated in many countries as a traditional springtime festival

celebrated in many countries as a traditional springtime festival

celebrated in many countries as a traditional springtime festival

celebrated in many countries as a traditional springtime festival

{images via j. sorelle}

tgif link love

Have yourself a lovely Spring, Easter weekend…

1. Do yourself a favor, and listen to some John Legend this weekend. I have always liked John Legend. But after an intimate concert my hubby and I went to last week {yes, date night}, I’m obsessed! His voice was flawless, his humor was sincere and funny and his honesty in sharing his story made him even more personable and lovable. I would share our video we took of his famous “All of Me” but you would hear my hubby and I in the background singing…and that may ruin it for you. So, this weekend, listen to  ‘You and I’ {1st video below…song starts at 0:50}, ‘Good Morning,’ ‘Tonight {Best You Ever Had}’, ‘All of Me’ and one of my faves, ‘Stay with You.’

2. Jenna daydreams of devouring this daily, and now that she’s no longer preggo, she can! Cheers to Moscato Jello Parfaits.

3. This birthday cake you can send in the mail is better than a chocolate cake!!

4. Make this French Toast for brunch this weekend…SO incredibly delicious.

5. This video and story couldn’t be any sweeter, more beautiful, heartbreaking or inspiring.

 {video via YouTube}