Halloween Crafts and Decor For Kids & Adults

cactus pumpkins_diy no carve pumpkin

It’s October, which means the leaves begin to fall, pumpkins adorn our porches, and the witches, ghosts, goblins and googly eye everything come out to play. We have a somewhat hard time in fall…it’s a bittersweet season for us. We are sad to say goodbye to summer, the pool and warm weather, yet we enjoy the vibrant colors on the trees, sipping hot tea (or coffee) and cooler days. But, we know fall is short-lived, and soon Colorado will be covered in white with cold temps. While we enjoy the stillness and beauty of the cold days with falling snow, it’s a long, cold and dark winter ahead. The changing seasons bring so many emotions, but as we get older, I think we see what season we would like to spend 90% of our time in. And, for us, it’s not the winter. 🙂

For now, we will embrace the fall season. We’ve created a few scary, but mostly sweet, fall and Halloween DIY’s over the years. We’re sharing some of our favorite fall DIY’s below, and there’s truly something for every age. Plus, they all are totally doable Halloween crafts, for those of us who have DIY in us, and those who don’t!

halloween and fall DIY crafts-pumpkin wine dispenser

1. Halloween Candle with DIY Googly Eyes: This is a new Halloween DIY, and we are obsessed. The DIY wax eyeballs create such a chic Halloween touch to any party or table setting. Find all the details here. We’ll give you a clue, you can break into your kids crayon box for this one.

2. Pumpkin Wine Dispenser: This is one of our all-time favorites. It’s a pumpkin wine dispenser!! Best part is the wine, of course, but also the fact that you can use it year and after! The wine will flow for all who desire. This is just too good (and easy) not to make!

3. Chocolate Cupcake Toppers: We love our chocolate. This fun cupcake topper looks super fancy, and like your an expert pastry chef, but the only skill set you truly need is the ability to trace. You just need to swap a pencil in for melted chocolate. See how to do it here.

4. Faux Floral Arrangement: Fall doesn’t mean all leaves and branches. You can create a pretty floral masterpiece with just a few stems, and skeleton props. See how we did it here.

diy halloween crafts and googly eye monster DIY for kids

1. Sticker Halloween Jokes: We love a good laugh, and our kids love ALL the cheesy jokes, so we made a FREE Halloween jokes printable for you. All you need to do is print it on sticker paper (Astrobrights in our favorite), and attach it to any snack, treat or gift you want. Due to all the COVID restrictions this year, kids are only allowed to bring pre-packaged items to school, so you can dress them up with Halloween stickers to get the kids laughing! Download the free printable here.

2. Furry Monster Pillows: You don’t need a sewing machine for this one (and barely any sewing kids), and the kids will love the cuddle session with an adorable, cute monster.

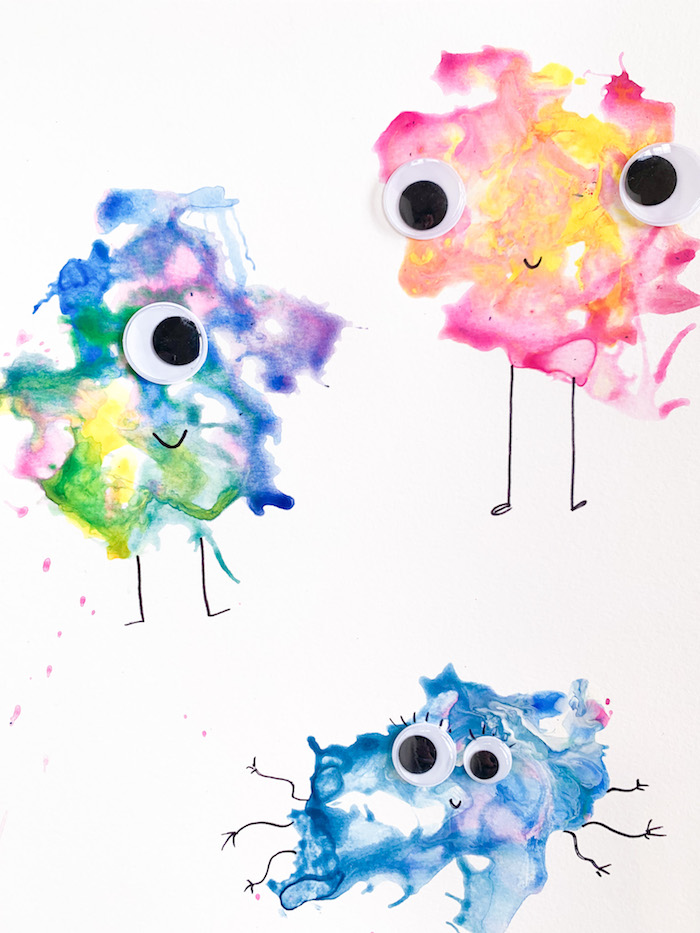
3. Blow Art with a Straw: Your kids will love this one, and it will keep them entertained for hours on those cold days when you are reaching your sanity limits inside.

4. Fingerprint Monster Pumpkins: We created 7 no-carve pumpkin ideas for Real Simple a few years ago, and this was a favorite. Paint your kids fingertips with paint, press tips on the pumpkin, then transform them into adorable monsters. You can avoid the whole sticky, gooey mess of carving pumpkins! You can this tutorial, plus 20 awesome other ideas, here.

Halloween Decor: DIY Googly Eye Wax Candles

DIY eyeball candles

We’ve got major heart eyes for these DIY eyeball candles. It’s subtle, but an amazing DIY candle upgrade for Halloween. The candle is store-bought, but the DIY eyeballs take less then 30 minutes to add, and the supplies needed are minimal. These are not traditional plastic eyeballs, because that would be a fire hazard…instead, these googly eyes are made from wax.

Once Halloween is over, you can store the candles as-is, or scrape off the eyes, and you have your standard black candles back!

DIY Eyeball Candles for Halloween 

Materials:

  • Soy candle wax, white
  • Crayon, black
  • Black taper candles
  • Heat-safe glass with spout (glass measuring cup works great)
  • Pot with about 2 cups water on the stove
  • Bamboo skewer, 2 for each color wax

Directions:

Step 1: Pour about 2 tablespoons candle wax flakes in the glass measuring cup. Set the cup in a pot with water on the stove. Set heat to high and watch it melt. You will not even use it all the wax for these DIY eyeballs, but you can add more if needed. We didn’t use a white crayon with this project because we couldn’t find one. We have 5 of every other crayon, but not white. You can try to use a crayon instead of the soy wax. The black crayon we used for the eyeball was easy to melt and use; however it was somewhat fickle attaching to the white eyeball. By fickle, we mean, the wax had to be very hot and sometimes it would take a second try to stick to the white eyeball (so not THAT fickle). So, we are not sure if this was due to the fact that they are two different kinds of wax, or if the crayons are slightly different to work with.

halloween candles

Step 2: Use the end of the bamboo skewer (the round, flat end, NOT the pointy end) to dab into the hot white wax, and then dab onto the candlestick. You can let the wax cool a bit, so it hardens faster on the candle. As you know a candlestick is round, so if you tilt, the eyeball will be a little deformed. We dabbed a couple drops of wax along one “side” of the candle, and once they turned white and hardened, we would rotate the candle and dab along another edge. The wax takes about 30 seconds to harden, so this is not too time consuming.

diy googly eye halloween candles-halloween crafts

diy googly eye halloween candles-halloween crafts

Step 3: Once you have all the white eyeballs, now it’s time to melt the black crayon. It’s easier to melt the black crayon if you use a knife to cut it into little shavings. When it’s melted, time to dip the skewer (you can try either end of the skewer, depending on the size of the white eye) and dab gently on each eye. If the black doesn’t attach right away, like we mentioned above, dip it into the melted crayon wax again (make sure it’s hot) and try again. It should work, even if it takes a try or two.

diy googly eye halloween candles-halloween crafts

diy googly eye halloween candles-halloween crafts


Step 4: Step them in a safe taper candle holder, and watch them glow as Halloween nears. As always, with any kind of candle or candle-related project, please be careful. Don’t ever leave candles unattended, or within close reach of children. Keep flammables away from open flames. Be smart.

diy googly eye halloween candles-halloween crafts

diy googly eye halloween candles-halloween crafts

diy googly eye halloween candles-halloween crafts

Note: This post contains affiliate links. We may make a small commission if you purchase any of the items, at NO extra cost to you. Thanks for supporting our family blog. 


Make Blow Paint Art With A Straw With Kids

DIY blow art with a straw-googly eye monsters art for kids

Well, we love straws in our drinks, but we never knew we would like them so much for art. We recently blew our way to colorful art with paint and, yes, a straw. Our kids loved this project. It’s fun year-round; on sunny days, and on cold days too, when the kids need to get creative, and off the screens. Since Halloween is around the corner, we made the colorful blown art into cute, adorable monsters. Get those straws out, and those lungs ready to blow.

Blow Art With A Straw

Materials:

  • Watercolor paper
  • Crayola washable paint (watered down with drops of water)
  • Straws (we used paper, but plastic would work, too)
  • Dropper
  • Sharpie
  • Googly Eyes

Directions:

Step 1: Get a paint tray, or tiny cups. Pour about 1/2 tablespoon paint into a cup, along with 1/2 tsp – 1 tsp water. If it’s too watery, the paint will run off the pages too quickly. If it’s too thick, it will not move much at all. Try to find the right consistency that makes drops when placed on paper, and moves well with some wind.

DIY blow art with a straw-googly eye monsters art for kids

Step 2: Use the dropper to drop “blobs” or dots of paint onto the paper. You can place them wherever you want – some close, some far, some big, some little, etc.

DIY blow art with a straw-googly eye monsters art for kids

Step 3: Now, it’s time to blow. Use the straw to create one-of-a-kind art. As you will discover, the art changes with the direction of the straw and wind. If you blow from the top, it’s a different effect if you blow from the side. We made tiny dots of color, big blended works of art, and medium sized ones, too! It was a lot of fun.

DIY blow art with a straw-googly eye monsters art for kids

DIY blow art with a straw-googly eye monsters art for kids


Step 4: Add googly eyes, and use a Sharpie to draw arms, legs and any monster-like accessory or body part you want. How cute are they?

DIY blow art with a straw-googly eye monsters art for kids

DIY blow art with a straw-googly eye monsters art for kids


DIY blow art with a straw-googly eye monsters art for kids

DIY blow art with a straw-googly eye monsters art for kids


Amazon Purchases Too Good Not To Share

Happy Friday! We all know how easy it is to click the yellow, Place My Order button on the Amazon app. The immediate satisfaction we get from finding a package on our doorstep in less than 2 days is sometimes just too good to be true. We have ordered everything from vitamins and coconut oil, craft supplies and home goods, to toys and games for our families. Every month we hope to share some of our favorite purchases with you. As you know, some can be hit or miss. But, we’ve found some good ones.

Download (PDF, 2.32MB)

Note: This post contains affiliate links. If you make a purchase, we may make a small commission, at absolutely no extra cost to you. Thanks for supporting our family blog.

A Corona-Era Back To School Supply Item: DIY Mask Lanyards For Kids (Adults Can Use, Too)

diy no-sew mask lanyard for kids

The kids started school this week. It’s so bittersweet. Summer is the best, and we hate to see it near it’s end. Plus, we love hanging out with our kids. But, we’re happy they get to see classmates again, get into a routine again (that went out the window in March, thanks COVID) and learn, learn, learn. We know it’s been a challenging time for everyone. Some people are choosing to homeschool, some are heading back into the classroom, and others are doing distance learning at home. We hope your navigating this new “norm” the best you can. We are rooting for you, and sending good (and patient) vibes to everyone.

We know the mask topic brings out everyone’s STRONG opinions. We should be able to listen to others opinions, and not hate one another for them. So, here it goes. We don’t think the kids should have to wear masks all day at school. It makes us incredibly sad and mad they have to try to connect to others (and learn) when their precious faces are covered up all day. We also believe masks should be a personal decision for individuals and businesses, not a government mandate. So, it was really hard for us to accept the fact that if we wanted our kids back in school, it meant they had to wear masks all day. We’ve done all we can to keep the kids outside all summer, where they don’t have to wear them. Now, it’s a huge reality check for us. Since masks are a giant pain in the ass, and the kids are likely to lose them, we made some last minute accessories to keep the masks around their neck and not on the floor, on their desk, on someone else’s mouth, or who knows where. They are so easy with absolutely no sewing skills or tools required (and a huge life-saver), so we just had to share!

We can’t take credit for the shoelace idea. Our family friends (shout out to Karen and Bill) came up with this simple, genius idea. They took it one step further, and added a bead in the middle of the shoelace (back of the head), so it fit like a glove around the head, and you don’t even have to use the mask ear straps. We didn’t make it that far yet, but it’s on our list of things to do.

diy mask lanyards for kids

DIY No-Sew Mask Lanyard with Shoelaces

diy mask lanyard with shoelaces for kids

Materials:

  • Shoe lace, flat (make sure the width of the lace is large enough for the snap closures. We found ours at Walmart, and also used the waist tie from an old pair of shorts.
  • Dritz Snap Fastener Kit
  • Hammer
  • Masks – we bought some from Target (Cat & Jack brand) and also supported a local company we love, Aksels

Directions:

Step 1: Cut the ends off the laces. My laces were long enough, that I cut the entire lace in half for two mask straps. The length you want is a personal preference, but mine were about 17 inches.

Step 2: Carefully burn the ends of the laces so they don’t fringe.

Step 3: Add the fasteners on each end, and hammer in place. You will create two little loop on each side of the lace that snaps, and you will put the mask straps inside each loop.  These can be easily removed when you need to wash the mask, and it’s comfortable on your neck.

diy mask lanyard with shoelaces for kids

diy mask lanyard with shoelaces for kids

diy denver broncos mask lanyard for kids

If you have a child that likes to craft, or wants a really colorful DIY mask lanyard, he or she might want to try the following method, a DIY Loom Mask Lanyard.

diy mask lanyard for kids

DIY Loom Band Mask Lanyard

Materials:

Directions:

The one and only step: Make a standard loom bracelet, except longer, about 17 inches. Then, add the key ring clasp on each end, and then attach to the ear straps for the mask. Voila. So easy to put on and take off.

diy loom band mask bracelet for kids

DIY loom band mask lanyard for kids

diy mask lanyard for kids


SHOP THIS POST:


This post contains affiliate links, which mean we may receive a small commission from your purchase; however, it is at NO additional cost to you. Thanks for supporting our blog. It means the world to us.