Game On: DIY Football Checkers

diy-football-checkers-game-time-fun-for-everyone

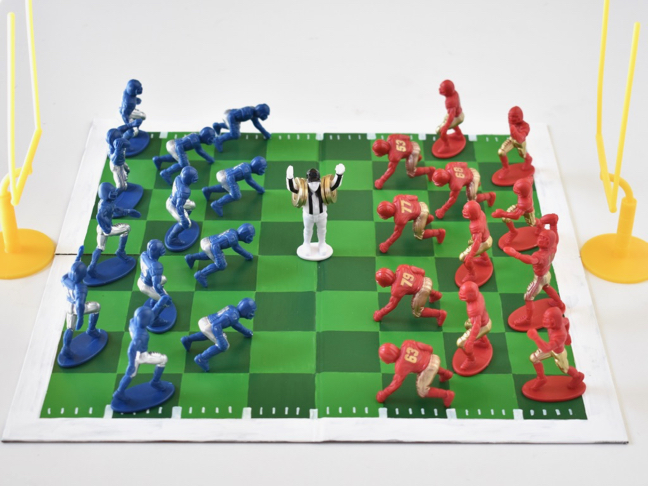
‘Tis the season for tailgating, game day snacks, rivalries, comebacks and all things football. With friendly competition in mind, plus tackle-free zones (home, school and the parking lot), we created a DIY football checkers game. It’s fun for the whole family. Pack it for your next tailgate, or play it at home! Our kids love it.

We shared all the details for how to make this DIY game on Momtastic.

diy-football-checkers-game-time-fun-for-everyone


$250 Oriental Trading Gift Card Giveaway

IMG_5027 (1)

Oh my goodness, we have an amazing giveaway with one of our favorite companies, Oriental Trading. When we think about parties, decorations, DIY’s, and crafts, Oriental Trading is top of mind.

Recently, we’ve been playing around with DIY Balloon garlands. It’s been a party of balloons in our house for several weeks now with all the lingering balloons. We get the kids in on the blowing and tying action, so it’s fun for the whole family. Oriental Trading has everything we need for our balloon garlands (tutorial coming soon). It’s a wow-factor for any party, and an affordable one. Get balloon happy like us and check out the awesome selection at Oriental Trading.

If you have a party coming up, want to stock up on school or craft supplies, or you’re hosting an upcoming holiday, enter the giveaway today to win $250.  The giveaway starts July 11 at midnight and ends July 25 at 11:59 pm (Pacific Time). Enter below.

$250 Oriental Trading Gift Card Giveaway

After you enter the giveaway, check out some of the other amazing blogs included in the giveaway:
Happy Family Blog
Teacups and Fairytales
Suburban Wife City Life
Little Bits of Everything
Living La Vida Holoka

Cheers To A DIY Christmas Stocking With A Wine Spout

diy-red-christmas-stockings-with-a-wine-spout-making-spirits-bright-holiday-bar

‘Tis the season for holiday parties, gift-giving and all things merry and jolly! We pour more wine around the holidays with all the parties, dinners and let’s face it, stress. So, wine was on our minds when we crafted our next DIY Christmas gift idea.

For this DIY, we’re changing the classic line from the Twas the Night Before Christmas poem that reads, “…the stockings were hung by the chimney with care, in hopes that St. Nicholas soon would be there,” to instead say, “…the stocking were hung by the bar with care, in hopes that friends and family soon would be there.” Yes, we’re hanging our families stockings in the living room like we always do for Santa, but we’re hanging a few extra in the bar this Christmas, and giving them to friends to spread good cheer. Christmas is all about making spirits bright, right?

diy-red-christmas-stockings-with-a-wine-spout-making-spirits-bright-holiday-bar

This DIY wine stocking makes for the perfect gift for friends, neighbors and family. Plus, it’s a really fun topic of conversation whether you’re at a party, or having a quiet night in with the girls.

Anyone and everyone can (and should) make these DIY Christmas stockings. Here’s how we made the ultimate stocking stuffer.

Materials:

  • Stockings, .98 cents at Wal-Mart, or other great options at big name retailers
  • Felt
  • Scissors
  • Boxed wine (we used Bota Box)
  • Hot glue and hot glue gun

Directions:

Step 1: First, we upgraded the stockings with about a $3 plaid fabric investment. We didn’t use a needle and thread – just scissors and a hot glue gun. Before the plaid, there was a thick strip of white felt.

red-and-plaid-stockings-with-funny-lines-diy-boxed-wine-stocking-holder

Step 2: Cut out letters for the fun quotes. We went with, Drink Up Grinches, Santa’s Helper, He Sees You When Your Drinking and Dreaming of a White Christmas. We had black letter stickers and just traced as we cut with the scissors. You can freehand the letters though, maybe even using good vinyl stickers to save yourself cutting time all together.

red-stockings-black-felt-letters-he-sees-you-when-your-drinking

Step 3: With a hot glue gun, glue the letters to the stocking.

red-stocking-dreaming-of-a-white-christmas

Step 4: Cut out a small hole in the front toe part of the stocking. If it’s too big, you can always hot glue the fabric tight around the wine pull tab.

scissors-red-stocking-wine-bag

Step 5: Insert the wine bag in the stocking and pull the wine tab through the hole in the toe.

red-and-plaid-stockings-with-funny-lines-diy-boxed-wine-stocking-holder

boxed-wine-bag-red-plaid-stocking-he-sees-you-when-your-drinking

diy-wine-stocking-holder-red-vino-and-plaid-stocking

diy-stocking-that-holds-wine

Step 6: Hang and pour. Cheers!

making-spirits-bright-holiday-bar-with-red-wine-stockings

diy-red-christmas-stockings-with-a-wine-spout-making-spirits-bright-holiday-bar

diy-red-christmas-stockings-with-a-wine-spout-making-spirits-bright-holiday-bar

diy-red-christmas-stockings-with-a-wine-spout-making-spirits-bright-holiday-bar


Light, Love & Paper at a Zen-Worthy Ladies Night

zen-ladies-night-with-diy-paper-art-lotus-flowers

Life is beautiful. We are truly blessed in this life. But, just like everyone, our stress levels rise, the to-do lists get longer, worries can be all-consuming and we are over-committed. To stay grounded (and sane), we have to find ways to bring peace into our lives. We often take refuge in family and friends who lift us up. We take breaks. We let in some of the love we deserve, but often neglect to receive. We have a cocktail. We have meltdowns. We put on yoga pants and watch the same movies we’ve seen a hundred times before. We pray. We take deep breaths. We party. We try to live with intention and grateful hearts.

A good reminder of our intentions, and the positive energy we need on a daily basis are the Mala beads we wear on our wrists. The string of beads used in prayer and meditation were first introduced to us several years ago after a stop in Tibet Imports in Denver, CO. A sweet woman, Sarita, gave us a Vedic Astrology reading, and we bought our first Mala prayer beads.

After receiving many compliments on our bracelets, we wanted to share that beauty and healing with others. What better way to celebrate all that good energy and fabulous piece of jewelry than with family? Not just any family – 16 strong women from our large Italian family. So, together at Jenna’s beautiful newly renovated home, we made Mala bracelets, listened to individual Vedic Astrology readings with Sarita and Suderson, sang, ate and drank our way into the night.

holla-for-some-mala-sign-and-mala-beads

Our goal was to make the space safe, pretty and full of love and light. It was a good vibes only zone. ASTROBRIGHTS® Papers helped us brighten the evening with all the colors of the rainbow, just like the seven Chakras, which are energy centers of the body known in Indian religions, often associated with vibrant colors.

mala-bead-making-party

Here’s fun ways on how we got our Mala on. We highly recommend it for your next girls night!

DIY Lotus Flower Art
We can’t believe this unique piece of art is made with paper. These DIY lotus flowers are dimensional, bright and one-of-a-kind. Lotus flower are known to grow from the bottom of streams and muddy ponds, and rise above the water and bloom. We chose this symbol to hang at our party because of it’s symbolic nature of spiritual growth and the ability to rise above obstacles.

red-orange-yellow-lotus-flower

Materials:

Directions:

Step 1: Print a photo of the lotus flower, tape it to the foam core, and use an X-acto knife to cut around all the edges of the flower. Be sure to only cut half-way through the foam core, not entirely through it.

black-printed-lotus-flower

white-foam-core-with-slits

Step 2: Next, cut 1-inch thick strips of paper. We used Sunburst Yellow™Cosmic Orange™., Rocket Red™, Blast-Off Blue™Celestial Blue®Lunar Blue™Terra Green™ and Martian Green™ for our lotus flowers.

strips-of-green-paper

Step 3: Insert the paper strips into the tiny slits you made in the foam core. You will have to cut the paper to fit each slit. We inserted the paper in the slit, and then cut it at the end of the slit. We did not cut and measure each one individually before inserting it. Once we put paper in all the slits, we cut paper with a scallop effect, and glued it around the edges for a lovely frame.

green-paper-lotus-flower

blue-lotus-flower-made-with-paper

red-orange-yellow-diy-lotus-flower

IMG_1277

For the framed word art, we cut powerful words, glued them to foam core and framed them the same way as the lotus flower. These are all beautiful (and totally affordable) pieces of art that you can do for any party (or just everyday décor).

diy-lotus-flower-art-on-doors

Bar Sign & Wall Decor
We’ve seen the Namaste play on words, such as Namast’ay in bed and Namast’ay a while, so we made our own sign with letters. The words read Namast’ay & Drink. It was placed strategically above the “bar.” This is as easy as printing and cutting letters. You can string the letters on twine, or hang them like we did with wall putty.

namastay-and-drink

Vedic Astrology is rooted in a birth chart, the planets, stars and their patterns. We made a string of 3-D stars, circles and moons to hang at the party. We used a variety of colors on this banner, including Eclipse Black™, Pulsar Pink™, Sunburst Yellow™, Fireball Fuchsia™, Celestial Blue®, Martian Green™, Stardust White™ and Outrageous Orchid™. To make these shapes, cut circles and stars, fold them in half and glue them along a piece of twine, also gluing all the sides of the shapes together. For each 3D shape, you will need four parts, or shapes. For example, you will need 4 circles to make one 3D circle or ball.

diy-hanging-paper-banner-circles-and-stars-shapes

paper-moon-circles-and-stars

Elephants are a sacred symbol in Buddhist and Hindu religions, so we knew we wanted to incorporate them somehow. We traced and cut an elephant shape, and then used our Silhouette electronic cutting machine to cut intricate designs on another piece of color paper. We glued them together, and hung them from a long piece of embroidery string. If you don’t have a Silhouette, you can draw designs on the elephant, or even find a photo online with designs already on the elephant. The colors we used for the elephant are Pulsar Pink™, Terrestrial Teal™, Outrageous Orchid™, Fireball Fuchsia™ and Blast-Off Blue™.

bright-and-colorful-paper-elephants

DIY Lanterns
Jenna has a stunning chandelier hanging from her ceiling, so we couldn’t compete with that. But, we tried to add a an element from Sarita’s shop to help her feel right at home. That element was DIY Tibetan lanterns. We made DIY paper lanterns with traditional Buddhist symbols printed on them, including the Om symbol and the Hamsa Hand. Although they are traditionally handmade from lokta paper or cotton, the Astrobrights worked great!

blue-om-paper-chandelier

Materials:

Directions:

Step 1: Find images of traditional Buddhism or Hindu symbols online. Copy and paste into Microsoft Word.

Step 2: Resize image in Word, and then print in the center of four pieces of paper.

Step 3: Fold the bottom ½ inch and the side 1 inch. You want the fold to be on the backside of the image.

folded-blue-paper

Step 4: Use a needle to prick holes every inch from the top to the bottom on the side of each paper through the fold. Repeat on all the sides of each sheet of paper (not the top and bottom edges).

Step 5: Tie a know at the end of a piece of string, and insert it from the back of one piece of paper, through the fold to the front, and then into one hold on another piece of paper. Essentially, you are “sewing” the sides of the lantern together. A cross-pattern worked best for us, but you can do whatever is easiest here. They just have to be attached to one another. We have NO sewing skills whatever, it’s just a pattern of going in through one hole and then up through another.

diy-yellow-tibetan-lantern

Step 6: Once all the sides are sewn together, add 4 equal pieces of string to the top of each lantern (either glue the string or attach it to the existing string) to hang it from the ceiling. For extra flair, add little tassels to the bottom of each corner of the lantern. Command hooks worked great to hang the lanterns. For this DIY, we used Sunburst Yellow™, Terra Green™  and Celestial Blue®.

diy-blue-and-green-paper-tibetan-lanters

yellow-paper-lantern-namast'ay-and-drink-paper-letters

As we face our busy days, our malas will serve as a reminder to bring a little love and light to everything we do. And, we will certainly remember this special night with family where we shared our stories, and laughed our way through bead making.

blue-mala-beads

blue-prayer-mala-beads

girl-holding-a-glass-of-wine-at-a-party-namastay-and-drink

sisters-wearing-mala-bead-bracelets

mala-beads-and-womens-hands

This post is in partnership with Astrobrights Papers. We were crafting with Astrobrights Papers paper long before this post. It’s always been a fave product of ours. Thank you for supporting the brands that support j. sorelle. Astrobrights was one of the first, so we are very grateful.

Affiliate Disclosure: This post contains affiliate links, which means j. sorelle receives a small commission from the sale of certain items; however, the price is the same for you, whether it’s an affiliate link or not. 


DIY Halloween Tee: Witchful Thinking

witchful-thinking-tee-diy-grey-shirt-witch-hat

It’s wishful thinking to think that we will dress up every year on Halloween. It can be fun, but it’s not our most favorite holiday to celebrate, so we typically don’t dress up. We dress the kids cute and call it good. Our favorite part about the holiday is celebrating at our aunt and uncle’s house. The party is loud, the food is good, the homemade costumes rock and the laughter echoes throughout the house. We love a good tradition that is carried on for generations…don’t you?

If you semi-like Halloween, don’t care for it at all, or have a party to go to but don’t want to dress up, this DIY semi-costume is for you. It’s a last-minute, really easy DIY tee that can be made in less than 10 minutes. Procrastinators, you got this!

This Witchful Thinking tee is cute, and you won’t be totally lame at this year’s party with black pants and a witches hat to fancy it up a bit.

Where our witches at?

witchful-thinking-tee-diy-grey-shirt-witch-hat

Materials:

  • Cotton t-shirt
  • Iron-on letters
  • Iron

Directions:

Step 1: Cut out letters for WITCHFUL THINKING.

Step 2: Follow iron-on letter package instructions.

witchful-thinking-tee-black-witch-hat-halloween-diy-costume

Step 3: Wear it and have fun!

witchful-thinking-tee-diy-halloween-costume-black-witch-hat

witchful-thinking-tee-diy-grey-shirt-witch-hat