Holiday DIY: How To Dress Up Boxed Wine for The Holidays

DIY Boxed Wine Gingerbread Boxes

Last time, we got cozy and cute with DIY beanie wine bottle toppers. Today, we’re dressing up boxed wine. In fact, we made a DIY boxed wine gingerbread village we lovingly call Vinoville. Let’s get one thing clear, there’s nothing wrong with boxed wine. If your a wino, it may not be your thing, and that’s cool. We love a smooth bottle of Brunello di Montalcino as must as anyone, and if we had the budget, we would splurge all the time.

But, we love to sip wine, whether it’s in a bottle or box. Wine, even when it’s presented from a box, tastes good, and helps us get our chill on. Plus, we’re getting more bang for our buck, and gotta love that! As a college student or 20-something who is hanging with girlfriends – a boxed wine on the table or bar is ALL good. As grown women who like to host (sometimes), a box of wine is not the prettiest addition to the bar. Again, absolutely nothing wrong with it, but dressing it up just a bit can make all the difference for a more ‘grown-up’ look, especially during the holidays. You can do it for very little money, and get creative with it! You can use the wrapping paper you have on-hand, so you don’t even have to go to the store. We love to wrap with Kraft paper, so we had some on hand, and used it to create Gingerbread Houses. But, imagine how cute this would be with plaid paper, or pretty metallic paper with a big bow!

diy boxed wine gingerbread houses-holiday DIY

DIY Boxed Wine Makeover: Gingerbread Houses 

Materials:

Directions:

Step 1: Remove the cardboard circle, where the spout comes out. Next, trace that circle  on the wrapping paper. Make sure you do it in the middle, like your wrapping a gift, so you have enough paper on all sides (basically don’t trace it on the edge of the wrapping paper). Cut the circle out with scissors or an X-acto knife. You can make it slightly larger so it doesn’t rip when you pull the spout through, or if you rip it like we did on one of them, you can add a black paper door (or even a mini wreath) around it and no one will ever know.

Step 2: Wrap the wine boxes. We didn’t get a good photo of that, but put the wine box upside down (you can take the bag out if it’s too heavy and crinkles the paper), and line up the cut out circle with the spout. You can pull the spout through it at this point if you didn’t already in step one. Wrap it like a gift, so do the back first, then “cut-in” on the sides for the bottom just like you would for a gift. See step 3 for the roof.

diy boxed wine gingerbread houses-holiday DIY

diy boxed wine gingerbread houses-holiday DIY


Step 3: Cut in the sides just like you did for the bottom, but just tape one of the sides, not the final “corner” – that peak is the roof. Kraft paper stays nice and straight. If you use flimsy wrapping paper, you can either find something to prop it up, have a flat roof or keep open up and glue two of the sides of the wine box together before wrapping it, so it creates a peak (we did that for the white-roof one before we created a ruffle roof with a crepe paper roll).

diy boxed wine gingerbread houses-holiday DIY

diy boxed wine gingerbread houses-holiday DIY

diy boxed wine gingerbread houses-holiday DIY-ho ho ho pour the pinot-wine craft

Step 4: Now, it’s time to make gingerbread house lines, swirls, doors, snowflakes, etc. Make each house your own. We used a marker pen for the white decorations, and added ribbon, pins and mini Santa hats, and a bell to accessorize. They can be as simple or as complex as you want. How fun would it be to make the Grinch house, Whoville, or even ugly Christmas sweaters?! If you want the labels, we can email them to you for free. Email us at hello@jsorelle.com or IM us on IG here and tell us you want the boxed gingerbread house wine printables. We have one for Merlot, Pinot and Chardonnay!

diy boxed wine gingerbread houses-holiday DIY

diy boxed wine gingerbread houses-holiday DIY

Step 5: Let the wine flow. Cheers!

diy boxed wine gingerbread houses-holiday DIY

Gnome For the Holidays

diy gnome wine toppers

We love our wine, and a glass of wine is better when shared with a friend, that’s for sure. Give wine to friends and family this holiday season, or have friends over and make sure wine is ready at the bar, with these adorable DIY gnome wine bottle toppers. They add that extra touch of homemade love and cuteness to an ordinary bottle of wine, and they are so easy to make. No sewing required.

Momtastic has all the details here.

Thanks to Cole and Dainer  for sharing some of the fluffy faux fur from her amazing blankets for the gnome beards. The fur on her blankets is like heaven on my family’s skin when we have snuggle sessions.

Cheers to a happy holiday!

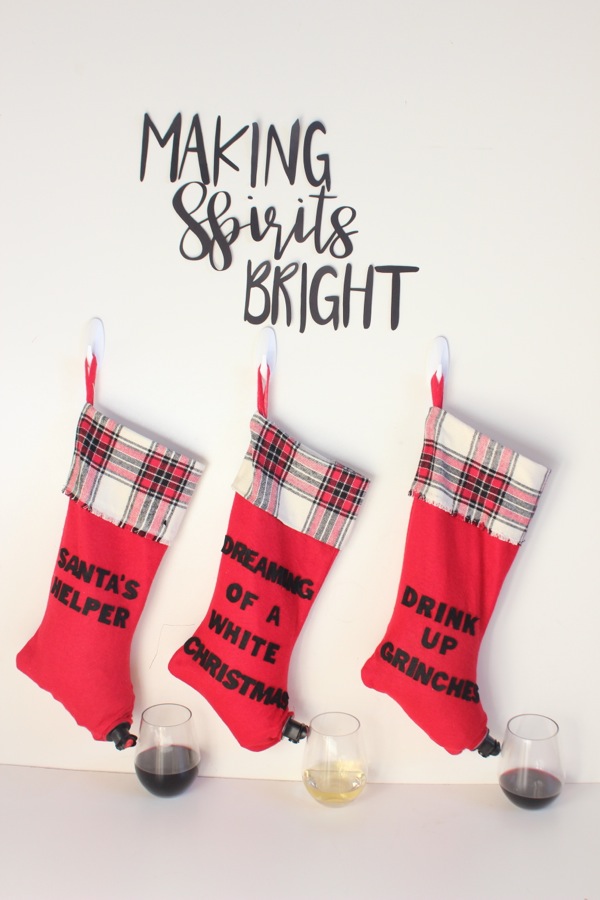
Cheers To A DIY Christmas Stocking With A Wine Spout

diy-red-christmas-stockings-with-a-wine-spout-making-spirits-bright-holiday-bar

‘Tis the season for holiday parties, gift-giving and all things merry and jolly! We pour more wine around the holidays with all the parties, dinners and let’s face it, stress. So, wine was on our minds when we crafted our next DIY Christmas gift idea.

For this DIY, we’re changing the classic line from the Twas the Night Before Christmas poem that reads, “…the stockings were hung by the chimney with care, in hopes that St. Nicholas soon would be there,” to instead say, “…the stocking were hung by the bar with care, in hopes that friends and family soon would be there.” Yes, we’re hanging our families stockings in the living room like we always do for Santa, but we’re hanging a few extra in the bar this Christmas, and giving them to friends to spread good cheer. Christmas is all about making spirits bright, right?

diy-red-christmas-stockings-with-a-wine-spout-making-spirits-bright-holiday-bar

This DIY wine stocking makes for the perfect gift for friends, neighbors and family. Plus, it’s a really fun topic of conversation whether you’re at a party, or having a quiet night in with the girls.

Anyone and everyone can (and should) make these DIY Christmas stockings. Here’s how we made the ultimate stocking stuffer.

Materials:

  • Stockings, .98 cents at Wal-Mart, or other great options at big name retailers
  • Felt
  • Scissors
  • Boxed wine (we used Bota Box)
  • Hot glue and hot glue gun

Directions:

Step 1: First, we upgraded the stockings with about a $3 plaid fabric investment. We didn’t use a needle and thread – just scissors and a hot glue gun. Before the plaid, there was a thick strip of white felt.

red-and-plaid-stockings-with-funny-lines-diy-boxed-wine-stocking-holder

Step 2: Cut out letters for the fun quotes. We went with, Drink Up Grinches, Santa’s Helper, He Sees You When Your Drinking and Dreaming of a White Christmas. We had black letter stickers and just traced as we cut with the scissors. You can freehand the letters though, maybe even using good vinyl stickers to save yourself cutting time all together.

red-stockings-black-felt-letters-he-sees-you-when-your-drinking

Step 3: With a hot glue gun, glue the letters to the stocking.

red-stocking-dreaming-of-a-white-christmas

Step 4: Cut out a small hole in the front toe part of the stocking. If it’s too big, you can always hot glue the fabric tight around the wine pull tab.

scissors-red-stocking-wine-bag

Step 5: Insert the wine bag in the stocking and pull the wine tab through the hole in the toe.

red-and-plaid-stockings-with-funny-lines-diy-boxed-wine-stocking-holder

boxed-wine-bag-red-plaid-stocking-he-sees-you-when-your-drinking

diy-wine-stocking-holder-red-vino-and-plaid-stocking

diy-stocking-that-holds-wine

Step 6: Hang and pour. Cheers!

making-spirits-bright-holiday-bar-with-red-wine-stockings

diy-red-christmas-stockings-with-a-wine-spout-making-spirits-bright-holiday-bar

diy-red-christmas-stockings-with-a-wine-spout-making-spirits-bright-holiday-bar

diy-red-christmas-stockings-with-a-wine-spout-making-spirits-bright-holiday-bar


DIY Red, White and Blue Ice Bucket

red-white-blue-ice-bucket-july-4th-wine-cooler

It’s about that time when red, white and blue are just about the only colors on our minds. Yes, one of our favorite holidays, July 4th, is coming up, and this year we’re adding a DIY fruit ice bucket to our party to do’s.

A DIY patriotic ice bucket is the perfect July 4th accessory, and it’s so easy and cheap to do. Guests will love the extra touch of red, white and blue, and they will enjoy their chilled beverage.

red-white-blue-diy-ice-bucket-fruit-diy-july-fourth-wine-cooler

red-white-blue-ice-bucket-july-4th-wine-cooler

Materials:

  • water
  • large bucket, we used a plastic one from Party City
  • small buckets {small enough to fit inside large bucket and large enough to fit a wine bottle or beer can}
  • blueberries, fresh or frozen, at least 2 cups
  • strawberries, fresh or frozen, sliced, 2-3 cups
  • weight, such as a rock
  • wine or beer

Directions:

Fill about 1/3 of the large bucket full of water, then drop in all the strawberries. Freeze for at least 5-8 hours.

strawberries-in-a-bucket

Place 2 small buckets on top of first layer of ice, add weight inside {we used a rock}, and fill another 1/3 of the bucket with water. Do not get water inside the small bucket because it will be more difficult to remove the buckets from the ice. Freeze for about 5-8 hours.

buckets

For the final layer, fill the remaining 1/3 of the container fill of water, and then drop in blueberries. Freeze for 8 hours.

blueberries-in-a-bucket

Remove from the freezer. Pour boiling water inside the small buckets and gently twist to remove from the ice. Additionally, run the outside of the large bucket with  hot water from the sink faucet. After about 15 seconds on each side, the ice cooler will be easily removed, and the layers should look like this.

red-white-blue-diy-ice-bucket-july-fourth-party

Carefully flip the ice cooler out from the bucket with your hands and set on a tray. Fill the holes with wine or beer. We couldn’t decide because beer, well, it’s all-American and those Budweiser cans are so patriotic and awesome. But, the vino lovers that we are couldn’t resist the taste and look of the red and blue Relax Wine bottles of wine.

budweiser-beer-red-white-blue-ice-bucket-diy-fourth-of-july-beer-cooler


relax-wines-red-white-blue-ice-bucket-wine-cooler

red-white-blue-ice-bucket-budweiser-beer-diy-cooler


relax-wines-red-white-blue

Cheers!

Important Note: We took photos of this DIY ice bucket with wine we had in the liquor cabinet, and after review of photos, while the wine was good, for the ultimate patriotic post, the wine bottle {and beer} needed to be more festive in color. Enter, Relax Wines and Budweiser beer! However, the ice bucket had to be re-frozen during a several hour photo shoot intermission, and a thin ‘film’ of ice formed over every layer, so the color of the DIY ice bucket was dulled, and the lines of the red, white and blue blurred. You win some, you lose some. Either way, we love our bucket, but honestly, it will be more vibrant than our photos if you have the right alcohol the first time around. 

How to Make the Best Antipasto Platter

antipasto plate_jsorelle

We’re Italian and proud of it. We love our heritage and the Italian culture…and of course, the food! Our mouths water with the site of a good Antipasto Platter.

But, how do they do it? How do people create that savory “before the meal” plate that can bring people together and satisfy their cravings? What’s the secret to a beautiful and delicious Antipasto Plate?

We know an expert who can tell us…because we know a place that does everything right when it comes to Italian food and ambiance.

Parisi.

Christine and Simone successfully recreated a little piece of Italy in Denver, Colorado. If you haven’t been, you need to go. And, if you don’t live in CO, you need to add a visit to CO to your bucket list, and add Parisi to your must-eat list.

Here’s owner Christine’s tips for a delectable Antipasto Platter.

– Make sure there’s a balance of olives, cheese, cold cuts & toasted bread with topping.
– Include a mix of soft and hard cheese.
– Tempt the palette with new flavors because people always like to try new things, but also intermingle with a few familiar flavors.
– Keep the toppings simple for the Bruschetta using seasonal veggies. It’s nice to add a little sweet balsamic to the mix to balance out the savory.

parisi antipasto platter_jsorelle

And, what about the essential sidekick to a yummy Antipasto Platter, otherwise known as wine? Christine has us covered there too.
“Reds are a good choice for heartier antipasti plates such as a San Giovese blend {San Giovese is the grape used for Chianti and so many of the Tuscan faves),” she said. “But a refreshing Pinot Grigio isn’t a bad choice for those who insist on white.” 
She added, “Oh, and then there is one of my favorite red Italian blends from the Veneto region:  La Cappuccina’s Madego.. it’s organic and so smooth, but not boring. But I am all for blends these days…I can’t commit to just one grape.”
parisi antipasto platter_jsorelle
The list of ingredients from the mouth-watering plate Meredith Moran of Meredith Moran Photography snapped for us at Parisi includes…
Drunken Goat (harder goat cheese immersed in red wine)
Fresh Asiago
Pecorino Picante
Prosciutto di Parma
Finocchiona salame (with fennel)
Castelvetrano & Kalamata Olives
Mortadella
Pancetta
Bruschetta with an artichoke topping & a cherry tomato topping
parisi antipasto platter_jsorelle
Now are you ready to impress your guests with the most amazing Antipasto Platter ever? Of course, if you need some authentic Italian food for inspiration, a great sandwich for lunch, an impressive place to bring a special date, or you just want to indulge yourself because you deserve it, stop by Parisi. If you want to eat for hours like the Italian’s do in a more intimate setting, make a reservation right below Parisi at Firenze a Tavola {same owners}. I promise, you will want to go back for more. It’s special to us, not only because Florence is our love affair city, but also because Jenna and Will celebrated their rehearsal dinner at Firenze a Tavola, and that was just the beginning to a wonderful life together.
parisi denver_jsorelle
parisit denver_jsorelle
Thanks to Christine at Parisi and Meredith Moran for making this post possible.