DIY Cosmetic Bag Party Favor

DIY cosmetic bag

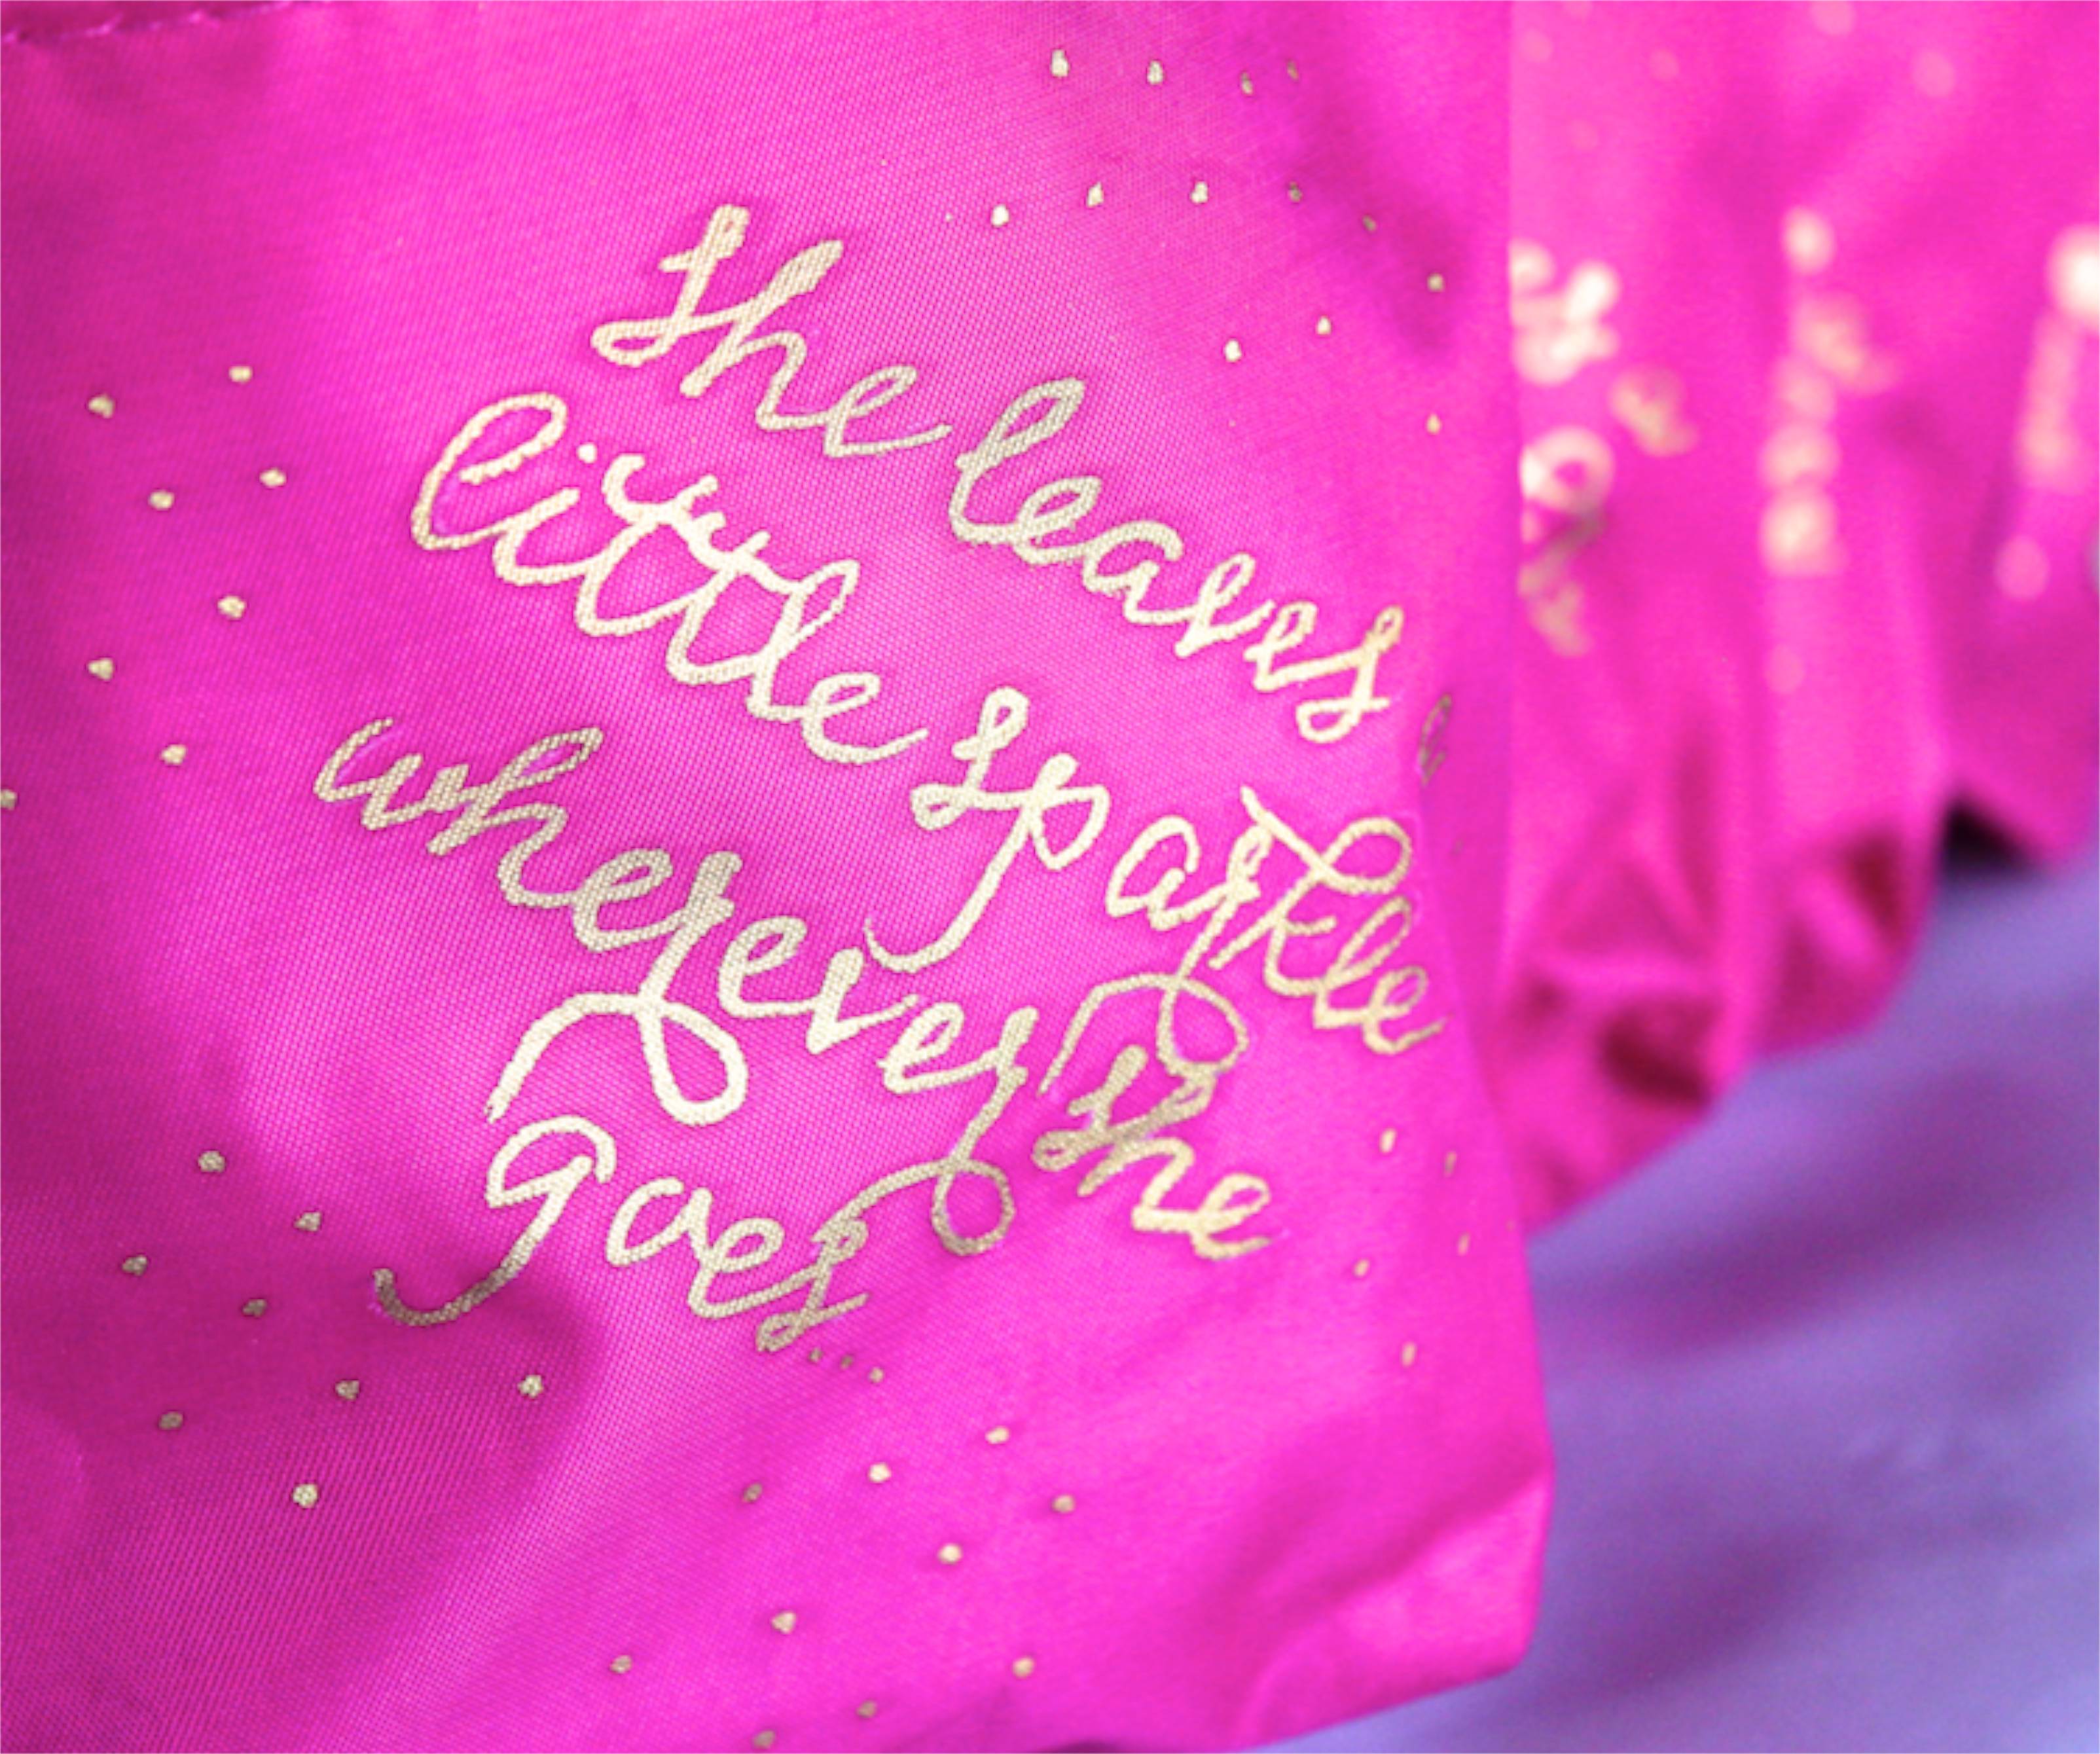
How do you leave a little sparkle?

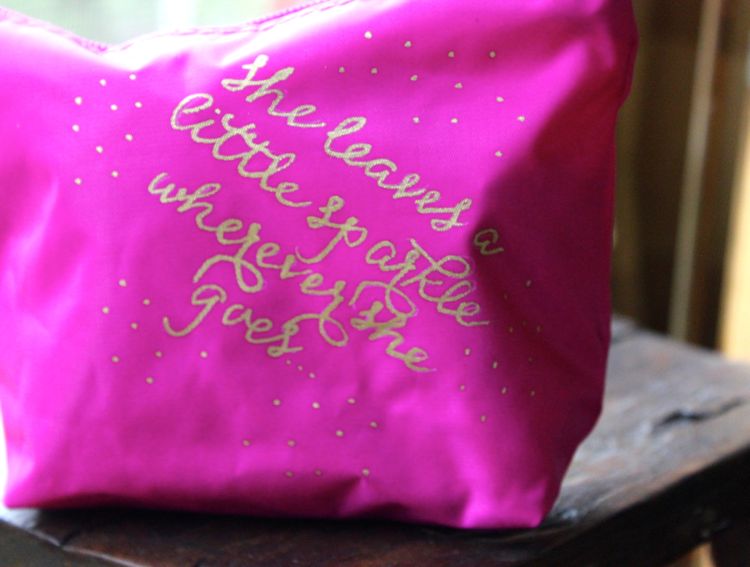
Maybe its your personality? Smile? Random, simple acts of kindness? A charming accent? Whatever it is, find it and do it because I love people who enter a room and own it, and leave me with a good feeling, or a memory when they walk out the door. I’m talking about the people I don’t forget, and leave a trace of their optimism behind with me. I have friends like this, who are special and simply amazing, and I believe they “leave a little sparkle wherever they go.” So, for a recent Bachelorette celebration for one of my bestie’s, I made cosmetic bags with this quote to go along with our Sparkle theme for the weekend. More photos of that extravaganza to come, but for now, a DIY.

You’ll Need
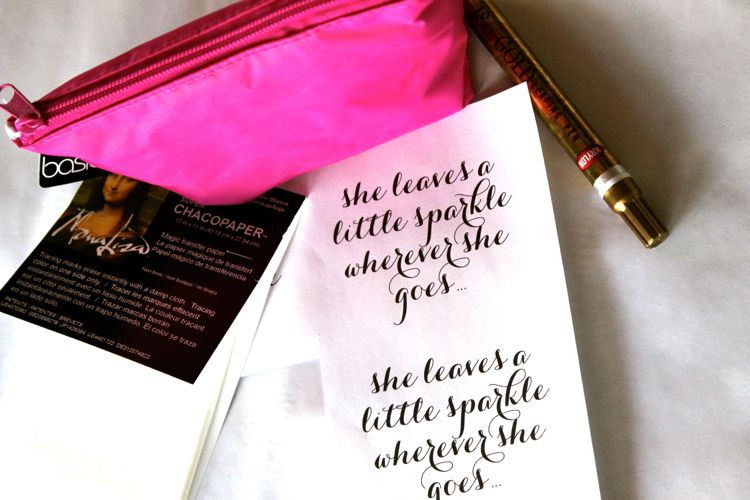
$3 cosmetic bags from Target {in the travel cosmetics section}
Chacopaper from Michaels
A printed quote
pen
Krylon Gold Leaf Pen from Michaels

DIY cosmetic bag

How To
Use Microsoft Word to create your quote in a favorite font.
Print your quote on a regular piece of printer paper.
Cut the quote and a piece of the Chacopaper the same size as the quote.
Layer the paper, bottom-up, starting with the ‘chalky side’ face down on the cosmetic bag {you can feel the ‘chalky’ side}, your quote and then top it off with the ‘tracing’ paper.
DIY cosmetic bag party favor
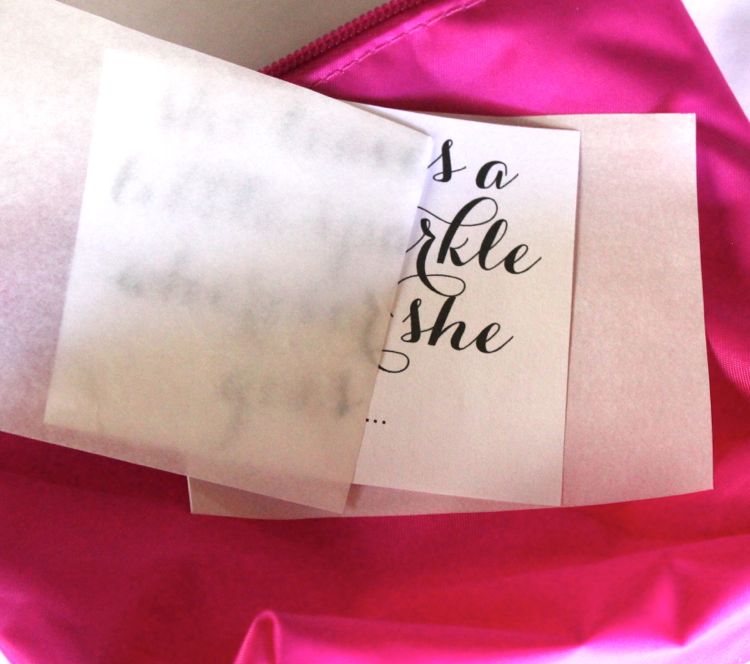
Use a black pen to firmly {without tearing} trace the quote on the tracing paper.
Once finished {or you can even get a sneak peek to see if its working if you can lift the edge without moving the paper} lift the 3 sheets of paper from your cosmetic bag and you will see a traced image of your quote. I used the white Chacopaper, so it appeared white like the photo below.
Use the Gold Leaf pen to carefully trace your ‘image’
Voila.
DIY cosmetic bag party favor

DIY cosmetic bag party favor{images via j. sorelle}

How to Turn a Frame into a Sparkly Tray

diy frame to tray_jsorelle

I see lots of sparkles around the winter holiday season, but I love sparkles year-round. Bring on the glam! We have a DIY project for you today from our Sparkle from Head to Toe photo shoot {featured on Hostess with the Mostess here…and soon to be featured right here at J. Sorelle}. We took $5 frames, and turned them into trays and party favors. Thanks to Kathryn Giarratano for making our trays shine even more with her gorgeous handmade jewelry.

diy sparkle tray_jsorelle

DIY frame trays

You’ll Need
Frames
Black and white striped paper {or patterned paper}
Paint
Primer
Doll heads – you will need either 3 or 4 per frame, depending on the size of the frame

How To
Remove the glass from the frame.
Spray paint the frame with primer, then your desired color or glitter. For my frames, I used one coat of Krylon White Primer and Krylon Glitter Paint.
If using glitter, cover with glitter sealer.
Paint doll heads white with spray paint or use a brush to paint, which are going to be your tray ‘legs.’
Once dry, use a hot glue gun to glue doll heads to the bottom of the frame.
Use the glass insert from the frame to trace the perimeter of the shape/size onto your patterned paper, and then cut.
Insert the glass, the paper, and then the back of the frame.
Voila, you have yourself a cute little tray for perfume, jewelry or nail polish…and a very cute gift for a girlfriend!

IMG_0464diy sparkle frames_jsorelle

{images via meredith moran photography and j. sorelle}

Black, White and Gold Glitter Party on Hostess with the Mostess

We’re thrilled and totally giddy to tell you that our latest party, Sparkle From Head to Toe, is featured on Hostess with the Mostess {Party of 5} today. OMG! Please take a moment and check it out here. Click on Sparkle From Head to Toe by Tre Sorelle.

We had so much fun styling this shoot…and we pulled it off with 5 kids under 5 running around behind-the-scenes, a first trimester preggo and very nauseous sister, a patient and kid-loving photographer {thanks Meredith Moran}, and our wonderful mom who made sure the kids were well cared for, and made sure we were done in 2 hours…in time to make it to Sunday mass.

We wanted to create a sparkly party to give women a chance to gossip with friends over cocktails and cookies, try on and shop for jewelry by local artists, and paint their nails at a OPI nail painting station. Women deserve to Sparkle from Head to Toe…and this party let’s them do just that! And it’s the perfect time of year to throw a sparkly party – or add it to the planning boards for your next bachelorette party, birthday party or ladies get together.

Thanks to OPI and Nicole by OPI for sending us gorgeous polish colors, and thanks for Kathryn Giarratano Jewelry to letting us model her gorgeous hand-made jewelry, and of course Jenna at Fleur de Lis for designing a beautiful invitation.

Check back in with us this week – we’re sharing details and tutorials on how to make the DIY striped tray bar and the small frames-turned-into trays/party favors.

VENDOR LOVE
Photography: Meredith Moran Photography
Jewelry: Kathryn Giarratano, contact trejsorelle@gmail.com for more info/to order
Nail Polish: OPI  and Nicole by OPI
Personally Speaking
Honey Ryder
Kissed at Midnight
Totally in the Dark
Luke of the Draw
Invitations and Printed Supplies: Fleur de Lis, a paperie
Cookies: Homemade
Location: Fleur de Lis, a paperie

 {images via Meredith Moran Photography}