DIY No-Carve Pumpkin with Customized Jean Pocket

diy-jean-pocket-pumpkin-green-bandana-country-cowboy-boots

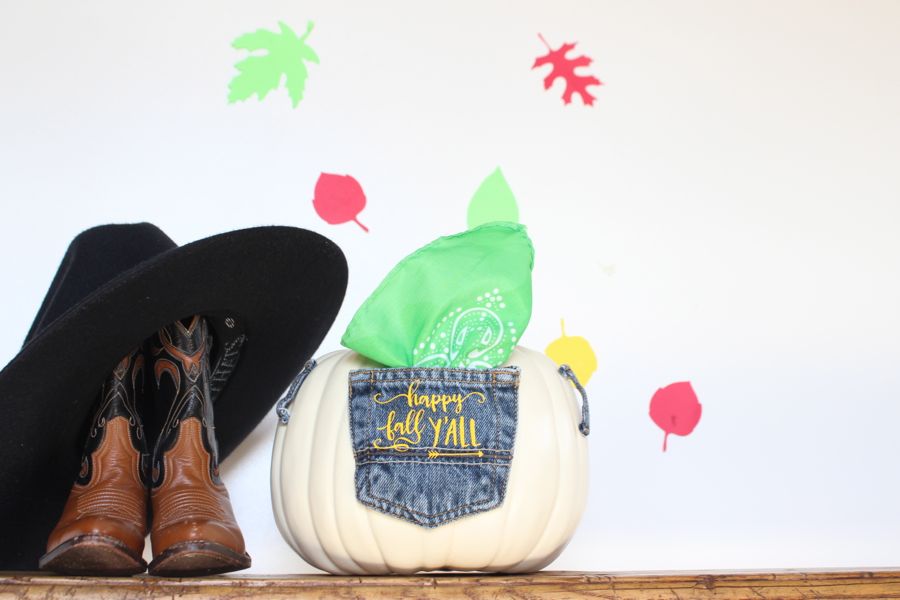
We can hardly believe the watermelons and pool bags are being replaced with pumpkins and scarves. But, the fall season is upon us, so we dove right in with a good ‘ole DIY country pumpkin. Maybe it’s our Colorado roots, but there is something nostalgic about farms this time of year for us. The beautiful changing leaves, campfires, pumpkin patches with the kids, corn fields, bales of hay, rustic farm houses and apple picking.

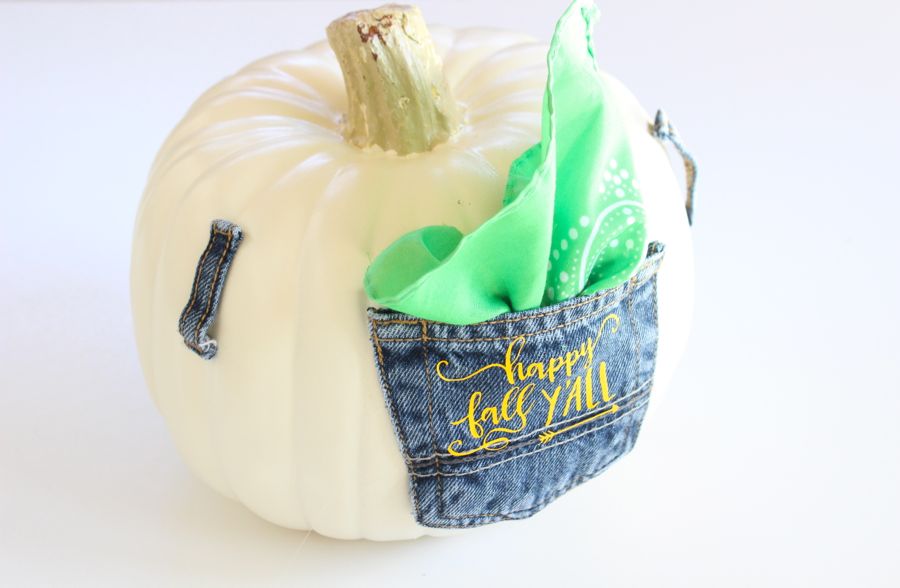
As we were going through our kids closets, we found old jeans with holes in the front. So, why not upcycle an old pair of jeans for a DIY pumpkin with a customized jean pocket? And, wait, the best part was that it didn’t entail any cutting or gut removal of the pumpkin. We’ll do that closer to Halloween, but for now this no-carve pumpkin was stress and mess free, which made us happy.

We tried our new Silhouette CAMEO 3 for this project, and we are so in love with the capabilities of it. This is just a blimp on its cutting radar. But, it’s a cute blimp, and a great way to welcome fall, that’s for sure!

This customized jean pocket pumpkin is so easy, you can do it within 30 minutes. If you really get into it, add a belt through the belt loops.

white-pumpkin-happy-fall-y'all-jean-pocket

Materials:

  • White pumpkin, faux {use a fake pumpkin for this, so you can re-use it year after year}
  • Silhouette Heat Transfer, yellow
  • Old pair of jeans
  • Scissors
  • Hot glue and glue gun
  • Bandana
  • Silhouette CAMEO 3 electronic cutting machine

Directions:

Step 1: Cut the pockets and belt loops from an old pair of jeans, or the kids jeans.

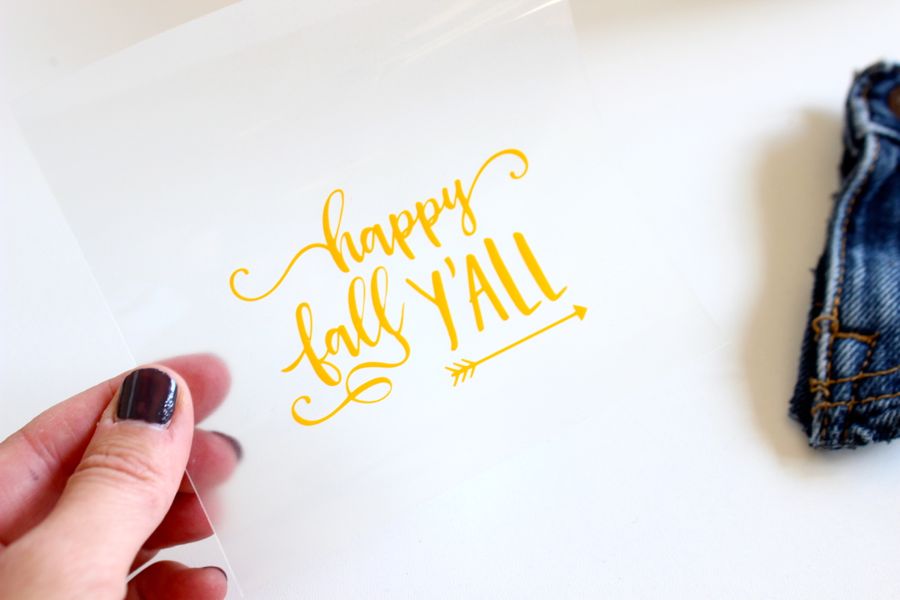
Step 2: Design a fall phrase on your Silhouette software. We bought the adorable Happy Fall Y’all for a whopping .99 cents. Cut the design according to Heat Transfer instructions on the packaging. Remove the yellow ’empty space’ from one side of the heat transfer material.

yellow heat transfer craft project

happy fall y'all

Step 3Press the design onto the jean pocket.

happy fall y'all-jean pocket

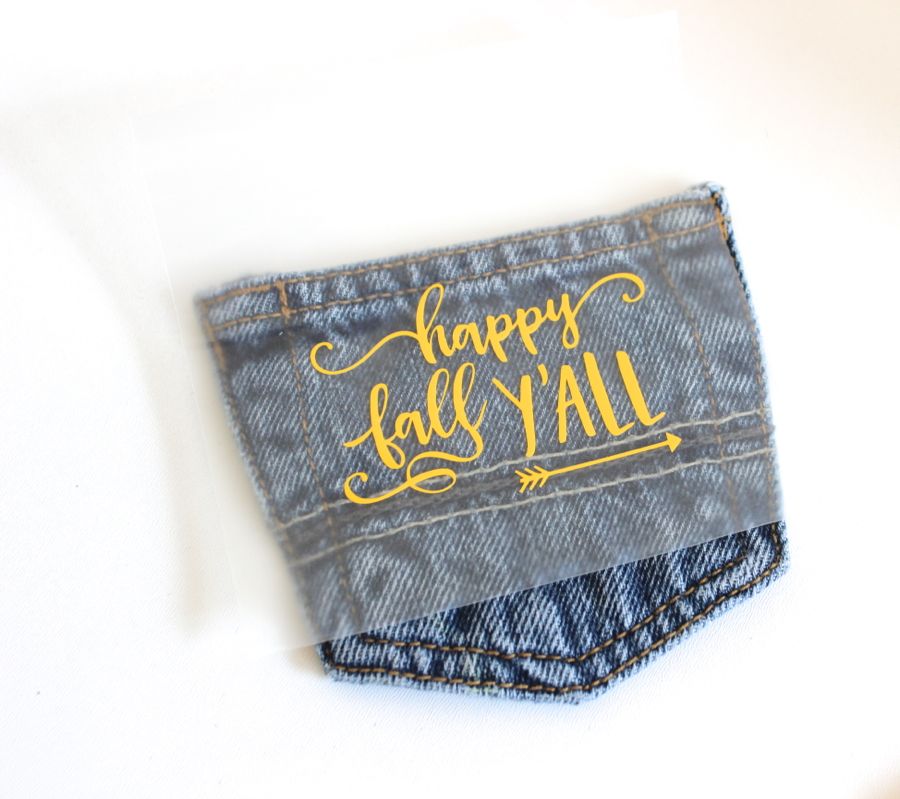
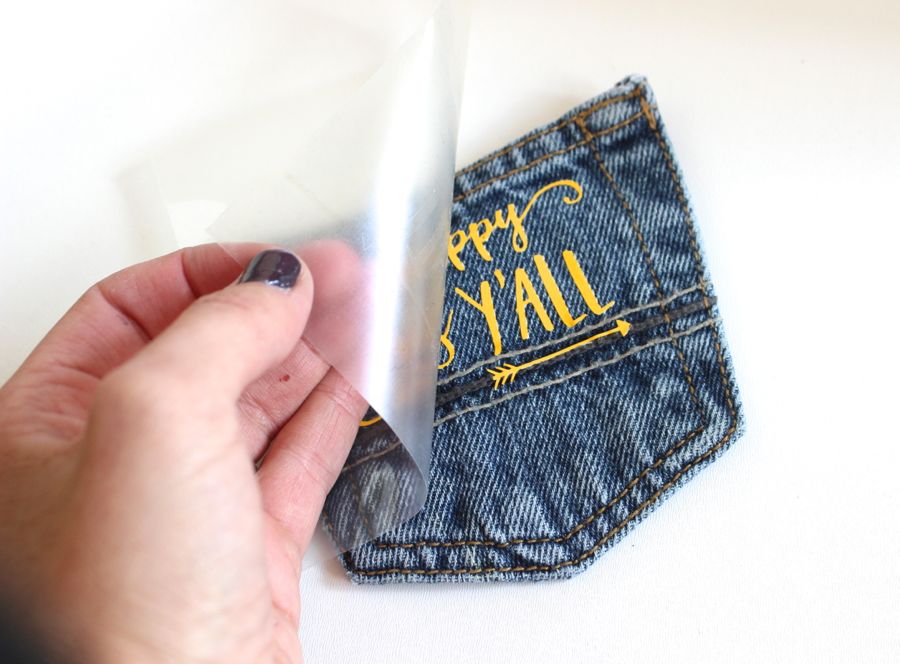
Step 4: Place a cloth over the pocket with the design, and use an iron to set it. We counted to 30, and then peeled up just a corner of the design to make sure it was set onto the pocket before removing the plastic entirely. Once the design is set, remove the plastic.

happy-fall-y'all-heat-iron-transfer

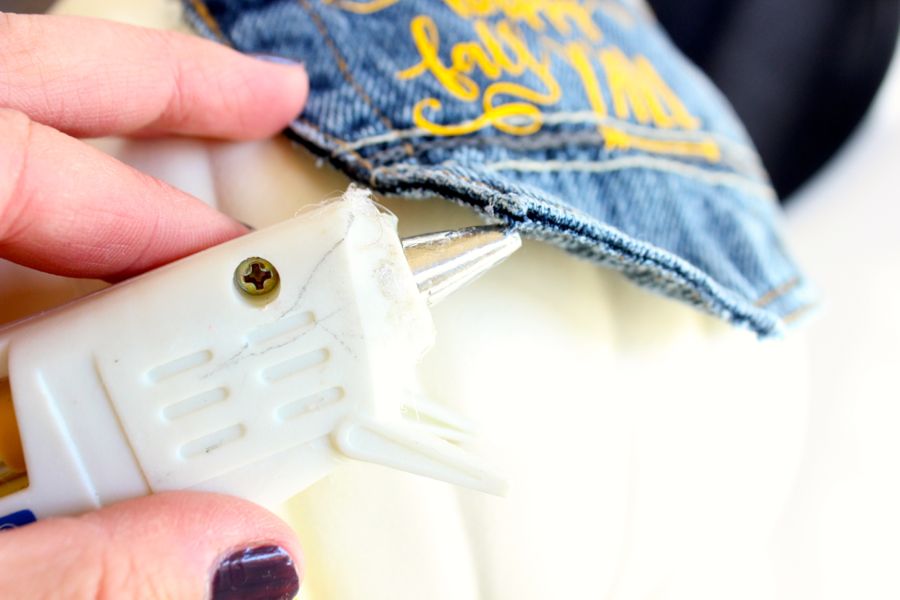
Step 5: Use a hot glue gun to glue the pocket onto the pumpkin. Glue the belt loops, too.

hot-glue-gun-pumpkin-fall-craft

Step 6: Insert a bandana, wheat, cotton or whatever ‘accessory’ you want into the pocket.

diy-punpkin-with-a-jean-pocket-bandana

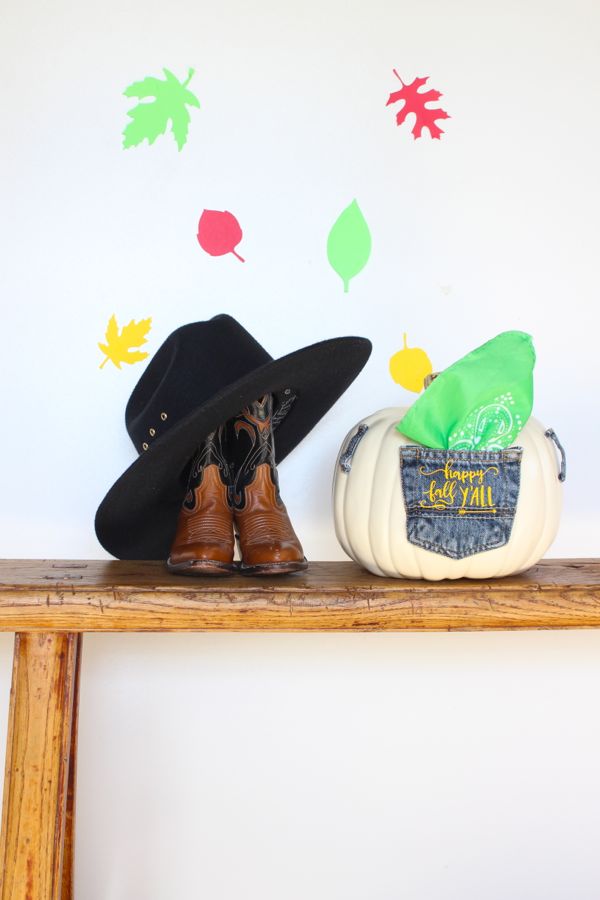
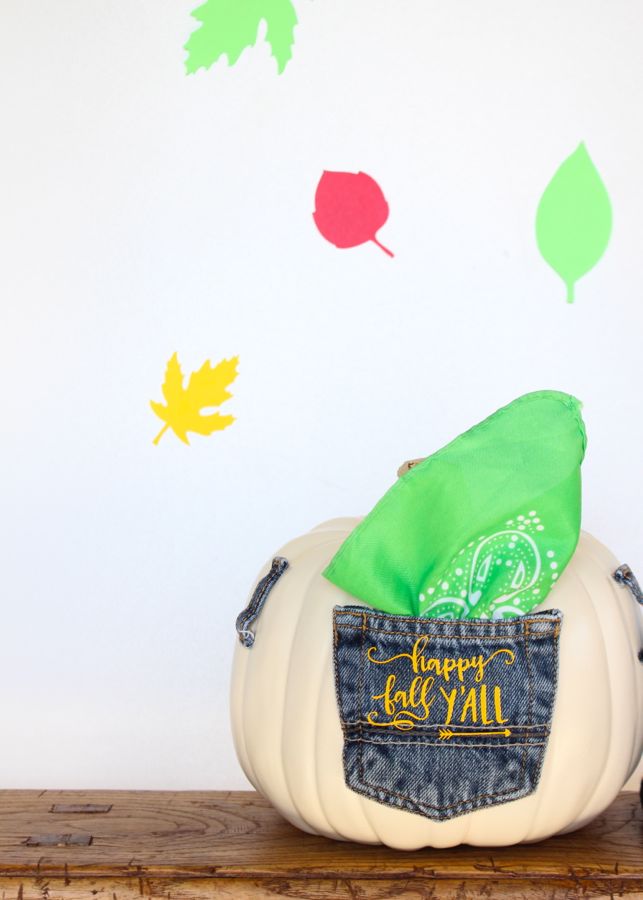
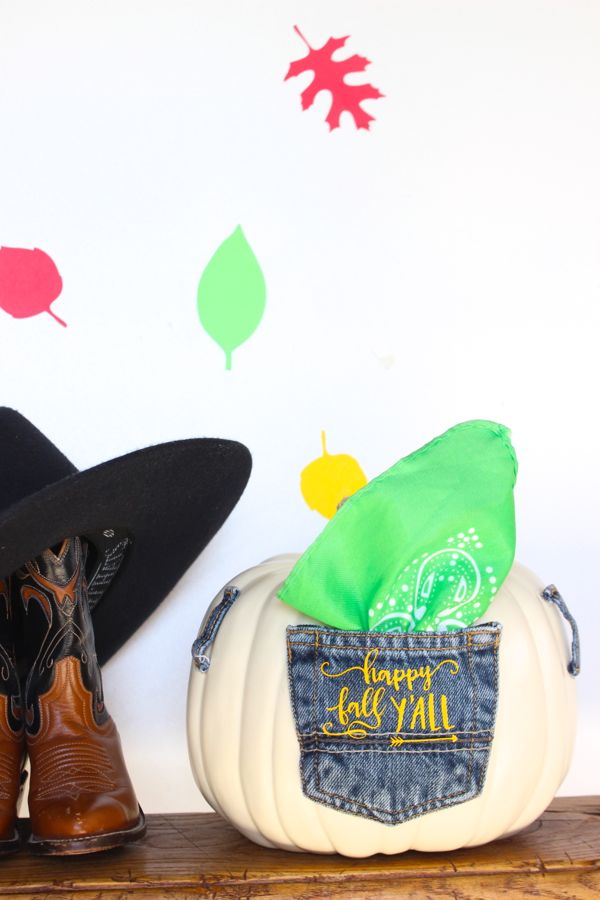
Step 7: Use the Silhouette CAMEO 3 to cut colorful leaves you can stick to the wall. Dust off your cowboy boots, and a hat, and you have a lovely country fall scene.

Happy Fall Y’all!

fall-bench-with-cowboy-boots-hat-pumpkin-jean-pocket-leaves

happy-fall-y'all-pumpkin-with-jean-pockets

jean-pocket-happy-fall-y'all-diy-white-pumpkin

diy-white-pumpkin-happy-fall-y'all-custom-jean-pocket

Thanks to Silhouette America for making this post possible. We loved Silhouette America since the inception of our blog, and would love them even if we didn’t receive product from them. All opinions expressed are our own. Thanks for supporting the companies that support j. sorelle. 

50 Patriotic Must-Haves Under 50 Dollars

There are 50 states, so naturally we had to find 50 red, white and blue must-haves as we celebrate America on the fourth of July. Wait, it gets better. All of them are under $50. 50 for 50 under 50. We love America, don’t you?

[show_ms_widget id=”35679856″ image_id=”41527275″ width=”999″ height=”777″]

  1. Star and Stripes Sandals
  2. Stars and Stripes Jean Shorts
  3. Stars and stripes American Tee
  4. Chuck Converse Shoe
  5. Scarf 
  6. Star Studs
  7. Stars and Stripes Socks
  8. Tunic
  9. Chambray Shirt Dress
  10. Red Toms Shoes
  11. Red Lipstick 
  12. Floppy Straw Hat
  13. Straw Tote with Tassels
  14. Bourbon and Bowtie White Stone Bangle
  15. Moon and Lola Script Pendant
  16. Raglan Shirt
  17. Off Shoulder Top
  18. USA Tee
  19. American Flag Turban
  20. Sunglasses
  21. American Flag Leggings
  22. American Flag Cap
  23. Star Print Shorts and Pajamas

[show_ms_widget id=”35679863″ image_id=”41527284″ width=”999″ height=”777″]

  1. Red and White Turkish Towel
  2. America Cheese Board
  3. Paper Napkins
  4. American Flag Tapestry
  5. Monogram Koozie
  6. Coasters
  7. Swell Water Bottle
  8. Red Star Dinner Plate
  9. Red Wooden Cutlery
  10. Radioflyer Wagon
  11. Sunscreen
  12. Red Cooler
  13. Swan Drink Holder
  14. Bamboo Tray
  15. Blue Sunnylife Radio
  16. Red, White and Blue Hanging Planter
  17. Bocce set
  18. Enamel Mug
  19. Ping Pong Set
  20. Monogrammed Mason Jar with Straw
  21. Celestial Coaster Set
  22. Red White and Blue Striped Box
  23. Picnic Blanket
  24. Merican Dream Doormat
  25. Cobalt Blue Vase 
  26. Giant Ice Pop Floatie
  27. American Flag Pillow

[show_shopthepost_widget id=”1725024″]

DIY Red, White and Blue Ice Bucket

red-white-blue-ice-bucket-july-4th-wine-cooler

It’s about that time when red, white and blue are just about the only colors on our minds. Yes, one of our favorite holidays, July 4th, is coming up, and this year we’re adding a DIY fruit ice bucket to our party to do’s.

A DIY patriotic ice bucket is the perfect July 4th accessory, and it’s so easy and cheap to do. Guests will love the extra touch of red, white and blue, and they will enjoy their chilled beverage.

red-white-blue-diy-ice-bucket-fruit-diy-july-fourth-wine-cooler

red-white-blue-ice-bucket-july-4th-wine-cooler

Materials:

  • water
  • large bucket, we used a plastic one from Party City
  • small buckets {small enough to fit inside large bucket and large enough to fit a wine bottle or beer can}
  • blueberries, fresh or frozen, at least 2 cups
  • strawberries, fresh or frozen, sliced, 2-3 cups
  • weight, such as a rock
  • wine or beer

Directions:

Fill about 1/3 of the large bucket full of water, then drop in all the strawberries. Freeze for at least 5-8 hours.

strawberries-in-a-bucket

Place 2 small buckets on top of first layer of ice, add weight inside {we used a rock}, and fill another 1/3 of the bucket with water. Do not get water inside the small bucket because it will be more difficult to remove the buckets from the ice. Freeze for about 5-8 hours.

buckets

For the final layer, fill the remaining 1/3 of the container fill of water, and then drop in blueberries. Freeze for 8 hours.

blueberries-in-a-bucket

Remove from the freezer. Pour boiling water inside the small buckets and gently twist to remove from the ice. Additionally, run the outside of the large bucket with  hot water from the sink faucet. After about 15 seconds on each side, the ice cooler will be easily removed, and the layers should look like this.

red-white-blue-diy-ice-bucket-july-fourth-party

Carefully flip the ice cooler out from the bucket with your hands and set on a tray. Fill the holes with wine or beer. We couldn’t decide because beer, well, it’s all-American and those Budweiser cans are so patriotic and awesome. But, the vino lovers that we are couldn’t resist the taste and look of the red and blue Relax Wine bottles of wine.

budweiser-beer-red-white-blue-ice-bucket-diy-fourth-of-july-beer-cooler


relax-wines-red-white-blue-ice-bucket-wine-cooler

red-white-blue-ice-bucket-budweiser-beer-diy-cooler


relax-wines-red-white-blue

Cheers!

Important Note: We took photos of this DIY ice bucket with wine we had in the liquor cabinet, and after review of photos, while the wine was good, for the ultimate patriotic post, the wine bottle {and beer} needed to be more festive in color. Enter, Relax Wines and Budweiser beer! However, the ice bucket had to be re-frozen during a several hour photo shoot intermission, and a thin ‘film’ of ice formed over every layer, so the color of the DIY ice bucket was dulled, and the lines of the red, white and blue blurred. You win some, you lose some. Either way, we love our bucket, but honestly, it will be more vibrant than our photos if you have the right alcohol the first time around. 

Mother’s Day Gift Guide

If your mom is like ours, there’s no way to thank her for all she’s done. No plant, pair of shoes or purse is grand enough to say thank you. Being a mom can feel like a thankless job, but it’s worth every bit of the blood, sweat and tears we put into it. And, every hug, kiss and, “I love you” we receive is really all the thanks we need to get through the day. Showing mom a little extra love on Mother’s Day helps too!

The thoughtful DIY gifts and cards are meaningful and worth the time to do. So, in addition to a sweet, sentimental gift, we’ve gathered up some of our favorite gifts to spoil mom a little more this Mother’s Day.

[show_ms_widget id=”34804319″ image_id=”40387555″ width=”720″ height=”540″]
1. Mom’s love a monogram, and this Acrylic Monogram Cuff bracelet from Mark & Graham is so chic.

2. Help mom welcome guests with an adorable, Hello Darling Doormat from Domino.

3. Luxurious pajamas by PJ Salvage Spring from Shopbop in a pretty print will keep mom comfortable and look good.

4. Jessica lathers this Past Tense, doTERRA roll-on miracle oil on her neck every night. She’s obsessed. It smells amazing, and feels so good with a slight cooling sensation. It helps those daily stresses melt away, and every mom needs that.

5. This Crosley Vinyl Turntable from Target is for Jenna because she and her boys still listen to vinyl records. This has that old-fashioned vibe, with a better technology of today.

6. Mom’s like to be organized, or at least feel like it with items placed in a pretty basket. Fill the Beachcomber Large Tote from Pottery Barn with a snuggly blanket, or some of mom’s favorite things this Mother’s Day.

7. Cheers mom with a tropical Lilly Pulitzer Spot Ya Wine glass from Dillards that is as pretty on the table as it is in mom’s hand.

8. A roomy Sole Society Faux Leather Trapeze Tote from Nordstrom will have mom prepared for anything she may need, while being fashionable.

9. Our mom likes anything rosary-inspired, plus this Woman’s Bauble Bar Bali Necklace from Nordstrom is so pretty and calming.

10. We always hear our mom talk about aging and the wrinkles on her face. She is a beautiful woman and the lines show how much she smiled growing up, but as we age, we understand the lines that come along with it. If there’s a solution without surgery, we’re in. Your mom will be grateful for Nerium Eye Serum.

11. Mixed patterns and texture look so chic and no-heels look so practical. It’s a win-win with these casual sandals by Dolce Vita ‘Payce’ Sandal, Nordstrom.

[show_shopthepost_widget id=”1581052″]

Personalized Book Giveaway and DIY Kite Easter Eggs

kite-easter-eggs-marker-stripes-bows-diy-

We are flying high with today’s post. Literally, we are as high as a kite in the sky! We love our newest DIY Kite Easter Eggs, and they were inspired by an I See Me! book, My Little Book of Blessings. We have always loved I See Me! products, and they remain one of our favorite newborn gifts. Recently we opened up the blessings book and found the graphics to be magical, and the words to be meaningful. A book that teaches children the golden rule, the importance of friendship and how to lend a helping hand is a book we want on our bookshelves. Plus, every page is customized with a child’s name, and a special note and photo on the front and back pages.

kite-book-i-see-me-books

The page about friendship has kite illustrations, and thus our DIY easter eggs were born. Please keep reading for a tutorial on the eggs, as well as a giveaway for a I See Me! book of your choice, just in time for Easter. The books are amazing, and the gift of reading is priceless.

diy-kite-easter-eggs-marker-coloring-bow-diy

Materials:

Directions:

Draw the kite designs with a pencil. If you mess up, you can erase it. We used free-hand to draw our designs.

pencil-egg-drawings-kite-easter

Outline the egg with a thin black Sharpie marker. Once the design is outlined, erase any pencil marks that remain on the egg.

vinny-diy-easter-eggs-black-lines

Begin to color inside the lines with Sharpie colorful markers. Continue until all kites are brightly colored.

diy-kites-easter-eggs-coloring-markers

diy-kites-easter-eggs-coloring-markers

To begin to make the kite tails, cut strands of embroidery string and cut mini bows from the card stock. You can find a template for mini bows online.

bow-string

Add glue to one side of the bow, and quickly place the string in the middle, and then cover with another bow.

glue-bow-string

string-bow

Once all the bows are in place, dab a tiny amount of glue to the bottom of the kite, and press the end of the string down on the glue.

diy-kite-easter-eggs-rainbow-markers

You’re done!

diy-kite-easter-eggs-rainbow-markers

easter-egg-kite-place-setting

Now, it’s giveaway time. Entry info below. Please make sure to leave your Instagram account name, because we will check the winner’s account. Good luck! The giveaway ends March 10, 2016.

a Rafflecopter giveaway

We received a product from I See Me! in conjunction with this post, but we would love I See Me! even if we didn’t. Thanks for supporting the companies that support our blog.