DIY Lip Balm Pouches Just In Time For Valentine’s Day

diy-lip-balm-in-red-and-pink-pouches-with-hearts

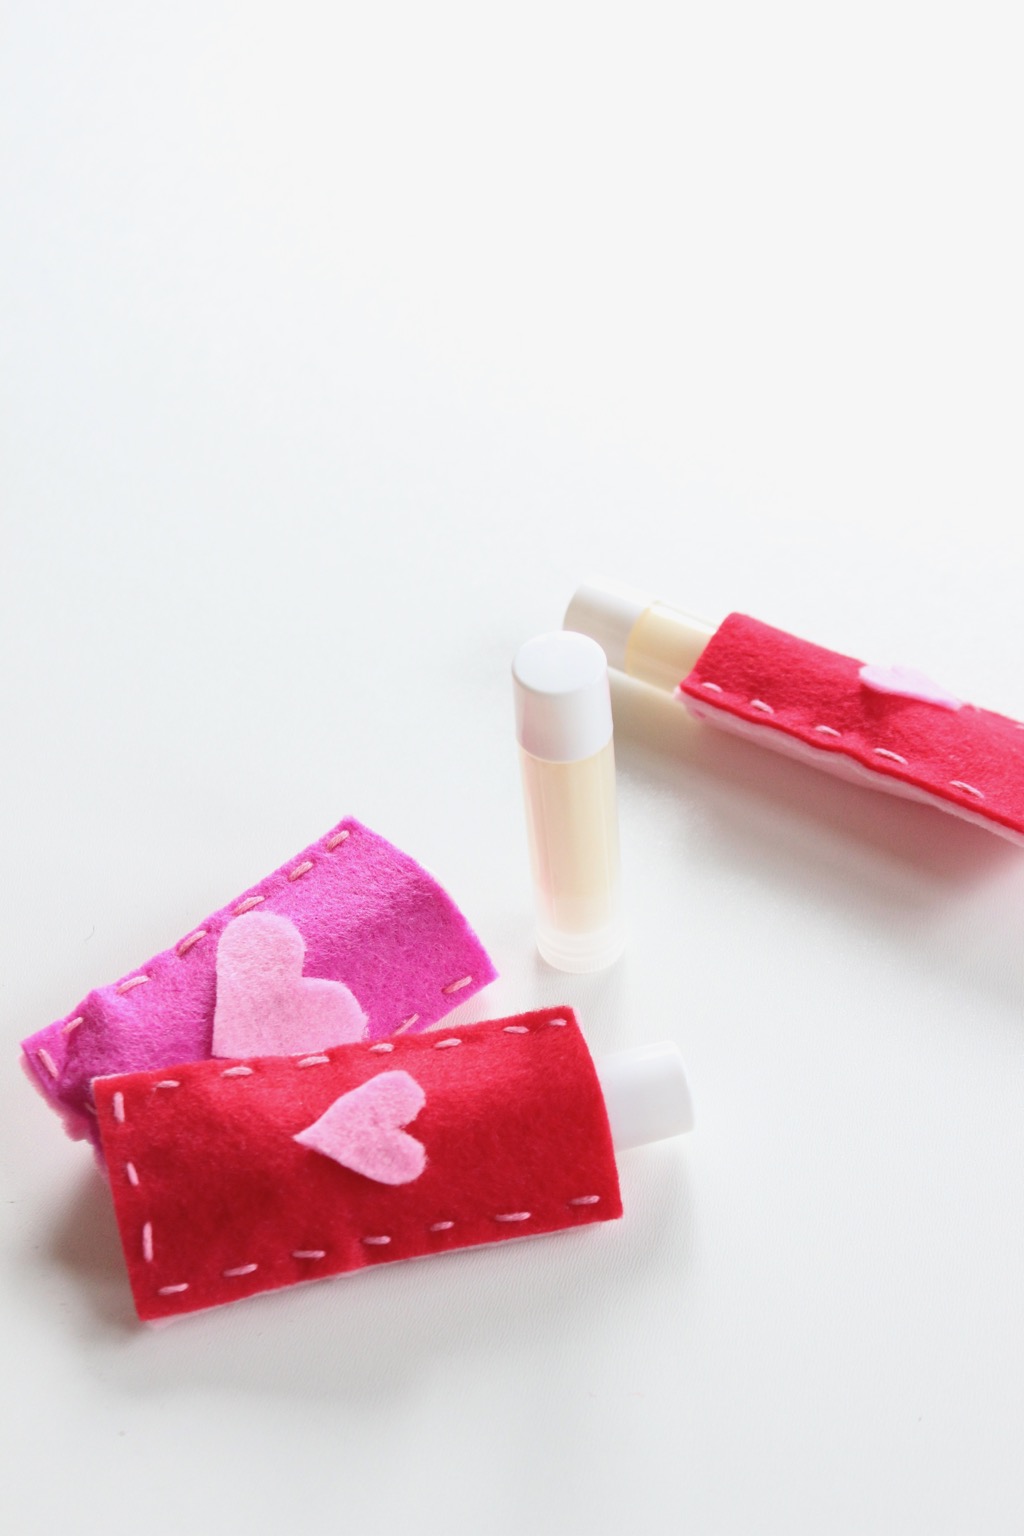
We love our essential oils, and one of our favorite goodies to make with our oils is DIY lip balm. Our lips are so dry in the winter, plus we love when we can put pure ingredients on our lips. Valentine’s Day is coming up, and for those that want kissable lips, or want to give a gift of kissable lips, we recommend DIY essential oil lip balm.

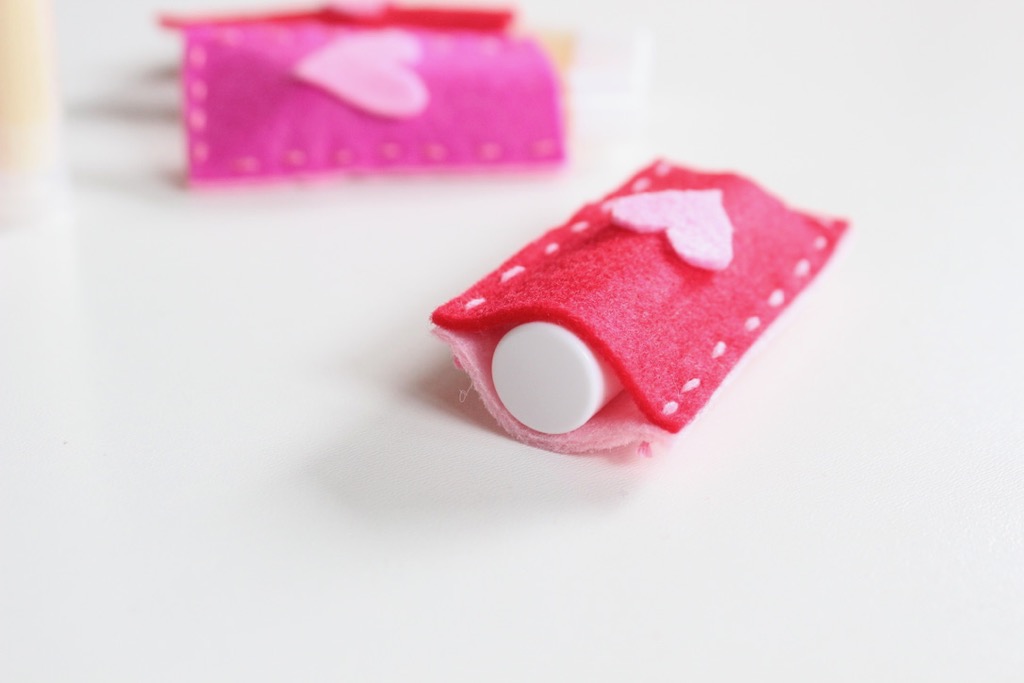
Read our DIY lip balm tutorial for the ingredients and instructions. To jazz it up a bit for gift giving, make a cute holder for it – a DIY lip balm pouch. It’s almost like a lip balm sleeping bag. It’s a cute DIY that can be made into all shapes and sizes. We made heart-shaped pockets to hold gift cards for teachers. You can also make DIY felt pouches to hold tissues, treats, and even larger pockets for photos and sweet notes.

This DIY project is incredibly easy. Here’s how we did it.

Materials:

Directions:

Step 1: Cut felt (we bought a pretty library of felt from Target, and it’s thicker than traditional felt, which worked well) into a rectangle larger than the width of the lip balm tube.

red-pink-felt-with-pink-hearts

Step 2: Once you have the pieces cut, thread a needle (don’t forget to tie a knot on the end), along the edges of two rectangles that are lined up. We do not have any sewing skills whatsoever, and we did it! Just go in and out of the felt, which will create a cross stitch pattern. Leave the top of the rectangle open so you have an opening for the lip balm.

diy-lip-balm-pouches-red-pink-felt-craft

diy-lip-balm-in-red-and-pink-pouches-with-hearts

diy-lip-balm-in-red-and-pink-pouches-with-hearts

Hope you find a way, even if it’s a wave or hug, to spread the love on Valentine’s Day!

SHOP THE POST:
[show_shopthepost_widget id=”3022995″]

DIY Busy Board Fun for Toddlers

Jenna has the baby of our entire family now (he’s the youngest of eight grandbabies for our parents), and it’s hard to believe he’s not a baby anymore. He is such a blessing, and pure joy – nothing can stop him from smiling.

Nine years ago, when we started having kids, we wish we had the knowledge that a quick stop to Home Depot could be the discovery of a DIY sensory activity for our kids that would last hours! Leo is the lucky one, because he got one of his very own.

diy-black-and-white-busy-board-for-toddlers

Whether you call it a sensory board, an activity board or a busy board, it’s all the same thing that keeps toddlers busy for hours. It’s genius. It’s so engaging for kids, and good practice for their fine motor skills.

The full tutorial of our DIY Busy Board is on Momtastic. Check it out here. IMG_1601

Choose Kind: DIY Wonder-Inspired Keychain for Kids

choose-kind-keychains-diy-wonder-the-book-and-movie

Happy New Year! Last year we were so touched by R.J. Palacio’s best-selling book Wonder, the theme of kindness (woven beautifully throughout the book) has become a priority in our own lives this year.

We must be kinder to ourselves and one another. And as mother’s, it’s so important to teach our children to be kind. If we can show them by example that kindness, even a small act of kindness, can change lives, they will choose to be kind. Maybe they will have courage to stand up for that one child who is being bullied. Perhaps they will be a friend to that one child who feels forgotten, and show him/her love. Or, hopefully they will have the opportunity to remind a child who looks different from them, that he/she is beautiful.

Just as R.J. Palacio said, “Courage. Kindness. Friendship. Character. These are the qualities that define us as human beings, and propel us, on occasion, to greatness.”

We all have different stories, and we were all made to be different. But, everyone can be kind. We have good and bad days, so some days it may come be more difficult than others (especially when others hurt and deceive us), but if we try to remind ourselves about the power of kindness, it may just make our hearts feel lighter, and let more love in in 2018.

To remind our kids about the small acts of kindness they can show their friends at school, we made Choose Kind keychains. They are made from a somewhat unconventional material from Oriental Trading Company, but with our free printable by Jenna, the discs were easily transformed.

Materials:

Directions:

Step 1: Drill a hole into the top of the wood circles.

Step 2: Paint the front and back of the circle blue.

Step 3: Print the free printable, and cut out the paper circles on card stock paper. Once the paint is dry, add Mod Podge to the back of the printable and press it down in the center of the wood circle.

diy-choose-kind-keychains-inspired-by-wonder

Step 4: Apply 2-3 thin layers of Mod Podge over the printable and the wood circle.

diy-choose-kind-keychains-inspired-by-wonder

Step 5: Add the keychain loop on top, and add it to your kids backpacks.

girl-with-a-backpack-and-diy-keychains

girl-with-a-backpack-and-diy-keychains

If you haven’t read Wonder yet, do yourself a favor and read it. There are so many life lessons to take from it and apply to your daily life. Here’s a quote from the book that will give you something to think about as you make your resolutions, or goals for the year.

“It’s what you’ve done with your time, how you’ve chosen to spend your days, and whom you’ve touched this year. That, to me, is the greatest measure of success.” ~ Wonder

DIY Essential Oil Roll-Ons

DIY essential-oil-rolls-ons-amber-bottles

We are obsessed with our doTERRA essential oils. It’s an everyday necessity in our homes. Jenna’s rubs Lavender on her boys before bed. Jodi’s rolls Lavender on her temples all day, and Peppermint when her headaches just won’t quit. Jessica can’t sleep without her lavender-filled diffuser, and when her family has that pesky winter cough, she rolls Breathe blend on their chests. We can’t neglect to mention our love for On-Guard, and that amazing Deep Blue Rub.

We’re so happy we made DIY essential roll-ons for Momtastic because we realized how easy it is, and now it’s a new favorite hobby. Get your roll on with us, won’t you? Read the full tutorial at Momtastic.

Interested in learning more about the oils we love? Email us at hello@jsorelle.com or check them out here.

IMG_1975


[show_shopthepost_widget id=”2945064″]

Wrapped with Love: DIY Gift Tags + Keychains

diy-acrylic-keychains-with-tassels-and-black-and-white-good-vibes-words

Gift wrap at Christmas time is an art. Sometimes the gift wrap is so pretty, it’s hard to actually want to open it to see what’s inside. We often wonder why we spend the extra time to make gifts pretty when it’s quickly ripped open and thrown in the trash. There is no perfectly sane reason to the wrapping madness, but there is a rhyme and reason. First, it may be vain, but it’s the truth – it’s pretty.  We (women) like to do things that look pretty. We want the gift to reflect our own personal style, and when it’s wrapped before Christmas Eve (rare in our houses), it’s an added bonus of “pretty” under the tree. Second, our grandma use to save the wrapping paper from opened gifts. She carefully opened every gift without a single tear, gently folded it, and kept it or re-used it.  If she were still here with us, she would keep it. If anyone out there is like my grandma, we better make the wrapping paper worth keeping.

This year, our wrapping is simple, but it has a fun and clever gift tag, which doubles as a gift. Gotta love that! Everyone will get a little keychain from Oriental Trading Company that Jenna made adorable printables for. There are 9 difFerent saying and styles to brighten one’s day, and they are all FREE for you. Everyone needs a reminder every once in a while about how awesome, amazing and beautiful they really are! These keychains do just that!

The printables are classic black and white; however we added some pizzazz to some of them with loose confetti, washi tape and of course, tassels. These make great stocking stuffers, gifts for girlfriends, teachers and of course, gift tags.

black-and-white-labels-hello-beautiful-your-awesome-tassels

Here’s how to do this insanely easy DIY.

Materials:

Step 1: Print the file, and cut the cards out. Click here for the free file.

black-and-white-cards-hello-beautiful-yes-you-can-your-awesome

Step 2: Decorate the cards for some extra color and texture if you wish.

tassels-and-black-and-white-good-vibes-words

diy-gift-tags-with-confetti-you-got-this

black-and-white-cards-hello-beautiful-yes-you-can-your-awesome

Step 3: Add a To: and From: on the back of the printables, or on a separate sheet of paper that’s cut the same size, so the recipient can remove it, and keep the cute printable on front!

diy-keychains-and-gift-tags-be-present-hello-beautiful


Step 4: Insert the paper into the acrylic sleeve. Add tassels if you want.

diy-acrylic-keychains-with-tassels-and-black-and-white-good-vibes-words

diy-acrylic-keychains-with-tassels-and-black-and-white-good-vibes-words

diy-acrylic-keychains-with-tassels-and-black-and-white-good-vibes-words

diy-acrylic-keychains-with-tassels-and-black-and-white-good-vibes-words

diy-acrylic-keychains-with-tassels-and-black-and-white-good-vibes-words

Step 5: Attach to the gift and you are d.o.n.e.!

kraft-gift-wrap-with-keychain-gift-tags

kraft-gift-wrap-with-keychain-gift-tags

Merry everything!

Oriental Trading sent us some items of our choosing for this post, free of charge. We’re so happy they did! All opinions are honest, and our own. No other type of compensation was received. Thanks for supporting the companies that support j. sorelle. We love Oriental Trading, even before this post.