DIY Lip Balm Pouches Just In Time For Valentine’s Day

diy-lip-balm-in-red-and-pink-pouches-with-hearts

We love our essential oils, and one of our favorite goodies to make with our oils is DIY lip balm. Our lips are so dry in the winter, plus we love when we can put pure ingredients on our lips. Valentine’s Day is coming up, and for those that want kissable lips, or want to give a gift of kissable lips, we recommend DIY essential oil lip balm.

Read our DIY lip balm tutorial for the ingredients and instructions. To jazz it up a bit for gift giving, make a cute holder for it – a DIY lip balm pouch. It’s almost like a lip balm sleeping bag. It’s a cute DIY that can be made into all shapes and sizes. We made heart-shaped pockets to hold gift cards for teachers. You can also make DIY felt pouches to hold tissues, treats, and even larger pockets for photos and sweet notes.

This DIY project is incredibly easy. Here’s how we did it.

Materials:

Directions:

Step 1: Cut felt (we bought a pretty library of felt from Target, and it’s thicker than traditional felt, which worked well) into a rectangle larger than the width of the lip balm tube.

red-pink-felt-with-pink-hearts

Step 2: Once you have the pieces cut, thread a needle (don’t forget to tie a knot on the end), along the edges of two rectangles that are lined up. We do not have any sewing skills whatsoever, and we did it! Just go in and out of the felt, which will create a cross stitch pattern. Leave the top of the rectangle open so you have an opening for the lip balm.

diy-lip-balm-pouches-red-pink-felt-craft

diy-lip-balm-in-red-and-pink-pouches-with-hearts

diy-lip-balm-in-red-and-pink-pouches-with-hearts

Hope you find a way, even if it’s a wave or hug, to spread the love on Valentine’s Day!

SHOP THE POST:

Wrapped with Love: DIY Gift Tags + Keychains

diy-acrylic-keychains-with-tassels-and-black-and-white-good-vibes-words

Gift wrap at Christmas time is an art. Sometimes the gift wrap is so pretty, it’s hard to actually want to open it to see what’s inside. We often wonder why we spend the extra time to make gifts pretty when it’s quickly ripped open and thrown in the trash. There is no perfectly sane reason to the wrapping madness, but there is a rhyme and reason. First, it may be vain, but it’s the truth – it’s pretty.  We (women) like to do things that look pretty. We want the gift to reflect our own personal style, and when it’s wrapped before Christmas Eve (rare in our houses), it’s an added bonus of “pretty” under the tree. Second, our grandma use to save the wrapping paper from opened gifts. She carefully opened every gift without a single tear, gently folded it, and kept it or re-used it.  If she were still here with us, she would keep it. If anyone out there is like my grandma, we better make the wrapping paper worth keeping.

This year, our wrapping is simple, but it has a fun and clever gift tag, which doubles as a gift. Gotta love that! Everyone will get a little keychain from Oriental Trading Company that Jenna made adorable printables for. There are 9 difFerent saying and styles to brighten one’s day, and they are all FREE for you. Everyone needs a reminder every once in a while about how awesome, amazing and beautiful they really are! These keychains do just that!

The printables are classic black and white; however we added some pizzazz to some of them with loose confetti, washi tape and of course, tassels. These make great stocking stuffers, gifts for girlfriends, teachers and of course, gift tags.

black-and-white-labels-hello-beautiful-your-awesome-tassels

Here’s how to do this insanely easy DIY.

Materials:

Step 1: Print the file, and cut the cards out. Click here for the free file.

black-and-white-cards-hello-beautiful-yes-you-can-your-awesome

Step 2: Decorate the cards for some extra color and texture if you wish.

tassels-and-black-and-white-good-vibes-words

diy-gift-tags-with-confetti-you-got-this

black-and-white-cards-hello-beautiful-yes-you-can-your-awesome

Step 3: Add a To: and From: on the back of the printables, or on a separate sheet of paper that’s cut the same size, so the recipient can remove it, and keep the cute printable on front!

diy-keychains-and-gift-tags-be-present-hello-beautiful


Step 4: Insert the paper into the acrylic sleeve. Add tassels if you want.

diy-acrylic-keychains-with-tassels-and-black-and-white-good-vibes-words

diy-acrylic-keychains-with-tassels-and-black-and-white-good-vibes-words

diy-acrylic-keychains-with-tassels-and-black-and-white-good-vibes-words

diy-acrylic-keychains-with-tassels-and-black-and-white-good-vibes-words

diy-acrylic-keychains-with-tassels-and-black-and-white-good-vibes-words

Step 5: Attach to the gift and you are d.o.n.e.!

kraft-gift-wrap-with-keychain-gift-tags

kraft-gift-wrap-with-keychain-gift-tags

Merry everything!

Oriental Trading sent us some items of our choosing for this post, free of charge. We’re so happy they did! All opinions are honest, and our own. No other type of compensation was received. Thanks for supporting the companies that support j. sorelle. We love Oriental Trading, even before this post. 

Cheers To A DIY Christmas Stocking With A Wine Spout

diy-red-christmas-stockings-with-a-wine-spout-making-spirits-bright-holiday-bar

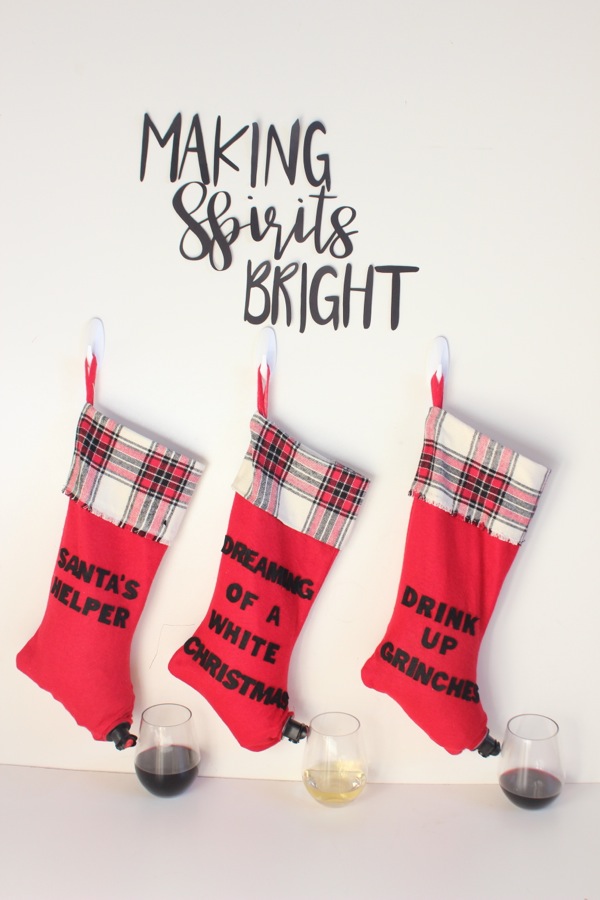
‘Tis the season for holiday parties, gift-giving and all things merry and jolly! We pour more wine around the holidays with all the parties, dinners and let’s face it, stress. So, wine was on our minds when we crafted our next DIY Christmas gift idea.

For this DIY, we’re changing the classic line from the Twas the Night Before Christmas poem that reads, “…the stockings were hung by the chimney with care, in hopes that St. Nicholas soon would be there,” to instead say, “…the stocking were hung by the bar with care, in hopes that friends and family soon would be there.” Yes, we’re hanging our families stockings in the living room like we always do for Santa, but we’re hanging a few extra in the bar this Christmas, and giving them to friends to spread good cheer. Christmas is all about making spirits bright, right?

diy-red-christmas-stockings-with-a-wine-spout-making-spirits-bright-holiday-bar

This DIY wine stocking makes for the perfect gift for friends, neighbors and family. Plus, it’s a really fun topic of conversation whether you’re at a party, or having a quiet night in with the girls.

Anyone and everyone can (and should) make these DIY Christmas stockings. Here’s how we made the ultimate stocking stuffer.

Materials:

  • Stockings, .98 cents at Wal-Mart, or other great options at big name retailers
  • Felt
  • Scissors
  • Boxed wine (we used Bota Box)
  • Hot glue and hot glue gun

Directions:

Step 1: First, we upgraded the stockings with about a $3 plaid fabric investment. We didn’t use a needle and thread – just scissors and a hot glue gun. Before the plaid, there was a thick strip of white felt.

red-and-plaid-stockings-with-funny-lines-diy-boxed-wine-stocking-holder

Step 2: Cut out letters for the fun quotes. We went with, Drink Up Grinches, Santa’s Helper, He Sees You When Your Drinking and Dreaming of a White Christmas. We had black letter stickers and just traced as we cut with the scissors. You can freehand the letters though, maybe even using good vinyl stickers to save yourself cutting time all together.

red-stockings-black-felt-letters-he-sees-you-when-your-drinking

Step 3: With a hot glue gun, glue the letters to the stocking.

red-stocking-dreaming-of-a-white-christmas

Step 4: Cut out a small hole in the front toe part of the stocking. If it’s too big, you can always hot glue the fabric tight around the wine pull tab.

scissors-red-stocking-wine-bag

Step 5: Insert the wine bag in the stocking and pull the wine tab through the hole in the toe.

red-and-plaid-stockings-with-funny-lines-diy-boxed-wine-stocking-holder

boxed-wine-bag-red-plaid-stocking-he-sees-you-when-your-drinking

diy-wine-stocking-holder-red-vino-and-plaid-stocking

diy-stocking-that-holds-wine

Step 6: Hang and pour. Cheers!

making-spirits-bright-holiday-bar-with-red-wine-stockings

diy-red-christmas-stockings-with-a-wine-spout-making-spirits-bright-holiday-bar

diy-red-christmas-stockings-with-a-wine-spout-making-spirits-bright-holiday-bar

diy-red-christmas-stockings-with-a-wine-spout-making-spirits-bright-holiday-bar


DIY Halloween Lanterns with Spooky Silhouettes

diy-lanterns-for-halloween-with-black-spider-and-bat-silhouettes

For us, Halloween is all about fun costumes (we spent our entire childhood dressed alike on Halloween night, and now we do the same with our kids), our mom’s homemade carmel popcorn, carving pumpkins, trick-or-treating and celebrating the holiday with our large Italian family. We don’t get into the scary stuff, horror movies or anything remotely gory. So, our Halloween decor can be a bit of a snooze for those who go all out for the Oct. 31st holiday. Pumpkins, Happy Halloween signs and a few spiders is just about all we have in our Halloween decor collection. It lacks a scare factor, which is ok with us (and our kids), but we stepped up our decor game a bit this year thanks to Oriental Trading Company.

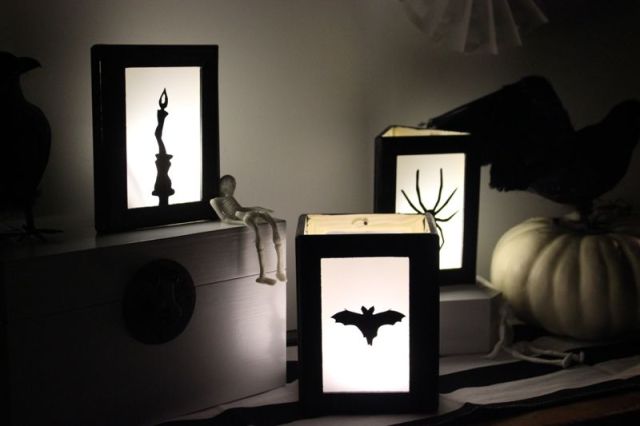
We’re lighting up the night with DIY Halloween silhouette lanterns. We stuck with Jenna’s favorite colors, classic black and white. All the other Halloween”classics” are there, too, including bats, skeletons and crows. We never have, and never will like spiders. But, we love their silhouette in our DIY lanterns.

diy-lanterns-and-halloween-silhouettes

This DIY lantern is so easy. Halloween will be here before you know it, but everything we made and set-up can be bought in one place, Oriental Trading, and crafted in less than half a day. Plus, you can re-use it year after year. Silhouettes never go out of style. We love, love the black and white table runner. It can be out year-round, and we were impressed with its thick, durable and quality fabric.

diy-halloween-lanterns

Here’s how you can light up the night, too.

Materials:

Directions:

Step 1: Paint the frames black.

wood-and-black-frames-craft-project

black-frames

Step 2: While the paint is drying, trace the glass or the wood backing of the frame onto the vellum. Cut the vellum rectangles.

scissors-and-vellum-paper-craft-project

Step 3: Cut the silhouettes. They have a thin border, so it’s best they are cut for a clean silhouette. Some of them are too large for the frames, so they need to be trimmed, or pieces of the silhouettes need to be used. For example, instead of using the entire candelabra, we just cut each individual candle. For extra stick, add glue to the back of the stickers before pressing them into the center of the vellum rectangles.

silhouette-black-halloween-stickers-and-scissors

halloween-black-silhouettes-on-vellum-paper-bat-spider

Step 4: Once the frames are dry, flip them over and use a hot glue gun (or Elmer’s glue) to glue the vellum along the inner frame.

black-halloween-silhouettes-bat-spider-and-candle-on-vellum-paper

bat-silhouette-for-halloween-in-a-frame

Step 5: Now it’s time to glue the frames together to make lanterns. We made some 3-sided lanterns, and one 4-sided lantern. To do this, patiently hold it up to have an idea of where the glue will need to go, and begin to glue side by side. You will need to hold the frames in place for a couple of minutes, then the glue holds it until it fully dries. If you don’t have patience for this, hot glue will work just fine. After the glue has dried, touch up the sides with black paint to cover up any glue.

hand-holding-a-black-frame

diy-halloween-lantern

black-silhouette-spider-frame

Step 6: Once the lanterns are dry, set them up with lights in the middle. Once the sun goes down, light them up. For a complete “look”, don’t forget the black and white runner, pumpkins, skeletons, spider web fans and crows.

tap-light-in-the-middle-of-a-diy-lantern

DIY-black-and-white-lanterns-oriental-trading-crow-halloween-decor

black-and-white-halloween-decor-with-spider-and-bat-silhouette-lanters

black-and-white-halloween-decor-with-spider-and-bat-silhouette-lanters

skeleton-resting-against-a-diy-lantern

diy-halloween-lanterns-bat-and-candle-silhouette

diy-halloween-lanterns-bat-and-candle-silhouette

diy-halloween-lanterns-bat-and-candle-silhouette

diy-halloween-lanterns-bat-and-candle-silhouette

Oriental Trading sent us some items of our choosing for this post, free of charge. We’re so happy they did! All opinions are honest, and our own. No other type of compensation was received. Thanks for supporting the companies that support j. sorelle. We love Oriental Trading, even before this post. 

DIY Halloween Tee: Witchful Thinking

witchful-thinking-tee-diy-grey-shirt-witch-hat

It’s wishful thinking to think that we will dress up every year on Halloween. It can be fun, but it’s not our most favorite holiday to celebrate, so we typically don’t dress up. We dress the kids cute and call it good. Our favorite part about the holiday is celebrating at our aunt and uncle’s house. The party is loud, the food is good, the homemade costumes rock and the laughter echoes throughout the house. We love a good tradition that is carried on for generations…don’t you?

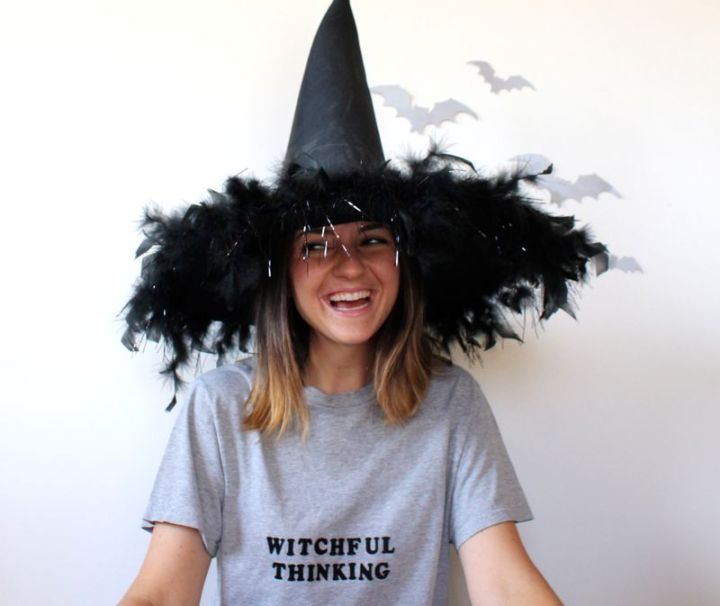
If you semi-like Halloween, don’t care for it at all, or have a party to go to but don’t want to dress up, this DIY semi-costume is for you. It’s a last-minute, really easy DIY tee that can be made in less than 10 minutes. Procrastinators, you got this!

This Witchful Thinking tee is cute, and you won’t be totally lame at this year’s party with black pants and a witches hat to fancy it up a bit.

Where our witches at?

witchful-thinking-tee-diy-grey-shirt-witch-hat

Materials:

  • Cotton t-shirt
  • Iron-on letters
  • Iron

Directions:

Step 1: Cut out letters for WITCHFUL THINKING.

Step 2: Follow iron-on letter package instructions.

witchful-thinking-tee-black-witch-hat-halloween-diy-costume

Step 3: Wear it and have fun!

witchful-thinking-tee-diy-halloween-costume-black-witch-hat

witchful-thinking-tee-diy-grey-shirt-witch-hat