Bohemian Glam Birthday Party

bohemian-glam-birthday-party-teepee-black-white-polkadot

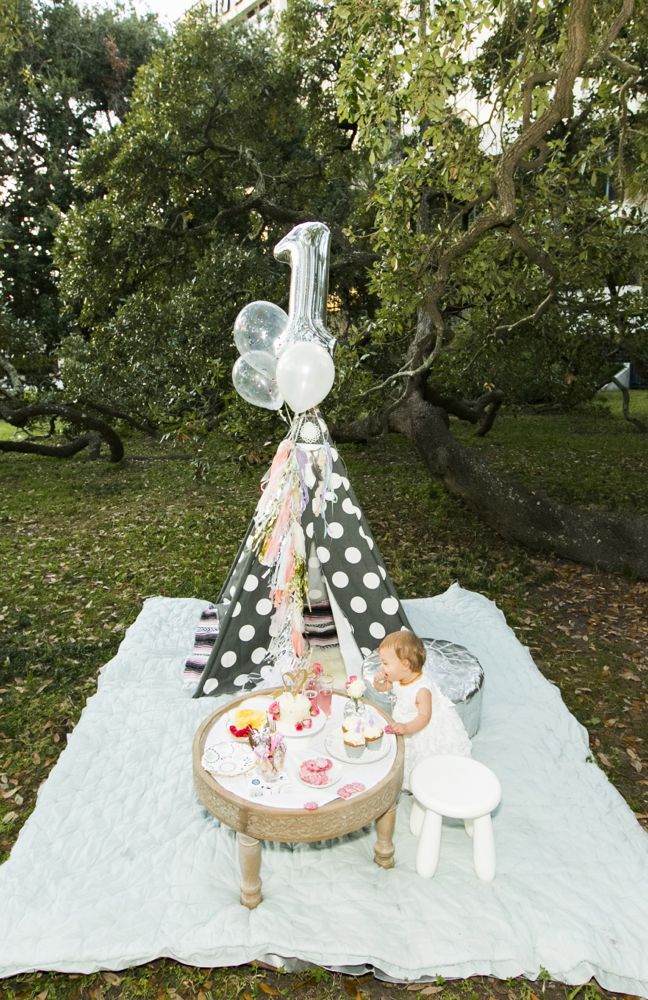
After looking at these photos of Mila’s first birthday party that Jessica shared with Momtastic, we decided 1-year-olds can have just as chic and as fabulous a birthday party as adults. Mila is one lucky little lady because her mom, Naysha Lopez, planned one dreamy bohemian glam first birthday party for her special day. It’s worth viewing all the photos.

We don’t know about you, but we want that silver pouf, dream catcher and teepee to be at our next birthday parties too…and we won’t be turning one. Special memories for a beautiful family! Happy Birthday Mila.

birthday-teepee-black-white-toddler-picnic-pouf-cupcake

{photos via Corinna Hoffman Photography}

How to Turn a Frame into a Sparkly Tray

diy frame to tray_jsorelle

I see lots of sparkles around the winter holiday season, but I love sparkles year-round. Bring on the glam! We have a DIY project for you today from our Sparkle from Head to Toe photo shoot {featured on Hostess with the Mostess here…and soon to be featured right here at J. Sorelle}. We took $5 frames, and turned them into trays and party favors. Thanks to Kathryn Giarratano for making our trays shine even more with her gorgeous handmade jewelry.

diy sparkle tray_jsorelle

DIY frame trays

You’ll Need
Frames
Black and white striped paper {or patterned paper}
Paint
Primer
Doll heads – you will need either 3 or 4 per frame, depending on the size of the frame

How To
Remove the glass from the frame.
Spray paint the frame with primer, then your desired color or glitter. For my frames, I used one coat of Krylon White Primer and Krylon Glitter Paint.
If using glitter, cover with glitter sealer.
Paint doll heads white with spray paint or use a brush to paint, which are going to be your tray ‘legs.’
Once dry, use a hot glue gun to glue doll heads to the bottom of the frame.
Use the glass insert from the frame to trace the perimeter of the shape/size onto your patterned paper, and then cut.
Insert the glass, the paper, and then the back of the frame.
Voila, you have yourself a cute little tray for perfume, jewelry or nail polish…and a very cute gift for a girlfriend!

IMG_0464diy sparkle frames_jsorelle

{images via meredith moran photography and j. sorelle}

How to Create a Black, White and Gold Glitter Bar

Here’s one of the details from our Sparkle from Head to Toe photo shoot we told you about Fri {the one featured on Hostess with the Mostess}.

We created the perfect party for women to kick off the holiday season and really SHINE. The sparkle party gave women a chance to gossip with friends over cocktails and cookies, try on and shop for jewelry by local artists, and paint their nails at a OPI nail painting station. Women deserve to Sparkle from Head to Toe…and this party let them do just that!

As you know, every good party needs a bar. With a small space, and a tight budget, we created a DIY bar from a tray. It’s a great accessory for any holiday party, bachelorette party, birthday party, or just a night with the ladies. Here’s how you can do it too.

DIY Black and White Striped Bar Tray

You’ll Need
Tray
Paint
Paint brushes
Painters tape
Wood letter from your local WalMart, Hobby Lobby or Michaels
Gold Glitter Spray Paint

How To
Clean and sand the tray if necessary.
Spray paint the whole tray with white primer.
Once primer is dry, paint entire tray white. Repeat once for two coats.
Add Painter’s Tape where you want stripes. My tray had the perfect lines carved into it, so I just lined the tape up with those.
Paint the non-taped parts black. I used a brush to paint for more control, instead of spray paint. Repeat for a total of 2 coats.
After 24 hours, pull the tape from the tray.
If you have any touch ups to do, use a small brush and paint to fix.
For the letters, it’s best to use the primer to spray paint so you don’t see the wood grain under the glitter.
Once the primer is dry, spray paint with glitter spray paint.
Accessorize the bar with champagne, Izze drinks and fresh fruit.

Labels printed and sparkled by FLEUR DE LIS, custom paperie.

{via Tutto Bella}

anna be: five, part 2

And, finally … Anna Be: Five photos part 2
We hope you love them as much as we do!

{images via Jenna Walker Photographers}