DIY Curly Girl Designs Coasters and Gift

DIY coasters

I think I am slightly obsessed with coasters! I want to make them for everyone. So, when I received DIY coasters from Kimi as a hostess gift, and she revealed how she and her mom {love you Barb} made them {the secret ingredient was napkins}, I knew I had to make some. They looked so good, I couldn’t believe it. Maybe I’m late in the game to discover this and this is so 90s or maybe they were on to something BIG…either way, I love it. I have so many fun napkins, always in need of a great gift…and who doesn’t need something to prevent a water ring from their cocktail?

DIY Napkin and Tile Coasters
{thanks Kimi and Barb}

You’ll Need:
Cute Napkins {mine were from Curly Girl}
4 white 4×4 tiles from Home Depot
Modge Podge {the regular kind you use with a brush, and also the spray…I used the spray this time to prevent streaks, and it worked, but you can definitely still use the regular kind}
Cork Board from Michaels

How To:
Peel all the layers of the napkin away from the top layer and cut it along its creases. With the Curly Girl napkins I used, 1 napkin gave me 4 perfect squares for 4 tiles.
Add about 1 tablespoon of Modge Podge to the tile and spread out with a foam brush.
Place the napkin on the tile and press down the sides along the sides of the tile. Careful not to pull as the napkin is thin and can tear.
Make sure all sides, corners and bubbles are pressed down.
Let dry for about an hour to two.
Gently tear the sides of the napkin ‘left over’ to the edge of the tile. It should tear easily. I didn’t need a scissors.
Spray the tiles with the Modge Podge and let dry for 20 minutes. Repeat the spray steps 2 more times. Don’t forget to spray the sides and corners. If you apply Modge Podge with a brush, I would apply at least 2 to 3 layers.
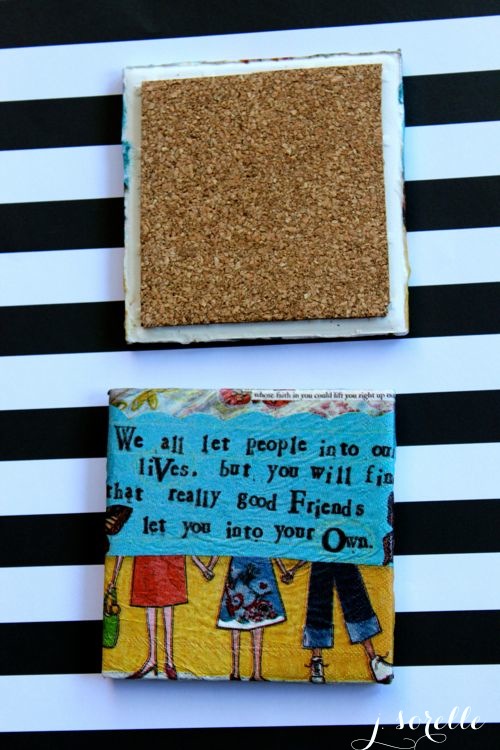
Cut the cork board into squares slightly smaller than 4×4.
Apply Gorilla Glue to the cork board and press down on tile. I applied a smaller square on the cork, as Gorilla Glue spreads 3-4 times as it adheres. If you over-apply, it will leak through the sides and will be really difficult to remove.
Place a heavy book on top of the cork board and tile, and in the morning {or 2 hours}, you will have a lovely set of coasters.

DIY napkin coasters

DIY coasters

DIY tile coasters

{images via j. sorelle}

DIY Glitter Menu

sequin menu

I am just in love with this menu Jenna from Fleur de Lis made for our recent Bachelorette Bash for Kimi. All photos of the party {thanks to the talented photographer and bridesmaid Amy Forness Photo} to come. Wouldn’t eating be more fun and just overall fabulous if we all had sequins menus like this for every meal?

Jenna printed the menus, then I used Elmer’s Craft Glue to glue sequins to each menu…sequins starting heavy in the corner, then scattered. If you need a menu like this in the future, e-mail us at hello@jsorelle.com. We can do it for you.

diy sequin menu

DIY sequin menu

DIY sequin menu

DIY glitter menu

{top and bottom images via Amy Forness Photo, and images in the middle from my cell phone}

DIY Cosmetic Bag Party Favor

DIY cosmetic bag

How do you leave a little sparkle?

Maybe its your personality? Smile? Random, simple acts of kindness? A charming accent? Whatever it is, find it and do it because I love people who enter a room and own it, and leave me with a good feeling, or a memory when they walk out the door. I’m talking about the people I don’t forget, and leave a trace of their optimism behind with me. I have friends like this, who are special and simply amazing, and I believe they “leave a little sparkle wherever they go.” So, for a recent Bachelorette celebration for one of my bestie’s, I made cosmetic bags with this quote to go along with our Sparkle theme for the weekend. More photos of that extravaganza to come, but for now, a DIY.

You’ll Need
$3 cosmetic bags from Target {in the travel cosmetics section}
Chacopaper from Michaels
A printed quote
pen
Krylon Gold Leaf Pen from Michaels

DIY cosmetic bag

How To
Use Microsoft Word to create your quote in a favorite font.
Print your quote on a regular piece of printer paper.
Cut the quote and a piece of the Chacopaper the same size as the quote.
Layer the paper, bottom-up, starting with the ‘chalky side’ face down on the cosmetic bag {you can feel the ‘chalky’ side}, your quote and then top it off with the ‘tracing’ paper.
DIY cosmetic bag party favor
Use a black pen to firmly {without tearing} trace the quote on the tracing paper.
Once finished {or you can even get a sneak peek to see if its working if you can lift the edge without moving the paper} lift the 3 sheets of paper from your cosmetic bag and you will see a traced image of your quote. I used the white Chacopaper, so it appeared white like the photo below.
Use the Gold Leaf pen to carefully trace your ‘image’
Voila.
DIY cosmetic bag party favor

DIY cosmetic bag party favor{images via j. sorelle}

DIY Homemade Lavender Body Butter Recipe and Planter Gift for Teacher

thank you for helping me grow teacher gift

I’ve been loving lavender lately. Can’t seem to get enough, so it was my inspiration for the kids teachers, ‘end-of-year, thank you for everything’ gift. This week the kids happily handed their teachers a lavender plant with its roots planted in a DIY decorated terra-cotta pot with the phrase, ‘thank you for helping me grow,’ along with homemade lavender body butter. Teachers need to relax, so hopefully lavender body butter in a mason jar {who doesn’t love a Mason jar} they can rub on their hands at feet at the end of a long day does the trick.

For the Lavender Plant
You’ll Need

terra-cotta pot
Sharpie oil-based paint markers from Home Depot
lavender plant
dirt

How To
Find a free printable or ‘art’ inspiration for your quote. I used this as an inspiration from Somewhat Simple.
Free hand your art on the terra-cotta pot or you can cut shapes and trace {you can lightly use a pencil or chalk first, and then trace with the Sharpie markers, which I loved}.
I re-traced the words and shapes 2-3 times so the Sharpie colors were darker/brighter…just wait until the first coat dries, which is about 15 minutes or less.
Have your child sign his/her name in the back of the pot.
Then, plant the lavender plant.

DIY teacher gift

DIY teacher gift

DIY teacher gift

DIY teacher gift

For the Body Butter
You’ll Need
mason jar with a wide lid
1/2 cup shea butter, raw and organic {from Amazon}
1/2 cocoa butter, raw and organic from Amazon}
1/2 cup olive oil, organic
1/2 cup coconut oil, organic and unprocessed
40 drops lavender essential oil {doTERRA brand} or whatever combination of oils you enjoy

How To
Add the oil ingredients into a double broiler, or add a glass bowl onto a pot with boiling water in it.
Mix with a whisk until completely melted.
Remove the bowl from the pan, remove whisk and let cool for a couple of minutes, then place in the refrigerator until it is chilled {hard on top}, which took 1.5-2 hours.
Remove from the refrigerator and begin to blend with a hand mixer for a whipped texture. Add your essential oils. Whip until you have a nice texture and then place in mason jars.

note: I am not a body butter expert, but I read that the butter can lose its whipped texture and harden slightly, but it’s still good. And, it will last for several months. It will likely melt in hot temps above 70, so keep it around room temperature. I’m only a week into trying it and I think its lovely. I use coconut oil daily as a lotion, so I’m use to the oil texture on my body, but your dry skin will thank you.

steps to homemade body butter

homemade body butter

homemade body butter

DIY lavender teacher gifts

{images via j. sorelle}

Breastfeeding Support and Humor for New Moms

pregnancy photo shoot

It’s May, so we are still celebrating mothers everywhere! We hope you had a lovely Mother’s Day. My 5 year old ran into my room at 6 a.m. to be the first to wish me Happy Mother’s Day, and on this day, it was a beautiful wake up call.

For all you mothers out there, you know motherhood is the most rewarding and exhausting job in the world. You know what a miracle each and every child is. You know the worries and prayers that we pray hourly for our children. You know that no matter what you do, they will continue to grow up. You know that if you have boys, your most likely going to get peed on. And, you know that breastfeeding is amazing and a ‘whole new world’ in and of itself.

For all of you who are about to become a mother, you’ll see…

or you can read an honest opinion of it here…

breastfeeding
written and produced by Jessica, Jenna and Jodi…the sisters of j. sorelle.

9 months of nourishing and painful hours of pushing,
but wait the sacrifices to your body have just begun…now its time to breastfeed your little one.

it’s another miracle of what our female bodies is capable of,
in addition to nurturing, strength and unconditional love!

though it can be beautiful and amazing, there are some things we must say,
there’s some joys and pains to it at the end of the day.

you will walk around the house topless and full of milk,
and not like the steamy nights of your honeymoon draped in silk.

when you pump, the thought of a cow may pop into your mind,
just stop yourself…remember…be kind.

nursing pads are a necessity if you are a leaker
yes, there are times, you may feel like the neighbors sprinkler.

in the next months/year or so your boobs will be free,
but expect that they may sag down to your knee.

i never knew something that caused me much pleasure would one day cause me pain,
but, as a mom, there is simply to time to be vain.

 if it’s too hard to do, don’t feel guilty about stopping one bit,
in fact, a happier you is a much better fit.

please remember to give yourself a break,
because as a mom you will give more than you take.

try to stick with it for several months – they say the lucky number is 3,
just remember, your milk is not only healthy, but it’s FREE

i promise the toe curling pain will soon begin to fade,
and hopefully it will be the best decision you’ve made.

it’s bonding time only you and your baby can share,
and time alone with your baby on your lap soon will be rare.

we do it all because having a child means to love like no other.
for your about to experience the pure joy of being a mother.

 #Alt Summit believes every mother counts

{image via Meredith Moran Photography}