adorable diy cake stands

When I first saw these DIY cake stands, I just knew I had to make them. There was a warning from the creative inventor, Jennie from A Well Crafted Party, that whoever tries to make one will be addicted and just have to make more. She was right. I admit, I’m addicted. Now you can be too. Thanks, Jennie.

DIY Cake Stand Tutorial, featured at Bump Smitten.

Materials:
1 plate— 4-inch plates make great cupcake stands
1 candle stick, goblet or sundae glass
Epoxy
1 heavy book
1 can of spray paint
1 can of acrylic sealant {I skipped this step due to time}

Instructions:
1. Spray paint your candle stick, goblet or sundae cup the color you wish the base of your cake stand to be.
2. Find your plate—any plate will work {square or round} but I recommend using one that has the color or image you would like as this will not be painted to keep the cake stand food friendly.
3. Affix the plate to a candle stick, goblet or sundae cup {the larger the base, the more sturdy the cake stand} using a glue made for ceramics and glass.
4. Place a heavy book on top of the stand and let the epoxy set according to directions. After the epoxy has set you should be able to pick up the stand with no movement from the candlestick or plate.
5. Before use, wash the top of the plate with dish soap and water. The stand is not dishwasher safe but is food-friendly as long as food is not touching the painted surfaces.

Read more detailed instructions from the original tutorial on Bump Smitten here.

P.S. I’ve used these stands for cupcakes, food displays and votives. Let your creativity fly.

{images via Bump Smitten}

stars and stripes detail

I love the look of the vintage American-inspired picnic table above. I’m a sucker for all things worn and antique-looking, so I want to take a seat on that picnic bench right now, and then bring it home with me. Authentic. Simple. Love it.

Below are some ideas to add that extra special detail of red, white and blue to your party.  

Sparkler Favors, Twig and Thistle

Download the free printable for the sparklers here.

Download the Light It Up matchbox cover and straw tag here.

Pinwheel Bouquet, Good Housekeeping

DIY Vase with Patriotic Ribbon, Good Housekeeping

 I love all-white flowers, especially hydrangea. This standard glass vase gets a stars and stripes facelift with simple ribbon…a diy project that will be sure to get noticed. Just measure the vase’s circumference, then cut lengths of patriotic ribbon to size. Attach with double-sided tape to cover the vase.

Patriotic Table Runner, Good Housekeeping

This crepe paper runner {aka streamers} can be made in minutes. Cover a table with a white paper tablecloth. Cut lengths of blue and red crepe paper to the lengths of the cloth. Weave the colors, as shown. To keep the runner in place, use double-sided tape on the edges.

 Star Medallion, Martha Stewart

Make these fabric medallions and hang from your porch, above your table or as a backdrop to a dessert table. Adorable. For directions, go here.  

Nautical Napkin Rings, Martha Stewart

1. Bind 96 inches of off-white cord at 12-inch intervals with clear adhesive tape. Snip through tape and cord to create 8 lengths. Thread each length through a boat snap {Boat snaps, also known as eye snaps, can be found at boating-supply shops}.
2. Loop cord, aligning ends on a 2-inch piece of 3/4-inch-wide off-white twill tape smeared with white or fabric glue.
3. Pinch sides of cord together to create 2 smaller loops, securing with tape.

Lanterns on a String {Ribbon}, Hostess with the Mostess

Hang lanterns with red, white and blue ribbon and be sure to light a candle inside for a warm glow throughout the evening.

Striped Straws in Mason Jar with Name Tag, Celebrations at Home

Get the DIY name tag printable here.

DIY Fabric Flower, Celebrations at Home

I love this flower idea. It can be added to any basket, box or bucket. It’s that little extra something that makes the presentation special.

You’ll Need
Strips of fabric cut to size with pinking shears
A button
Needle & thread

How To
Begin layering your strips of fabric in criss-cross patterns until you have a full circle.
Then place your button in the center and sew a few stitches through it and the fabric to keep it all together.
Apply the ‘flower’ using glue dots

{images via Country Living, Twig and Thistle, Good Housekeeping, Martha Stewart, Hostess with the Mostess and Celebrations at Home}

grad par-tay

Are you graduating in a few weeks? If you are, (and are throwing a party to celebrate), check out these fun decor ideas to make your grad party one to remember.

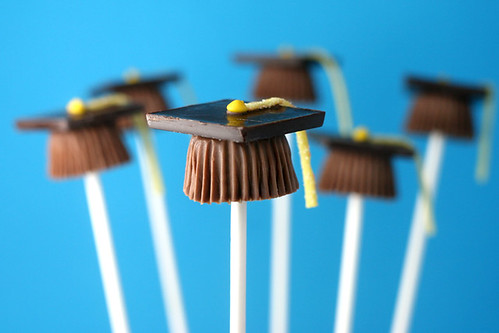
I was browsing on The Party Dress and found these cute graduation cap pops by Bakerella. So simple yet creative.

grad pops

You’ll need: Airheads Extremes Rainbow Berry Sweetly Sour Belts, mini Reese’s peanut butter cups, lollipop sticks, a styrofoam block and Godiva chocolate squares. Visit Bakerella for “how-to” instructions.

I recently graduated from college and my parents threw me a fantastic grad party at Crimson & Gold Tavern. My invitations and thank-you notes were totally fabulous, thanks to Bonnie Marcus (available at Fleur de Lis). How cute and chic is the girl on this invite? I had to have her on my invitations and thank-you notes!

bonnie marcus stationery

We decided to carry the image from the stationery  throughout the decor. This fashionista grad was the center of the decor at the party:

Just go to Kinko’s and enlarge whatever image you like, attach it to a colored-poster board and hang it on the wall!

We had yummy cupcakes from Intricate Icings and added a little something special on top – cupcake toppers! A fun, easy way to decorate your deserts. All you need are crazy-scissors, double-sided tape, a hot glue gun and a lollipop stick! And yes, we had the grad image on the toppers, duh!

toppers

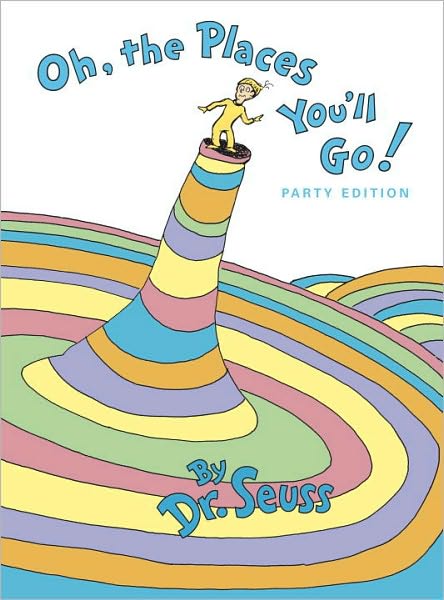
Wondering what to gift to give a grad? Oh, the Places You’ll Go! is a cute little something that is perfectly fitting for a recent grad. My niece and nehphew gave me a copy when I graduated – I loved it! Pair it with money or a gift card 🙂

barnes & noble

{images via tutto bella, The Party Dress and Barnes & Noble}

Cookie Monster Party

My kids 3rd and 1st birthdays are quickly approaching, so my mind is churning with ideas for themes, colors, etc. Since I was on the subject of toddler birthdays, I thought I would share my son’s last birthday party.

I was inspired to do a milk and cookies party for my son’s 2nd birthday party after coming across a blog posting by Anne from A. Party Style. My son, Jameson, LOVES cookies; after all, cookie was one of his first words. So, there seemed nothing more appropriate than throwing a cookies and milk party. I liked the brown and white color scheme, but wanted a touch of blue. My son also loves Cookie Monster from the kid-loved Sesame Street, so it seemed perfect…a cookies and milk party with special appearances from Cookie Monster! Once I had the theme, I hit the ground…and Michael’s…running! 

Many of the details are DIY, which I love.

I made the invitations (yes, I cut the cookies and added each chocolate chip with a sharpie in-hand, and the milk bottle). I printed the invites on my computer at home. You can find the paper to do this yourself at Fleur de Lis.

c is for cookie invitation

inside c is for cookie invitation

After “Jameson’s Art to Eating a Cookie” photo session, I had an idea to use an antique window pane I had in the garage for a photo display. I made a frame for all cookie photos using construction paper and double-sided tape.

antique window pane photo display

I couldn’t resist creating a balloon wreath after seeing this birthday wreath at HowDoesShe? It was simple to make and turned out adorable!

diy balloon wreath 

The DIY custom water labels posted on etsy.com from RyCreationShop were just too cute to pass up.  

cookie monster custom water labels

Due to the weather, I had to create a fun game for the toddlers to play inside – what better than a cookie decorating party at a cookie party? I made sugar cookies, and bought icing, a variety of sprinkles, food color pens, etc. The kids had a blast…and had faces covered with chocolate and sprinkles to prove it.

I hung balloons from the arch in the middle of the room, which was a cost-effective way to add color to the party.

balloons

I placed a Pottery Barn lantern with photos of Jameson in the middle of the table. Stay tuned for a DIY tutorial blog post on how to make these lanterns yourself. They are cute, and also serve as a warm ambiance with the candles glowing throughout the evening.  

lantern centerpiece

The party wouldn’t be complete without the birthday boy wearing a cookie monster t-shirt from the ShockNRoll Etsy Shop.

cookie monster shirt

I’m obsessed with striped straws.  The kids loved drinking their milk from them too.

striped straws and shortbread on a stick

The menu of cookie options included homemade chocolate chip cookies, homemade oatmeal cookies, homemade shortbread cookies, oreo cookies, and ingredients to make s’mores by the fire-pit outside.

cookie bar

The kids’ goody bags, with a custom name tag made from cupcake toppers from RyCreationShop, and a custom label printed at home on my computer, contained chalk, bubbles, shortbread cookies and milk with a custom label, “Jameson’s sweet 2% milk.”  

goody bags

shortbread for goody bags

chalk for goody bags

The party was a success, and my little cookie monster loved it!

{images via tutto bella}