DIY Winter Wreath With Bells

diy modern wreath with bells

If you didn’t pick up on from a recent post, I’m having a bell obsession. Yes, I want them everywhere. I like to hear them, I like to see them – on place cards, garlands, doors and wreaths. So, it’s no surprise I made a trio of DIY winter wreaths with bells to decorate an empty wall in my house. I actually made the wreaths last year, and upgraded them this year with the bells. After I made them, I saw them on sale at a boutique store for $65-$85 per wreath. I like to think I saved money with this craft (it’s what I’m telling myself for yet another Amazon order at my doorstep) since these wreaths cost less than $10 each, and I made a chic new addition to my holiday home decor.

diy winter wreath with bells

DIY Winter Christmas Wreath With Bells
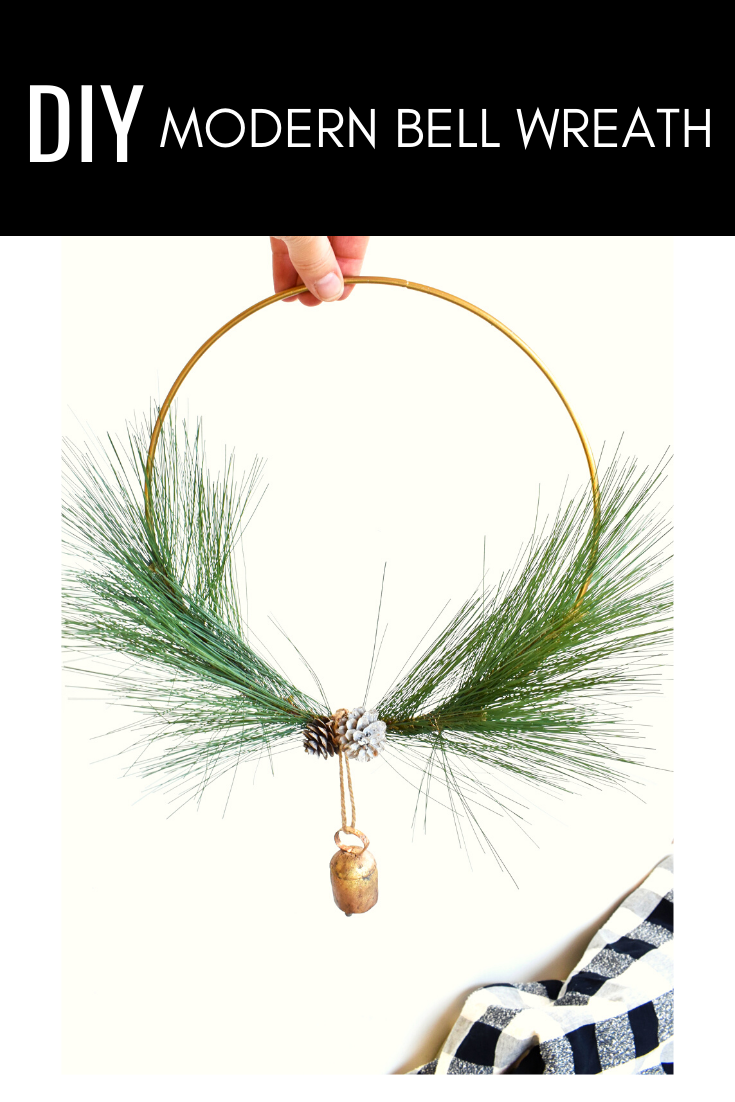
You’ll Need:

Here’s How To Do It:

Step 1: Buy 3 different size metal loop from Michaels. I spray painted mine copper, but any color will work.

Step 2: Next, buy faux greenery, (such as pine or any other winter greenery) and floral wire. Cut and add pieces of the greenery on the wreath, and wrap the stems in wire around the metal hoop. It’s that easy!

As for the bell, wrap twine through the bell, and then around the hoop. Listen for the sound of bells all season. It will make you smile. I know just looking at the bell decor makes me smile. Jingle all the way this Christmas season!

diy modern wreath with bells

diy modern wreath with bells

affiliate disclosure

Christmas Craft for Kids and Tweens: DIY Glitter Snow Globe

DIY glitter globe-holiday-craft-and-tween-gift

My son’s teacher has a DIY calm down jar in the classroom for kids to play with, or to shake when they need to calm down. Something about the way the glitter falls in the liquid is mesmerizing, and calming for kids. Like T. Swift says, “You need to calm down.” Now, there’s a jar for that. Haha.

Glitter is fun, especially when it’s contained, and there’s something magical about snow globes this time of year. So we combined the two for the cutest DIY glitter snow globe. This time of year is crazy, so if anything, no matter how simple, can help kids (or adults) calm down, it’s worth trying. Plus, these make adorable gifts for friends for kids and tweens. Let’s get this glitter party started.

DIY glitter globe-holiday-craft-and-tween-gift

DIY Glitter Snow Globes

Materials: 

Instructions:

Step 1: Fill the snow globe about 1/2 full with warm water.

Step 2: Add the glitter glue. I used 1 bottle for all three snow globes, and all got equal amounts. So, 4 tablespoons of glue per snow globe is a good start. In a mason jar, which is larger, you can use 1/2 cup glue.

Step 3: Add 2-3 drops food coloring. I used similar color glitter glue, food coloring, and glitter – all green tones. But, you could see how it turns out with multi-color glitter and glue. Don’t use more than 3 drops food coloring with these smaller globes, or you won’t be able to see the glitter.

Step 4: Add the glitter. I added about 2 tablespoons glitter per snow globe. You can add more or less if you want. There wasn’t much of an exact science to this. I used fine glitter in all of them, and added star glitter in some as well.

Step 5: Fill the remaining space in the snow globe with warm water, until it’s almost fill (leave a small space at the top so you can still shake it). Push in the inner seal in the globe insert, and then add super glue to the inner rim of the screw top, and then screw it on.

DIY glitter globe-holiday-craft-and-tween-gift

Step 6: This is optional, but you can customize each snow globe you make for friends with vinyl or stickers. We used our Silhouette Cameo to make vinyl words and mini stars for an extra magical touch.

Finally, shake and watch that glitter swirl, and then fall. Merry Christmas, everyone!

DIY glitter globe-holiday-craft-and-tween-gift

DIY glitter globe-holiday-craft-and-tween-gift


affiliate disclosure

Easy Halloween Boo-Quet Centerpiece

black-crow-diy-halloween-centerpiece-spooky-bouquet

Pumpkins, crows and skeletons, oh my! Now that it’s October, our fall arrangements were in need of some spooky, dark updates! With some Halloween props, our fall arrangements transitioned perfectly into Halloween.

More tips on Momtastic.

SHOP THE POST
*affiliate links
[show_shopthepost_widget id=”3755018″]

The Secret To The Best Glitter Nails


beauty hack for the best glitter nails

You know when you want to get your sparkle on, but when you try to paint glitter on your nails (the traditional way), you have to do like 100 strokes to TRY to get it covered in glitter, and it just doesn’t look good?? Yep, us too. Well, someone smart found this genius way to add glitter to your nails. We tried it. We love it! It’s so simple. YOU can do it. This is going to be our go-to this holiday season.

We shared all the details here on Momtastic.

beauty hack for the best glitter nails

Valentine’s Day DIY: Sweet Heart Packaging

diy heart-gift-boxes-diy-art-project

This project reminded me of my grandma, because she use to love Russell Stover  chocolates. I don’t know anyone who loved those tiny chocolates like she did. I don’t even know if she had a favorite flavor inside the famous heart-shaped boxes, but still to this day, when I see those boxes, I think about her. It was really nice to have quiet moments to think about her while I painted the hearts. So many of my memories about my grandparents revolve around food. Coffee in the mornings with my grandparents, delicious biscuits and gravy at their dining room table after a sleepover, homemade perogi’s, Twizzlers stored in my grandparents kitchen cupboard, and the countless homemade meals that nourished my body and soul. Life is so sweet with all those memories!

Whether you have someone you buy Russell’s candy boxes for, or want to send a sweet gift to a loved one this Valentine’s Day, this craft is for you! This would also be an adorable gift for grandparents – just let the kids paint the art on the box! You can fill the boxes with anything small you want to give including jewelry, doTERRA oils, lipgloss, notes, tea bags or money. It’s a keepsake people can keep on their dresser, too!

Materials:

  • Russell Stover heart shaped boxes (found them on sale for $1 each in the Valentine’s Day section of the grocery store, which was better than the $10 pre box online)
  • Acrylic paint
  • Paintbrushes

Paint, paint and paint some more. That’s it! I painted the outside of the box white first, and then the colorful design on top of that.

If you plan to buy keep the chocolates inside the heart-shaped boxes, don’t paint the inside of the box. You can paint the outside, and it will still be food safe. Also, the bottom of the box (where the label is) is not as shiny as the top, so you can paint the bottom white, and then flip the box so it’s the top with your design on it.

diy heart-gift-boxes-diy-art-project

diy heart-gift-boxes-diy-art-project

diy heart-gift-boxes-diy-art-project

diy heart-gift-boxes-diy-art-project

diy heart-gift-boxes-diy-art-project