DIY Bleach Ice Dye Sweatshirt

DIY bleach ice dye sweatshirt

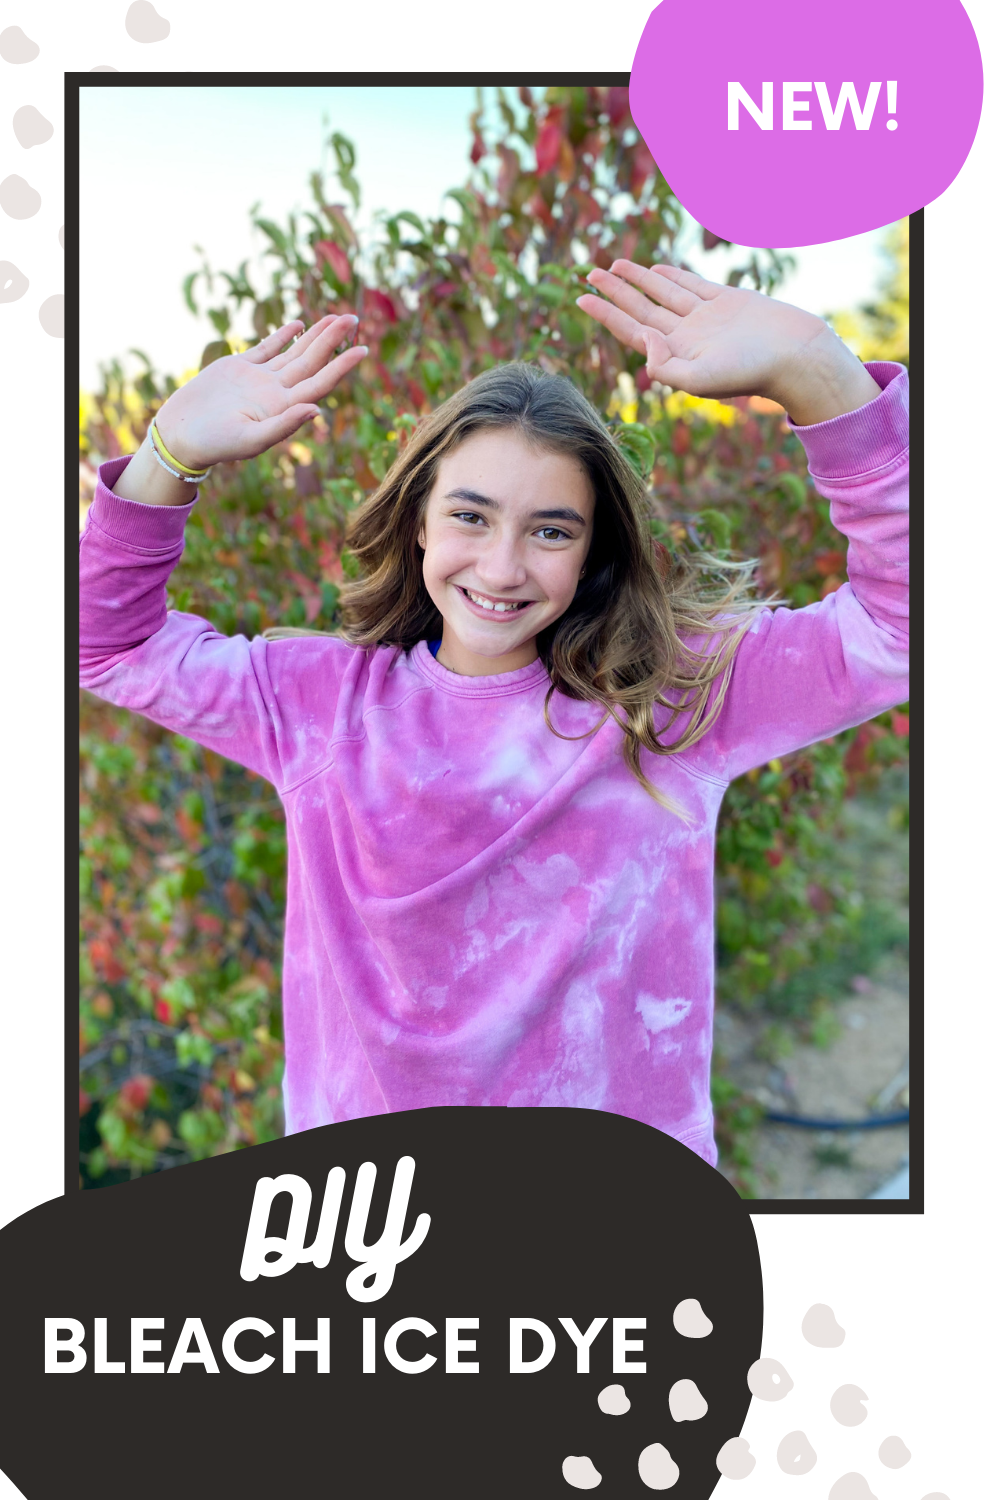
First of all, I can’t believe I have a teenager. Well, not officially, but it sure looks like it…and she sure acts like it. I’m beyond grateful for her, but may God help us. She helped me with my latest project – DIY Ice Dye with Bleach! Tie-dye apparel is all the rage for tweens, teens, and let’s face it, adults, too! We all love to wear it (especially in our loungewear). After making our sweatshirts, we are hooked to this ice dye technique. Bring on all the bleach ice dye projects!

The materials and directions to make DIY bleach ice dye sweatshirts, shirts or pants are on Momtastic. Check it out!


We Used Baking Soda to Paint This DIY Designer Vase

This beautiful vase caught our eye. But, $150+ isn’t in our budget for a vase, so we took a trip to the thrift store and made a DIY version. We are slightly obsessed! We’ve been wanting to try the new baking soda + paint trend, so that DIY paint method was used in the making of this vase. It’s a must-try!

All the details to make this DIY designer vase are here, at Momtastic.

diy vase made with paint and baking soda

The Cutest DIY Easter Eggs, Ready For Spring Storms

diy easter eggs-spring eggs-diy beanie hats with yarn-fun family crafts for easter

We made DIY easter eggs with beanie hats, and they are the cutest! This no-sew, no-dye, really easy Easter egg tutorial is fun for all ages. The eggs are not edible, so no boiling needed and you can reuse them yearly. The DIY yarn beanie does not require sewing or crocheting of any kind. We made DIY beanie ornaments and wine toppers this winter, so we improvised and made more this Spring.

You may think these are eggs are experiencing some seasonal confusion, but it’s actually quite accurate. We know Spring means snowmelt, new beginnings, sprouting seeds and warmer weather; however, we live in Colorado, so while it may be Spring (thank the Lord), that doesn’t mean the snow is gone for good. It likes to linger and March is often the most snowy month of the year. It is not uncommon to have Easter eggs hunts in the snow or to see a winter jacket over spring dresses. In fact, the weather this week is cold and snowy.

We hope to make some bright eggs with flowers and things that represent all-things-Spring, too. But, if you’re not ready to say goodbye to the snow, you’re looking for a fun craft that doesn’t require dye, or can’t resist that cozy beanie feeling, these DIY easter eggs are for you.  These eggs are ready for rain, snow or sunshine – whatever Easter Sunday may bring.

diy easter egg-diy yarn beanie-spring-happy egg

Materials:

  • Eggs, plastic (like this)
  • yarn (any spring color, but the thicker the better)
  • Sharpie (thin tip)
  • Pink colored pencil
  • Toilet paper roll
  • Hot glue gun
  • X-acto knife or scissors

Directions:

diy easter eggs with diy beanies, happy eggs, crafts for kids, spring craft

Step 1: Use scissors or an Xacto knife to cut a toilet paper roll about 1 inch wide. Cut several of these. You need to make the roll a little wider to fit around the circumference of the egg, so we cut one of the rolls, and added it to another one (to make it 1 inch bigger) with hot glue.

toilet paper roll

Step 2: Cut the yarn about 12 inches long. Fold the yarn in half, loop the “loop end” through the toilet paper roll, and pull the strings through the loop so it creates a knot. Continue this with the yarn until the entire roll is covered. It should look like a squid with long tentacles.

yarn craft

yarn crafts-diy yarn beanie hat

yarn beanie craft

Step 3: Push the “tentacles” all the way back through the inside of the toiler paper roll.

diy beanie-yarn craft

Step 4: Grab the bunch of yarn and tie another small piece of yarn tight around it.

diy beanie-yarn craft

Step 5: Next, cut the yarn ends to make a small pom pom.

diy easter egg-diy yarn beanie-spring-happy egg

Step 6: Add a dab of glue on the eggs (try on the hat first to make sure where you want to glue it) and place the beanie on top. Finally add a cute face with a Sharpie and pink cheeks with the colored pencil.

diy easter egg-diy yarn beanie-spring-happy egg

Oh my goodness, they are so adorable.

Here’s more of our egg-traordinary spring and Easter egg favorites:

DIY Easter Eggs

Happy Spring!


*this post contains affiliate links. thanks for supporting our blog.

Amazing Resin Projects To Try This Weekend (Just In Time For Valentine’s Day)

resin hair clip and heart keychain

Resin is one of those mediums we see everywhere, and it’s been on our must-try list for a long time. We’re happy to report that we finally got around to it. We made some fun heart-themed gifts for Valentine’s Day – DIY keychains and DIY resin hair clips. We’re basically obsessed with all the amazing things you can make with resin and epoxy, and hope this is just the beginning of the things we will create. There is somewhat of a learning curve with resin, at least for us, so hopefully this is a helpful tutorial, and you will be crafting with resin in no time.

Kimberly at A Girl and A Glue Gun has so many tips and trick when working with resin and epoxy, and we highly recommend watching her videos. She made some amazing coasters, jewelry and keychains.

DIY Resin Keychains & Hair Clips

Materials:

  • Art ‘N Glow Resin – if this doesn’t arrive in time from Amazon, your local Michaels or Joann’s has resin, too
  • Heart silicone mold (Walmart for $4)
  • Hair clip set
  • Keychain accessories or this keychain kit (helpful if you want to make alphabet letters in the future)
  • Glitter (just about any glitter or small sequins will work – you can even use dyes, alphabet beads and dried flowers and photographs). We did’t use the dye this time. We have used it before, and it works great)
  • Small disposable cups and popsicle sticks
  • Disposable table cloth and disposable gloves (very important – it was messy for us)
  • Multi-purpose lighter or match
  • e-6000 or clear gorilla glue (the other that doesn’t expand)

Directions:

First, we want to apologize for the fact that we don’t have photos of the process. Our hands were wet with resin and didn’t want to mess with a camera at the same time.

Step 1: Follow the directions that come with the resin kit, very carefully. Put on gloves, and set up space with disposable cloth. It’s crucial is have good airflow while stirring and pouring resin. We always have a window open close to the craft table when working with resin. Fresh air is your friend with this one. The first step will be to pour a small (1-2 tbsp or so) amount of resin and hardener in separate cups, then pour an equal amount of each into another cup. The two you pour in together is what you’re going to pour into your project, so estimate the right amount. You will have to stir the two together very slowly for 3-5 minutes. You will see some bubbles – we have found that the slower you stir, the smaller and less bubbles (which is a good thing). Once you are done stirring, pour in another cup, and then add your glitter, a couple drops of dye or whatever you are putting inside. Stir and/or mix it in with a popsicle stick.

art n glow resin

Step 2: Pour the resin and add-ins in the molds.

For Hair Clips: You will want to carefully pour to the top of the hair clip molds. If any excess overflows, carefully swipe off with the side of a popsicle stick or wipe with paper towel. You can move any sprinkles or glitter around with a toothpick if you need to.

Hearts: Pour about halfway, not to the top of the mold. If you are adding small alphabet beads, pour a tiny amount of resin in the heart, and then add the beads (you can use a toothpick to help place or wiggle them around), hold a flame close to the top of the resin if any bubbles (they will pop magically), and then pour the rest of the resin to cover the letters The heart should be about 1/2 to 3/4 full.

Step 3: Once the resin is in the mold, you will want to take your lighter and hold it closer to the surface of the resin. We learned this from A Girl and A Glue Gun. It’s amazing – the bubbles pop when the fire gets near it. Carefully hover the lighter over the surface of the resin to get out all bubbles.

Step 4: Wait 24 hours for resin to completely dry/cure. This is super important. It’s hard to do, but you can do hard things! Once 24 hours has passed, push the object through.

diy resin hair clips with glitter and heart sequins

diy resin hair clips with glitter and heart sequins


diy resin keychains with glitter and heart sequins

diy resin hair clips with glitter and heart sequins

Step 5:
Hair Clips: You’re ready to glue the heart resin clip topper onto the actual metal clip. Add e-6000 glue to the metal clip and place the resin topper to the clip. Use chip bag clips to keep the resin in place on the clip. Let dry for at least 2 hours, but 12 is preferable.

Heart keychain: To make this a keychain, you will need the kit mentioned above with the keychain loops, screws and mini drill. Drill a hole smaller than the screw into the top of the letter, so you can twist the eye screw nice and snug in the letter. If you don’t have a drill (like us), you can use a jewelry pliers to twist the eye screw into the letter. It can be frustrating at first, but after a couple twists, it will hold in place, and then you twist further until it’s fully in the letter. Next, add the letter, and you have a darling new keychain.

diy resin keychains with glitter and heart sequins

diy resin keychains with glitter and heart sequins

diy resin keychains with glitter and heart sequins

diy resin keychains with glitter and heart sequins

diy resin keychains with glitter and heart sequins

A Bright Idea: Recycle A Pasta Box & Transform Into This Magical Light Box

diy recycled pasta box-light box craft-twinkle lights

We are Italian, so we eat a lot of pasta. It’s our love language. We still dream of all the delicious pasta we ate everyday in Italy. We love to cook pasta for our families, too. Whether it’s with red sauce, or a creamy pesto sauce, and topped with meat or vegetables, we love to cook it…and devour it. Most of us are gluten free, and initially (years ago), pasta just wasn’t the same. Now, there are so many wonderful gluten free options at the store, we cannot even tell the difference. It’s so yummy. Barilla is hands-down our favorite. It tastes delicious, and it’s easy to cook. Plus, we can buy spaghetti noodles, lasagna no-boil noodles, penne and more! This post is not sponsored by Barilla (we genuinely love their products), although we would love to make some recipes sponsored by them. Hint, hint!

Recently, our Barilla gluten free penne box not only inspired a meal, but also a craft. We recycled the box, and transformed it into a DIY light box for Valentine’s Day. Now, that’s a bright idea worth sharing! The kids helped paint the boxes, and we cut the hearts, so it was a family effort. This DIY project costs very little money, it can be shipped to a loved one, aka grandparents, easily because it’s very lightweight, and when lit, it’s magical. It’s hard not to feel the love when those lights comes on inside the box. If you have little ones that want to continue crafting after they decorate the box, save some noodles, and paint them too. Send a pretty DIY necklace along with the box.

Let’s get started…

diy recycled pasta box-light box craft-twinkle lights

Materials:

  • Barilla pasta box
  • Acrylic paint (optional: glitter and stickers)
  • Paintbrush
  • cellophane paper
  • Xacto knife
  • double-sided tape
  • twinkle lights (remote-operated, color or white lights work)
  • Paint pen, Elmer’s, fine tip

Directions: 

Step 1: Find a heart printable on the internet. Print it. Tape it on top of the box, and begin to cut with the Xacto knife.

Step 2: Paint the box. Two coats is best, depending on the saturation and paint color you choose.

Step 3: Once paint is dry, cut small boxes of cellophane sheets to match the size of each heart. Place the small square over the heart, to make sure it fits. Add a small square of double sided tape to each corner of the box. Now, carefully use your fingers to place the cellophane box inside the pasta box behind the heart you sized it for. Press down on each corner so it stays in place. Repeat until all the hearts have a colorful cellophane sheet behind them.

diy recycled pasta box-light box craft-twinkle lights

Step 4: Place twinkle lights inside. Move them around as you need. As far as twinkle lights go, the colorful ones were the brightest, and we liked them the best. But, white lights are pretty, too. These are so small, the battery pack can be glued inside the box, but not sure they will be the brightest due to 20 fairy lights on each string. If you use a small pasta box, these would work great, and you get more of them, so more bang for your buck.

diy recycled pasta box-light box craft-twinkle lights

Step 5: With the paint pen, add a cute phrase like, “You light up my life.” on the bottom clear cellophane strip already on the pasta box. If you want to make it extra special, you can add a photo behind one of the hearts, too.

diy recycled pasta box-light box craft-twinkle lights


diy recycled pasta box-light box craft-twinkle lights

diy recycled pasta box-light box craft-twinkle lights

diy recycled pasta box-light box craft-twinkle lights

Happy Valentine’s Day!


This post contains affiliate links. If you purchase any of the items, we may make a small commission, at no extra cost to you. Thanks for supporting our family blog.