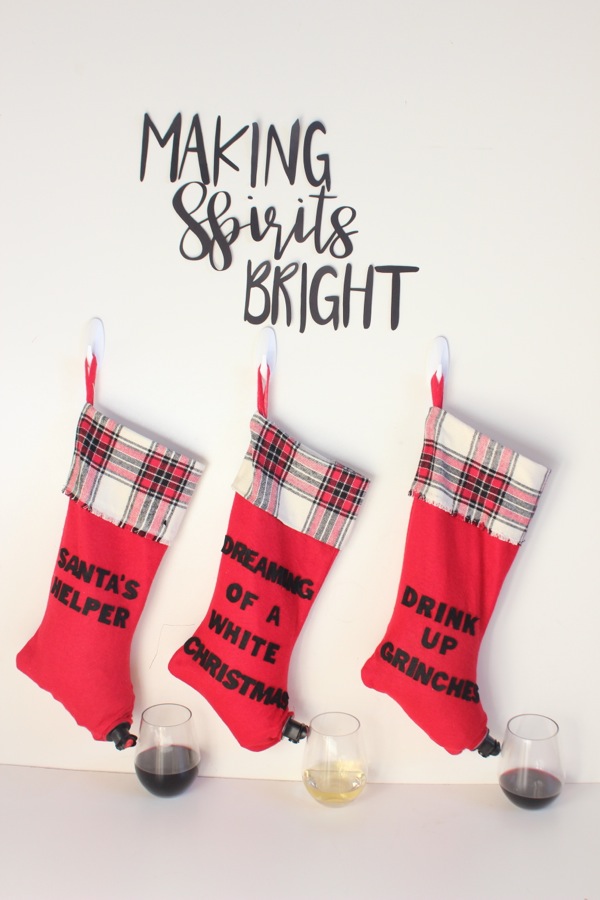
Cheers To A DIY Christmas Stocking With A Wine Spout

diy-red-christmas-stockings-with-a-wine-spout-making-spirits-bright-holiday-bar

‘Tis the season for holiday parties, gift-giving and all things merry and jolly! We pour more wine around the holidays with all the parties, dinners and let’s face it, stress. So, wine was on our minds when we crafted our next DIY Christmas gift idea.

For this DIY, we’re changing the classic line from the Twas the Night Before Christmas poem that reads, “…the stockings were hung by the chimney with care, in hopes that St. Nicholas soon would be there,” to instead say, “…the stocking were hung by the bar with care, in hopes that friends and family soon would be there.” Yes, we’re hanging our families stockings in the living room like we always do for Santa, but we’re hanging a few extra in the bar this Christmas, and giving them to friends to spread good cheer. Christmas is all about making spirits bright, right?

diy-red-christmas-stockings-with-a-wine-spout-making-spirits-bright-holiday-bar

This DIY wine stocking makes for the perfect gift for friends, neighbors and family. Plus, it’s a really fun topic of conversation whether you’re at a party, or having a quiet night in with the girls.

Anyone and everyone can (and should) make these DIY Christmas stockings. Here’s how we made the ultimate stocking stuffer.

Materials:

  • Stockings, .98 cents at Wal-Mart, or other great options at big name retailers
  • Felt
  • Scissors
  • Boxed wine (we used Bota Box)
  • Hot glue and hot glue gun

Directions:

Step 1: First, we upgraded the stockings with about a $3 plaid fabric investment. We didn’t use a needle and thread – just scissors and a hot glue gun. Before the plaid, there was a thick strip of white felt.

red-and-plaid-stockings-with-funny-lines-diy-boxed-wine-stocking-holder

Step 2: Cut out letters for the fun quotes. We went with, Drink Up Grinches, Santa’s Helper, He Sees You When Your Drinking and Dreaming of a White Christmas. We had black letter stickers and just traced as we cut with the scissors. You can freehand the letters though, maybe even using good vinyl stickers to save yourself cutting time all together.

red-stockings-black-felt-letters-he-sees-you-when-your-drinking

Step 3: With a hot glue gun, glue the letters to the stocking.

red-stocking-dreaming-of-a-white-christmas

Step 4: Cut out a small hole in the front toe part of the stocking. If it’s too big, you can always hot glue the fabric tight around the wine pull tab.

scissors-red-stocking-wine-bag

Step 5: Insert the wine bag in the stocking and pull the wine tab through the hole in the toe.

red-and-plaid-stockings-with-funny-lines-diy-boxed-wine-stocking-holder

boxed-wine-bag-red-plaid-stocking-he-sees-you-when-your-drinking

diy-wine-stocking-holder-red-vino-and-plaid-stocking

diy-stocking-that-holds-wine

Step 6: Hang and pour. Cheers!

making-spirits-bright-holiday-bar-with-red-wine-stockings

diy-red-christmas-stockings-with-a-wine-spout-making-spirits-bright-holiday-bar

diy-red-christmas-stockings-with-a-wine-spout-making-spirits-bright-holiday-bar

diy-red-christmas-stockings-with-a-wine-spout-making-spirits-bright-holiday-bar


DIY Earrings As Sweet As A Pineapple

IMG_9806

We find inspiration for our blog from everything around us – magazines, colorful patterns, Pinterest, blogs, people, nature and fashion. Sometimes an idea for a future project and party comes to us late at night when we can’t sleep. Other times, we are brainstorming out loud. The idea for these adorable DIY pineapple earrings came to us while perusing the aisles of Pier 1 Imports (one of our fave home stores). We stood in front of a tropical themed tablescape looking at tiny pineapple table confetti. Instead of seeing it for what it was, we saw the tiny fruit die-cuts as DIY earrings. We call it our confetti hack.

We love pineapples, we crave piña coladas on the beach (our favorite vacation drink growing up was virgin piña colada’s and strawberry daiquiri’s) and we love a good DIY. So, this was a really fun pineapple project to work on.

These DIY earrings would make for lovely gifts for girlfriends and mom (Mother’s Day is coming up, y’all).

So bring me two piña coladas (or pineapples)
One for each ear. 

diy-pineapple-earrings-pink-yellow-tassels

Materials:

Directions:

Use the pliers to open two earring jump rings. One will go in the middle largest opening in the top of the pineapple, and the other will attach to the first ring and the earring wire hoops. Use the pliers to close the rings. The pineapples are thin, so be gentle with them.

jewelry-pliers-green-pineapple-gold-plated-earring-supplies

diy-pineapple-earrings-pink-yellow-green

diy-pineapple-earrings-yellow-tassel

If you want to present them in a cute way, use a small hole punch to punch two holes in a card stock tag. Insert the earrings through the holes and add the safety backs. A tassel makes everything cuter, so we attached a colorful tassel. Finally, add a custom touch with a hello beautiful pineapple stamp. We made the stamp with our Silhouette Mint, which is so easy and fun to use. We can a little stamp happy each time we use it.

card-stock-with-black-pineapple-stamp-and-yellow-tassel

diy-pineapple-earrings-pink-yellow-tassels-green-pineapple

diy-pineapple-earrings-pink-yellow-tassels

diy-pineapple-earrings-pink-yellow-tassels

When you make/wear the earrings, carry these pineapple vibes…

be like a pineapple
stand tall,
wear a crown,
& be sweet on the inside


SHOP THE POST

DIY Typography Tray: I Heart You

diy-letter-tray-wood-black-letters-pink-i-heart-you-diy-craft

We tend to hoard things we find in the Target Dollar Spot, known as Bullseye’s Playground. Does anyone else have that problem? They are never absolute necessities, but at the time they are must-haves, and at $1 or $3, it’s hard to pass up. This tray was sitting in Jessica’s craft pile for months and months. It was one of those Playground finds. Finally, a lightbulb moment went off. We played with letters, and with just a couple materials we made a unique DIY tray for a loved one this Valentine’s Day. It can be used year-round because the words I (heart) you can, and should, be said year-round.

diy-letter-tray-wood-black-letters-pink-i-heart-you-diy-craft

Materials:

Step 1: Lay the letters out on the tray the way you want them to look. Spread out the I, heart and you among the black letters so the message stands out. If you want to use a different object other than letters, such as matches, beads, etc you can, just make sure they are thin. The thinner they are, the less Dimensional Magic needed to cover them.

letters-tray-glue-art-project


letters-pink-i-heart-you-diy-craft-project

Step 2: Super glue the back of each letter, and lay it back down where you want it. Wear gloves for this step – you don’t want letters stuck to your skin!

super-glue-letter-s

blue-latex-gloves-diy-art-project
Step 3: Once all the letters are glued, start to pour the Dimensional Magic. We suggest smaller trays for this project. We needed four packages of Dimensional Magic, which wasn’t too expensive at $5 each, but the smaller the tray, the less product you need to buy.

dimensional-magic-diy-letter-tray

dimensional-magic-diy-tray-with-black-letters-and-a-pink-heart

dimensional-magic-on-a-tray-with-black-letters-and-a-pink-i-heart-you

dimensional-magic-project-diy-tray-with-black-letters-typography-i-heart-you-pink-letters

Step 4: Let the Dimensional Magic dry for at least 8 hours. The color will be clear, and not cloudy once it’s fully dry.

diy-letter-tray-wood-black-letters-pink-i-heart-you-diy-craft

diy-letter-tray-wood-black-letters-pink-i-heart-you-diy-craft

Pucker Up: DIY Lip Balm with Essential Oils Just in Time for Valentine’s Day

DIY-essential-oils-lipbalm-peppermint-beeswax-pellets-yellow
We have a drawer full of essential oils. The more we learn about the uses of the oils, the more we love. The more we love, the more we want to make. The more we make, the more we want to share.

This post was inspired by Gabriella’s (Jessica’s daughter) lip-making kit she got for Christmas (if a 6-year-old can make DIY lip balm with the help of a kit, we could surely make it, too), as well as Valentine’s Day. We made DIY lip balms with essential oils that not only smell amazing, but feel soft and smooth on lips too! These make awesome gifts for girlfriends and loved ones. It was so easy, and so fun.

DIY-essential-oils-lipbalm-peppermint-beeswax-pellets-yellow

DIY Lip Balm with Essential Oils
makes 6 lip balm tubes

Ingredients:

Directions:

Step 1: Add 2 inches of water to a saucepan on the stove. Put on high for boiling water.

Step 2: Add shea butter, beeswax pellets and coconut butter to a glass measuring cup.

diy-lip-balm-ingredients-beeswax-pellets-essential-oils-coconut-oil

Step 3: Place the glass measuring cup in the pan on the stove, and occasionally stir the mixture with a wood popsicle stick until all pellets are melted. Once they are melted, remove the cup from the stove, wait about 30 seconds, then add the essential oils. The combinations we chose are:
Peppermint: 30 drops
Peppermint and Lavender: 15 drops Peppermint and 10 drops Lavender
Peppermint and Wild Orange: 15 drops of each
Lemon and Wild Orange: 15 drops of each

Step 4: Stir the essentials oils in the oil. Quickly pour into the lip balm tubes before it hardens.

Step 5: Print labels. We made our labels for our lip balms using Avery labels. Free PDF file here. The Avery label you need to purchase is 5195. There are 60 labels per sheet.

Step 6: Once the lip balm is set (about 3 hours), stick the labels on.

diy-lip-balm

diy-lavender-and-peppermint-wild-orange-lip-balms

Share the lip balm love, and give to friends! Baci, Baci (kisses, kisses).

diy-lip-balm-with-yellow-beeswax-pellets


DIY Stocking Stuffer Your Kids Will Love: Reindeer Snot

reindeer-snot-diy-glitter-slime-red-holiday-stocking-stuffer

We can hardly believe we made anything that resembles or even has the word snot in it, as we dislike our kids snotty noses all winter. But, this idea was just too fun not to make. Jessica made Reindeer Snot, aka glitter slime, and shared all the details with Momtastic.

Get a tissue, wipe your nose – do whatever you have to do – just get over there to learn all about it. We used our favorite new stamp-making machine, Silhouette Mint, to make the custom stamp. We got a little stamp happy, and plan to make these holiday favors for the kids friends. Not only is the homemade slime a great DIY stocking stuffer, but also it’s a creative thing to make with the kids that they can ooh and ahh over this holiday season.

reindeer-snot-diy-slime-stocking-stuffer-kids-craft