Sparkly Holiday Vibes With These DIY Embellished Shoes

diy embellished shoes for a glam holiday party

We have a little sparkle in our step this holiday season…and it makes us so happy. We have absolutely no idea why we haven’t made DIY embellished shoes before! This was such an easy, and fun DIY project, and the result is sparkly goodness just in time for all those holiday parties. Momtastic has all the details here on how we created these totally affordable DIY embellished shoes.

Remember ladies…leave a little sparkle wherever you go, whether it’s in flats or heels.

diy embellished shoes for a glam holiday party

SHOP THE POST:

DIY Lip Balm Pouches Just In Time For Valentine’s Day

diy-lip-balm-in-red-and-pink-pouches-with-hearts

We love our essential oils, and one of our favorite goodies to make with our oils is DIY lip balm. Our lips are so dry in the winter, plus we love when we can put pure ingredients on our lips. Valentine’s Day is coming up, and for those that want kissable lips, or want to give a gift of kissable lips, we recommend DIY essential oil lip balm.

Read our DIY lip balm tutorial for the ingredients and instructions. To jazz it up a bit for gift giving, make a cute holder for it – a DIY lip balm pouch. It’s almost like a lip balm sleeping bag. It’s a cute DIY that can be made into all shapes and sizes. We made heart-shaped pockets to hold gift cards for teachers. You can also make DIY felt pouches to hold tissues, treats, and even larger pockets for photos and sweet notes.

This DIY project is incredibly easy. Here’s how we did it.

Materials:

Directions:

Step 1: Cut felt (we bought a pretty library of felt from Target, and it’s thicker than traditional felt, which worked well) into a rectangle larger than the width of the lip balm tube.

red-pink-felt-with-pink-hearts

Step 2: Once you have the pieces cut, thread a needle (don’t forget to tie a knot on the end), along the edges of two rectangles that are lined up. We do not have any sewing skills whatsoever, and we did it! Just go in and out of the felt, which will create a cross stitch pattern. Leave the top of the rectangle open so you have an opening for the lip balm.

diy-lip-balm-pouches-red-pink-felt-craft

diy-lip-balm-in-red-and-pink-pouches-with-hearts

diy-lip-balm-in-red-and-pink-pouches-with-hearts

Hope you find a way, even if it’s a wave or hug, to spread the love on Valentine’s Day!

SHOP THE POST:

Cheers To A DIY Christmas Stocking With A Wine Spout

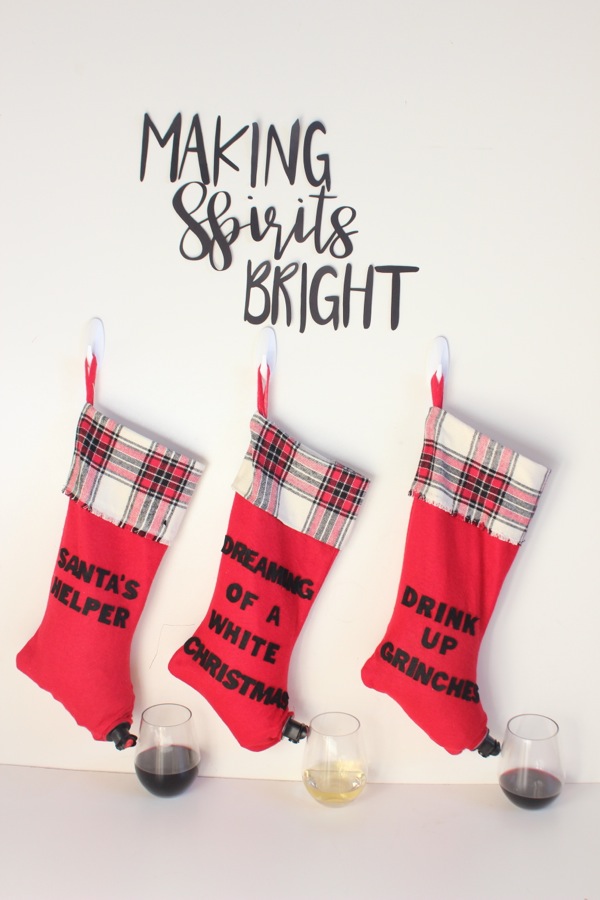
diy-red-christmas-stockings-with-a-wine-spout-making-spirits-bright-holiday-bar

‘Tis the season for holiday parties, gift-giving and all things merry and jolly! We pour more wine around the holidays with all the parties, dinners and let’s face it, stress. So, wine was on our minds when we crafted our next DIY Christmas gift idea.

For this DIY, we’re changing the classic line from the Twas the Night Before Christmas poem that reads, “…the stockings were hung by the chimney with care, in hopes that St. Nicholas soon would be there,” to instead say, “…the stocking were hung by the bar with care, in hopes that friends and family soon would be there.” Yes, we’re hanging our families stockings in the living room like we always do for Santa, but we’re hanging a few extra in the bar this Christmas, and giving them to friends to spread good cheer. Christmas is all about making spirits bright, right?

diy-red-christmas-stockings-with-a-wine-spout-making-spirits-bright-holiday-bar

This DIY wine stocking makes for the perfect gift for friends, neighbors and family. Plus, it’s a really fun topic of conversation whether you’re at a party, or having a quiet night in with the girls.

Anyone and everyone can (and should) make these DIY Christmas stockings. Here’s how we made the ultimate stocking stuffer.

Materials:

  • Stockings, .98 cents at Wal-Mart, or other great options at big name retailers
  • Felt
  • Scissors
  • Boxed wine (we used Bota Box)
  • Hot glue and hot glue gun

Directions:

Step 1: First, we upgraded the stockings with about a $3 plaid fabric investment. We didn’t use a needle and thread – just scissors and a hot glue gun. Before the plaid, there was a thick strip of white felt.

red-and-plaid-stockings-with-funny-lines-diy-boxed-wine-stocking-holder

Step 2: Cut out letters for the fun quotes. We went with, Drink Up Grinches, Santa’s Helper, He Sees You When Your Drinking and Dreaming of a White Christmas. We had black letter stickers and just traced as we cut with the scissors. You can freehand the letters though, maybe even using good vinyl stickers to save yourself cutting time all together.

red-stockings-black-felt-letters-he-sees-you-when-your-drinking

Step 3: With a hot glue gun, glue the letters to the stocking.

red-stocking-dreaming-of-a-white-christmas

Step 4: Cut out a small hole in the front toe part of the stocking. If it’s too big, you can always hot glue the fabric tight around the wine pull tab.

scissors-red-stocking-wine-bag

Step 5: Insert the wine bag in the stocking and pull the wine tab through the hole in the toe.

red-and-plaid-stockings-with-funny-lines-diy-boxed-wine-stocking-holder

boxed-wine-bag-red-plaid-stocking-he-sees-you-when-your-drinking

diy-wine-stocking-holder-red-vino-and-plaid-stocking

diy-stocking-that-holds-wine

Step 6: Hang and pour. Cheers!

making-spirits-bright-holiday-bar-with-red-wine-stockings

diy-red-christmas-stockings-with-a-wine-spout-making-spirits-bright-holiday-bar

diy-red-christmas-stockings-with-a-wine-spout-making-spirits-bright-holiday-bar

diy-red-christmas-stockings-with-a-wine-spout-making-spirits-bright-holiday-bar


DIY Pineapple Fingerprint Easter Eggs

easter-eggs-in-a-basket-with-colorful-pineapples-and-green-grass

We’ve feeling the Easter vibes today with a recent DIY Easter egg craft. These cuties were inspired by a pattern we saw in Target’s Bullseye’s Playground. You will literally make your mark with these eggs because the adorable pineapples on the eggs are made with fingerprints. Yes, adult or child fingerprints are all you need to make these colorful eggs. They are easy and quick, adorable, family-friendly and cute as can be.

easter-eggs-in-a-basket-with-colorful-pineapples-and-green-grass

Materials:

  • Acrylic paint, Michaels
  • Sharpie marker, black and green
  • Eggs, we prefer the faux eggs that can be used year after year, but real, hard-boiled ones work too

Directions:

Step 1: Dab your (or your kids) pointer finger in paint, and then press firmly on the egg. Your fingerprints will make the perfect shaped pineapple.

easter-eggs-in-a-basket-with-colorful-pineapples-and-green-grass

Step 2: Repeat step 1 until the eggs is covered in fingerprints. Let dry.

easter-eggs-in-a-basket-with-colorful-pineapples-and-green-grass

Step 3: With a Sharpie, add black lines on the pineapples – diagonals, waves and small v’s all work for pineapples marks. Don’t forget to draw the top of the pineapple. Fill in the leaves with a green Sharpie.

easter-eggs-in-a-basket-with-colorful-pineapples-and-green-grass

All this pineapple talk has us in the mood for a cocktail. Who’s ready for a pina colada?

easter-eggs-in-a-basket-with-colorful-pineapples-and-green-grass

DIY Cardboard Box Entertainment for Kids: Indoor Golf

diy-indoor-golf-game-for-kids-cardboard-box

When Christmas is less than one week away and it’s too cold to go outside, we like to transform a cardboard box into a DIY Holiday indoor golf game. It’s totally worth it because it entertains our kids for hours.

Cardboard boxes have always been, and will always be such a versatile toy, capable of endless hours of activity and creativity.

If you feel like bringing a little golf indoors like we did, see the full tutorial we shared at Momtastic.

For those of you that look at this and see way too much work like most people, you must know…you don’t have to paint a thing or make it fancy. A plain cardboard box with small openings gets the job done. And, if the kids want to be the lead artist, let them.

diy-indoor-golf-game-for-kids-cardboard-box