DIY Marble and Copper Tray Hack

marble-and-copper-tray-west-elm-hack-vase-palm-leaf

We love, love, love to shop West Elm. But, we often love a good home decor hack even more. Our DIY side is totally satisfied when we successfully pull off a home décor hack that looks almost identical to the real thing sold in stores, at a fraction of the price.

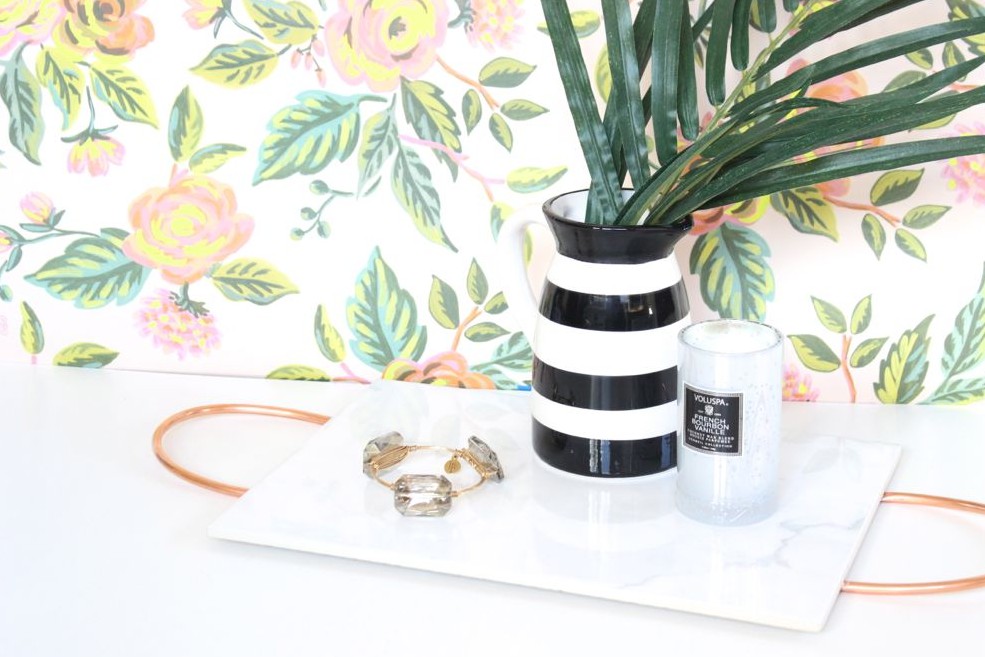
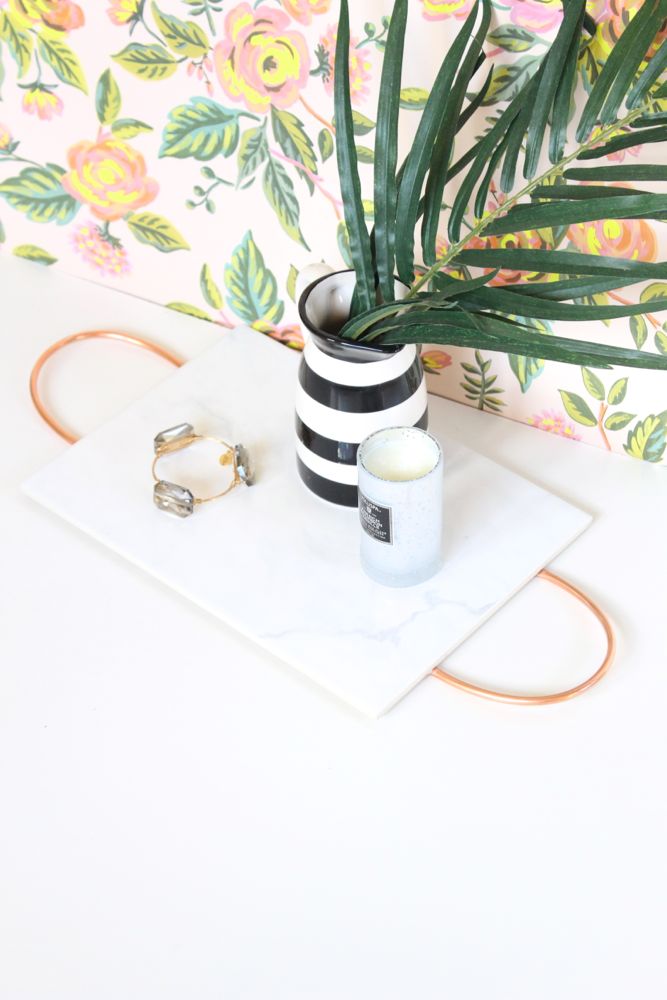
One can never have enough trays, especially pretty ones like the Copper and Marble serving board at West Elm. So, one must make this DIY version of the Copper and Marble tray and West Elm hack. It’s so simple, and stunning.
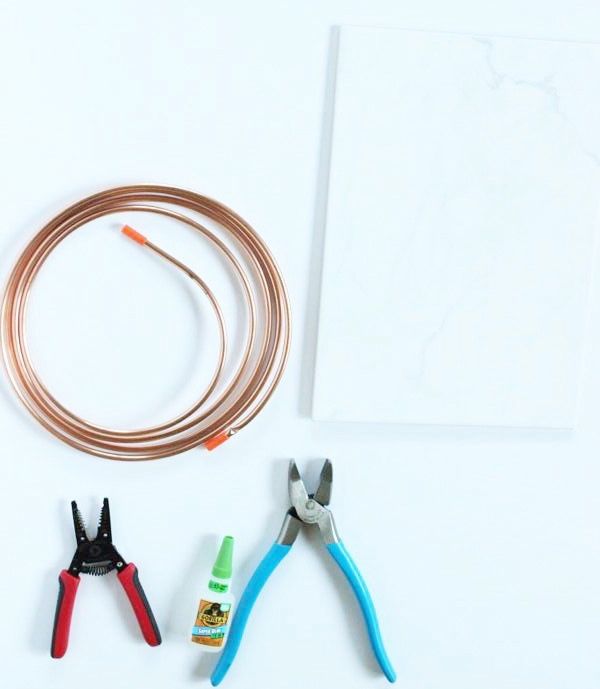
marble-and-copper-tray-west-elm-hack-vase-palm-leaf-flower-wallpaper

Materials:

  • Copper Coil, 1/4 inch, Home Depot
  • Marble Tile, Home Depot
  • Super glue or Epoxy glue, Home Depot
  • Pliers and wire cutter, Home Depot

marble-and-copper-tray-west-elm-hack-vase-palm-leaf

 Directions:

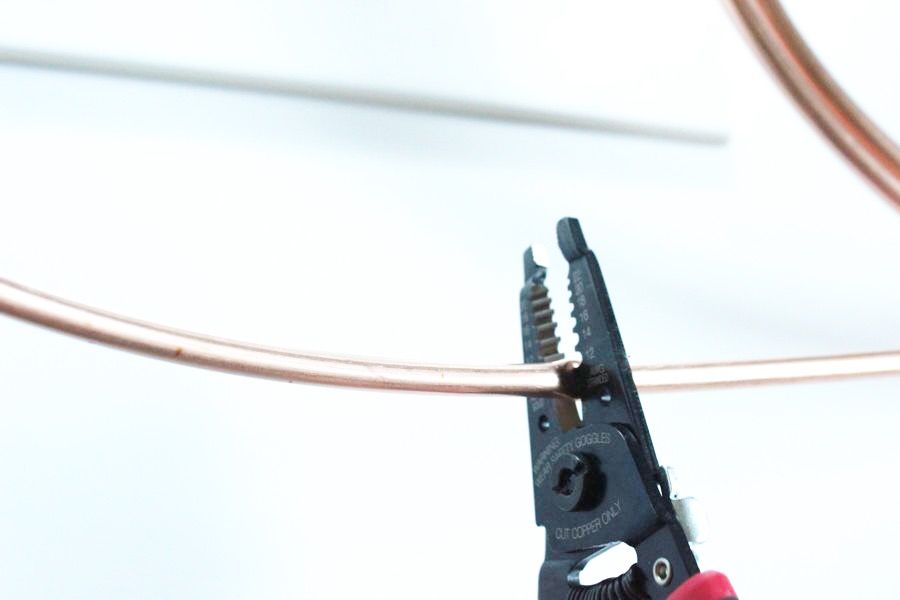
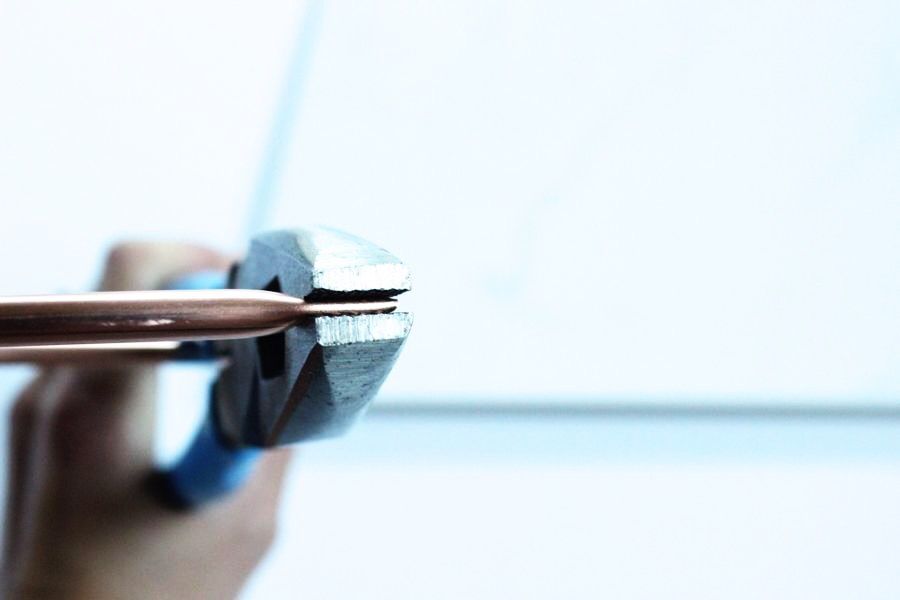
Step 1: Cut the wire to approximately 8 inches long for the handles. Adjust the size according to your preference. Round the copper coil to the shape of a handle – it’s easy to bend and can be done with your hands.

marble-and-copper-tray-west-elm-hack-vase-copper-coil

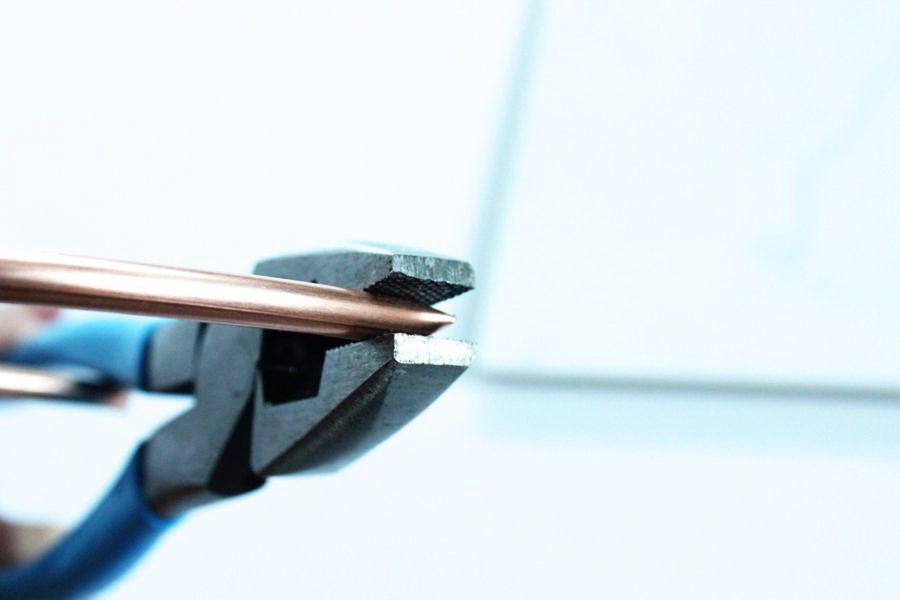
Step 2: Insert the ends of the copper into the pliers and press firmly. This will flatten the round shape of the copper coil.

marble-and-copper-tray-west-elm-hack-vase-copper-coil

marble-and-copper-tray-west-elm-hack-vase-copper-coil

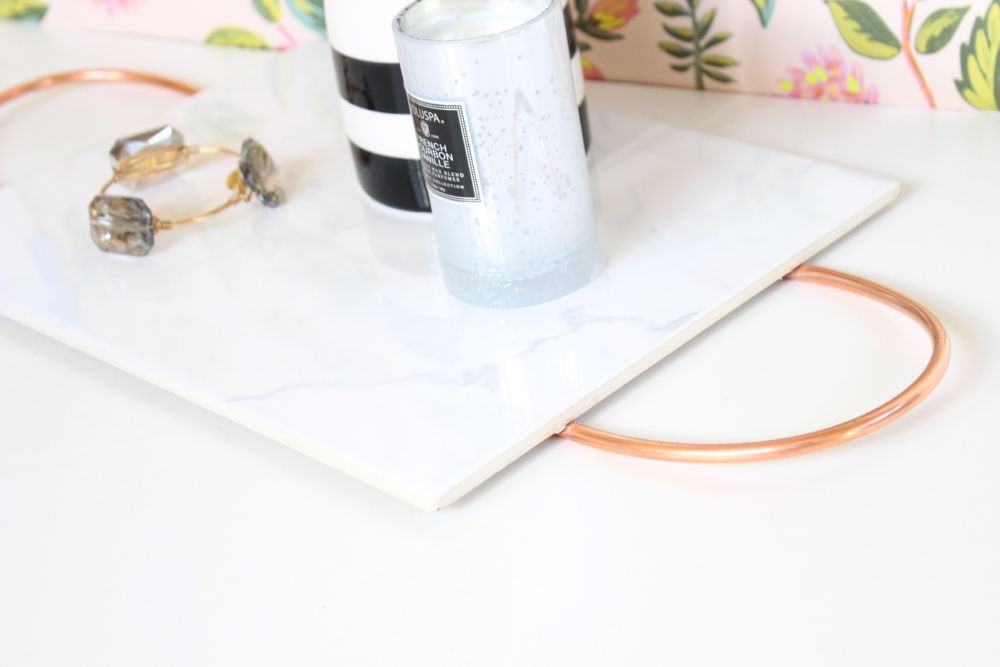
Step 3: Add glue to the ends of the copper coil and press it into the back of the marble tile. The flat sides of the copper should not show on the top side of the tray because it should be glued directly to the back of the tile.

marble-and-copper-tray-west-elm-hack-vase-copper-coil

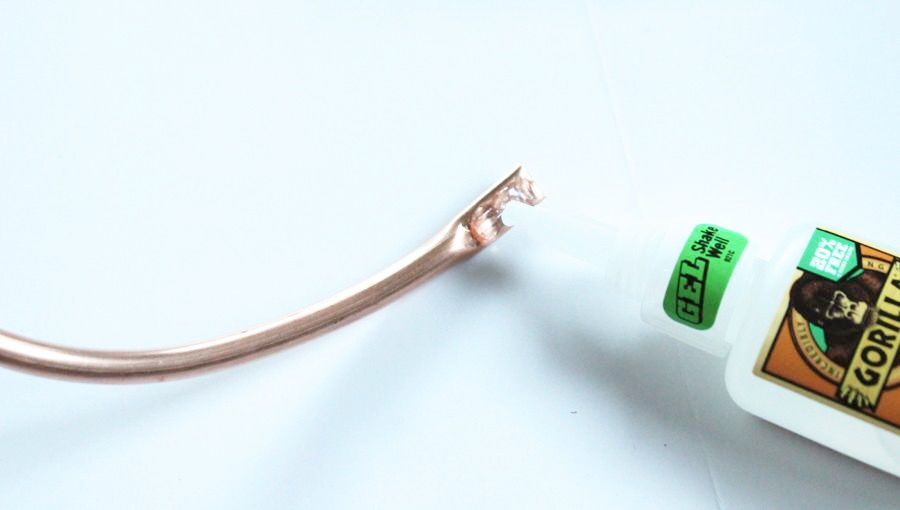
Important note: if you use super glue, be extremely careful when pressing the copper ends down because your finger will get glued to the copper almost immediately. Wear gloves and/or be aware of the glue.

marble-and-copper-tray-west-elm-hack-vase-copper-coil

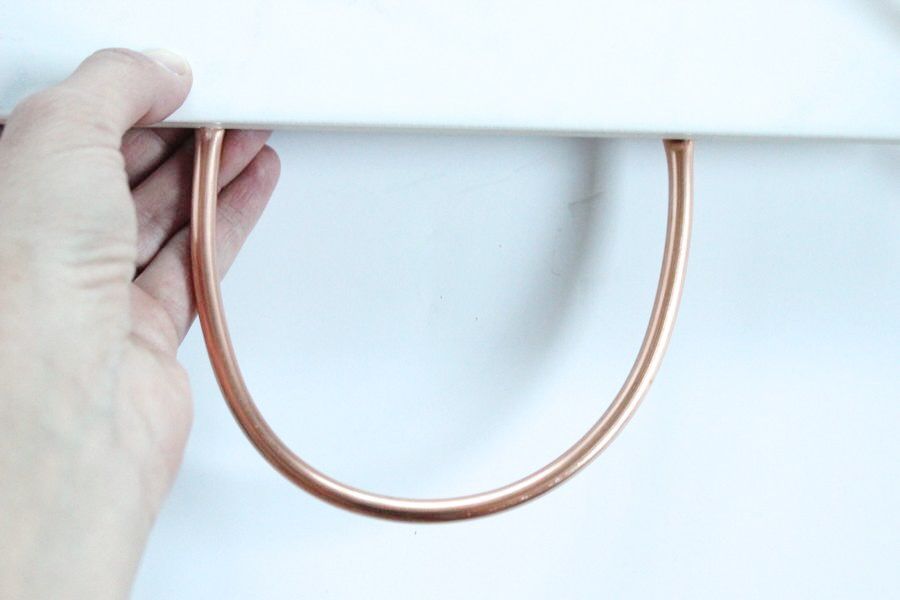
After holding the handles in place for several minutes, I got wise, and flipped the tray over, and placed heavy books on the tile where the copper was glued.

marble-and-copper-tray-west-elm-hack-vase-copper-coil

Step 4: Let it dry overnight.

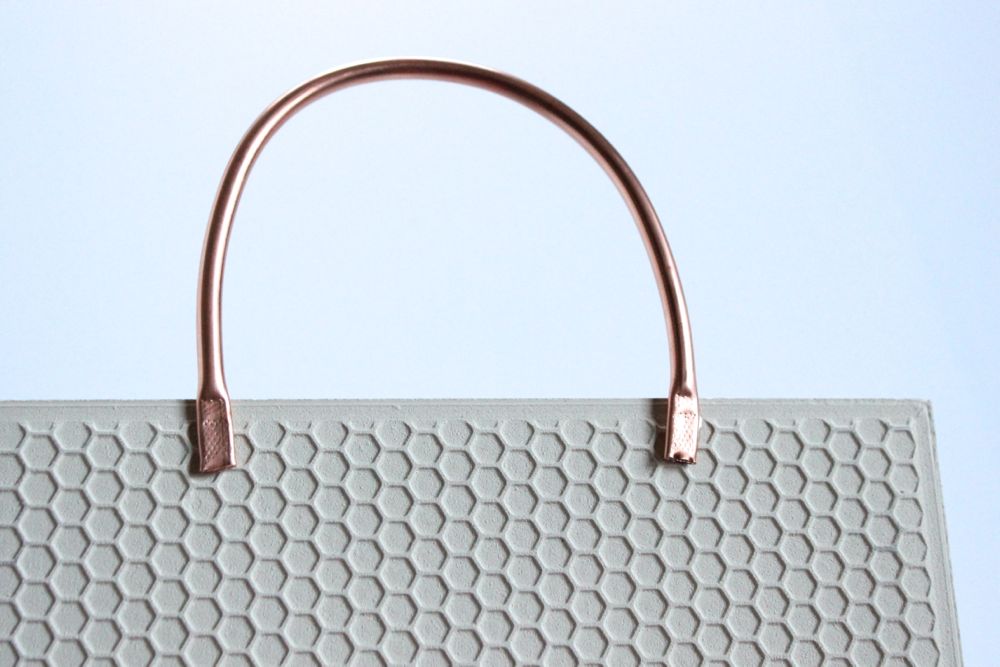
This tray can be used as a cheese appetizer tray because it’s food safe, but we prefer it on a shelf with pretty jewelry, a bud vase or perfume.

 marble-and-copper-tray-west-elm-hack-vase-palm-leaf

marble-and-copper-tray-west-elm-hack-vase-palm-leaf

marble-and-copper-tray-west-elm-hack-vase-palm-leaf

marble-and-copper-tray-west-elm-hack-vase-palm-leaf

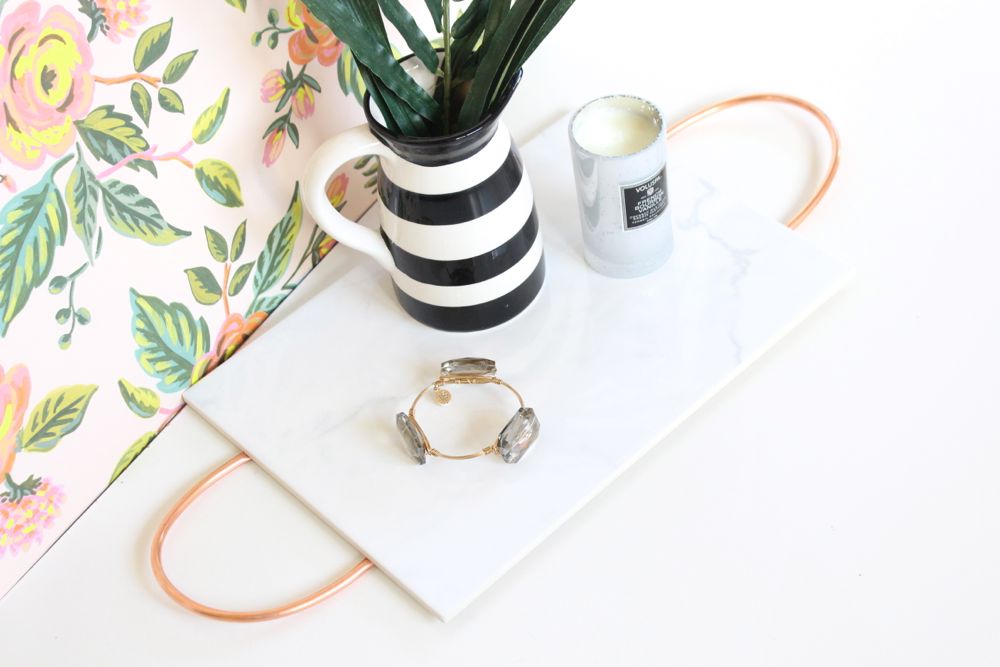
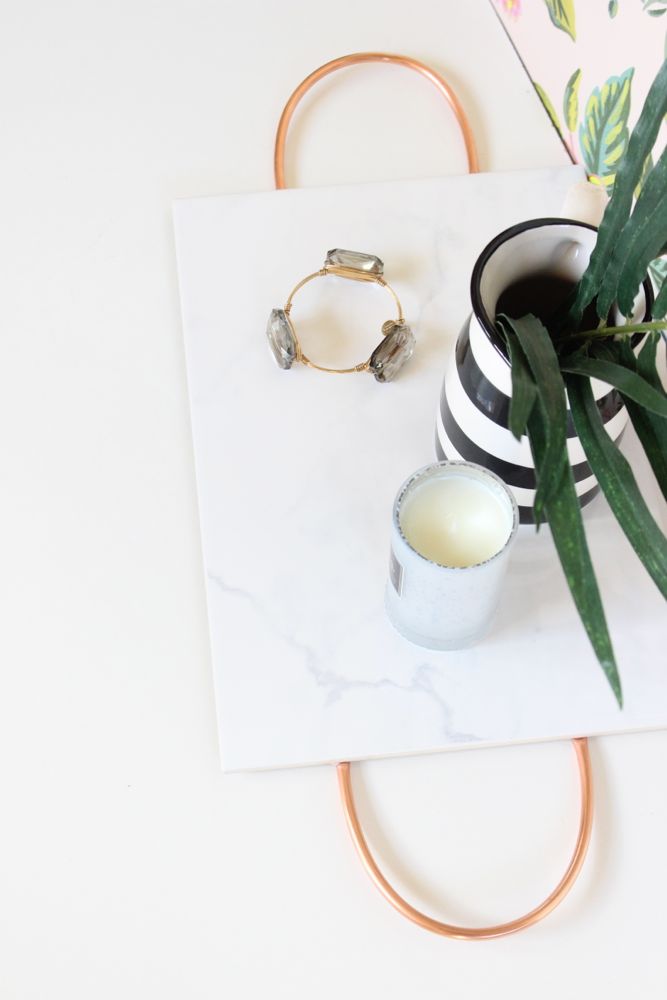
If your eyes go straight to the Bourbon and Bowties bracelet, we’re a lot alike, because we love them! Buy one at Nordstrom {and while you’re there, shop the sale} – your arm will thank you.

DIY Dream Sign


dream-sign-planter-hanging-cloud-nusery

We watch the craft and food videos on Facebook with amazement and watering mouths. Video’s are on our ultimate to-do list. Darby Smart must have read our minds, because we recently worked with them on one of their To DIY for Boxes, and their genius video editors put together an awesome video from our clips. Jessica’s hands are famous – it’s a good thing she actually painted her nails.

Our head is in the clouds dreaming big most of the day, so we wanted to represent all our big dreams with a DIY Dreaming in the Clouds sign.
Please take a moment to watch our Darby Smart video, add it to your faves, and then check out our other projects, too. It’s 30 seconds of dreamy, goodness.
You Mustn’t Be Afraid to Dream a Little Bigger, Darling. 

IMG_6035


DIY Red, White and Blue Ice Bucket

red-white-blue-ice-bucket-july-4th-wine-cooler

It’s about that time when red, white and blue are just about the only colors on our minds. Yes, one of our favorite holidays, July 4th, is coming up, and this year we’re adding a DIY fruit ice bucket to our party to do’s.

A DIY patriotic ice bucket is the perfect July 4th accessory, and it’s so easy and cheap to do. Guests will love the extra touch of red, white and blue, and they will enjoy their chilled beverage.

red-white-blue-diy-ice-bucket-fruit-diy-july-fourth-wine-cooler

red-white-blue-ice-bucket-july-4th-wine-cooler

Materials:

  • water
  • large bucket, we used a plastic one from Party City
  • small buckets {small enough to fit inside large bucket and large enough to fit a wine bottle or beer can}
  • blueberries, fresh or frozen, at least 2 cups
  • strawberries, fresh or frozen, sliced, 2-3 cups
  • weight, such as a rock
  • wine or beer

Directions:

Fill about 1/3 of the large bucket full of water, then drop in all the strawberries. Freeze for at least 5-8 hours.

strawberries-in-a-bucket

Place 2 small buckets on top of first layer of ice, add weight inside {we used a rock}, and fill another 1/3 of the bucket with water. Do not get water inside the small bucket because it will be more difficult to remove the buckets from the ice. Freeze for about 5-8 hours.

buckets

For the final layer, fill the remaining 1/3 of the container fill of water, and then drop in blueberries. Freeze for 8 hours.

blueberries-in-a-bucket

Remove from the freezer. Pour boiling water inside the small buckets and gently twist to remove from the ice. Additionally, run the outside of the large bucket with  hot water from the sink faucet. After about 15 seconds on each side, the ice cooler will be easily removed, and the layers should look like this.

red-white-blue-diy-ice-bucket-july-fourth-party

Carefully flip the ice cooler out from the bucket with your hands and set on a tray. Fill the holes with wine or beer. We couldn’t decide because beer, well, it’s all-American and those Budweiser cans are so patriotic and awesome. But, the vino lovers that we are couldn’t resist the taste and look of the red and blue Relax Wine bottles of wine.

budweiser-beer-red-white-blue-ice-bucket-diy-fourth-of-july-beer-cooler


relax-wines-red-white-blue-ice-bucket-wine-cooler

red-white-blue-ice-bucket-budweiser-beer-diy-cooler


relax-wines-red-white-blue

Cheers!

Important Note: We took photos of this DIY ice bucket with wine we had in the liquor cabinet, and after review of photos, while the wine was good, for the ultimate patriotic post, the wine bottle {and beer} needed to be more festive in color. Enter, Relax Wines and Budweiser beer! However, the ice bucket had to be re-frozen during a several hour photo shoot intermission, and a thin ‘film’ of ice formed over every layer, so the color of the DIY ice bucket was dulled, and the lines of the red, white and blue blurred. You win some, you lose some. Either way, we love our bucket, but honestly, it will be more vibrant than our photos if you have the right alcohol the first time around. 

DIY Let Love Grow Plant

let-love-grow-plant

Dolly Parton said it best, Let Love Grow.

When we really look around, in spite of the horrific hatred we see daily on the news, we find that love still exists. In fact, love is all around. But, sometimes we need a little reminder. To us, the heart shape, whether big or small, signifies love. Inside of us, it represents this beautiful life with every heart-pumping beat; but outside of us, the shape represents love, goodness and kindness. When we open our eyes, minds and hearts, we find that not only is love everywhere, but hearts are, too. And, with every heart we spy with our eyes, it’s an opportunity to reflect on the love in our lives, and how we can share it with others.

Last week, we saw a heart designed on the top of our latte. Everyday, as our children learn to draw hearts, we pause to think about the love and joy that lives in their hearts {and the role we play in shaping what love looks like in their world}. Every time we send and receive a handwritten note from a loved one, it’s signed with a heart. And, just the other day, one of our kids saw a heart-shaped cloud in the sky.

Recently, we used our green thumbs to create a green heart to remind us to let love grow. The plant can be transplanted outdoors if it outgrows the container, and good news – it’s a perennial – so it will come back year after year.

let-love-grow-plant-yellow

Materials:

  • Plastic Pot Saucer, Home Depot
  • Sedum Tile Ground Cover
  • Scissors, sharp {garden scissors}
  • Potting Soil
  • Chalkboard sign, small stick and pen

Directions:

Drill several holes into the plastic saucer. We drilled one in the center and four evenly spaced around the saucer.

planter-drill-yellow

planter-yellow

Fill the planter 1/2-3/4 full with dirt.

planter-with-dirt

Remove the entire square tile of Sedum from the container and flip it over. Use chalk to draw your design, or eye-ball it. We chose a heart, and without lines to follow, we began to cut.

greenery-ground-cover-plants

plants

Place the heart in the center of the saucer with dirt, and then fill in all the surrounding space with dirt.

heart-plant-greenery-yellow-ombre

Make a sign – Let Love Grow or Love Lives Here – and insert it in the dirt.

let-love-grow-chalkboard-sign

let-love-grow-planter-yellow

let-love-grow-greenery-planter


DIY Hourglass Rope Planter

diy-rope-white-stripes-planter-succulents-patio-lights

We’re obsessed with modern hourglass accent side tables. We stumbled across the photo below in a Better Homes and Gardens magazine {or something similar}, and snapped a photo for future inspiration. Until we can find a way to make a DIY, chic hourglass side table, we settled for a DIY hourglass rope planter. Our thumb was sore from pressing the glue gun, but that was the only tiny hard thing about this whole project.

blue-striped-planter-nautical-hourglass-patio-side-table

diy-rope-stripes-planter-succulents

Materials:

  • 2 Terra cotta pots, one larger and the other smaller, The Home Depot
  • White spray paint
  • Rope, 3/8 inch Sisal Rope {we used 1.5 rolls from Home Depot}
  • Glue gun and glue
  • Gorilla Super Glue
  • Paint brush
  • White acrylic paint
  • Succulents or plants, The Home Depot

Directions:

Step 1: Spray paint the terra cotta pots white. One coat will work just fine. It doesn’t need to be perfect – it’s just to keep the background neutral in case there is a tiny opening through the rope.

terra-cotta-pots

white-terra-cotta-pot-spray-paint

Step 2: Flip the large terra cotta pot upside down and dab super glue around the base. Place the smaller terra cotta pot on top in the center {the holes should be lined up} and press down firmly.

super-glue-terra-cotta-pot

terra-cotta-pot-glue

terra-cotta-pot

white-planters

Step 3: Once dry, it’s time to cover it with rope. Start at the bottom by placing a strip of hot glue along the bottom edge, and press the rope onto the glue. Continue to wrap the rope around the pot row after row until the entire pot is covered.

white-terra-cotta-pot-hot-glue

rope-craft-project

diy-rope-planter

diy-rope-planter-white-terra-cotta-pot

rope-hourglass-planter

Step 4: Paint stripes on the planter. We didn’t use painter’s tape – we just eye-balled it.

paint-rope-planter

Step 5: Plant succulents, or the plant of your choice, in the top part of the planter.

succulents-rope-white-stripes-hourglass-planter

diy-rope-hourglass-striped-planter

diy-succulent-hourglass-planter-rope-white-stripes