upcycle mania

So sorry we’ve been MIA. Goodness, it seems we took a 3 week spring break. Between birthdays, vacation, kiddos and work, we haven’t had a chance to sit at the computer at all.

In honor of Earth Day today, we are sharing a few upcycle DIY projects that make re-using old things in a new way just, well…fabulous. And the best part…the only energy it takes is from you. If you’ve done any cool upcycling yourself lately, please send us photos…

Upcycled Ladder with Shelves, Less Than Perfect Life with Bliss


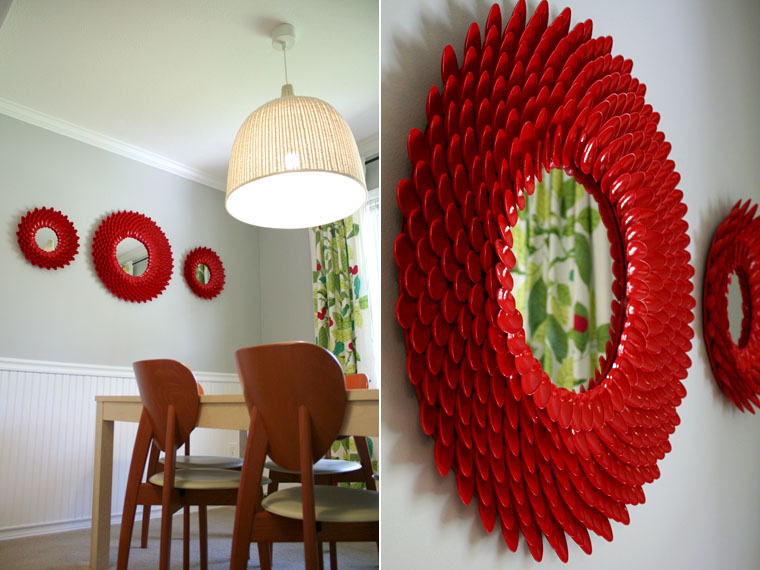
Plastic Spoon Mirror, Little Things Bring Smiles
Frame Corner Ceiling, Michael Stravato for the New York Times

Suitcase Side Table, Cupcake and Cashmere

Ski Lift Swing, Colorado Weddings Magazine
I don’t like to ski, but I could so do this

Hanging Rainboots Planters, Rosy Posy

 Upcycled Can Vase, Apartment Therapy

Leather and Wood Shelf, Design Sponge

Record Side Table, The Flourishing Abode

{images via Less Than Perfect Life with Bliss, Little Things Bring Smiles, The New York Times, Cupcakes and Cashmere, Colorado Weddings Magazine, Rosy Posy, Apartment Therapy, Design Sponge, The Flourishing Abode}

DIY Crayon Flower Art

Crayon art is everywhere this year, so on a snowy Colorado day, while the kids and I were stuck inside, I brought out the box of crayons. The kids were busy making hearts and dinosaurs {for the kids, we used the standard method, inspired by my friend, Devon, who was also stuck inside with her kiddos for the day}, which included wax paper, shredded crayons, a towel and an iron.

When the kids went down for a nap, while I was cleaning up, an idea popped into my head. And when an idea pops into a DIY-addicts head, there’s bound to be another project…and a mess. The result, melted poppy crayon art.

Melted Poppies

Ingredients:

Wax paper
green crayon
red and yellow crayon shreds
modge podge
griddle
battery powered candles
glass vases/hurricanes

 How to:

Shred the crayons you want to use for the flower color. I used 1 yellow crayon and 2 red crayons. I didn’t find a cheese grater to be effective, so I used a pencil sharpener, and it worked great.

Cut the wax paper to the size of the vases {wrap the wax paper around the vase and leave just an inch or two extra space to overlap – this will be the area where you add the modge podge}.

Turn the griddle on low.

NOTE: You must work with quick hands for the next step.

Have the green crayon {to use for the stems and grass} and the crayon shreds ready and accessible because you will need to work quickly.

Place the wax paper on the griddle and immediately draw the grass and the stems freehand.

Quickly, place the center of the flower on each stem with yellow shreds, then immediately grab the red crayon shreds and add around the center of the flower. Don’t pile on the shreds too thick – a small amount is enough.

Once all the shreds are melted, which will take about 5 seconds or so, gently slide the wax paper off the griddle {don’t pull the paper up, or the flower will melt into each other}

Immediately place tightly around the vase {if you wait too long, the crayons will harden and then will crack/break when you curve the paper around the vase}.

Add modge podge to the end of one side of the wax paper and seal.

Add the candles to the vase and you have a lovely, DIY spring centerpiece.
 

Happy Spring!

{images via Tutto Bella}

DIY gift: 6 colorful ways to spring

Today we’re sharing a DIY project that makes a lovely gift to send to a girlfriend, or bring to the hostess on Easter morning. Or, fill the eggs with school-related items {paper clips, eraser, chalk, etc} for a spring teacher gift or kid-friendly items {stickers, candy, chalk, money, etc} beginning the Monday of Easter week, and it would be a fun countdown to Easter morning.

Ingredients:
Plastic Eggs
Nail Polish {purple}
Sunflower Seed Packet {yellow}
Jelly Beans {orange}
Lipgloss {pink}
Gum {blue}
Starbuck’s Via Packet {green}
Hot glue gun and glue
Free Fleur de Lis printable {Like Fleur de Lis on facebook to get the free printable below}
NOTE: make sure all your color coordinated ‘ingredients’ that go inside the eggs are smaller than the egg, so it fits in the egg when closed.

How To:
Line up the eggs in the order you want, then use a hot glue gun to glue them together.
Be sure to place the hot glue dot under the ‘egg’s closure seam’ so you can close the egg and it stays shut.
Add the color coordinated items to each egg.
Place in a bag or use clear cellophane to wrap the eggs and add a bow.
Write a note, and attach the tag and you’ve got yourself a lovely and affordable gift.

To receive the FREE file via email {without the Fleur de Lis copyright on the file}, just like Fleur de Lis on Facebook with Rafflecopter below, and you will receive the file via e-mail within 48 hours.

a Rafflecopter giveaway

Happy Spring.

{image via Tutto Bella}

DIY Crayon Valentine for Kids

Last year we created cute labels {see here}, and this year we’re channeling our inner Picasso. Crayon art was all over Pinterest in 2012, so for our kids Valentine’s this year, we took our inspiration from the popular, child-friendly melted Crayon art.

We’ve taken that simple idea, and made it a fun, doable and unique Valentine’s Day card for our kids and their friends this year.

The poem, available for purchase can be found here at Fleur de Lis, a paperie on Etsy.

you make my heart melt, valentine
this crayon art is a gift from me to you,
on this valentine’s day, 
it’s the perfect project to do.

find your mom and dad before you start,
this beautiful, wonderful piece of art.

grab a blow dryer and hold close to crayons to apply hot heat
turn on low, and within minutes the melted art will be so neat.

put in your room or on display,
and think of me at the beginning or end of each day.

Here’s How You Can Do It Too…

Directions:
Use a pencil and ruler to measure the size of each valentine ‘favor’ {we decided to use 7 crayons for each child, which was about 4×8}.
Use the blade to cut along your lines {I also tried to use scissors, but the cut was not as clean due to the thickness of the board, so for a clean, more precise cut, use a razor blade}.
Get the kids help in picking 7 colors per friend.
Use a hot glue gun to glue 7 crayons {or as many crayons as you need to cover the width of your foam board} next to each other on the board.
Place in a cellophane bag, wrap with twine.
Cut the You Melt My Heart, Valentine labels, punch two holes in the top about an inch apart from one another, then loop the twine through and tie a bow.

This year, your kids’ friends will have a fun art project to do when they get home, and a Crayola masterpiece to cherish.

{images via Tutto Bella}

Ampersand Home Decor and Gifts

With Valentine’s Day coming up, there’s a lot of YOU & ME and ME & YOU talk. And, I can’t help but notice and LOVE the & in between it all. I’ve always loved the & symbol. I love the way it looks ~ against a wall, on an invite and on a piece of jewelry. So, today we’re all about the ampersand, &.

1. rustic gold leaf wood ampersand, Edie’s Lab via Etsy {$7}
2. ampersand wedding art print, between everything {$24}
3. ampersand bowl, pure home {$28}
4. ampersand brass letterpress necklace, Gwen Delicious Jewelry via Etsy {$37}
5. small ampersand cutting board, house industries {$90}
6. french style ampersand cushion, the wooden crate {$30}
7. ampersand coin purse, alphabet bags {$22.25}
8. galvanized ampersand single hook, the country porch {$7.95}
9. vintage ampersand marquee sign, saddle shoe signs {$35 to rent and $150 to purchase}
10. ceramic ampersand dish, iron accents {$7.95}
11. DIY mossy ampersand tutorial, two twenty one

{images via House Industries, Gwen Delicious Jewelry, alphabet bags, edie’s lab, the country porch, iron accents, the wooden crate, pure home, between everything, saddle shoe signs, and two twenty one}