DIY Air Plant Holder

air-plant-holder-wood-slice-diy-gold-push-pin-gift

If you have a real Christmas tree you decorated this year, you’re 1. likely vacuuming pine needles daily like Jessica, and 2. about to recycle your tree.

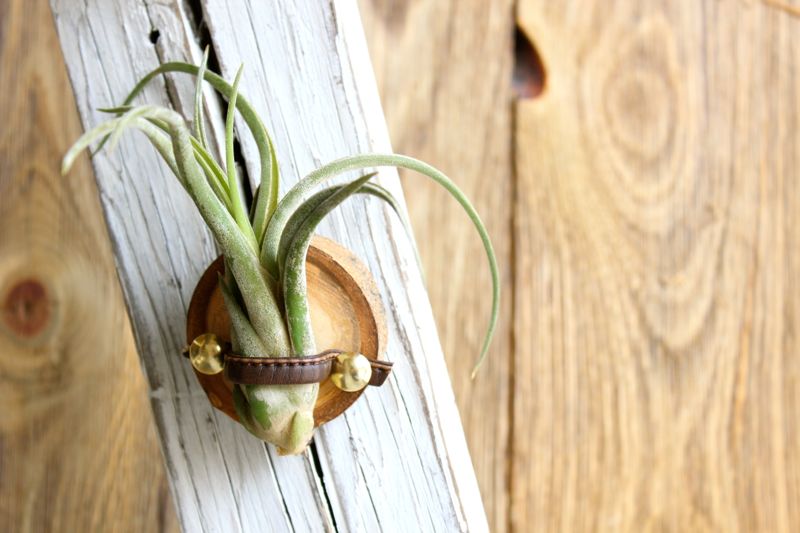
Before you get rid of the tree forever, if you can, slice the trunk into discs. You can use them for so many crafts projects, but additionally, you can make a DIY air plant holder in less than 5 minutes. It makes for a great gift.

Materials:

  • air plant
  • wood discs/slices
  • gold pushpins
  • leather

Directions:

  • Place the air plant on the wood slice and measure the length the leather needs to be.
  • Cut the leather.
  • Insert the push pins into both ends of the leather into the wood slice.
  • Place the air plant through the leather holder.
  • You can drill a small hole through the top of the wood slice if you want to hang the air pant holder. Or, you can use Command strips on the back for damage-free hanging.

air-plant-holder-wood-slice-diy-gold-push-pin-gift

air-plant-holder-wood-slice-diy-gold-push-pin-gift


Stay Gold DIY Pencil Pouch + Black Friday Deal

Happy Thanksgiving. May your heart be filled with gratitude today.

stay-gold-polka-dot-notebook--pen-ornament-star

It’s that holiday time of year when gold is everywhere, so start throwing gold sparkles on everything. It’s also that time of year when Silhouette America has an amazing BLACK FRIDAY sale. We couldn’t have made this DIY Stay Gold pencil pouch {nor could we have made other amazing things this year like thisthis or this} if it weren’t for our Silhouette cutting tool from Silhouette America.

black-friday-sale-silhouette-america-design-store-electronic-cutter

Shop the Black Friday sale today through Dec. 4, 2015. The amazing machine bundles are as low as $99.00 including Silhouette Mint for $99.99, Portrait and Mint for $189.99, CAMEO for $199.99 and CAMEO and Portrait for $289.99. Plus, almost everything in the Silhouette America store is up to 40% off. Use code SORELLE when you check out. For 20% off Silhouette Design Store subscription, enter BLACK at checkout. Oh my goodness, free shipping available to the contiguous United States, too.

Once you receive your amazing electronic cutting tool that will change your life for the better, make this DIY pencil pouch.

When we spotted this gold pencil pouch during back to school shopping in August, we knew it would come in handy some day.

stay-gold-diy-pencil-pouch-gift-star-headband-robert-frost-poem

The reference of “Stay Gold” comes from the book, The Outsiders. The quote in the book stems from the famous poem by Robert Frost.

Nothing Gold Can Stay
Nature’s first green is gold,
Her hardest hue to hold.
Her early leaf’s a flower,
But only so an hour.
Then leaf subsides to leaf,
So Eden sank to grief.
So Dawn goes down to day,
Nothing gold can stay.

stay-gold-robert-frost-quote-pencil-bag-diy-gift-star

This quote is powerful in our own lives. Our hope is that our children can remain young and innocent forever. As we age, our view of the world ‘hardens’ and we forget to play, imagine, and believe in the goodness in ourselves and people around us. We must always remember and teach our children to Stay Gold – stay good, and stay true!

DIY Stay Gold Pencil Pouch
Silhouette Vinyl
Gold Pencil Pouch, Target
Frog’s Tape
Credit Card or straight-edge

Directions:

Create a stay gold design on Silhouette software.
Print the vinyl according to package directions.
Remove the vinyl backing, and lay front side-down onto rows of Frog’s Tape {you can also use transfer paper, which we didn’t have handy}.
Use a credit card to make sure all bubbles are out, then pull the vinyl paper up. Your words should be face-down on the tape.
Pick up the tape, and place carefully on your pencil pouch. Your words should be legible now, right-side-up. Use a credit card to get out all the bubbles.
Carefully pull up each piece of tape. The vinyl should stay in place on the pencil pouch, and you’re done.

stay-gold-diy-pencil-pouch

stay-gold-diy-pencil-pouch-holiday-gift

Now, eat some turkey and pie. Hug family and friends. Rest. Sleep. Wake up. Shop.

YOLO DIY Cosmetic Bag

yolo-black-white-stripes-glasses-cosmetic-bag-diy-triangles

My sister-in-law and I went shopping, and I tried on a pair of designer jeans on sale for $100 from $200ish. I liked them, but didn’t really NEED them. You know, that age-old teaching we teach our children and tell ourselves – need vs. want. Do I really need this? Or, do I want this? My sister-in-law said, “Just get them. My new motto in life is YOLO.” I did a semi-smile and nod reaction, then asked, “What the heck does YOLO mean?” You may be thinking that I live under a rock, and perhaps I do, but I honestly had no idea what YOLO meant. She shared her hashtag wisdom upon me that day and told me that YOLO stands for…You Only Live Once. #YOLO

What powerful words that we often forget. You Only Live Once. We have one shot at this ONE beautiful, amazing, hard and miraculous life. Why waste it? Make the most of everyday, and live your best life…and life will give it’s best to you. YOLO!

Long story short, I bought the jeans. And, I learned what YOLO stands for.

Shortly thereafter my sister-in-law embarked on a new journey in a new city with a new job. She was nervous, but brave. I sent her off with a reminder of what she taught me that day, and some tips to go with it.

DIY YOLO Cosmetic Bag

You’ll Need:

  • Cosmetic bag {mine was $3 from Target}
  • Acrylic paint
  • Golden GAC 900 Medium, to make regular paint into fabric paint
  • Freezer paper
  • X-acto knife
  • Paintbrush
  • Gifts to go inside. I found most of my gifts {see below} from my favorite small town bookstore, The Bookworm
  • Watercolor paper
  • Watercolor paint
  • Gold sharpie or gold leaf pen

Directions:

First, I used Microsoft Word to design my YOLO to place in the middle of the bag. Print YOLO on regular computer paper, then trace it onto freezer paper.

YOLO-freezer-paper-washi-tape

 Use an X-acto knife to cut out the words and a border. Then, iron in onto the costmetic bag.

yolo-freezer-paper-trace-diy

Paint YOLO with black ink.

YOLO-black-diy

Design a pattern around YOLO. I chose to do triangles, so I randomly made a geometric triangle shape print with Frog’s Tape. Then, paint inside the triangles.

yolo-painters-tape-green-diy

yolo-bag-pink-triangles-diy-target

Shop for all your small gifts that go inside the YOLO bag.

yolo-bag-gift-diy-costmetic-bag-candle-lipstick-compass-tea-bag-chocolate

Once your YOLO bag design is complete, start to make the tags to go along with each gift. Cut watercolor paper into triangles. Freehand the words of wisdom for your friend in gold sharpie or gold leaf pen. Then, use soft watercolor over it.

pink-watercolor-tags-gold-diy

My tags read:

Wear red | red lipstick
Set your own direction | Compass button
Indulge in sweetness | Curly Girl chocolate bar
Remember to laugh | Blue Q funny chewing gum box
Celebrate | Hyrda Soap Hangover Bath Tea Bag
Stop to smell the roses | Paddywax Rose scented candle
Believe in yourself | Quotables The Sky is the Limit matchbox
Be Kind | Be Good to People chapstick

wear-red-lipstick-pink-watercolor-gold

compass-button-pink-watercolor-tags-gold-diy-gift

curly-girl-chocolate-bar-indulge-in-sweetness-pink-watercolor

remember-to-laugh-coffee-gum-pink-watercolor-diy-gift

stop-to-smell-the-roses-candle-diy-gift-pink-watercolor-tag

believe-in-yourself-pink-watercolor-tag-the-sky-is-the-limit-candle

be-kind-be-good-to-people-chapstick-pink-watercolor-tags-diy-gift

Attach the labels to each item.

YOLO-wear-red-diy-gift-watercolor-pink-tags-bath-tea-bag

YOLO-wear-red-diy-gift-watercolor-pink-tags-bath-tea-bag

Place all the fun items inside the DIY YOLO cosmetic bag and gift.

yolo-black-white-stripes-glasses-cosmetic-bag-diy-triangles

DIY Floral Antlers

diy-antler-display-white-gold-pink-flowers

Let’s talk about potential for just a brief minute. We all have potential for greatness. You may have realized your true potential {good for you}, or maybe you are still trying to figure it out {welcome to the club}.

I hope in this one, precious gift we call life, I can dig deep inside and let my best self shine. How the heck am I going to do it? I’ll start by being a bright light for others, surrounding myself with friends and family who are only going to lift me up, stay really close with the good Man upstairs, and have the courage to live my best life. It’s not going to be easy, but nothing worthwhile ever is. And, this is most definitely worthwhile.

How do you realize your fullest potential?

I know, I know – somewhat deep for a Friday, but as I worked on this trash to treasure project, I thought about the word ‘potential’ and the importance of it in my own life. Before I give up on someone, something, and me, I need to just be in a place of love, and remember the potential that lies within all of us.

These antlers are the trash to treasure project I’m referring to. Originally part of a broken candle centerpiece, and in the trash pile, I knew they had potential. With a little paint and TLC, these antlers are now pretty in pink…and gold.

diy-antler-display-white-gold-pink-flowers


Here’s how I did it.

You’ll Need:

  • Faux antlers
  • Spray paint
  • Gold leaf paint
  • Flowers and greenery {I found mine at Pier1}
  • Hot glue gun

Step 1: Remove old wax, dirt from the antlers.

diy-antler-display-white-gold-pink-flowers

Step 2: Spray paint the antlers heirloom white {paint from Home Depot}.

Step 3: Paint the tips gold.

diy-antler-display-white-gold-pink-flowers

Step 4: Hot glue flowers and greenery in place.

diy-antler-display-white-gold-pink-flowers

Right now, the DIY floral antlers are sitting pretty on Gabriella’s new desk, but they will be put to good use as a DIY floral antlers necklace display, or decor on the wall.

diy-antler-display-white-gold-pink-flowers

diy-antler-display-white-gold-pink-flowers-ladder-have-courage-and-be-kind

Cheers to re-purposing…and, of course living your best life.

Beautiful words of advice by Cinderella so thoughtfully designed by HelloTosha.


Design a Beautiful Nursery on a Budget

baby-girl-nursery-pink-ombre-baskets-white-ikea-gold-crib-nursery-gold-animal

Babies are expensive, but that doesn’t mean their room has to be, too. We love the nursery Mila Mae, the newest {and beautiful} addition to our large Italian family, calls home. Sweet Mila has a lovely, special place to call her own, and her mom is sharing the details with us. Kerri designed a pretty room for Mila, without maxing out the credit card. Win, win!

Her nursery is clean and white with touches of pink…and we love it.

Here’s how you can do it, too.

1. Shop at Ikea.
We all love the affordability and chic design to be found in the never-ending aisles at Ikea. Kerr’s ombré baskets are from Ikea. They are functional because they hold toys, book and stuffed animals, but they also add the perfect pop of color for a princess’s room. The little white flower-pot tins on the dresser are also from Ikea. They help Kerri organize everything! On the dresser, she holds hand sanitizer, diaper ointment, baby powder, etc. in them.
baby-girl-nursery-pink-ombre-baskets-white-ikea-gold-crib-nursery-gold-animal

baby-girl-nursery-pink-ombre-baskets-white-ikea-gold-crib-nursery-gold-animal

2. Incorporate family heirlooms.
Kerri incorporated her grandma’s dresser in Mila’s room, which holds sentimental value for her. She updated it with several coats of white paint, and painted the knobs gold. Another special touch is the dress hanging from the gold hanger next to the crib. It’s Kerri’s mothers dress she wore when she was a baby. A piece of 3 generations of women from the same family lives inside those 4 walls! The ultra-glam gold sequins hanger is from The Golden Gurl via Etsy.

baby-girl-nursery-pink-ombre-baskets-white-ikea-gold-crib-nursery-gold-animal

3. Add DIY details.
We love DIY details, and although Kerri said she is not a big DIYer, she did manage to spray paint dollar store animals with gold spray paint. Animals are a favorite for little kids, so with the DIY gold animals, Kerri added a childhood favorite with a touch of glam.
baby-girl-nursery-pink-ombre-baskets-white-ikea-gold-crib-nursery-gold-animal

4. Buy handmade items from Etsy.
Handmade items add warmth and authenticity to a nursery, plus it’s always great to support small shops. The driftwood wall hanging with tissue paper tassels is from Fleur Lux and the beautiful gold pillows in the crib are from Kerri’s talented friend at Bright July.
baby-girl-nursery-pink-ombre-baskets-white-ikea-gold-crib-nursery-gold-animal

baby-girl-nursery-pink-ombre-baskets-white-ikea-gold-crib-nursery-gold-animal

5. Incorporate color, texture and culture from travels. 
The world is a grand and beautiful place with bright colors and a vast array of textures, so it’s nice to bring memorabilia from various cultures home. Plus, its unique decor that can’t be found anywhere else. The authentic Mexican blanket hanging from the side of the crib was a gift Kerri’s parents brought back from Mexico. The impact is big, but the price tag was little – the blanket was just $5.

Thanks for sharing your room with us today, Kerri {Marco and Mila, too}. We love you.