DIY Pool Bag: Hello Sunshine

hello-sunshine-diy-pink-and-yellow-pineapple-summer-pool-bag-tropical-vibes

We love to spend our summers at the pool. We did it growing up with our mom, and we do it now with our kids. Jessica is a swim team mom, so she is at the pool earlier than she would like during the summer months, but she’ll take the summer over winter any day!

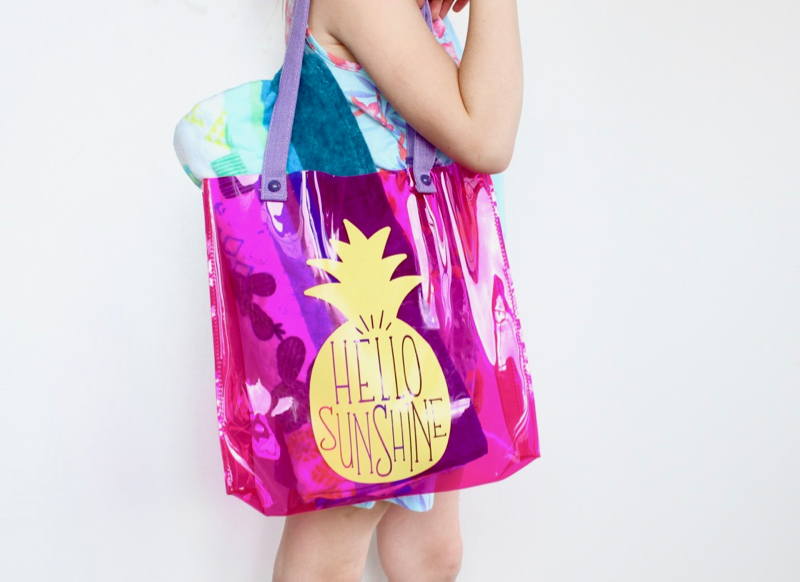
We made a DIY pool bag that just screams summer, and sunshine and tropical vibes. Tutorial for the bag is below. We’re also sharing some of our favorite summer pool essentials we fill our pool bags with.

Materials:

  • Pool Bag, Target (we found ours in Spot’s Bullseye’s Playground, but this one works)
  • Vinyl, yellow
  • Silhouette CAMEO electronic cutting machine

Directions: 

Step 1: Find a cool file on Silhouette Software, like our pineapple one.

hello-sunshine-yellow-vinyl

Step 2: Follow Silhouette directions to cut the vinyl with your machine. If you don’t have a machine, you can find cute pre-cut vinyl on etsy.

pink-clear-bag-with-hello-sunshine-yellow-pineapple

hello-sunshine-yellow-vinyl

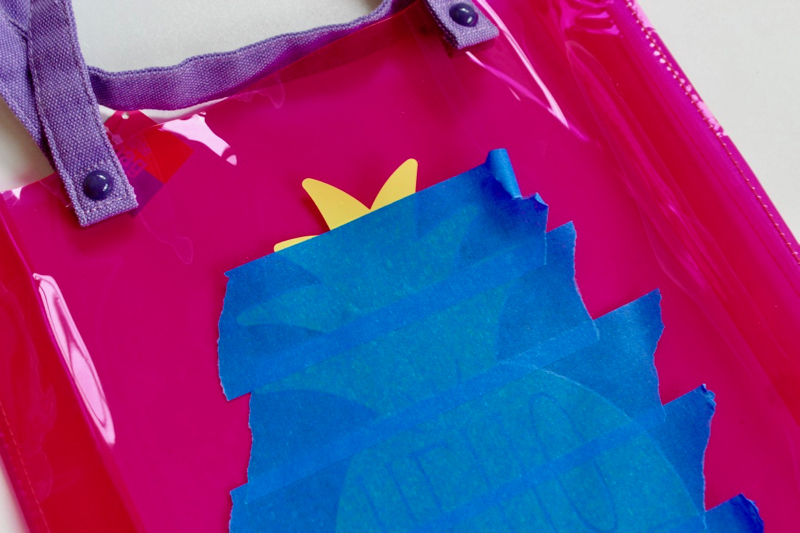
Step 3: If you don’t have transfer paper, line up Painter’s Tape along the pineapple cut out. Once the pineapple is covered use a straight edge over the pineapple, and then lift up the tape. Your entire pineapple should be stuck to the tape. Now, place in the exact spot you want the pineapple on the bag (tape down), and use a straight edge again to smooth out bubbles. Pull off the tape, layer by layer to reveal your pineapple. You can use a straight edge to move any bubbles, too!

painters-tape-

hello-sunshine-pineapple-pink-bag-for-summer-fun

hello-sunshine-diy-pink-and-yellow-pineapple-summer-pool-bag-tropical-vibes

hello-sunshine-diy-pink-and-yellow-pineapple-summer-pool-bag-tropical-vibes

Now, on to what’s in our pool bag.
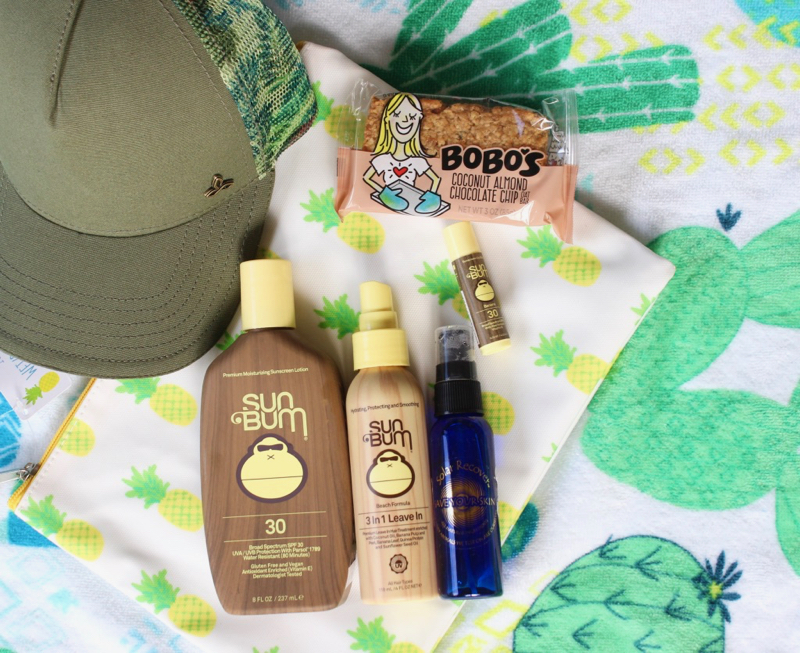
sunscreen-and-other-pool-bag-essentials

POOL BAG ESSENTIALS

Solar Recover, Every Day Moisturizer: We can’t say enough about this spray. It smells heavenly, and it’s so cooling for the skin. We’ve used on burns, and it helps heal them. We spray our entire bodies everyday after we get out of the shower, whether we’ve been in the sun or not. It’s a must buy for the summer!

Sun Bum Sunscreen Spray SPF 30: We love the smell of this sunscreen, plus it’s fantastic brand of sunscreen. We love that it’s paraben-free, oil/PABA free, hypoallergenic, Oxybenzone free, Retinyl Palmitate Free, Vegan, Cruelty and Gluten Free. For those of your with babies or toddlers, Jenna loves this Babyganics spray sunscreen for her boys.

Sun Bum 3-In-1 Conditioner: Our hair gets so tangled after we get out of the water. This is a delicious-smelling 3-in-1 conditioner detangles, conditions and protects hair! Great for girls, too!

Sun Bum Lip Balm SPF 30: It’s so important to protect lips, too! This lip balm smells amazing, and feels good on the lips.

Quay Sunglasses: These aren’t in our bag, but we really want them to be. It’s on our must-buy list for summer style.

Beach Towels: Bright colors and tropical prints are what we’re loving for beach towels. If pink is your thing, try this. If cool blues are more your style, go with this towel.

Fun Pool Toys: We always keep extra pool toys in our bag for pool fun, and entertainment!

YETI Insulated Rambler: Something cold, whether it’s spike or not, is essential at the pool. Hydrate, hydrate!! We love Yeti ramblers because they can go in the dishwasher, and they keep liquids cold or hot for a long time.

Snacks: We don’t go anywhere without snacks for us and our kids. We are snackers. We are obsessed with Bobo’s Bars. They are made in our home state of Colorado, and so so yummy. Plus, they are gluten free.

Hats: Now that we are aging, we know more sun on our face means more wrinkles. So, we travel with our hats. If your more of a baseball cap lady, this is for you. If you want more coverage and style, go with this Do Not Disturb option.

Affiliate Disclosure: This post contains affiliate links, which means j. sorelle receives a small commission from the sale of certain items; however, the price is the same for you, whether it’s an affiliate link or not. 

DIY Advent Calendar

diy-advent-calendar-red-green-christmas-girl-ladder-holiday

The thought of the upcoming holidays brings us a sense of panic with all there is to do, but also great joy. It’s our favorite time of year, so bring on the cheer. We’ve been known to not put up our Advent calendar until mid-December, which may or may not defeat the purpose, so this post is our attempt to have our DIY Advent calendar up by December 1. Other than our usual tardiness, the other con to our past Advent calendar was the size…how are we supposed to fit one thing larger than a candy cane in each tiny opening? This year, we went long and tall, and got creative with ice cream pint containers!

diy-advent-calendar-red-green-christmas-girl-ladder-holiday

May we just say that had we known blogging would have been in our future, we would have an all-white wall with light floors. Since that’s not feasible with any of our homes, and we needed a well-lit area to show you our Advent Calendar, a ‘rustic Colorado ‘ rock wall was our second best option. Our 5-year-old model had a ‘make-it-work’ moment, which she didn’t seem to mind.

diy-advent-calendar-red-green-christmas-girl-ladder-holiday

diy-advent-calendar-red-green-christmas-girl-ladder-holiday

You’ll Need:

Directions:

Make or print number labels. You can use a Silhouette like we did, or buy number stickers. For number 25, we used a red star ornament since that’s the magical day. Glue the labels on the container lids.

diy-advent-calendar-red-green-christmas-girl-ladder-holiday

Drill the pint containers to the long piece of wood {totally doable, even with do drill experience}, and then fill the pint containers with goodies.

diy-advent-calendar-red-green-christmas-holiday-bear-toys

Place lids on the pint containers.

diy-advent-calendar-red-green-christmas-antler-holiday

Set up the colorful Advent calendar. You can make it a horizontal Advent calendar, or a vertical one like we did. Because ours is vertical and tall, we couldn’t resist a set up with a ladder – it makes for a fun adventure everyday for the kids and with a good lean, no nails or holes in the wall.

diy-advent-calendar-red-green-christmas-girl-ladder-holiday

diy-advent-calendar-red-green-christmas-girl-ladder-holiday

Someone special wants it to be Christmas now.

diy-advent-calendar-red-green-christmas-girl-ladder-holiday

We teamed up with Sillhouette America to give away 1 Silhouette CAMEO on Instagram. Nov. 25 the giveaway ends, and all you have to do is follow us on Instagram and tag 3 friends. Go here now.

#colorize #silhouetterocks #adventcalendar

DIY heart-shaped crayon necklace

crayon-heart-necklace-valentine-iheartyou-diy

We are still on our Crayola Crayon kick over here, so we made sweet Valentine’s for the little ladies in our lives. Jessica’s daughter made crayon hearts for her friends, and Jessica found the drill so they could wear them around their necks. A girl always needs to accessorize, and she needs a colorful writing utensil close by, right?

Here’s how you can do it too:

  • Follow these directions to make the crayon hearts. Super easy, we promise.
  • Use a small drill bit to drill two holes, one on each side of the heart.
  • Insert red and white twine through the holes and tie a bow at the top of the necklace.
  • For the packaging, we used our amazing electronic cutting tool, the Silhouette, to cut rectangles with an I {space} U with colorful Astrobrights Papers to spell out “I {heart} U.”
  • Of course, everything is cuter with Washi Tape, so with just a small piece of it, the package is sealed and ready for delivery.

heart-necklace-crayon-crayola-valentines-diy

dig-valentine-necklace-heart-crayon-washi tape

{images via j. sorelle}

DIY Bat Halloween Cards

love you to the moon and bat halloween cards_jsorelle

We know bats and Halloween aren’t always associated with fuzzy feelings of love. When we think of Halloween, we think of candy, scary ghosts and goblins, vampire fangs, trick or treating, etc. But, why not take the opportunity to tell friends and family you love them with a Halloween favorite…BATS.

How cute are these ‘love you to the moon and bat’ Halloween cards? We frequently say, “I love you to the moon and back,” to our kids, so this phrase carries a lot of meaning at our house. We used our awesome, amazing, couldn’t-live-wihout Silhouette to cut the images of bats, and also to create the cut out cards. We added glitter, orange and black and white striped paper behind the front of the card to make the letters pop.

Happy {early} Halloween. We love you to the moon and bat too!

love you to the moon and bat_jsorelle

love you to the moon and bat_jsorelle

love you to the moon and bat_jsorelle

{images via j. sorelle}