Walk On The Wild Side With A DIY Zebra Rug

diy-zebra-rug-inspired-home-decor-pop-of-orange

Do you walk on the wild side sometimes? When Jessica was in High School, she got on a wild streak with her room decor. Her room was bold with tiger and cheetah prints! No, it was not manageable splashes of the animal print – it was an entire comforter, large pillows, bath towels and a rug. We all go through periods in our lives, and sometimes look back and say, “What in the world was I thinking?” This is one of those periods.

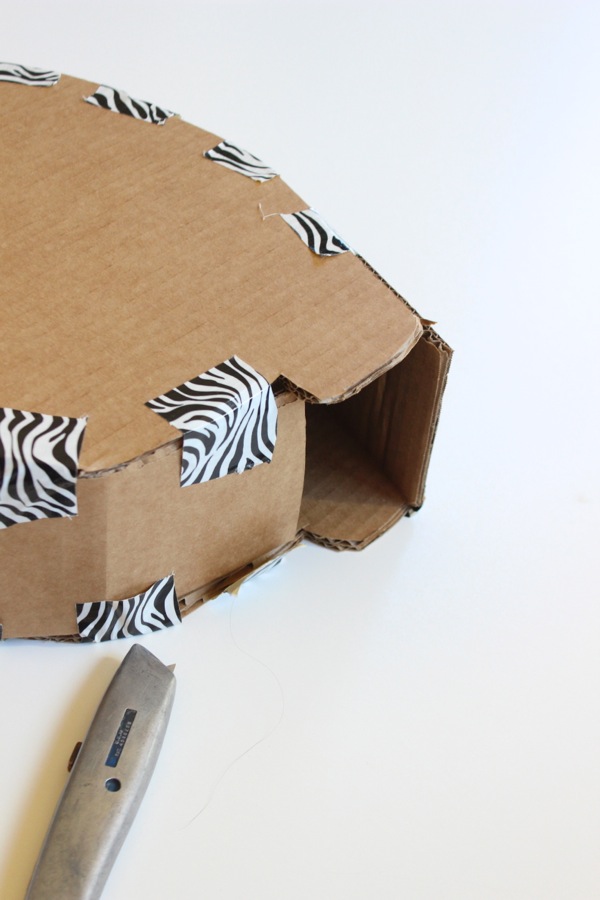
We hope this isn’t one of those moments, but after seeing many expensive zebra rugs online, we decided to walk on the wild side once again and make an affordable version of the zebra rug. We like the way it turned out, and happy we paid less than half the prices online.

To see the full tutorial, visit a site we love, Momtastic.

DIY Halloween Lanterns with Spooky Silhouettes

diy-lanterns-for-halloween-with-black-spider-and-bat-silhouettes

For us, Halloween is all about fun costumes (we spent our entire childhood dressed alike on Halloween night, and now we do the same with our kids), our mom’s homemade carmel popcorn, carving pumpkins, trick-or-treating and celebrating the holiday with our large Italian family. We don’t get into the scary stuff, horror movies or anything remotely gory. So, our Halloween decor can be a bit of a snooze for those who go all out for the Oct. 31st holiday. Pumpkins, Happy Halloween signs and a few spiders is just about all we have in our Halloween decor collection. It lacks a scare factor, which is ok with us (and our kids), but we stepped up our decor game a bit this year thanks to Oriental Trading Company.

We’re lighting up the night with DIY Halloween silhouette lanterns. We stuck with Jenna’s favorite colors, classic black and white. All the other Halloween”classics” are there, too, including bats, skeletons and crows. We never have, and never will like spiders. But, we love their silhouette in our DIY lanterns.

diy-lanterns-and-halloween-silhouettes

This DIY lantern is so easy. Halloween will be here before you know it, but everything we made and set-up can be bought in one place, Oriental Trading, and crafted in less than half a day. Plus, you can re-use it year after year. Silhouettes never go out of style. We love, love the black and white table runner. It can be out year-round, and we were impressed with its thick, durable and quality fabric.

diy-halloween-lanterns

Here’s how you can light up the night, too.

Materials:

Directions:

Step 1: Paint the frames black.

wood-and-black-frames-craft-project

black-frames

Step 2: While the paint is drying, trace the glass or the wood backing of the frame onto the vellum. Cut the vellum rectangles.

scissors-and-vellum-paper-craft-project

Step 3: Cut the silhouettes. They have a thin border, so it’s best they are cut for a clean silhouette. Some of them are too large for the frames, so they need to be trimmed, or pieces of the silhouettes need to be used. For example, instead of using the entire candelabra, we just cut each individual candle. For extra stick, add glue to the back of the stickers before pressing them into the center of the vellum rectangles.

silhouette-black-halloween-stickers-and-scissors

halloween-black-silhouettes-on-vellum-paper-bat-spider

Step 4: Once the frames are dry, flip them over and use a hot glue gun (or Elmer’s glue) to glue the vellum along the inner frame.

black-halloween-silhouettes-bat-spider-and-candle-on-vellum-paper

bat-silhouette-for-halloween-in-a-frame

Step 5: Now it’s time to glue the frames together to make lanterns. We made some 3-sided lanterns, and one 4-sided lantern. To do this, patiently hold it up to have an idea of where the glue will need to go, and begin to glue side by side. You will need to hold the frames in place for a couple of minutes, then the glue holds it until it fully dries. If you don’t have patience for this, hot glue will work just fine. After the glue has dried, touch up the sides with black paint to cover up any glue.

hand-holding-a-black-frame

diy-halloween-lantern

black-silhouette-spider-frame

Step 6: Once the lanterns are dry, set them up with lights in the middle. Once the sun goes down, light them up. For a complete “look”, don’t forget the black and white runner, pumpkins, skeletons, spider web fans and crows.

tap-light-in-the-middle-of-a-diy-lantern

DIY-black-and-white-lanterns-oriental-trading-crow-halloween-decor

black-and-white-halloween-decor-with-spider-and-bat-silhouette-lanters

black-and-white-halloween-decor-with-spider-and-bat-silhouette-lanters

skeleton-resting-against-a-diy-lantern

diy-halloween-lanterns-bat-and-candle-silhouette

diy-halloween-lanterns-bat-and-candle-silhouette

diy-halloween-lanterns-bat-and-candle-silhouette

diy-halloween-lanterns-bat-and-candle-silhouette

Oriental Trading sent us some items of our choosing for this post, free of charge. We’re so happy they did! All opinions are honest, and our own. No other type of compensation was received. Thanks for supporting the companies that support j. sorelle. We love Oriental Trading, even before this post. 

DIY Modern Fall Wreath

diy-fall-wreath-with-copper-ring-and-peony

As much as we tried to keep summer around as long as we could, it came and went. There’s no denying it’s fall. With some recent snowfall, it feels a lot like winter. When the air gets cold, and the leaves change color, we throw on the scarves, bust out the pumpkins and drink a lot more tea.

After a recent trip to Michael’s, Jessica was inspired to make a DIY fall wreath for her front door. It’s outside the traditional “orange fall” box for her. Though we love orange, there is no orange color on this wreath. It’s modern, and pretty. Here’s how she did it in less than 30 minutes (once the paint on the ring dried).

Materials:

  • Wire ring, 18″
  • Copper spray paint
  • Faux greenery, including lamb’s ear, eucalyptus, a fall-tone peony and burgundy leaves
  • Mini pumpkins, Pier 1
  • Copper floral wire
  • Hot glue gun and hot glue

Directions:

Step 1: Spray paint the ring copper.

Step 2: Cut stems from the faux greenery, and once the ring is dry begin to lay out the greenery along the ring. I wanted everything slightly off-center on the lower right corner.

faux-greenery-and-copper-wire-with-burgundy-leaves

Step 3: Hold stems on the ring and wrap with a 3-4 inch long piece of copper wire. Wrap it until it’s tight on the ring wreath. As you add stems, try to cover the copper wire.

copper-wire-for-a-faux-greenery-wreath

Step 4: Leave a small space in the center for the flower and pumpkin. Use hot glue to glue the flower.

faux-greenery-and-blush-peony

diy-fall-wreath-with-copper-ring-and-peony-on-a-copper-modern-wreath

Step 5: Drill two small holes on the bottom of the pumpkin at an angle where you can insert the copper wire through one hole, and push it out through the other hole. Once the wire is in, set on the copper wreath and wrap the wire around the wreath.

copper-pumpkin-with-two-small-holes-and-a-copper-wire

diy-modern-fall-wreath-with-copper-ring-and-peony

diy-modern-fall-wreath-with-copper-ring-and-peony

Step 6: If you need to hide the copper wire, glue leaves and stems here and there. Then, just hang.

diy-modern-fall-wreath-with-copper-ring-and-peony

diy-modern-fall-wreath-with-copper-ring-and-peony

diy-modern-fall-wreath-with-copper-ring-and-peony

A Colorful Summer Party with Sunglasses and Ice Cream

summer-vibes-girl-with-sun-sunglasses-colorful-rainbow-of-sunglasses

Summer vibes are strong in our houses right now, and it feels so good! It’s so close we can practically taste and smell all the wonderful things about summer – watermelon, cocktails on the porch, pool days and fun in the sun. The 2016/2017 school year is almost over, so we’re celebrating all the vibrant shades of summer. Nothing is brighter than ASTROBRIGHTS® Papers. Nothing is cooler than a stylish pair of sunglasses. And, nothing is sweeter than ice cream cones. All together they make one heck of a School’s Out For Summer party.

The most amazing thing about this party is that paper is the main component for all the décor. In fact, not just the décor is made of paper, the activities are primarily paper, too. Everything else – the bubbles, chalk, juice, music, candy and ice cream (the real deal, non-paper version) is just an added (but not necessary) bonus, and most can be found around the house.

It’s time to COLORIZE the start of summer, ya’ll. Here’s how to kick it off bright!

DIY Sunglasses Piñata

diy-sunglasses-pinata-black-and-bright-coral-gigantic-sunglasses

Parties are just more fun with a piñata. If we had nothing but a piñata at our kid’s birthday, they would be thrilled and not notice anything else was missing. But, they can be expensive, and if you do things last-minute like us (actually, just Jessica and Jodi procrastinate, not Jenna), it costs too much to overnight ship a piñata. Luckily, we had cardboard, duct tape and ASTROBRIGHTS paper on hand to help me make the coolest piñata around town – a pair of sunglasses.

First, draw the shape of the glasses on cardboard. We used an 8×10 cut out of each lens and drew a larger tracing around it. Once everything is drawn, use an X-acto knife to cut the cardboard glasses shape. You will need a front and back, so once one pair of glasses is done, trace it on another piece of cardboard and cut it to create a second pair. Next, cut 3-inch wide strips of cardboard for the sides. Carefully bend the strips to fit the curves of the glasses.  Use small strips of duct tape (or masking tape) to secure the strip in between both pieces of cardboard glasses. We only had zebra print duct tape in our crafting bin, but we suggest using clear tape, or brown masking tape for this step. Before the entire thing is bordered, leave a small opening large enough to fit your hand in it. Drill (or punch with scissors) two small holes on top of the piñata. Insert the rope into one hole and use your hand to pull it along the inside so it can go up and out the other hole. Also, at this time, stuff the piñata with small toys and candy. Once it’s filled and the rope is attached for hanging, close up the last part of the piñata with a strip of the 3-inch cardboard and duct tape it.

IMG_9856

cardboard-sunglasses-cut-out-with-zebra-duct-tape

Once all the edges are securely taped, begin to cut 1.5-inch to 2 inch wide strips of paper. Use scissors to fringe the strips. Start to glue (Elmer’s Glue works here) each strip on the cardboard glasses. One crucial tip is to begin at the bottom and work your way up.

diy-sunglasses-pinata-black-and-bright-coral-gigantic-sunglasses

Once the entire thing has strips of fringe, cut out two large (8×10 size each) lenses for the glasses. Add glue to the back of them, and add them to the sunglasses frame.

We used Rocket Red™ colored paper, not card stock weight, for fringe around the piñata and Eclipse Black™ for the shades. How cool are those shades? Plus, it was pure entertainment for the kids as they hit it to find the goodies inside.

diy-sunglasses-pinata-black-and-bright-coral-gigantic-sunglasses-boy-hitting-pinata

diy-sunglasses-pinata-black-and-bright-coral-gigantic-sunglasses-girl-hitting-pinata

diy-sunglasses-pinata-black-and-bright-coral-gigantic-sunglasses

DIY Summer Vibes & Rays of Sunshine

summer-vibes-paper-backdrop-colorful-sunnglasses-arched-like-a-rainbow

We don’t know about you, but we can’t get through summer without our most favorite accessory, sunglasses. Thus, those little round (or square, oval, butterfly, oblong or aviator) must-have frames were the source of inspiration for our main backdrop, the rainbow of sunglasses.

The first step is to cut out colorful frames for all the glasses. You can use an electronic cutting machine like Silhouette America Cameo to cut the glasses, or trace and cut one you find online. We used Terrestrial Teal™, Outrageous Orchid™, Sunburst Yellow™, Rocket Red™ and Martian Green™. Add Eclipse Black™ lenses behind each frame. For the rays of sunshine radiating from the sunglasses, cut 3.5 inch strips of paper. Add them to a wall, and you’ve got yourself a pretty rainbow of sunglasses. To save the wall from any paint removal, use 3M Removable Putty. It worked great.

summer-vibes-paper-backdrop-colorful-sunnglasses-arched-like-a-rainbow-kids-playing-and-crafting-on-a-white-picnic-bench

summer-vibes-paper-backdrop-colorful-sunnglasses-arched-like-a-rainbow-kids-playing-and-crafting-on-a-white-picnic-bench

summer-vibes-paper-backdrop-colorful-sunnglasses-arched-like-a-rainbow-kids-playing-and-crafting-on-a-white-picnic-bench-and-blowing-bubbles

girl-wearing-black-paper-sunglasses

colorful-summer-vibes-paper-wall-decor-and-a-giant-pair-of-green-paper-sunglasses

summer-fun-bubbles-chalk-glasses-for-kids

DIY Mini Ice Cream Parlor

ice-cream-as-tall-as-me-diy-paper-ice-cream-awning

Ice cream on a hot summer day is just pure joy. Our goal was to re-create that feeling of an ice cream parlor and happiness on a summer day with an ice cream activity for the kids. We all know how quickly our children grow. We mark their height at the beginning of the school year, or when they are young, but we don’t do it at the beginning and end of the summer. We’ve never marked their height with ice cream before. Why not start now? It was a huge success – like creamy, vanilla ice cream combined with gooey, chocolaty brownies, drizzled with caramel and topped with a cherry success. Yes, it was that good, and fun!

To make the DIY paper ice cream awning, use scissors to round one side of the paper. Line them up along the wall, and use 3M Putty to hang them along the top, straight-edge part. For the awning, we used Pulsar Pink™ and Celestial Blue® colored paper.

ice-cream-as-tall-as-me-diy-paper-ice-cream-awning

Trace and cut letters for the phrase, “Ice Cream As Tall As Me,” and add it to the wall under the awning. If you have a Silhouette electronic cutting machine, that will save you time, but it’s not a deal breaker for this project. Next, cut out triangles in the shape of ice cream cones. Tape the cones to the bottom of the wall. Cut out ice cream scoops 6 inches tall, which will help you give a “more accurate” estimate of each child’s height. Next, cut out sprinkles and cherries, so the kids can decorate their ice cream scoops with sprinkles, and finish their tall ice cream with a cherry on top. This was our kid’s favorite part.

paper-ice-cream-scoops-and-colorful-paper-sunglasses

paper-ice-cream-scoops-and-colorful-paper-sunglasses

paper-ice-cream-scoops-and-colorful-paper-sunglasses

paper-ice-cream-scoops-and-colorful-paper-sunglasses

One by one the kids ran over to their cone and stacked their ice cream. If only they could actually order an ice cream this tall. One can dream, right?

kids-taping-ice-cream-scoops-on-a-wall

boy-standing-in-front-of-paper-ice-cream-awning-and-ice-cream-scoops-as-tall-as-him

ice-cream-as-tall-as-me-stacked-colorful-ice-cream

baby-boy-standing-next-to-ice-cream-scoops-and-holding-bubbles

We enjoyed real ice cream shortly after the breaking of the piñata, and it was oh so yummy. The countdown is on – 17 more days of school, and then school’s out for summer! You can bet we will have our shades on!

baby-boy-with-sunglasses-on-his-back-and-a-newsboy-hat

This post is in partnership with ASTROBRIGHTS. We were crafting with and coloring on ASTROBRIGHTS paper long before this post. It’s always been a fave product of ours. Thank you for supporting the brands that support j. sorelle. ASTROBRIGHTS was one of the first, so we are very grateful.

Affiliate Disclosure: This post contains affiliate links, which means j. sorelle receives a small commission from the sale of certain items; however, the price is the same for you, whether it’s an affiliate link or not. 

DIY Sand Craft and Mod Podge Frame

DIY-frame-ikea-craft-sand-seashells-tropical-plant

It’s almost Spring Break time, and we don’t know about you, but we’re dreaming about sand between our toes, salty beach hair and cocktails at sunset. We’re also like our mom on most vacations, and try to get all those special moments on film, or in our case, digital jpg files. But, when we return home most of our photos remain on our computer, and the sand remains far away on the beach.

This DIY Mod Podge and sand frame merges those wonderful photo memories with colorful sand, so it’s one happy and colorful display. Plus, with the base of the frame being an Ikea GRUNTDAL, it can be displayed on anything metal or magnetic.

Get all the how-to details at Momtastic.

And, if you’re headed somewhere warm for vacay, have fun (and stop to take those photos that you will always cherish…no matter how much your children whine).

diy-sand-art-and-ikea-magnet-photo-frames