Day 6: Your Cocktail’s Best Accessory, a DIY Drink Stirrer

diy drink stirrer_holiday cocktail

On the 6th day of Christmas, j. sorelle gave to you…a DIY drink stirrer.

We accessorize our outfit for holiday parties…so why not accessorize our cocktails too? This year our drinks will be a bit more festive – cheers to that!

snowman drink stirrer

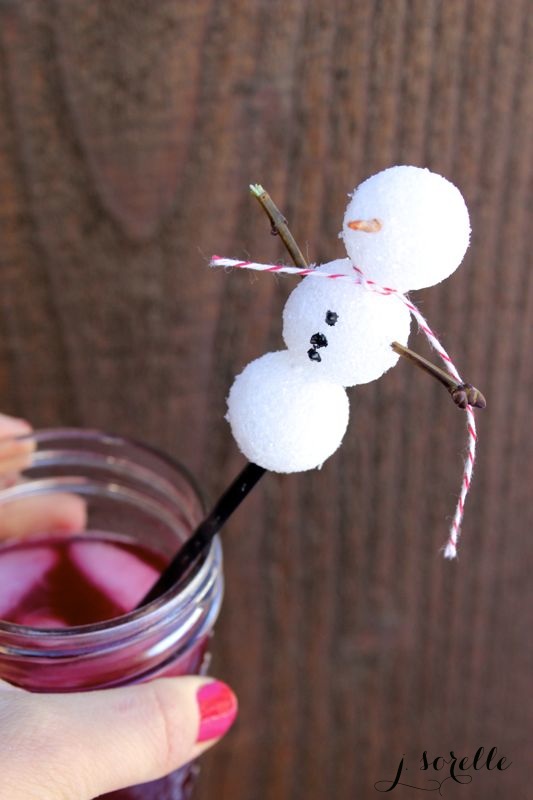
Snowman Drink Stirrer

You’ll Need
:

  • 3 mini styrofoam balls
  • Hot glue gun
  • Shredded carrot sticks
  • Black puff paint
  • Drink stirrer
  • Red and white striped twine
  • Mini branches

How To:


  1. Glue the 3 styrofoam balls together.
  2. Push the carrot in the face for the nose.
  3. Add three buttons with the puff paint on the middle ball or ‘belly’ of the snowman.
  4. Tie a small piece of twine around the ‘neck’ of the snowman so he/she has a scarf.
  5. Add a mini branch to each side of the snowman so he/she has arms.
  6. Push the top of the drink stirrer into the bottom ball.

tinsel and ornament drink stirrer

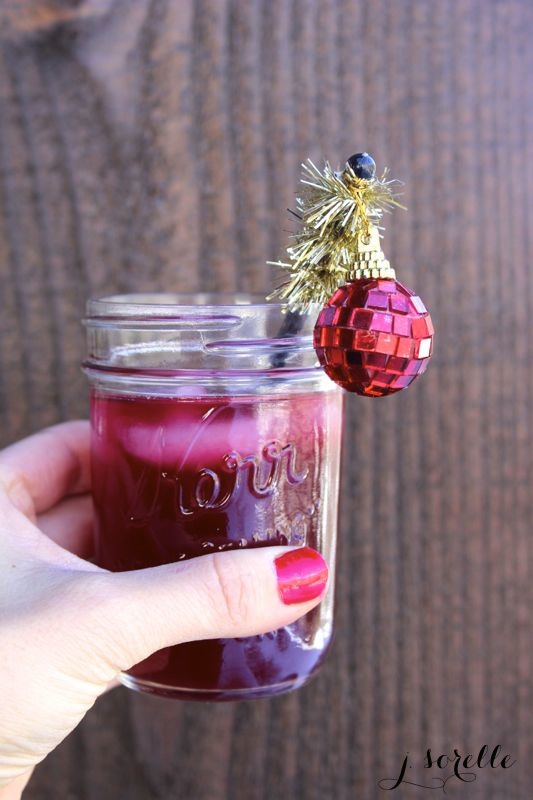
Tinsel and Ornament Drink Stirrer

You’ll Need:

  • Mini ornament from your local Target or Walmart
  • Tinsel
  • Drink stirrer
  • Hot glue gun

How To:

  1. Wrap a small piece of tinsel around the top of the drink stirrer. Add a dab of hot glue to the end tip of the tinsel to keep it in place.
  2. Wrap the string attached to the mini ornament around the top of the drink stirrer and add a dab of glue to keep it in place, too.

Now that you have two adorable drink stirrers to make, you just need a cocktail to fill your cup. Stay tuned because we have a yummy and festive drink recipe we can’t wait to share.

{images via j. sorelle}

Day 4: Mint Hot Chocolate Homemade Hostess Gift

mint hot chocolate for the hostess

On the 4th day of Christmas, j. sorelle gave to you…a potted mint homemade hostess gift.

We love the refreshing taste of mint with our water and cocktails in the summer, so why not incorporate it in our favorite warm drinks in the winter, like hot chocolate? The idea of sipping a mint hot chocolate warms us up, and it will warm up the host/hostess too with the potted mint plant hostess gift we shared with Momtastic.

It’s minty fresh, y’all. Check it out.

{image via j. sorelle}

Day 3: DIY Teacher Gift + {FREE PRINTABLE}

diy teacher gift every teacher will love

On the 3rd day of Christmas, j. sorelle gave to you…a DIY teacher gift and free printable.

We decided that we couldn’t go wrong with a chalkboard for a holiday teacher gift this year. And with handwritten notes from kids on a free printable, it’s priceless. We love the DIY Teacher Gift we shared with Momtastic. It’s a gift from the heart that really makes the grade – an A+ grade – so it’s worth checking out.

{image via j. sorelle}

Day 2: DIY salt and pepper shakers for the hostess

DIY salt and pepper shakers

Shake it off, Shake it off. Ok, Jessica has a minor obsession with Taylor Swift’s new song, and it’s a great motto for  Day 2 of our 12 Days of Christmas.

On the second day of Christmas j. sorelle gave to you…DIY heart-shaped salt and pepper shakers.

These DIY salt and pepper shakers make an easy, affordable and adorable hostess gift or Christmas gift. You can start and complete the project in less than an hour.

DIY salt and pepper shakers_jsorelle

You’ll Need:
Mini jam jars – You can find small jam or honey jars at your local grocery store or you can find some from the English Tea Store
Push pin like these
Clear Scotch tape
Sharpie pen
Salt & pepper

How To:
Step 1: Clean out the jars.
Step 2: Place a piece of clear tape over the lid of the jam jar and with a Sharpie, add dots in the shape you want. We chose to do a heart to go with the theme of ‘season everything with love.’

DIY salt and pepper shakers

Step 3: Poke holes through the lid on your dotted design.

DIY salt and papper shakers

Step 4: Once you poked through every dot, remove the piece of tape to see your design.
Step 5: Add salt & pepper to the shakers, package with twine or a bow and give, give, give. To make it really cute, attach a ‘season everything with love’ note to the twine.

season everything with love_DIY salt and pepper shakers

 Season everything with love this Christmas!

{images via j. sorelle}

Day 1: DIY Christmas Art

diy christmas art_jsorelle

On Friday, we announced a BIG DEAL from SilhouetteAmerica.com {promo code SORELLE} happening through Dec. 8. So, today we’re going to show you a little of what a Silhouette Portrait can do.

Today is also the start of j. sorelle’s 12 Days of Christmas. For 12 days, we have fun, creative and festive Christmas DIY projects, holiday party necessities and gift ideas for you!

Without further adieu…

On the first day of Christmas, j. sorelle gave to you…DIY Christmas art.

diy christmas art_jsorelle

We’re dreamy for deer this time of year, and we love the nostalgic, fuzzy feelings we feel when we see a photo of a freshly cut Christmas tree strapped to the top of a red car. Now, we can display our favorite holiday images in our homes with our own Christmas Art. We call our art Deer Date, Merry Merry and Oh Joy

You’ll Need:

How To:
Step 1: Design and cut the art using your Silhouette Studio software and Portrait or CAMEO cutting machine. They have so many beautiful and fun artwork options you can purchase for .99 each. If you don’t have a Silhouette and want one for Christmas, check this out. And, if you don’t have access to a Silhouette, you can trace and use cut outs and pre-cut art.

Step 2: Use a paintbrush to paint Modge Podge on the back of each cut out and place on your blank canvas.

DIY christmas wall art

diy christmas art

Step 3: Once all art is in place, find a place with really good ventilation and spray sealant on your art.

Step 4: Display.

deer date

oh joy

DIY christmas art_jsorelle

christmas wall art

#ColorizeYourParty

{images via j. sorelle}