DIY Valentine for Teachers

valentine-teacher-dig-box-red-socks-heart-slippers

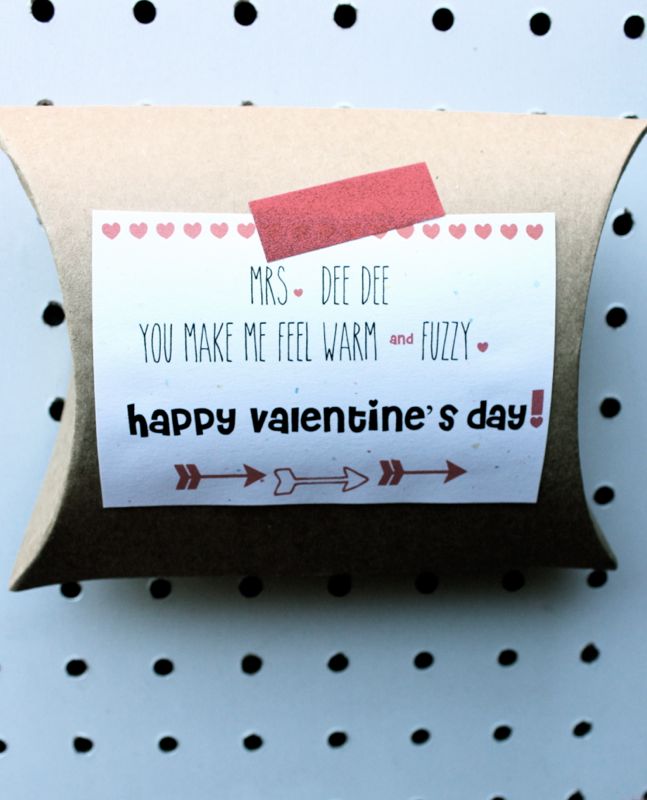
We are letting our teachers know just how warm and fuzzy they make our kids feel with socks this year.

Target was our source for the cute slipper socks adorned with stripes and a heart. We also scored with pillow boxes and sparkly red tape from Target’s $1 and $3 bins.

We used Microsoft Word to create the tag, so you can easily do it too.

valentine-teacher-socks-slippers-stripes-heart-diy-holiday

You’ll score extra points with your child’s teacher, and their toes will be warm and toasty all winter long.

valentine-socks-slippers-kids-stripes-heart-diy

{images via j. sorelle}


DIY Chocolate Valentine’s Gift

candy-valentine-riesen-love

Sometimes when we walk down the candy aisle at the grocery store, we just can’t control ourselves. One of our favorite treats to sneak into the cart is yummy chocolate caramel bites, known as Riesen {pronounced just like the word reason}. Our Nani introduced the candy to us years ago, so as we chew the deliciousness that is Riesen, we lovingly think about her. She also loves Valentine’s Day, which made it the perfect reason to tell her how much we love her, and do it with her favorite candy.

A pillow box is in the mail to our Nani with her favorite candy, and all the Riesens or “Reasons” we love her.

candy-riesen-valentinesday-love

To re-create for someone you love, you’ll need:

  • A pillow box. We bought a pack of 5 from Target
  • A bag of Riesen candy
  • Paper {Astrobrights Paper}
  • Glue stick
  • A Silhouette electronic cutting machine {Sharpie or stickers will work too}
  • A lovely person to send it to

We used our Silhouette to design the wording on the front of the pillow box, as well as the numbers. If you don’t have a Silhouette {you should add it to your want list}, you can also write or print your own design, or buy stickers. We used a glue stick for all the letters and numbers, as well as on the bottom of the candy wrapper to keep them in place on the paper. Finally, write all the reasons why you love the person your sending it to on small pieces of paper.

It’s a simple, cheap way to share love and chocolate. It’s going to make your loved one’s day…and you get to eat chocolate in the process. Win-win.

valentinesday-candy-chocolate-riesen

{photos via j. sorelle}

DIY heart-shaped crayon necklace

crayon-heart-necklace-valentine-iheartyou-diy

We are still on our Crayola Crayon kick over here, so we made sweet Valentine’s for the little ladies in our lives. Jessica’s daughter made crayon hearts for her friends, and Jessica found the drill so they could wear them around their necks. A girl always needs to accessorize, and she needs a colorful writing utensil close by, right?

Here’s how you can do it too:

  • Follow these directions to make the crayon hearts. Super easy, we promise.
  • Use a small drill bit to drill two holes, one on each side of the heart.
  • Insert red and white twine through the holes and tie a bow at the top of the necklace.
  • For the packaging, we used our amazing electronic cutting tool, the Silhouette, to cut rectangles with an I {space} U with colorful Astrobrights Papers to spell out “I {heart} U.”
  • Of course, everything is cuter with Washi Tape, so with just a small piece of it, the package is sealed and ready for delivery.

heart-necklace-crayon-crayola-valentines-diy

dig-valentine-necklace-heart-crayon-washi tape

{images via j. sorelle}

DIY Pencil + Crayon Cupid Arrow

pencil-arrow-cupid-crayola-crayon-heart-valentines.jpg

Valentine’s Day is still a month away, but we’re in the mood for love. And we’ve been struck by the cutest bow and arrow ever!

If you’re opting for a non-candy Valentine, or want to play cupid on February 14, this is the arrow for you.

crayon-cupid-arrow-crayon-heart-valentine.jpg

Materials Needed

How To Create Our Crayola Love Struck Arrow:

  1. Fill the silicone tray with old or new bits of crayons to the top.
  2. Bake at 250 degrees for 13 minutes. Once the tray cools a bit, place in freezer for 5-10 minutes. The hearts should pop right out.
  3. Use a drill to drill a small hole in the top-middle part of the heart, so the tip of the pencil fits into the heart similar to a pencil sharpener. Don’t drill the hole too big, but if it’s not fitting just right, add some glue to the tip of the pencil and insert.
  4. For the end of the arrow, cut felt and either glue the two pieces together or if you use sticker felt like us, just press the two pieces together, sandwiching the pencil.

If you want to package for classmates or a friend, place the arrow in a thin cellophane bag and seal with washi tape.

crayon-pencil-cupid-arrow-dig-valentine

diy-cupid-arrow-valentines-crayon-pencil-valentine.jpg

{images via j. sorelle}

How to Throw a Colorful NYE Party with Paper

when the clock strikes midnight

If you blinked, Christmas is over, and a new year is now upon us. The thought of throwing another party can be totally overwhelming, but what if we told you that it could be easy and cost-efficient to #ColorizeYourParty and you could do it primarily with paper?

Intrigued?

Good, because we put together a colorful and fun way to ring in the New Year with Astrobrights Papers that you, too, can put together in less than a day.

Just like Cinderella, we hope year 2015 is a fairy tale for you. However, unlike Cinderella, When the Clock Strikes Midnight, a magical spell will not be broken, but another year will begin. A new beginning. A fresh start. Another chance. A new love. An opportunity for adventure. Travel. Good times {and some bad times too}. Lessons to be learned.

To celebrate 2015 and the magic that happens When the Clock Strikes Midnight, here’s 3 ways you can #ColorizeYourParty

Countdown Clock and Wishes
Colorize Your Party with a large, colorful clock made from paper. Print and cut out numbers, as well as the big hand and little hand, then stick to a wall. You can use a Silhouette cutting tool like we did, or you don’t need a fancy program at all – you can print numbers via Microsoft Word, and then cut. We used DAP BlueStik reusable adhesive putty to stick the paper to the wall, so it’s easily removable and reusable. Every hour, you can move the ‘hands’ as the midnight hour approaches.

when the clock strikes midnight

when the clock strikes midnight

Before the clock strikes midnight, encourage your guests to write wishes for friends, family and loved ones at the party. Your guests will go home with the mason jars as favors, along with heart-felt wishes for 2015. Remember to use colorful Astrobrights Papers to add labels to the top of the mason jars, and 2015 Wishes tags with twine. For extra table height, wrap small boxes like a package with colorful paper.

when the clock strikes midnight

when the clock strikes midnight NYE party

when the clock strikes midnight NYE party

when the clock strikes midnight NYE party

NYE Essentials Wall
Whether you hope for a magical, butterflies-in-your-stomach kiss, a first kiss, an old but favorite kiss, a kiss from your children or a kiss from a friend, this NYE Essentials wall will ensure everyone will have soft lips, good breath and confetti to throw when the clock strikes midnight. We filled 98 cent plastic ornaments with DIY paper confetti {we used a good old-fashioned hole punch to create bright confetti from Astrobrights Papers}, custom labeled lip balm and pink and white tic-tacs.

NYE colorful party with Astrobrights Papers

NYE confetti

NYE party with confetti

To make the wall more eye-catching, we hung tinsel and white twinkle lights with Painter’s Tape, and strung the ornaments on the tinsel. For the big ribbon banner made entirely of paper, we simply printed our sign, added Martha Stewart glitter to NYE letters, glued 3 sheets of paper together, bent the paper and taped the ends to the wall. As for ‘tails’ of the ribbon, we cut the paper and taped it to the wall.

NYE colorful confetti party

NYE midnight ESSENTIALS

NYE party essentials

NYE party essentials

NYE party confetti

IMG_7304

Photo Booth
We thought about doing a glitter photo booth, or even a photo booth with all kinds of paper props, but a simple geometric background with the words This is How G-double-O-D I looked in 2014 seemed like the most honest and to-the-point backdrop for our NYE celebration. You have to own your hotness in 2014 to look even better in 2015, right? We think so.

photo booth this is how good i looked

For the geometric backdrop, we simply cut Astrobrights Papers into 8×8 squares, and then cut it diagonally in half. We used 4 different colors, and once all the triangles were cut, we used a glue stick to stick it to a wood board. For the words, we used a Silhouette cutting machine, but you can trace or print your own letters.

NYE photo booth

We hope you create a unique and memorable celebration using Astrobrights Papers to #ColorizeYourParty, and we wish you a happy, safe and healthy 2015!

Stay inspired all year-long with Astrobrights Papers via Facebook, Pinterest, Instagram and Twitter.

{images via j. sorelle}

side note about our model: Major props to Jessica’s hubby {the handsome model in our photo booth}, who not only took care of an entire family infected with Influenza A before, during and after Christmas, but kindly modeled for our backdrop despite lack of sleep and rest, when we were too sick to do so. 

j. sorelle received products and/or payment for this post, however we love Astrobrights Papers even if they didn’t send us product, and all opinions are ours, we promise. View all of Astrobrights vibrant colors here