Design a Beautiful Nursery on a Budget

baby-girl-nursery-pink-ombre-baskets-white-ikea-gold-crib-nursery-gold-animal

Babies are expensive, but that doesn’t mean their room has to be, too. We love the nursery Mila Mae, the newest {and beautiful} addition to our large Italian family, calls home. Sweet Mila has a lovely, special place to call her own, and her mom is sharing the details with us. Kerri designed a pretty room for Mila, without maxing out the credit card. Win, win!

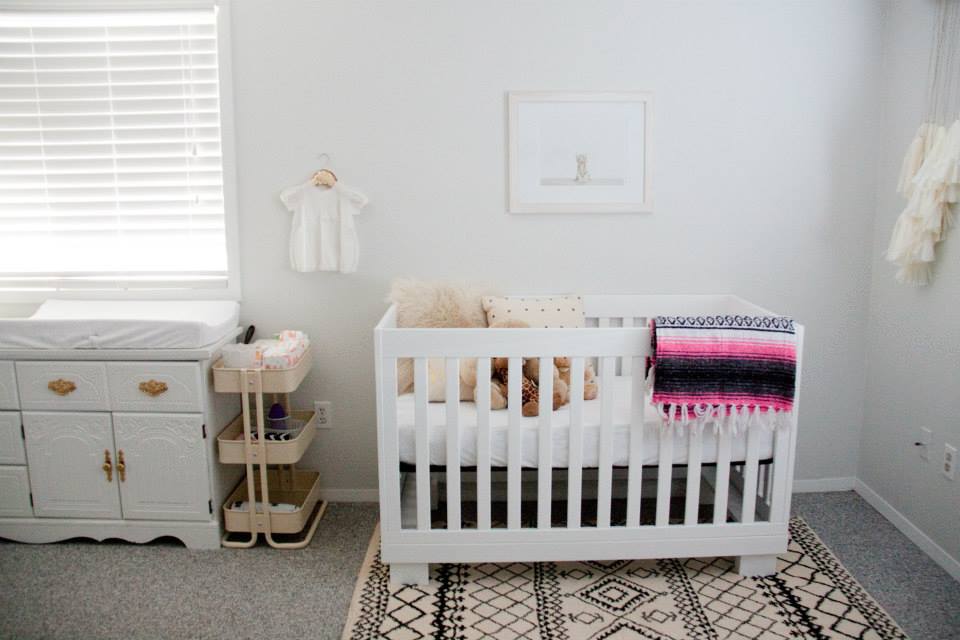
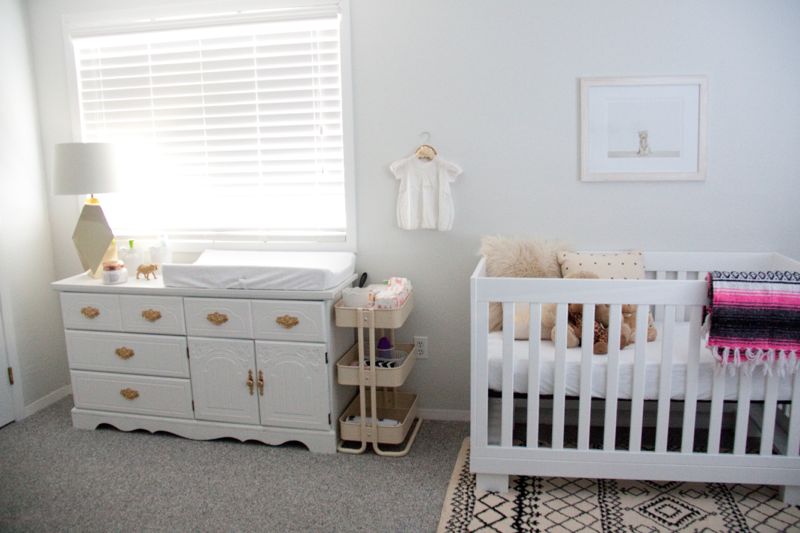
Her nursery is clean and white with touches of pink…and we love it.

Here’s how you can do it, too.

1. Shop at Ikea.
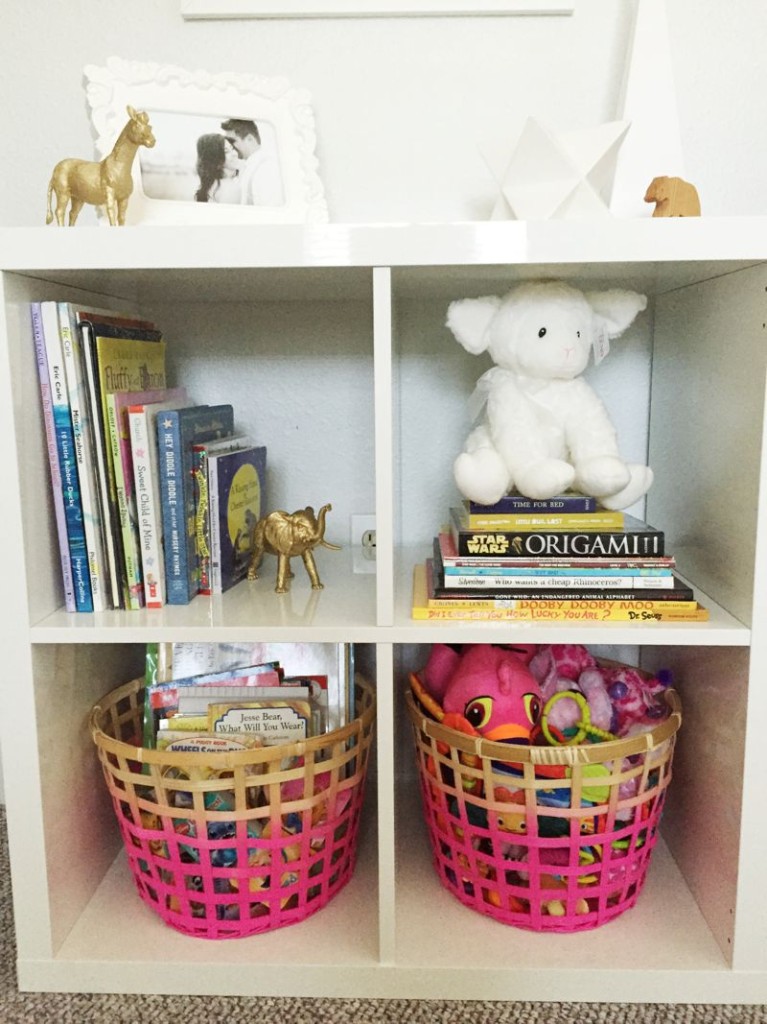
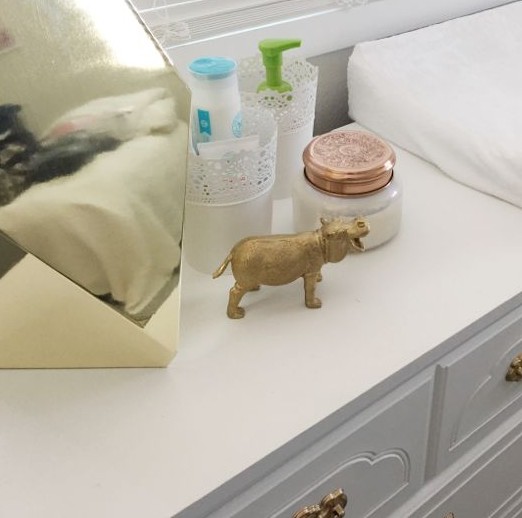
We all love the affordability and chic design to be found in the never-ending aisles at Ikea. Kerr’s ombré baskets are from Ikea. They are functional because they hold toys, book and stuffed animals, but they also add the perfect pop of color for a princess’s room. The little white flower-pot tins on the dresser are also from Ikea. They help Kerri organize everything! On the dresser, she holds hand sanitizer, diaper ointment, baby powder, etc. in them.
baby-girl-nursery-pink-ombre-baskets-white-ikea-gold-crib-nursery-gold-animal

baby-girl-nursery-pink-ombre-baskets-white-ikea-gold-crib-nursery-gold-animal

2. Incorporate family heirlooms.
Kerri incorporated her grandma’s dresser in Mila’s room, which holds sentimental value for her. She updated it with several coats of white paint, and painted the knobs gold. Another special touch is the dress hanging from the gold hanger next to the crib. It’s Kerri’s mothers dress she wore when she was a baby. A piece of 3 generations of women from the same family lives inside those 4 walls! The ultra-glam gold sequins hanger is from The Golden Gurl via Etsy.

baby-girl-nursery-pink-ombre-baskets-white-ikea-gold-crib-nursery-gold-animal

3. Add DIY details.
We love DIY details, and although Kerri said she is not a big DIYer, she did manage to spray paint dollar store animals with gold spray paint. Animals are a favorite for little kids, so with the DIY gold animals, Kerri added a childhood favorite with a touch of glam.
baby-girl-nursery-pink-ombre-baskets-white-ikea-gold-crib-nursery-gold-animal

4. Buy handmade items from Etsy.
Handmade items add warmth and authenticity to a nursery, plus it’s always great to support small shops. The driftwood wall hanging with tissue paper tassels is from Fleur Lux and the beautiful gold pillows in the crib are from Kerri’s talented friend at Bright July.
baby-girl-nursery-pink-ombre-baskets-white-ikea-gold-crib-nursery-gold-animal

baby-girl-nursery-pink-ombre-baskets-white-ikea-gold-crib-nursery-gold-animal

5. Incorporate color, texture and culture from travels. 
The world is a grand and beautiful place with bright colors and a vast array of textures, so it’s nice to bring memorabilia from various cultures home. Plus, its unique decor that can’t be found anywhere else. The authentic Mexican blanket hanging from the side of the crib was a gift Kerri’s parents brought back from Mexico. The impact is big, but the price tag was little – the blanket was just $5.

Thanks for sharing your room with us today, Kerri {Marco and Mila, too}. We love you.


DIY No-Sew Mini Football Pennant

blue-orange-bronco-football-pennant-diy-drink-stirrer-yay-go-helmet-banner-utensil

I been waitin’ all day for Sunday night

The tough get rough in a primetime fight

The last one standin’ gets to turn out the lights

‘Cause I been waitin’ all day for Sunday night

Yea, yea, yeah

Recognize that song {and the foxy lady that sings it} on NBC primetime Sunday night? Well, if your husband/boyfriend/dad/brother/son/friend is like ours, it’s more like, been waiting all day for Thursday, Saturday, Sunday and Monday because we’re pretty certain between college and the NFL, there are big, must-see games every one of those nights!

Yes, it’s that football time of year. Whether you like it or not, it’s here. Might as well make something cute to go along with it!

We made DIY mini pennants that can be used as a DIY pennant drink stirrer, or DIY mini pennant utensils for pre-game tailgate madness or a fun football party.

Can you guess what team we’re rooting for? CO born and raised, baby!

DIY Mini Football Pennant

blue-orange-bronco-football-pennant-diy-drink-stirrer-yay-go-helmet-banner-utensil

You’ll Need:

  • Colorful craft foam sheets
  • Pencil
  • X-acto knife
  • Hot glue gun
  • Plastic forks or spoons

Directions:

  • Step 1: Hand draw or trace your designs with a pencil onto the craft foam sheets. We created a pennant shape in Microsoft word, and found the Bronco logo, as well as the helmet online. For all the letters, they were hand drawn.

blue-orange-bronco-football-pennant-diy-drink-stirrer-yay-go-helmet-banner-utensil

  • Step 2: Cut out your shapes.

blue-orange-bronco-football-pennant-diy-drink-stirrer-yay-go-helmet-banner-utensil

  • Step 3: Glue the letters or shapes onto the pennants. Remember to leave a small space on the left side of the pennant for a small slip to insert a fork, spoon or stick.

blue-orange-bronco-football-pennant-diy-drink-stirrer-yay-go-helmet-banner-utensil

  • Step 4: Use an X-acto knife to cut a slit at the top and bottom of the pennant, on the left side of the letters/shapes.

blue-orange-bronco-football-pennant-diy-drink-stirrer-yay-go-helmet-banner-utensil

  • Step 5: Insert a spoon, fork or stick into the slits.

blue-orange-bronco-football-pennant-diy-drink-stirrer-yay-go-helmet-banner-utensil


blue-orange-bronco-football-pennant-diy-drink-stirrer-yay-go-helmet-banner-utensil

  • Step 6: Glue the little tags/strips on the back of the flag, next to the back of the spoon.

blue-orange-bronco-football-pennant-diy-drink-stirrer-yay-go-helmet-banner-utensil

blue-orange-bronco-football-pennant-diy-drink-stirrer-yay-go-helmet-banner-utensil

  •  Step 7: Place in a mason jar because you’re done, and everyone has the cutest DIY pennant utensil ever!

blue-orange-bronco-football-pennant-diy-drink-stirrer-yay-go-helmet-banner-utensil


DIY Black and White Coasters + Idea Swap

desk-accessory-coffee-coaster-antler-white-black-quotes-diy-gift-dream

It’s National Swap Idea Day. In honor of the swap day, we teamed up with some of our favorite bloggers to create DIY desk accessories to swap with one another. The challenge was to create a DIY desk accessory or DIY desk organization item for under $20. That’s it! Every blogger that participated was assigned to another blogger, so no one went home empty handed…and now we all have a new desk accessory!

I know Jodi and I {Jessica} are in the need of a serious desk overhaul, so we were excited to see what everyone came up with.

Our girl, Christina Williams Blog, was the lucky recipient of our gift swap – DIY black and white coasters with quotes. We all need inspirational and uplifting quotes while we work, and a hot cup of joe to keep us going. So, our black and white coasters with an antler base is a chic way to get rid of those annoying coffee cup rings. Plus it’s a daily reminder to dream and believe in ourselves.

Shh! Jenna secretly wishes she could keep the coasters because it’s black and white {those are the only two colors she likes} and she drinks coffee all day! 

black-white-coasters-diy-idea-swap-desk-accessory-dream-quotes-wood

Here’s how we did it.

Materials Needed:

  • Coasters {we found ours at the thrift store, along with the antler base for $6}
  • White, gloss spray paint
  • Black Vinyl from Silhouette
  • Frog Tape
  • Shellac

Directions:

  • Step 1: Spray paint the coasters, and antler base white. Below is our original thrift store find.

antler-coaster-set-deer-diy-thrift-store-project-idea-swap

  • Step 2: Design or purchase a design from Silhouette with inspiration words. We used our Silhouette electronic cutting machine to cut the vinyl for this project; however, you could easily use Mod Podge to adhere your design and favorite quotes to the coasters, or just paint your own quotes.

black-white-coasters-diy-idea-swap-desk-accessory-dream-quotes-wood

  • Step 3: Transfer the vinyl to the coasters, following Silhouette vinyl transfer directions. Instead of transfer paper, we used Frog Tape.
  • Step 4: Spray the coasters with waterproof Shellac or sealant.

black-white-coasters-diy-idea-swap-desk-accessory-dream-quotes-wood

  • Step 5: Sip while you work.

desk-accessory-coffee-coaster-antler-white-black-quotes-diy-gift

We are obsessed with the Pencil and Air Plant Holder Miranda at One Little Minute Blog sent us. Air plants is just about the only indoor plant we can keep alive, so it’s perfect!

Check out all the amazing projects and women involved – you are gonna LOVE what you find. All projects are featured on instagram, too.

DIY Honeycomb Napkins Are All The Buzz

honeycomb-napkins-pink-gold-white-honey-bee-summer-diy


The kids are learning their geometric shapes…and we are painting our favorite geometric shapes. The hexagons on these DIY honeybee napkins are sweeter than tupelo honey!

See the full tutorial on Wayfair. 

Jenna’s got you covered if you need the hexagon invite.

honeycomb-napkins-pink-gold-white-honey-bee-summer-diy


DIY Pegboard Art

diy-peg-board-art-paint-colors-vanishing-point-quote

Pegboard is the source of so many amazing art projects and organizational walls. We’ve seen them accessorized with hooks, baskets, jars, letters, ribbon and photos. But one specific pegboard in an art classroom really caught our eye. The colorful, bright DIY pegboard with an inspirational quote was made by one creative and talented art teacher, Sam Mizwicki. The quote by Roald Dahl says, “If you have good thoughts, they will shine out of your face like sunbeams and you will always look lovely.”

Well, this colorful piece of DIY pegboard art radiates like a sunbeam, which gives us good thoughts…and we’re hoping it makes us look lovely.

Sam is sharing all her tips in a how-to tutorial below. Thanks, Sam!

diy-peg-board-art-paint-colors-vanishing-point-quote

Materials:

  • Peg board
  • Pencil
  • Yard stick or ruler
  • Acrylic paint
  • Painter’s tape

Directions:

  • Step 1: Purchase the pegboard in a big sheet from Home Depot. It was quite inexpensive for the size of the piece. You can also find some in white, but I liked the brown look.
  • Step 2: Use a table saw to cut pegboard down to desired size, or ask the nice employees of Home Depot to cut it for you.
  • Step 3: I used the concept of perspective here, where every line goes back to the vanishing point. Find the center of the pegboard and make a little dot. All lines will end at that point (the vanishing point).
  • Step 4: Start at the perimeter of the pegboard and divide up into sections of whatever size you prefer. You can measure it out to make it exact or just wing-it! I measured mine out to be a bit more precise. I used a pencil to make a little dot to mark each section.
  • Step 5: Use a yard stick or ruler to draw a line from the outer perimeter dot to the inside vanishing point dot. Continue this until you have filled in the whole space. Press lightly with your pencil because it makes it easier to erase.
  • Step 6: Next comes the fun part, painting! I used acrylics. Since I am an Art teacher, I have quite a collection of all different types of acrylics. A more heavy bodied acrylic will need less coats of paint, and can add a bit of texture. You can always water them down a bit. I used different sized brushes to get into the small spaces. Painters tape or masking tape can you keep straight lines, and avoid bleeding into another section. Just be careful when you pull off the tape, because the paint may come with it. If you stick the tape to your pant leg before applying it to the board, it will make it a little less sticky, which may help avoid the dried paint being pulled off.
  • Step 7: Fill in all sections with paint. Get creative with the colors. I used rainbow colors, but you could try different values in the same color family or black and white.

diy-peg-board-art-paint-colors-vanishing-point-quote

  • Step 8: Sketch a paper template of the banner with a quote. Trace your sketch onto the pegboard, and recruit a friend to cut it with a jigsaw. Sharp curves can be tricky with a jigsaw, so keep that in mind when designing the shape of your banner.
  • Step 9: Paint a white acrylic coat on the banner. Gesso will work here too.
  • Step 10: Find a quote that you like, keeping the space of the banner in mind.
  • Step 11: Freehand the letters, or print them out in a Word document to do a transfer. It is often easier to start with the words in the middle and work your way out, so you don’t have too much or not enough space left. To transfer letters, use graphite paper or just a pencil. Run your pencil on the back of the printout. Press hard. Then lay the letters down where you want on the banner. Use a sharp pencil to press hard on the outline of the letters on the front. This will make a transfer of the letters that appear on the banner. It is like making homemade graphite transfer paper. The letters might be faint,  but you can always trace over it.
  • Step 12: Use a paint pen or sharpie to trace over your lettering.
  • Step 13: Hang the banner from the painting. I used a ball chain to hang the banner. You can find this at any craft store for a few dollars.

diy-peg-board-art-paint-colors-vanishing-point-banner-quote

diy-peg-board-art-paint-colors-vanishing-point-quote