DIY Hostess Gift: Crayon Candles

DIY crayon candle craft and hostess gift with kids

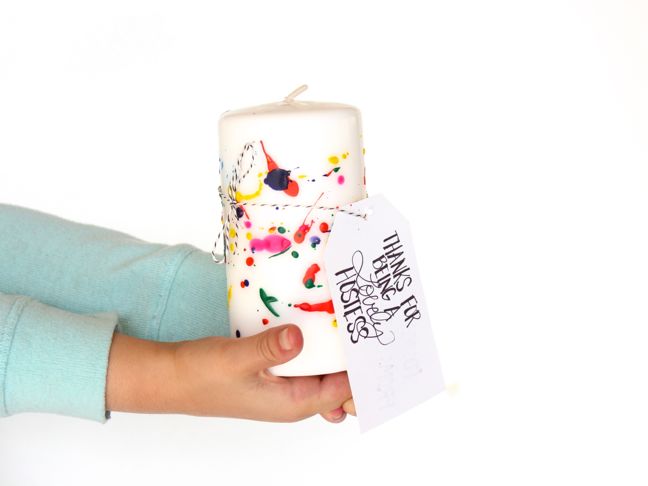
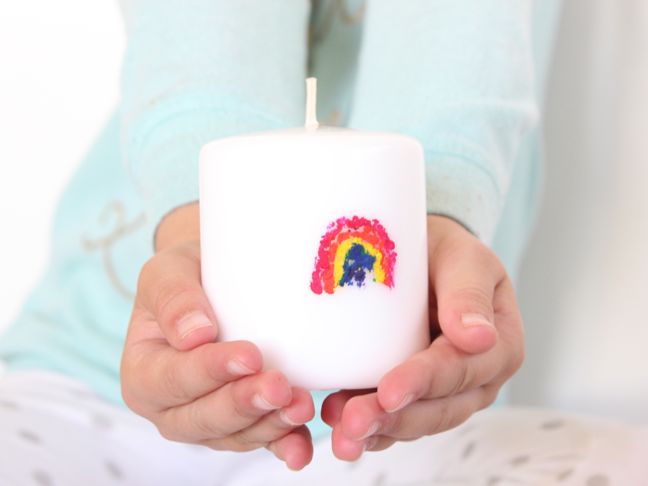
We melted crayon wax a couple weeks ago, and the project we shared with Momtastic quickly became one of our favorite DIY hostess gifts. We haven’t actually given any of the DIY candles away because we love what our kids created so much, they are on display in our homes.

Learn how we made the DIY custom art melted crayon candles here.

img_7233


You Are Enough + DIY Custom Stamp

post-it-notes-teal-pink-diy-stamp

We are all a work in progress. But, while we do our work, we need to be kinder to ourselves. Because how often do you let your mind go to that place. That judgmental, negative place? You know the one, where you are too fat, too thin, not smart enough, not rich enough, not good enough, not popular enough and not a good enough mom, wife or friend. We, especially women, barrage our minds with negative thoughts all the time. How are we supposed to be the best version of ourselves if we are our harshest critic all the time? Isn’t it time we became our own champion?

These thoughts stem from an interview we recently watched on Oprah. The New York Times best-selling author and blogger, Glennon Doyle Melton, graced Oprah’s Super Soul Sunday show. She is a beautiful woman, and as a young girl she was consistently told that she was pretty. She was told this so often, she began to believe that all she was was just a pretty face. Beauty became her sense of worth. It became an impossible standard to measure up to. Eventually it became too much, and she developed an eating disorder, and addictions. She is now sober and helping others with her new book Love Warrior and it’s predecessor, Carry On, Warrior. She tells it like it is, and she is changing lives for the better. Bravo, Glennon.

It got us thinking…how can we love ourselves more, and help our children do the same?

1. When we start the day, we need to use a love language when we look in the mirror. For example, I am powerful. I am courageous. I am amazing. At the end of the day, we need to give ourselves a break if we don’t get everything on our long to-do list done. We need to love who God made us to be – flaws and all. We are enough. YOU ARE ENOUGH.

2. We need to tell our children how brave, smart and remarkable they are every day. We need to teach them how to be kind and show compassion to others. Too often we tell our girls, “You’re so pretty.” “You look so beautiful in that dress.” “You’re hair looks perfect like that.” Just like Glennon Doyle Melton, our daughters young brains begin to associate their worth by just their beauty (similar comparisons can be said for boys). And, there’s so much more to them, including their minds, hearts and souls. Let’s tell them, “You are smart.” “You are sunshine.” “You are strong.”  We love our children, and we tell them how much we love them ALL THE TIME. But, as we go about our busy days reminding them to pick up their toys, finish their homework, fix this and do that, we rarely take the time to stop and remind them just how special and extraordinary they are. So, we put together a phrase that is a game-changer for us.

The simple and power phrase is: You are ______ (fill in the blank).

It should be said everyday, and we’ve learned it should also be in writing.

To help us with our efforts, we made a stamp. With our Silhouette Mint custom stamp maker, we designed the stamp to say, you are_________. Every day we stamp a Post-It note, and find a word that describes and compliments our children to fill in the blank. We hide the notes in our kids lunches, bathroom mirrors, inside pages of books and on their wall next to their bed. Honestly, it brings the biggest smile to their faces and a joy to their hearts. They love it so much, they ask us daily for more surprise notes. Now, their friends at school are asking for notes. We’ve seen what a boost of confidence it can be. What a blessing to wake up everyday and tell our children how wonderful they really are! Thanks to Silhouette for helping us do that.

Materials:

  • Silhouette Mint custom stamp maker, stamp kit and ink
  • Post-It notes
  • Pen or Sharpie

Directions:

Step 1: Follow the directions included in the Silhouette Mint pamphlet for the best results, but we’ll tell you how we did it. It was really quite easy. First, design the stamp with the Silhouette Mint software. Make sure the right size stamp is selected.

Step 2: Print the stamp. This took about 10 seconds. Amazing!

silhouette-mint-stamp

Step 3: Bend the stamp at the perforated edge to remove the stamp.

silhouette-mint-stamp

Step 4: Remove the sticker on the stamp base, and add the new stamp to the base.

silhouette-mint-stamp

silhouette-mint-stamp

silhouette-mint-stamp-machine

Step 5: Add ink to the stamp’s design. Wait for about 5-10 minutes so it can soak in, and then do a couple tests stamps.

post-its-silhoeutte-mint-stamp-machine

silhouette-mint-stamp-black-ink

silhouette-mint-stamp-black-ink

Step 6: Stamp away, and then fill in the blank.

post-it-stamps-with-silhouette-mint-machine-pink-teal-notes

pink-post-it-note-silhouette-mint-stamp-machine

you-are-stamps-pink-teal-post-it-notes

diy-you-are-loved-stamps-made-with-silhouette-mint-machine

diy-you-are-loved-stamps-made-with-silhouette-mint-machine

Step 7: Get creative. Leave notes for your kids to find, and remind them how loved and special they are.

diy-you-are-loved-stamps-made-with-silhouette-mint-machine

diy-you-are-brave-stamps-made-with-silhouette-mint-machine

diy-you-are-beautiful-stamps-made-with-silhouette-mint-machine

diy-you-are-smart-stamps-made-with-silhouette-mint-machine

diy-you-are-a-star-stamps-made-with-silhouette-mint-machine

Thanks for supporting the companies like Silhoeutte America that support our creativity. We received product for this post, but all opinions expressed are our own, and we would love Silhoeutte regardless. 

DIY No-Carve Pumpkin with Customized Jean Pocket

diy-jean-pocket-pumpkin-green-bandana-country-cowboy-boots

We can hardly believe the watermelons and pool bags are being replaced with pumpkins and scarves. But, the fall season is upon us, so we dove right in with a good ‘ole DIY country pumpkin. Maybe it’s our Colorado roots, but there is something nostalgic about farms this time of year for us. The beautiful changing leaves, campfires, pumpkin patches with the kids, corn fields, bales of hay, rustic farm houses and apple picking.

As we were going through our kids closets, we found old jeans with holes in the front. So, why not upcycle an old pair of jeans for a DIY pumpkin with a customized jean pocket? And, wait, the best part was that it didn’t entail any cutting or gut removal of the pumpkin. We’ll do that closer to Halloween, but for now this no-carve pumpkin was stress and mess free, which made us happy.

We tried our new Silhouette CAMEO 3 for this project, and we are so in love with the capabilities of it. This is just a blimp on its cutting radar. But, it’s a cute blimp, and a great way to welcome fall, that’s for sure!

This customized jean pocket pumpkin is so easy, you can do it within 30 minutes. If you really get into it, add a belt through the belt loops.

white-pumpkin-happy-fall-y'all-jean-pocket

Materials:

  • White pumpkin, faux {use a fake pumpkin for this, so you can re-use it year after year}
  • Silhouette Heat Transfer, yellow
  • Old pair of jeans
  • Scissors
  • Hot glue and glue gun
  • Bandana
  • Silhouette CAMEO 3 electronic cutting machine

Directions:

Step 1: Cut the pockets and belt loops from an old pair of jeans, or the kids jeans.

Step 2: Design a fall phrase on your Silhouette software. We bought the adorable Happy Fall Y’all for a whopping .99 cents. Cut the design according to Heat Transfer instructions on the packaging. Remove the yellow ’empty space’ from one side of the heat transfer material.

yellow heat transfer craft project

happy fall y'all

Step 3Press the design onto the jean pocket.

happy fall y'all-jean pocket

Step 4: Place a cloth over the pocket with the design, and use an iron to set it. We counted to 30, and then peeled up just a corner of the design to make sure it was set onto the pocket before removing the plastic entirely. Once the design is set, remove the plastic.

happy-fall-y'all-heat-iron-transfer

Step 5: Use a hot glue gun to glue the pocket onto the pumpkin. Glue the belt loops, too.

hot-glue-gun-pumpkin-fall-craft

Step 6: Insert a bandana, wheat, cotton or whatever ‘accessory’ you want into the pocket.

diy-punpkin-with-a-jean-pocket-bandana

Step 7: Use the Silhouette CAMEO 3 to cut colorful leaves you can stick to the wall. Dust off your cowboy boots, and a hat, and you have a lovely country fall scene.

Happy Fall Y’all!

fall-bench-with-cowboy-boots-hat-pumpkin-jean-pocket-leaves

happy-fall-y'all-pumpkin-with-jean-pockets

jean-pocket-happy-fall-y'all-diy-white-pumpkin

diy-white-pumpkin-happy-fall-y'all-custom-jean-pocket

Thanks to Silhouette America for making this post possible. We loved Silhouette America since the inception of our blog, and would love them even if we didn’t receive product from them. All opinions expressed are our own. Thanks for supporting the companies that support j. sorelle. 

DIY Backyard Jungle Obstacle Course for Momtastic

the-jungle-book

Jessica was lucky enough to work with Momtastic for a DIY Jungle Obstacle Course in celebration of Disney’s The Jungle Book release on Blu-Ray Aug. 30. The Jungle Book was one of our kid’s favorite movies this year, so it was really fun to transform our backyard into a jungle adventure.

One bonus obstacle (only seen here) for the course was our DIY honeycomb climb. In the movie, Mowgli had to climb a tall cliff side to get honey, nature’s ointment, for Baloo. Since honey is a bear necessity, we made our little man cub’s climb a diy rope to reach our 3D paper hive.

Here’s how we made it.

diy-rope-climb-for-kids-honeycomb-bee-hive-paper-craft

Materials:

Directions:

Step 1: Design and cut 3D honeycombs using a template online, or via Silhouette cutting machine (like we did). If 3D is too labor intensive for you, we get it – just cut standard honeycombs. Use different shades of yellow for texture.

Step 2: Glue all the sides of the hexagon together with a glue stick (if you opted for the 3D design).

Step 3: Draw a honeycomb shape similar to the hives in The Jungle Book on a foam core board and cut it out with an X-acto knife.

Step 4: Glue the honeycombs (hexagons) on the board with a hot glue gun to fit like a puzzle. We glued some facing forward and others flipped for some added texture.

Step 5: Cut out mini bees using a template online or an electronic cutting machine.

Step 6: Glue the bees onto the hive. For an added 3D effect, we glued one end of a small piece of wire onto the foam core and then a bee on the other end of the wire.

Step 7: Poke two holes on the top corners of the hive and hang with string from a tree.

As we mentioned, this was a bonus obstacle for the course – don’t miss the main DIY Jungle Obstacle Course here.

diy-rope-climb-for-kids-honeycomb-bee-hive-paper-craft

honeycomb-craft-rope-climb-for-kids

honeycomb-craft-rope-climb-for-kids

Photography by Pure Lee Photography

Shark and Mermaid Party

IMG_6597

It’s that time of year again for Jessica’s family – that time when it feels like Christmas in July. All three kids celebrate birthdays in July, so not only is the month busy, but it’s really fun. She’s going to take us back to her Shark and Mermaid party, and the details she created…

Every year I to find a theme that will work for boys and girls, and this year, our trip to Florida inspired our fin and tail celebration.

Note: It wasn’t until shortly after we took photos of the party, when we realized the t and h were mixed up in the word birthday on the mermaid side. And, well, when guests arrived, we partied! We were so focused on details, we forgot to spell. The mistake was quickly fixed and the party went on.

Supplies: 

Directions:

Step 1: Create a shark backdrop. During a recent trip to Florida, the kids took photos in front of a cool Megalodon. Print the photo on an engineering print from Staples. Glue the photo on one of the large wood boards with the multi-purpose spray adhesive.

Think again before you order plates from Oriental Trading for just food, because they make the perfect waves for an ocean backdrop. Use a hot glue gun to glue plates on the bottom of the photo for an ocean wave effect. Start with the dark blue and then glue light blue plates on top of it. Layer until you reach the bottom of the photo.

shark-party-wall-mural-kids-swim-

shark-party-wall-mural-kids-swim-

Step 2: Create a mermaid backdrop. Draw and cut a mermaid tail on foam core, and then cover it with paint chips. I love these paint chips from Oriental Trading because there is a wide variety of colors, and no circle cutter necessary – they are perfect circles when they arrive. Once all the chips are glued in place, flip it over and use an X-acto knife to cut the edges of the paint chips along the fin tail shape. Glue the tail to the other piece of thin white wood board. Just like the shark backdrop, glue paper plates to make waves. Start at the top, and work your way down.

mermaid-tail-colorful-seashell-crowns-doll-girl-party

mermaid-birthday-party-coloful-tail

Step 3: Add tablecloths to each table. Layer three tablecloths on each side. Cut the bottom of each layer in waves, or scallops. Each layer should be visible.

party-mermaid-shark-under-the-sea-boy-girl-party-diy

Step 4: Accessorize the tables. Shark koozies and bubbles made for the perfect shark table accessories, plus they doubled as great party favors. Another fun detail on the table was a pint container filled with a t-shirt, and topped with a blue paper shark. The shark’s edges were sealed with hot glue, but before it was totally sealed, it was filled with swedish fish. All boys had to do was rip, eat and enjoy!

For the mermaids, the table was set with pink cups with shells glued in the center, DIY seashell crowns (also a party favor), DIY shell and bead necklaces, a plush mermaid and cupcakes with tails. To make the DIY seashells crowns, use a hot glue gun to glue shells on crowns from Oriental Trading. Play with the shells and design the crowns of your mermaid dreams.

shark-koozie-blue-striped-straws-cups

shark-bubbles-blue-ocean-party

shark-party-favor

pink-cups-with-shells-striped-straws

seashell-crowns-girls-mermaid-party

seashell-crowns-diy-mermaid-gifts

seashell-necklace-beads

mermaid-party-girl-smiling-diy-crown

Step 5: Decorate the entire party area. Hang pom poms, fish nets and happy birthday banners.

shark-party-mermaid

Step 6: Play games. Aside from all the pool fun, set up a fishbowl game. Set up plastic cups in cascading order, 8, 7, 6, 5 and so on. Fill them with water, and then set a prize inside each cup. The cups at our party were filled with seashells and mini shark toys. Draw a line on the ground several feet away from the table, and get the kids throwing for some fun prizes.

pool-party-floatie

game

ping-pong-ball-game

Step 7: Send friends off with favors. Every family went home with a special bag of Shark vs. Mermaid Tic Tac Toe. The shark photo prop at Oriental Trading inspired me to paint DIY shark rocks, and well we didn’t have to paint the shells because they were so pretty. The game packaged in drawstring bags with the Tic Tac Toe lines drawn on top with a Sharpie marker. This game is so much fun, and can be easily brought to church or dinner out to keep the kids occupied.

shark-painted-rocks

shark-mermaid-tic-tac-toe-diy-party-favor

shark-mermaid-tic-tac-toe-seashells-party-favor-drawstring-bag-diy-kids-game

shark-mermaid-tic-tac-toe-diy-party-favor

shark-mermaid-tic-tac-toe-diy-kids-game

Oriental Trading sent us some items of our choosing for this party, free of charge. All opinions are honest, and our own. No other type of compensation was received. Thanks for supporting the companies that support j. sorelle. We love Oriental Trading, even before this post.