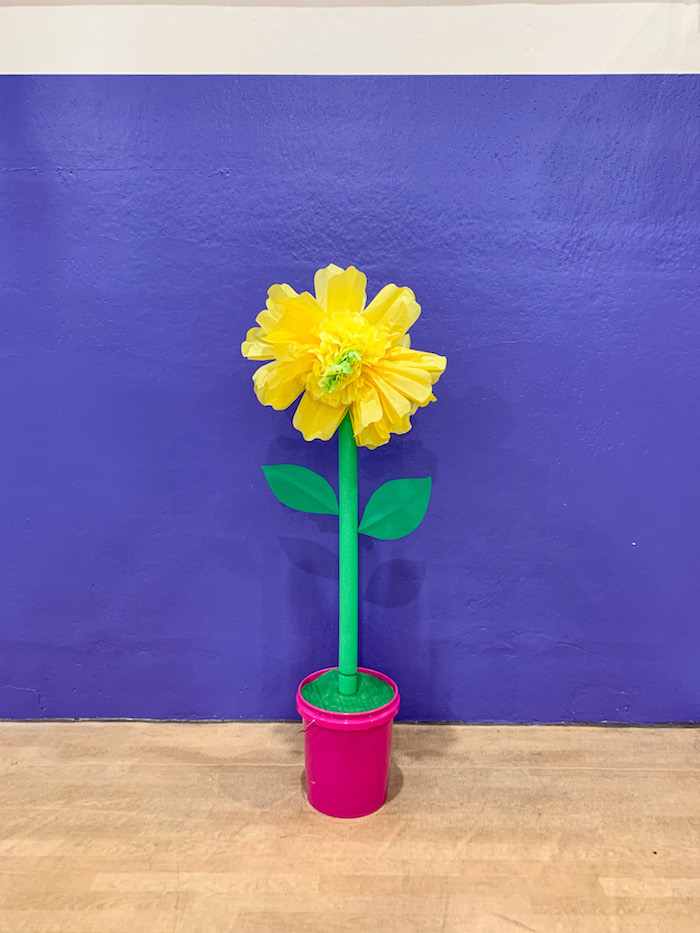
Stock Up On Pool Noodles Now To Make These DIY Giant Flowers

DIY giant pool noodle flower

We know school is in limbo, and our world has been rocked with the arrival and contagion of COVID-19. Spring plays were cancelled, graduations were virtual, and birthday parties became drive-by, honking car parades. Although you may not have a large school play or birthday party in the very near future, it will happen again. In fact, small, safer gatherings are happening now. When the time is right (even if it’s next spring) we have the cutest decoration, DIY giant flowers, that costs less than $5 each. We are sharing this spring and summer DIY craft now, so you remember to stock up while they are “in season,” (and store the ones you have) to make these large DIY flowers. It’s easy to do, and adds a dose of sunshine to any space, or party.

Sorry about the ‘non-professional’ photos. This was a quick project in spring 2019, and didn’t think it would be such a hit, so cell phone photos have to do.

DIY Giant Flowers Made With Pool Noodles

Materials:

  • Giant tissue paper flowers
  • Pool noodles, green
  • Industrial buckets, Walmart (they were about $2.97)
  • Cardboard
  • X-acto knife
  • Acrylic paint, green
  • Rock
  • Card stock, green
  • Wood skewer, thin
  • Glue, glue stick works fine
  • Packaging tape

walmart buckets

walmart pool noodles

Step 1: Buy stems, or the pool noodles, from Walmart. Also at Walmart, find the colors buckets that will serve as the “pots” or “planter” for the flowers.

cardboard cut out and pool noodle stem

Step 2: Cut left over cardboard packages from all those Amazon packages you’ve been buying. Trace the opening of the bucket on the cardboard, and cut it slightly inside the pencil outline. I find that an X-acto knife works better than scissors when working with cardboard. Also, trace the outline of the noodle in the center of the cardboard circle. This will be where the stems fits inside, so cut it slightly inside the pencil outline as well, so the pool noodle fits nice and snug.

green cardboard cut out

Step 3: Paint the cardboard with acrylic green paint.

diy pool noodle flower

Step 4: Add heavy rocks to the bottom of the buckets. We know it’s just a pool noodle and a tissue flower, but it’s somewhat heavy, so you will need something to stabilize them so they are not top-heavy.

diy pool noodle flowers


giant DIY flower

Step 5: Cut leaves from green paper (we love Astrobrights Paper), and glue two stems with a large thin wood skewer in the middle. This will look like a “leaf vein”, and also makes it easy to just stick inside the noodle so it will stay in place.

diy pool noodle flowers

Step 6: Insert the stems inside cardboard cut-outs, and then insert it inside the buckets. They fit nice and snug in the buckets. Fluff some pre-made tissue flowers from Amazon. They come with a string attached, so I wrapped it around the top of the noodle and also secured it with a piece of packaging tape.

Here are a couple flowers “on set” for a spring singing pageant.
spring school play DIY decor

You Are Enough + DIY Custom Stamp

post-it-notes-teal-pink-diy-stamp

We are all a work in progress. But, while we do our work, we need to be kinder to ourselves. Because how often do you let your mind go to that place. That judgmental, negative place? You know the one, where you are too fat, too thin, not smart enough, not rich enough, not good enough, not popular enough and not a good enough mom, wife or friend. We, especially women, barrage our minds with negative thoughts all the time. How are we supposed to be the best version of ourselves if we are our harshest critic all the time? Isn’t it time we became our own champion?

These thoughts stem from an interview we recently watched on Oprah. The New York Times best-selling author and blogger, Glennon Doyle Melton, graced Oprah’s Super Soul Sunday show. She is a beautiful woman, and as a young girl she was consistently told that she was pretty. She was told this so often, she began to believe that all she was was just a pretty face. Beauty became her sense of worth. It became an impossible standard to measure up to. Eventually it became too much, and she developed an eating disorder, and addictions. She is now sober and helping others with her new book Love Warrior and it’s predecessor, Carry On, Warrior. She tells it like it is, and she is changing lives for the better. Bravo, Glennon.

It got us thinking…how can we love ourselves more, and help our children do the same?

1. When we start the day, we need to use a love language when we look in the mirror. For example, I am powerful. I am courageous. I am amazing. At the end of the day, we need to give ourselves a break if we don’t get everything on our long to-do list done. We need to love who God made us to be – flaws and all. We are enough. YOU ARE ENOUGH.

2. We need to tell our children how brave, smart and remarkable they are every day. We need to teach them how to be kind and show compassion to others. Too often we tell our girls, “You’re so pretty.” “You look so beautiful in that dress.” “You’re hair looks perfect like that.” Just like Glennon Doyle Melton, our daughters young brains begin to associate their worth by just their beauty (similar comparisons can be said for boys). And, there’s so much more to them, including their minds, hearts and souls. Let’s tell them, “You are smart.” “You are sunshine.” “You are strong.”  We love our children, and we tell them how much we love them ALL THE TIME. But, as we go about our busy days reminding them to pick up their toys, finish their homework, fix this and do that, we rarely take the time to stop and remind them just how special and extraordinary they are. So, we put together a phrase that is a game-changer for us.

The simple and power phrase is: You are ______ (fill in the blank).

It should be said everyday, and we’ve learned it should also be in writing.

To help us with our efforts, we made a stamp. With our Silhouette Mint custom stamp maker, we designed the stamp to say, you are_________. Every day we stamp a Post-It note, and find a word that describes and compliments our children to fill in the blank. We hide the notes in our kids lunches, bathroom mirrors, inside pages of books and on their wall next to their bed. Honestly, it brings the biggest smile to their faces and a joy to their hearts. They love it so much, they ask us daily for more surprise notes. Now, their friends at school are asking for notes. We’ve seen what a boost of confidence it can be. What a blessing to wake up everyday and tell our children how wonderful they really are! Thanks to Silhouette for helping us do that.

Materials:

  • Silhouette Mint custom stamp maker, stamp kit and ink
  • Post-It notes
  • Pen or Sharpie

Directions:

Step 1: Follow the directions included in the Silhouette Mint pamphlet for the best results, but we’ll tell you how we did it. It was really quite easy. First, design the stamp with the Silhouette Mint software. Make sure the right size stamp is selected.

Step 2: Print the stamp. This took about 10 seconds. Amazing!

silhouette-mint-stamp

Step 3: Bend the stamp at the perforated edge to remove the stamp.

silhouette-mint-stamp

Step 4: Remove the sticker on the stamp base, and add the new stamp to the base.

silhouette-mint-stamp

silhouette-mint-stamp

silhouette-mint-stamp-machine

Step 5: Add ink to the stamp’s design. Wait for about 5-10 minutes so it can soak in, and then do a couple tests stamps.

post-its-silhoeutte-mint-stamp-machine

silhouette-mint-stamp-black-ink

silhouette-mint-stamp-black-ink

Step 6: Stamp away, and then fill in the blank.

post-it-stamps-with-silhouette-mint-machine-pink-teal-notes

pink-post-it-note-silhouette-mint-stamp-machine

you-are-stamps-pink-teal-post-it-notes

diy-you-are-loved-stamps-made-with-silhouette-mint-machine

diy-you-are-loved-stamps-made-with-silhouette-mint-machine

Step 7: Get creative. Leave notes for your kids to find, and remind them how loved and special they are.

diy-you-are-loved-stamps-made-with-silhouette-mint-machine

diy-you-are-brave-stamps-made-with-silhouette-mint-machine

diy-you-are-beautiful-stamps-made-with-silhouette-mint-machine

diy-you-are-smart-stamps-made-with-silhouette-mint-machine

diy-you-are-a-star-stamps-made-with-silhouette-mint-machine

Thanks for supporting the companies like Silhoeutte America that support our creativity. We received product for this post, but all opinions expressed are our own, and we would love Silhoeutte regardless. 

DIY Teacher Gift Ideas

When you shop for your school supplies this year, think outside the backpack, and be inspired by them for future favors and gifts. Some very talented people came up with some very adorable DIY ideas…

Gumball Pencil, Paisley Petal Events

Hi-Liter Teacher Gift, One Charming Party

Crayon Favors, One Charming Party

Milk and Cookies Recipe Card {Report Card}, The Sweetest Occasion
{free printable here}

Crayon Art, Apartment Therapy


Pencil Vase
{a lovely teacher gift filled with fresh flowers}, Love of Family and Home

{images via Paisley Petal Events, One Charming Party, The Sweetest Occasion, Apartment TherapyLove of Family and Home}

bake sale

I LOVE to bake…and I LOVE to eat baked goods. I could easily be extremely overweight I love them so much. Thankfully, I have some self-control. So, knowing all that, it’s no surprise I love BAKE SALES.

I remember baking cookies and cupcakes with my mom to raise money for my school and sports teams…and now the tables have turned and just this summer, I was baking for my son’s school fundraiser {the first of many, I’m sure}.

With these delicious treats, you will be the queen of the bake sale…and rake in the big bucks!!

Pencil Push Pops, Bakerella

Apple Cupcakes, Martha Stewart


Cupcake Cones
, Taste of Home


Rice Krispies Dipper Treats
, Rice Krispies


Glazed Doughnut Muffins
, My Baking Addiction


Slutty Brownies
…definitely RENAME before arriving at school, The Londoner


Mini Berry Pie
, Martha Stewart

Once you’ve made your delicious treats, don’t forget to spend the time on presentation! View these tips from the super talented Amy Atlas and if your making cupcakes {not on a cone}, and want cute and easy packaging, be sure to visit Lisa Storms site here.

{images via BakerellaMartha Stewart, Taste of Home, Rice Krispies, My Baking Addiction, The Londoner}

back to school week

Though we are not starting back in school ourselves {thank God…I still have nightmares about not studying for an exam or not being able to find my locker on the first day}, its back to school time for many kids, teenagers and adults. So, this week we’re inspired by all-things-school and hope it brings a little bit of the classroom into your life again {in a good way}.

Today..RULE the school.

Vintage Ruler Wall Decor, Honest to Nod

Wood Ruler Mirror, Design Sponge

DIY Ruler Topped Table, tutorial and details found at Country Living

Ruling the Roost Nightshade, Roost Living


Yardstick Buffet
, tutorial and details found at Corner House

Table and Chairs, VivaTerra via Apartment Therapy

Ruler Drop Table Cloth, visit Country Living for the DIY instructions

Ruler Hook Rack, DIY tutorial available at Susie Harris Blog
Ruler Stairs, Design Sponge

{images via Land of NodDesign Sponge, Country Living, Roost Living, Corner House, Apartment Therapy, Susie Harris}