welcome bags…to do or not to do

Weddings are expensive. Plain and simple. Flowers. Photographers. Food and Drink. The Dress. Reception Site. The list goes on and on. So, many ask, “Is it necessary to give guests welcome bags at our wedding?” We are no Emily Post when it comes to etiquette, but having worked in the industry a little, and meeting with brides at Fleur de Lis on a daily basis, here’s our opinion. No, welcome bags are not necessary. It can be another expense, and often a logistical nightmare.

However, if the budget allows, it is a nice gesture, especially when you are having a destination wedding. Plus, we {especially me} are obsessed with the ‘little touches’ at weddings, so we believe a welcome bag is another opportunity for the bride and groom to share their personalities and relationship with their guests, it’s another chance to be creative and its a way of doing something special for your guests who traveled to attend your wedding.

If you’re getting hitched soon, and are contemplating gift bags, here’s some useful tips when putting it together.

IT’S ALL IN THE PACKAGING
Everything looks better and more beautiful when it’s in a pretty or cute package.

{images via destination tote bag: LH Calligraphy, roots wedding tote: Wedding Chicks, Wrapped frame art-print: Martha Stewart}

MAKE IT PERSONAL
Add a personal label to items {hotel door hanger like below}, share your favorite restaurants or things to do in the town of your nuptials, include a personal hand-written note and homemade treats {banana bread and honey butter or vanilla extract with a family tradition recipe like below}.

{images via…door hanger: Fleur de Lis, a paperie, banana bread: Everyday Occasions by Jenny Steffen, vanilla extract and recipe: Snippet and Ink}

INCORPORATE LOCAL FAVORITES
Highlight the towns best treat, and buy from local companies. It will give guests a taste of the town, and a deeper appreciation for it. And, be sure to include items guests will need/enjoy related to the town’s activities and weather.

{images via Martha Stewart, Real Simple, Miami tote: Jesi Haack Weddings, boston: Style Me Pretty}
INCLUDE ‘NECESSITIES’ FOR SURVIVING A FUN WEEKEND
Guests will likely enjoy a cocktail or two, so make sure they stay hydrated and you provide hangover essentials.
{images via…Hangover Kits bags: Jennifers CookiesMartha StewartNewlywish}

INCLUDE THE WEEKEND AGENDA

Make sure to include an itinerary of the weekend, tips on how to stay warm or cool, what to wear, who to call – the who, what, when, where and how of the weekend.

{images via Good Morning Newsletter: Martha Stewart Weddings, Oh So Beautiful Paper}

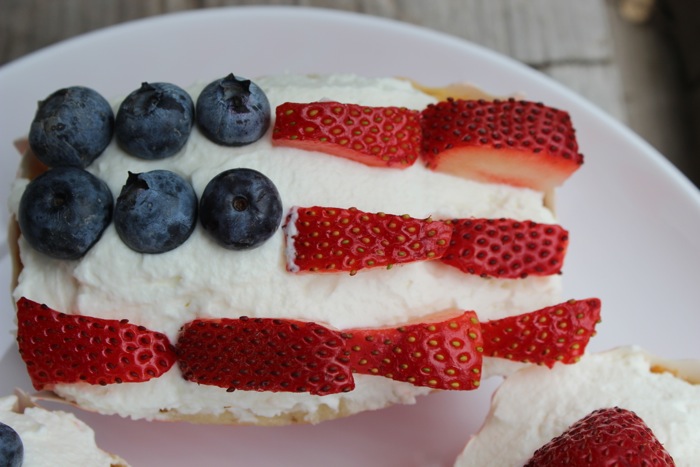
{recipe} mini patriotic pound cakes

Hope you all had a wonderful 4th of July holiday. We had a terrific weekend with family and friends at the pool, on the golf course and at fabulous parties {you will see party details soon}.

We had some glitches last week on our blog {convenient with a holiday, huh?}, so forgive us for not getting some of our patriotic posts to you. Good news is this recipe is easy and versatile. You don’t need to decorate with red, white and blue. Use fresh strawberries and blueberries if you want – but design it with someone’s name, a flower or even shapes.  Keep this in your recipe books because it is the best pound cake recipe ever! It’s the perfect summer time dessert. It’s slightly revised from my grandma’s recipe, and I think my grandma is one of the best cooks I’ve known. I will always cherish the special times I spent in the kitchen with her.

Mini Pound Cake
makes 14 or 1 loaf

Ingredients
1/2 cup butter {softened}
1 cup sugar
2 eggs
1.5 cups whole milk
2 cups flour
2 tsp baking powder
1 tsp vanilla
1/2 tsp salt

How To
Add butter, eggs and sugar and mix with a blender until well blended.
Add salt and baking powder to the flour, then add the flour and milk, alternating each {while blending}.
Add vanilla and blend.
Pour into baking cups {you do not need to grease baking cups, however if you are using a standard loaf baking tin, you need to grease the pan}
Fill the baking cup 1/2-3/4 full.
Bake at 350 degrees for 20-23 minutes. If you are making a standard loaf, cook for 50 minutes.
Stick a toothpick in the loaf or mini loaf, and if its comes out clean, it’s done.
Top with whipped cream and decorate with fruit.

Whipping Cream
2 cups heavy whipping cream
2-3 tablespoons powdered sugar
1/2 tsp vanilla.

Whip on a medium to medium-high speed until cream gets thicker and forms peaks.

Savor each bite! I know I do.

{images via Tutto Bella Blog}

10 ways to host a fabulous backyard par-tay

It’s summertime, and there’s nothing like hosting a lovely party outside. I know the summer in the mountains only lasts 3 months, so I better get my party on. Here’s 10 ways to help you host the perfect summer night out…in your backyard!

1. CREATE A BAR
Most people cannot build a permanent outside bar, and when you live somewhere like we do, where its cold all winter and winter lasts forever, it doesn’t make sense to have an outdoor bar. The good news is bars can come in all shapes and sizes, so it can be versatile. From a trendy bar cart on wheels, to a small tray like this beautiful rustic one from Pottery Barn, a DIY cooler or even a bucket – as long as there is liquor, and all the accessories – IT WORKS! This kitchen cart from Ikea could be a rocking bar cart. And, this is an affordable option from CB2 and I just LOVE this one from Pottery Barn. If you just want to add a shelf to your wall you can flip down when there is a party, then flip back up when it’s over, this one is perfect inspiration.

2. STOCK THE BAR
Now, you must stock the bar. Make sure you have an ice bucket and tongs, a cocktail shaker, bottle opener and limes. Essentials are vodka, rum, tequila and gin. Don’t forget the mixers, seltzer’s and juices. Try mixing a signature cocktail for the evening, and place it in a cute container so it can be self-serve. You should 6 or 8 of each of the following: short glasses, tall glasses and stemware. I love melamine for the summer. Mix and match glasses if you need to – makes for an eclectic look, which I love. I’m obsessed with these glasses from Sur La Table.

3. CREATE A LIVING ROOM OUTSIDE
A comfortable environment will make people feel at-home. You should provide comfortable seating for friends. That can be folding chairs stored in your garage, wicker furniture or a comfy love seat. Pillows add a pop of color and personality, and also add that extra level of comfort. Like a living room, only outside. I love the collection of outdoor pillows at Pier1.

4. LIGHT THE NIGHT SKY
Create an ambiance with lighting. You can create an intimate setting, a colorful setting or a soft glow. You can opt for candles like this. Or, for more of a rustic look, we love these. For an industrial look, we love these caged lights from Target.

5. SET THE MOOD
Create a playlist for the evening. Oldies. Pop Hits. Soft rock. Country. Have a little something for everyone.

6. ENTERTAINMENT
Play traditional games like Bocce or Horseshoe, or bring another fun game into the mix.

7. SURROUND YOURSELF WITH BLOOMS OR GARDEN HERBS
For a nice touch, decorate with flowers from garden beds or herbs in pots. Depending on the flowers you choose, it can create a sweet aroma, and it makes for a pretty setting. It doesn’t have to be large bouquets – even single bloom flowers and bud vases would do the job.

8. SERVE YUMMY APPS
With these family favorites, your guests will be ‘wowed.’ The Avocado and Corn dish will be devoured.  

9. FIRE UP THE GRILL
Slice meat and veggies and make a variety of kabobs pre-party, or get everyone involved and they can make their own kabob with an array of chicken, steak and veggie options. This recipe from Two Peas and their Pod looks delish.

10. SATISFY THOSE SWEET TEETH
Serve a yummy dessert, like this Fruit Pizza. Check out the recipe from The Pioneer Woman.

{images via A Curated Lifestyle, Style Me Pretty, One Kings Lane, Style at Home, Sunset, The Pioneer Woman}

its picnic time


June 18 is International Picnic Day. Save the date. Find a date. Or be your own date. And pack a snack.

1. Take the time to think about the space and ambiance…pick a pretty blanket, make it comfortable with pillows, find a beautiful spot, think about lighting with summer lanterns, candles or tiki torches, bring flowers in a basket, and pack an ipod player to really set the mood.

2. Use acrylic or melamine plates – there are bold and bright plates available now at Pottery Barn like these. Invest in Vino2Go’s for everyone, because they are fabulous and you will use all the time {you can buy at Fleur de Lis at 303.996.6885}. I am obsessed with this Mason Jar Cocktail Shaker from Terrain {$48} for other cocktails.

3. Don’t forget to pack a wine opener, utensils, knife, garbage bag for easy clean up, napkins and a knife. We love this idea of making Clip-On Picnic Utensils by Oh Happy Day – utensils attached to a paper bag.

4. Food should be easy to transport and eat – pack sandwiches, fruit salads, kabobs, salad, pasta salad, etc.
 Spring Orzo Pasta Salad with Asparagus and Artichokes, Food for My Family
Cheesecake in a Jar, I am Baker
my all-time favorite because it brings me back to my days in Italy Brie, Baguette, Grapes and Salami
Sliced watermelon

Our Picnic Necessities
LL Bean Horseshoe Set {$69}
Kate Space Picnic Blanket, Kate Spade
Picnic Basket Tote, Swoozies {$28.95}
Mason Jars for food, candles, flowers and drinks {found at Amazon}

{images via Everything Fab, We Heart It, RoveristaFood for My Family, I am Baker, Kate Spade, Oh Happy Day, Catch my Party, Swoozies and LL Bean}

paleo-style burgers {recipe of the week}

So, my husband is into the Paleo-diet these days. We’ve just ‘dipped’ our toes ever so slightly into the new craze, but I believe in the premise and research behind it, and know that whole and healthy food is the key to optimal health and defeating chronic disease. The Paleo-diet has been described as the cave-man diet because the diet consists of meats, seafood, vegetables, fruits, and nuts. I’m all for it…I have a hard time with all the meat {I tend to lean more to the vegetarian-side}, but sign me up for the veggies, fruits, seafood and nuts. If you haven’t heard about the whole Paleo-diet craze, read more about it here.

I visited PaleOMG – it’s a great site and a wonderful resource…plus Juli is a fellow Colorado gal and you gotta love that!! This recipe caught my eye. I made a few changes because I didn’t have some ingredients/changed to my liking…and it was DELISH. The whole family loved it, and wanted round 2. It’s been added to my recipe book. I hope you give it a try. Buon Appetito.

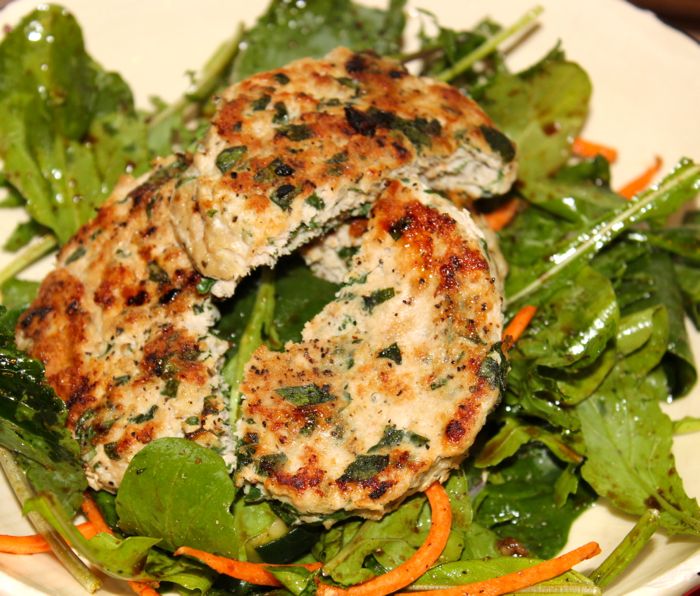
Spinach Turkey Burgers
recipe adapted from PaleOMG
*makes about 5-6 patties

Ingredients
1 pound ground organic turkey
¼ cup fresh parsley, finely chopped
2 cups fresh spinach, finely chopped
1 tablespoon dried minced onion
1 garlic clove, pressed
1/2 teaspoon dried thyme
1 teaspoon dried basil
1 teaspoon garlic powder
salt and pepper to taste
avocado, sliced

Garnish/Salad Ingredients
spinach
arugula
baby kale
carrots {any vegetables of your liking}
olive oil/balsamic vinaigrette dressing {I made my own dressing with olive oil, balsamic, salt, pepper and pressed garlic}

How To
1.  Add all the ingredients for your burgers in a medium size bowl and use your hands to mix well
2. Form balls with your hands
3. Place a non-stick large skillet OR warm a griddle {and add olive oil to prevent sticking patties} on medium heat. Once hot, place the balls onto the skillet/griddle, then press down with a spatula to flatten out
4. Cook on both sides for at least 8-10 minutes until turkey cooked through
5. Once done, add to the top of your salad, top off with avocados and devour!
NOTE: for the kiddos, I made the burgers traditional-style, topped with cheese in between buns…and they {most impressively, my incredibly picky son who turns his nose to everything green} LOVED them.

If you have any other delicious Paleo-diet recipe you want to share, please send them to trejsorelle@gmail.com. We’d love to try more recipes.

{images via Tutto Bella}