DIY Bouquet Wrap for the Hostess

diy-flower-bouquet-wrap-sunflower-art-twine-pink-orange-summer-diy-hostess-gift

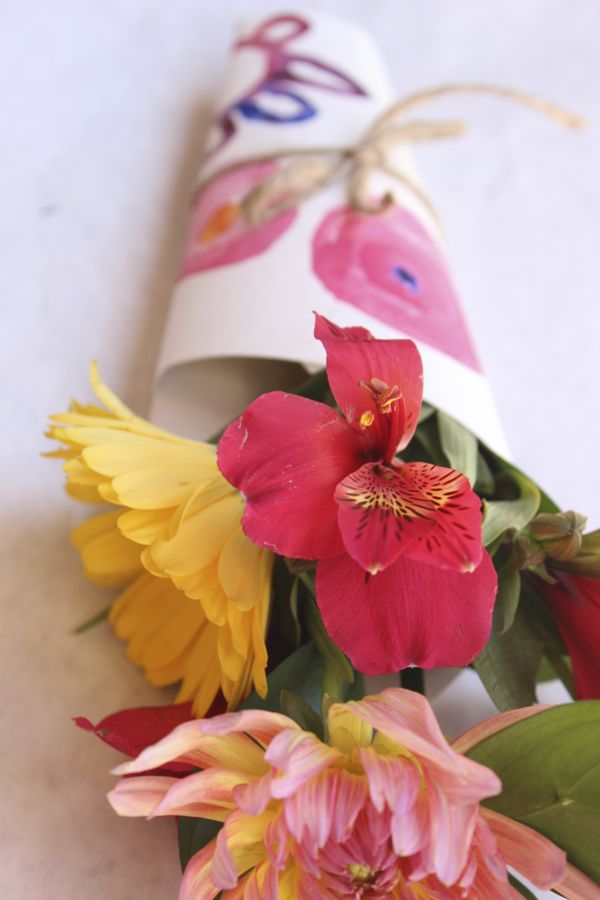
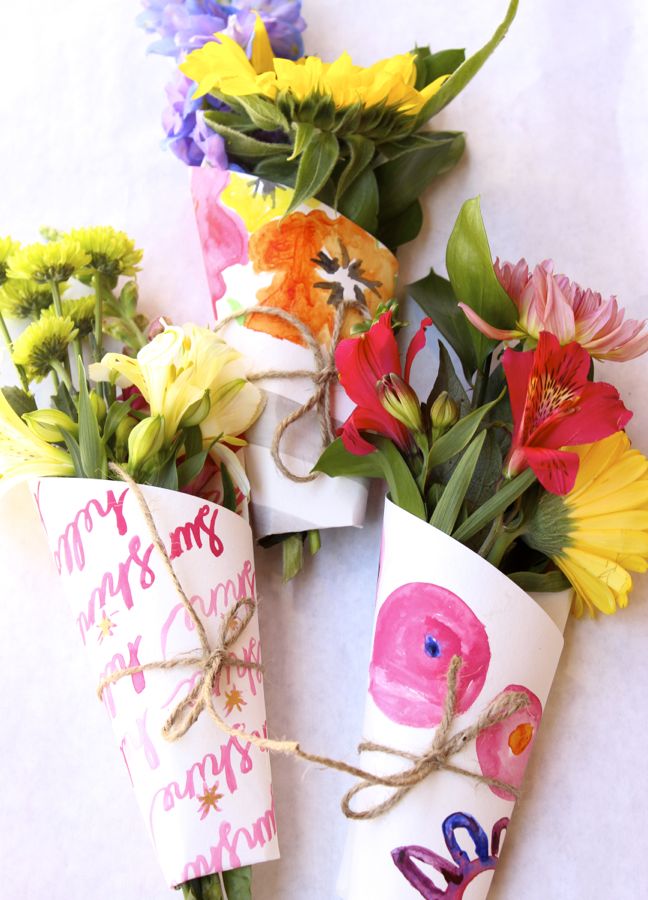
Art is therapeutic. Flowers are beautiful. Kids love activities. Combine all three for a DIY hostess gift that is both personal and memorable. Whether the booms are fresh from the garden, or store-bought, they are even prettier when they are wrapped in a custom, DIY flower wrap.

Jessica shared details of her sunny afternoon painting on the porch, and how she created the DIY bouquet wraps with her kids on Momtastic. After you read it, make sure you find time in your day to stop and smell the roses!

diy-hostess-gift-bouquet-flower-wrap-watercolor-art


DIY Thank You Note

thank-you-crossword-puzzle-red-letters-diy-note

Thank you. Grazie. Merci. Danke. Gracias.

No matter how you say it, ‘thank you’ is such a beautiful and powerful word.

Jenna is always early, or on time with her thank you notes. Jodi’s speed runs about average. Jessica is always late. Typical.

thank-you-crossword-puzzle-red-letters-diy-note

Now, you can say thank you with a lot of letters in a DIY word search, and a red Sharpie to help those special words stand out. Here’s how…

You’ll Need:

  • Red Sharpie
  • Blank fold-over note
  • Access to a computer and printer
  • Washi tape

Directions: 

  • Create a table/chart {with invisible lines} on Microsoft Word, and add random letters inside each box. Make sure and add Thank You letters in there somewhere. Click here for our DIY Word Search Thank You file.
  • Print a copy of your word search on regular printer paper.
  • Trace your fold over note on the copy of the word search. This will help you determine the placement of the note on the paper when you need to print the actual note.
  • Tape the fold over note onto a piece of printer paper with your washi tape. Make sure you align it with the lines you traced. Load your tape note into the printer, and print.

thank-you-crossword-puzzle-red-letters-diy-note-washi-tape

  • Remove the tape.
  • Circle the thank you letters with a bright, colored Sharpie.
  • Write your note.

thank-you-crossword-puzzle-red-letters-diy-note

thank-you-crossword-puzzle-red-letters-diy-note


DIY Hanging Wall Art

Words to live by…

do-your-best-diy-hanging-wall-art-back-to-school-ruler-frame-diy-teacher-gift

See all the details on how we made the back to school-inspired DIY hanging wall art on Momtastic.

Thanks Fleur de Lis, a paperie for the adorable printables!

Look…It’s Ice Cream Shaped Like an Avocado for Dessert!

avocado-ice-cream-balloon-dessert-diy-mexican-pistacio-chocolate-bowl

Avocado + ice cream.

It’s not an everyday pairing. At first thought, it sounds creamy, slightly odd and interesting.

Well, after experimenting a bit in the kitchen, we can tell you that the combination of an avocado + ice cream dessert is delicious.

We wish we could take total credit for this idea. However, if there are any Triple D {Diners, Drive-Ins and Dives} fans out there like Jessica’s hubby, you may have seen an episode where a Mexican restaurant made an exact replica of an avocado for dessert; except instead of an avocado, it was homemade avocado ice cream in a chocolate shell, and a homemade caramel and chocolate ball inside. Yum!

We would have attempted actual avocado ice cream, but we went with something easier to make {just buy and scoop}, and sweeter {not as healthy}. Plus, the gelato had the word Sicilian in it, and being of Sicilian heritage, it was a no-brainer.

At your next party, surprise guests with an avocado dessert…or at least Avocado shaped ice cream for dessert. It will be a hit!

avocado-ice-cream-balloon-dessert-diy-mexican-pistacio-chocolate-bowl

You’ll Need:

Directions:

Make the Chocolate Avocado Shell

  • Step 1: Melt the chocolate wafers. We melted it via microwave in 30-second intervals until it was melted. Stir until smooth.
  • Step 2: Blow up a balloon about the size of an avocado.

avocado-ice-cream-balloon-dessert-diy-mexican-pistacio-chocolate-bowl

  • Step 3: Prepare a baking sheet with wax paper or parchment paper.
  • Step 4: Make sure the chocolate is slightly cool.
  • Step 5: Gently dip the balloon in the chocolate, coating the bottom half of the balloon.

avocado-ice-cream-balloon-dessert-diy-mexican-pistacio-chocolate-bowl

  • Step 6: Place on the baking sheet. Repeat for as many bowls as you want to make. Place the baking sheet in the refrigerator for about 10 minutes.

avocado-ice-cream-balloon-dessert-diy-mexican-pistacio-chocolate-bowl

  • Step 7: To release the air from the balloon, pinch the balloon and use a tack or knife to puncture a small hole.

avocado-ice-cream-balloon-dessert-diy-mexican-pistacio-chocolate-bowl

  • Step 8: Release the air gradually. If the air is released too fast, the bowl will be more likely to break.
  • Step 9: Carefully peel the deflated balloons from the bowl, trying not to press down or squeezing the bowl.

avocado-ice-cream-balloon-dessert-diy-mexican-pistacio-chocolate-bowl

avocado-ice-cream-balloon-dessert-diy-mexican-pistacio-chocolate-bowl

Add Ice Cream to the Shell

  • Step 1: Remove the ice cream from the freezer, and let it thaw slightly so it’s easier to mold without breaking the shell.
  • Step 2: Gently add spoonful’s of ice cream into the chocolate ‘avocado shell’ until it’s full.
  • Step 3: Press a Lindt chocolate truffle into the ice cream so it looks just like the nut inside an avocado.

avocado-ice-cream-balloon-dessert-diy-mexican-pistacio-chocolate-bowl

  • Step 4: Place the sweet DIY ice cream avocados into the freezer until you are ready to serve.

avocado-ice-cream-balloon-dessert-diy-mexican-pistacio-chocolate-bowl

avocado-ice-cream-balloon-dessert-diy-mexican-pistacio-chocolate-bowl

Make DIY String Light Poles with Concrete Stands for Outdoor Entertaining

concrete-globe-lights-aspen-trunk-picnic-table-wood-alfresco-dining-outdoor-entertaining-the-home-depot-diy-challenge

When we started this little blog years ago, we dreamt of working with large and reputable corporations – one of the companies at the top of our list was The Home Depot. So, needless to say, we were giddy with excitement to join the DIY concrete challenge at The Home Depot Blog.

We hadn’t worked with concrete before, and honestly, we can’t wait to work with it again. After happily spending hours in The Home Depot, we stayed in a semi-comfortable DIY zone and opted for a somewhat simple project to add outdoor lighting to Jessica’s patio.

We created rustic string light poles with a concrete base.

concrete-globe-lights-aspen-trunk-picnic-table-wood-alfresco-dining-outdoor-entertaining-the-home-depot-diy-challenge

Our mom was the first to see the DIY concrete project; in fact, she helped mix the concrete. She loved it so much, she requested a DIY concrete stand to string lights in her backyard, too.

concrete-globe-lights-aspen-trunk-picnic-table-wood-alfresco-dining-outdoor-entertaining-the-home-depot-diy-concrete-challenge

Whether you’re experienced with concrete or beginners like us, you can easily make this DIY concrete stand. It’s a high impact DIY project on a low-budget. Plus, you will take your outdoor summer entertaining to a whole new level of ambiance and warmth.

Check out the full tutorial at The Home Depot Blog.

concrete-globe-lights-aspen-trunk-picnic-table-wood-alfresco-dining-outdoor-entertaining-the-home-depot-diy-concrete-challenge