Hot Cocoa and Marshmallow Valentine Treat

marshmallow-heart-hot-chocolate-cup-valentine-cupid-arrow-textWe shared some gooey, yummy and sticky details on how to make the cutest cupid’s arrow made of marshmallows at Momtastic. Read more before you sip your next cup of hot cocoa.

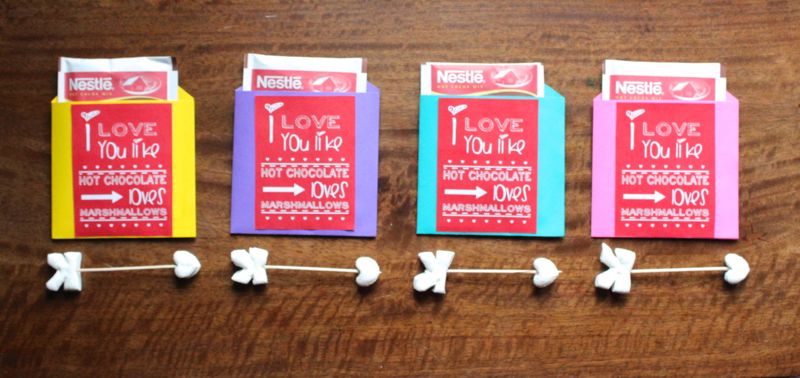
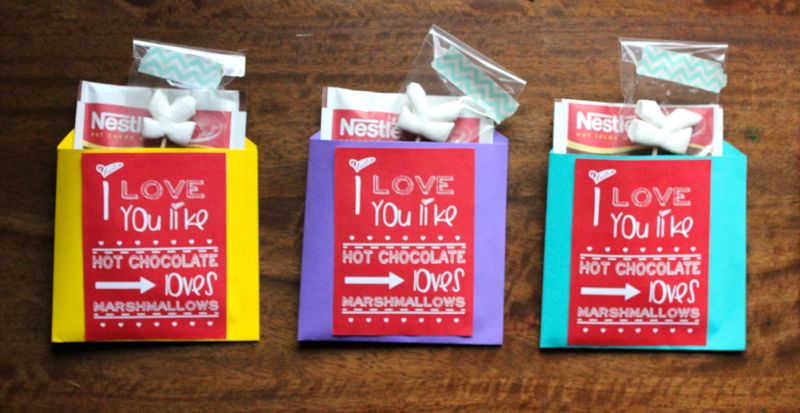
Jessica is late to everything, and this post is no exception, but you still have time to make the arrow before Valentine’s Day tomorrow, and package it for friends and family like we did below. If not, there’s always next year!

marshmallow_arrow_cupid_valentine_paper_yellow_purple_pink_diy

Here’s What you Need to Do:

  1. Buy packets of hot cocoa.
  2. Create paper pockets. We ran out of cellophane bags, thus we created our own pockets for the packets made from Astrobrights Papers. Follow these instructions to make the paper pockets. It’s easy. All you need to do is fold paper and have a glue stick handy.
  3. Print the free printable, I love you like hot chocolate loves marshmallows, designed by Jenna at Fleur de Lis. Click here to download the printable.
  4. Glue the tag on the front of the pocket.
  5. Insert the packet in the pocket.
  6. Insert cupid’s arrow in the pocket. We wrapped our marshmallow arrow in a skinny cellophane bag and used Washi Tape to seal it.

marshmallow-diy-gift-red-yellow-purple-cocoa-valentine

For all you pink lovers out there, don’t miss the Wayfair Homemakers Housewarming Party, PINK edition at Pink Heels, Pink Truck. Our I believe in Pink ‘birthday in a box’ DIY was featured in her round-up. Y’all are going to get your pink fix…an absolute necessity before Valentine’s Day!

{images via j. sorelle}

How to Create a Chalkboard Wall

chalkboard-wall-kids-room-diy-chalk-yellow-grey-room

We saw a glimpse of Amy’s chalkboard wall in her kids room while looking through beautiful photos by the talented Sally Mae. We loved the wood nightstand, the bright yellow bedding, the antler hung on the wall…and of course, the chalkboard wall.

Amy was so kind to share how she created the wall, where she found the adorable accessories and also 10 very good reasons why every child should have a chalkboard wall {or board} in their room. Jessica shared it on Momtastic.

{images via Amy, Design Lotus}

DIY Salt and Pepper Shakers

salt-pepper-kitchen-heart-initials-valentine-kitchen-diy-love-hostess-gift

We just can’t get enough of that crazy little thing called LOVE this Valentine’s Day.

This DIY tutorial brings us back to our teenage, high school days when we wore split heart necklaces. You know, when you wore one half of the necklace that said Best, and your bestie wore the other half that said Friend. Well, we have matured {ever so slightly}, so we revised the split heart trend. This time, we are not wearing it around our necks, we are shaking it in our kitchens.

Shaking it with mini, personalized salt and pepper shakers.

Separately the shakers look like two half hearts with initials…

heart-valentine-diy-gift-love-salt-pepper-hostess

…but together, they make a complete pair.

salt-pepper-shaker-gift-heart-initial-valentine-diy-hostess

This DIY took about 10 minutes, and we’re adding it to our list of favorite hostess gifts, engagement gifts, anniversary gifts, going away and bridal shower gifts.

And, for this Valentine’s Day, let your loved one, or good friend know that you go together like salt & pepper.

DIY Split Heart Salt & Pepper Shakers

You’ll Need:

  • Mini salt and pepper shakers. We found ours at a kitchen store for about $2 each.
  • Silhouette Vinyl {BTW, all heat transfer is 35% off right now with code SORELLE}
  • Silhouette Transfer Paper or lint roller {good alternative}
  • Silhouette electronic cutting machine. If you don’t have one, an alternative is enamel paint to paint on the hearts.
  • Salt
  • Pepper

How To:

  • Design your heart art using the Silhouette Software. I used a free design that had a heart in it, and edited it. Make sure you cut the heart in half {via the software} before you click cut.
  • Place your Vinyl on the cutting mat {black side facing up}, click print and watch the tool work its magic.
  • Peel away the vinyl you’re not using. Place the transfer paper over half the heart and use a straight edge {credit card, etc} across it to make sure the vinyl sticks to the transfer paper.
  • Pull the paper up and half your heart should be stuck to the paper.
  • Place the image on one of the shakers. You will need a credit card or a straight edge to smooth our all bubbles.
  • Peel away the transfer paper slowly and your vinyl should stick to the item.
  • Repeat the steps above to add the other half of the heart to the remaining shaker.
  • Fill the shakers with salt and pepper.

valentine-gift-salt-pepper-diy-shaker-hostess-gift-heart

valentine-diy-salt-pepper-shaker-gift-hostess-initial-heart

{image via j. sorelle}

Vanilla Ice Cream Topped with DIY Frozen Strawberry Hearts

red-frozen-strawberry-hearts-valentine-ice-cream-banana

We love February.

We love ice cream.

And our daughter’s still love the movie Frozen.

So, with vanilla ice cream topped with frozen strawberry hearts, we figured we couldn’t go wrong. We were right! This easy, simple and delicious dessert has been a hit around our houses, and it’s so cute, we can’t wait to make it for friends and family.

Surprise your loved ones this month{after all, it is the month of love} with ice cream topped with frozen strawberry hearts.

frozen-valentine-red-banana-strawberry-heart-diy-dessert-

red-frozen-strawberry-heart-bowl-banana-ice-cream-dessert

Here’s how…

Ingredients
Strawberries
Sugar
Wilton Mini Heart Silicone Mold
Vanilla Ice Cream
Bananas
Wilton Round Linzer Cutter Set

How to Create
Cut off the stems from about 8-10 strawberries and place them in a blender or Cuisinart.
Add 1-2 tablespoons sugar.
Puree the strawberries and sugar together until smooth.
Use a spoon to fill heart silicone mold with strawberries puree. Fill the molds to the top, without overflowing them.
Place in a freezer bag and freeze for at least 3 hours.
Once the hearts are set and you’re ready for some ice cream, scoop vanilla ice cream in a bowl, and simply press the strawberry frozen hearts out with your fingers.
We love vanilla ice cream with bananas, so we also used a Wilton Round Linzer Cutter to cut slices of bananas into small hearts, and froze them along with the strawberries. The combo of strawberries, bananas and vanilla ice cream was delicious…in fact, the bowl was devoured in less than 2 minutes!

bowl-ice-cream-red-love-valentine

 {images via j. sorelle}

DIY Funny Valentine’s Underwear for Girlfriends

underwear-heart-customized-hollywood-hunk-valentine-girlfriend

We’ve shared Valentine’s gifts for…

Now it’s time for a funny gift for our girlfriends. And, it’s adorned with their Hollywood crushes.

Alison, we took your custom, days-of-the-week underwear for your daughter to a whole new, slightly more inappropriate level! It was a fun and easy project to do…and our girlfriends got a good laugh.

valentines-mail-mailbox-heart-bradley-cooper-crush-valentine-diy-underwear

Here’s how you can do it too.

  • For inspiration, see Alison’s easy tutorial.
  • Find cute underwear, investigate who your girlfriends have secret or not-so-secret crushes on and find good photos that you plan to iron on to underwear. We found our heart underwear at Target.
  • Print the labels on Avery Dark Transfer Paper. Follow the directions on the packaging.
  • Buy mini mailboxes for cute packaging. We found ours at Target.
  • Create tags using Illustrator or Microsoft Word.

bradley-cooper-underwear-heart-valentine-gift-DIY-crush

ryan-gosling-mailbox-valentine-crush-panty-underwear-girlfriend-gift-DIY-heart

Our girlfriends received a funny and gorgeous package in the mail this week…and it’s something that will make them laugh every time they put on their ‘hollywood hunk & heart’ underwear.

mailbox-red-bradley-cooper-heart-underwear-panty-valentine-gift-DIY

{images via j. sorelle}