DIY Pumpkin Succulent Planter

pumpkin-succulent-planters

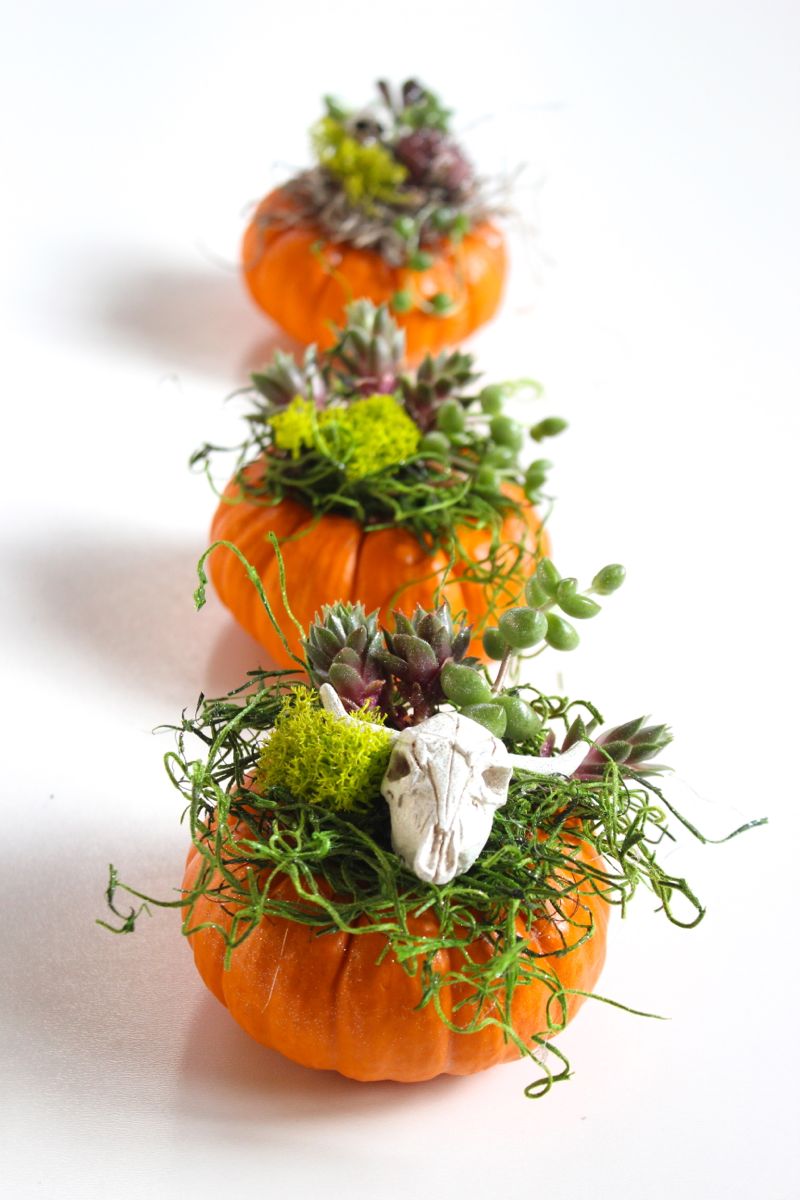
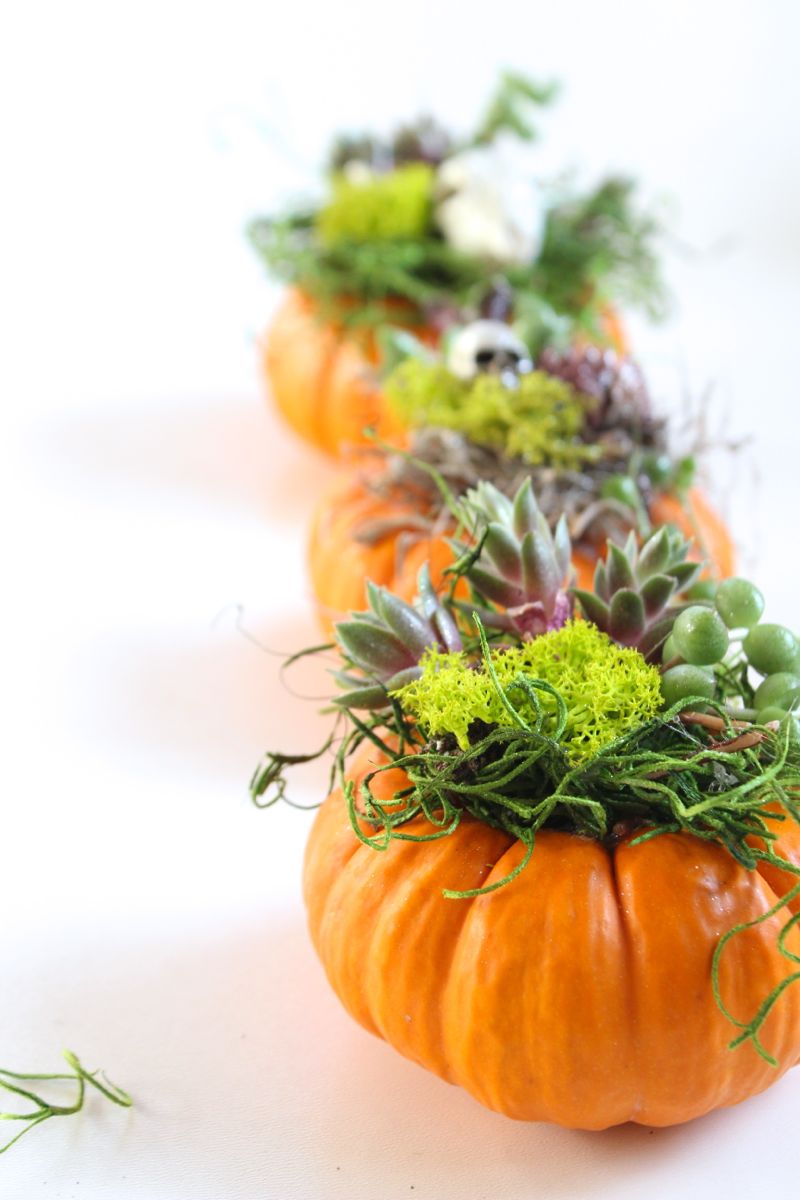
Our love for succulents has never faded. We love them, year-round! So, recently when we took a trip to find pumpkins at a garden center and saw pumpkin planters with succulents, we were head-over-heels in love. We made our own versions of the pumpkin planter {we bought the one with the skeleton}. This no-carve Halloween arrangement can be made for friends and family this Halloween and Thanksgiving season, and when pumpkin season is over, transfer the arrangement to a more festive winter holiday base.

halloween-fall-pumpkin-succulent-planter

Materials:

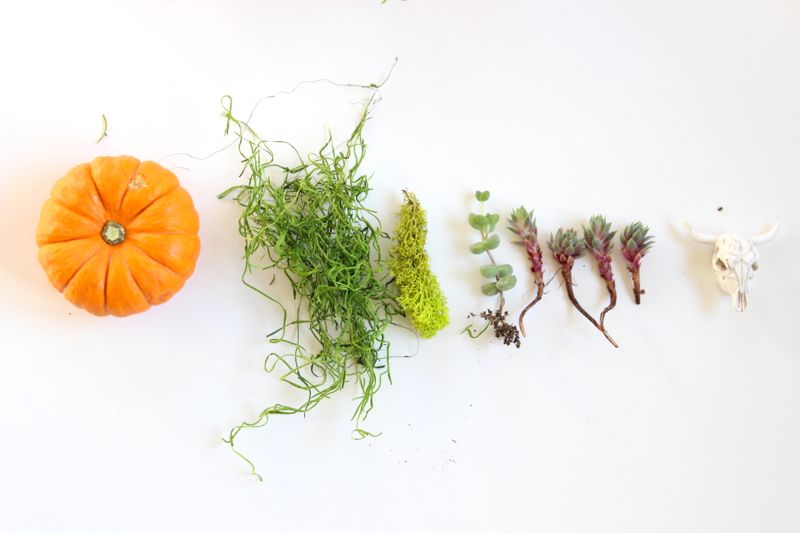
  • Mini pumpkins, faux or real
  • Succulents, mini
  • Hot glue
  • Skulls and other fairy-size decorations
  • Moss, Spanish Moss
  • Glitter hairspray

Directions:

Step 1: Gather supplies.

pumpkin-plants-succulent-moss

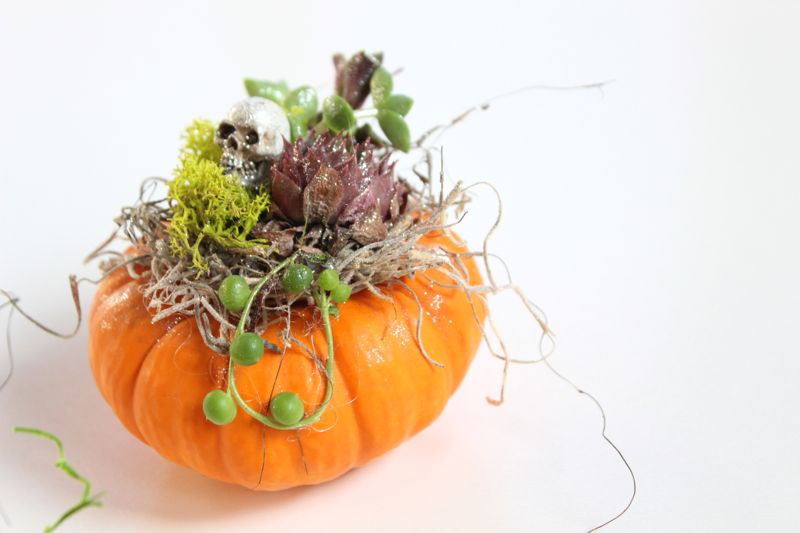
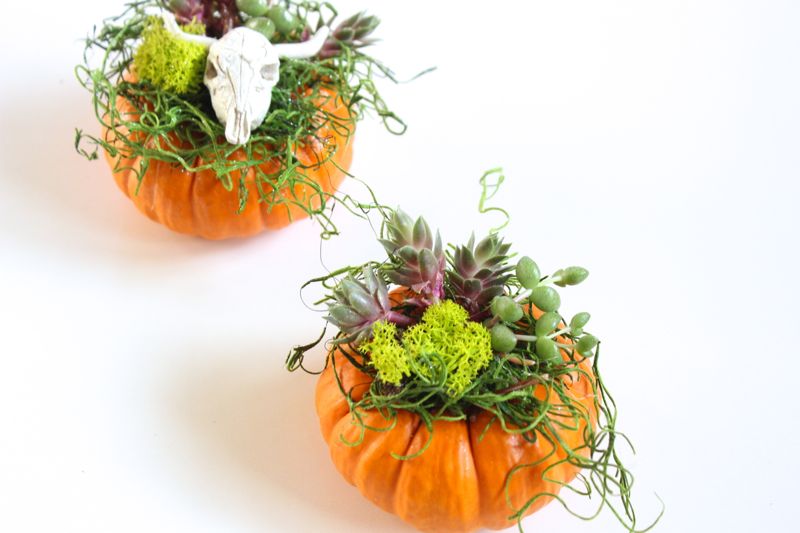
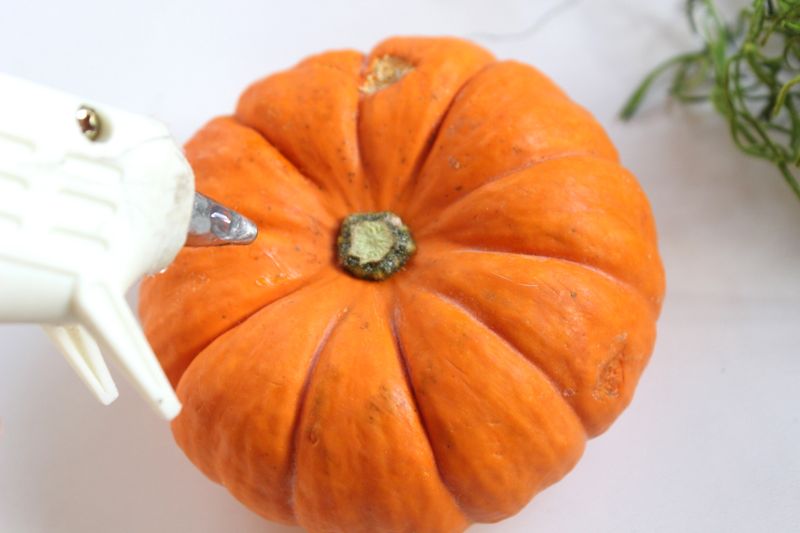
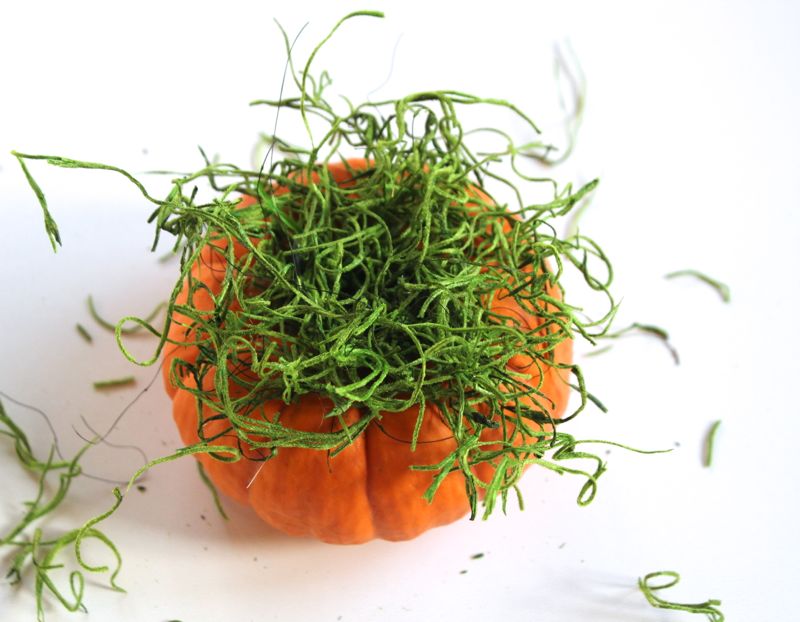
Step 2: Glue a handful Spanish Moss to the top of the pumpkin.

pumpkin-glue

pumpkin-planter-with-moss

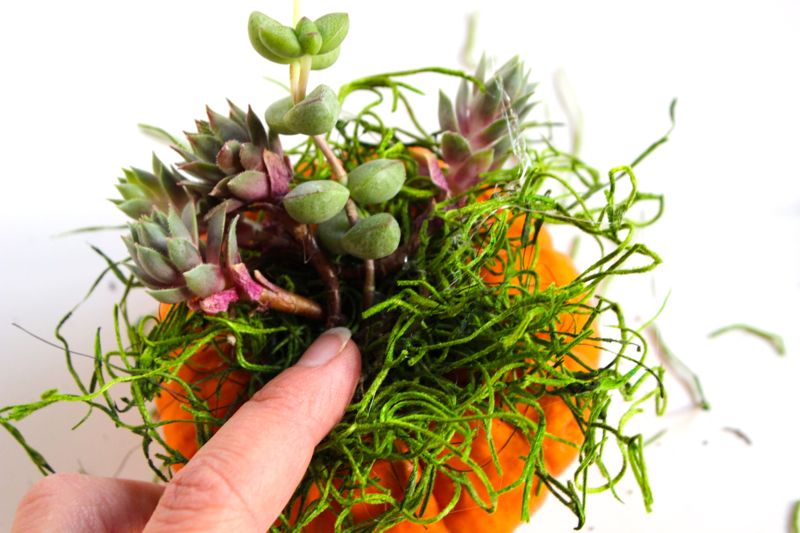
Step 3: Insert the small succulents into the moss. Use a little hot glue if you have to keep them in place.

pumpkin-planter-succulent

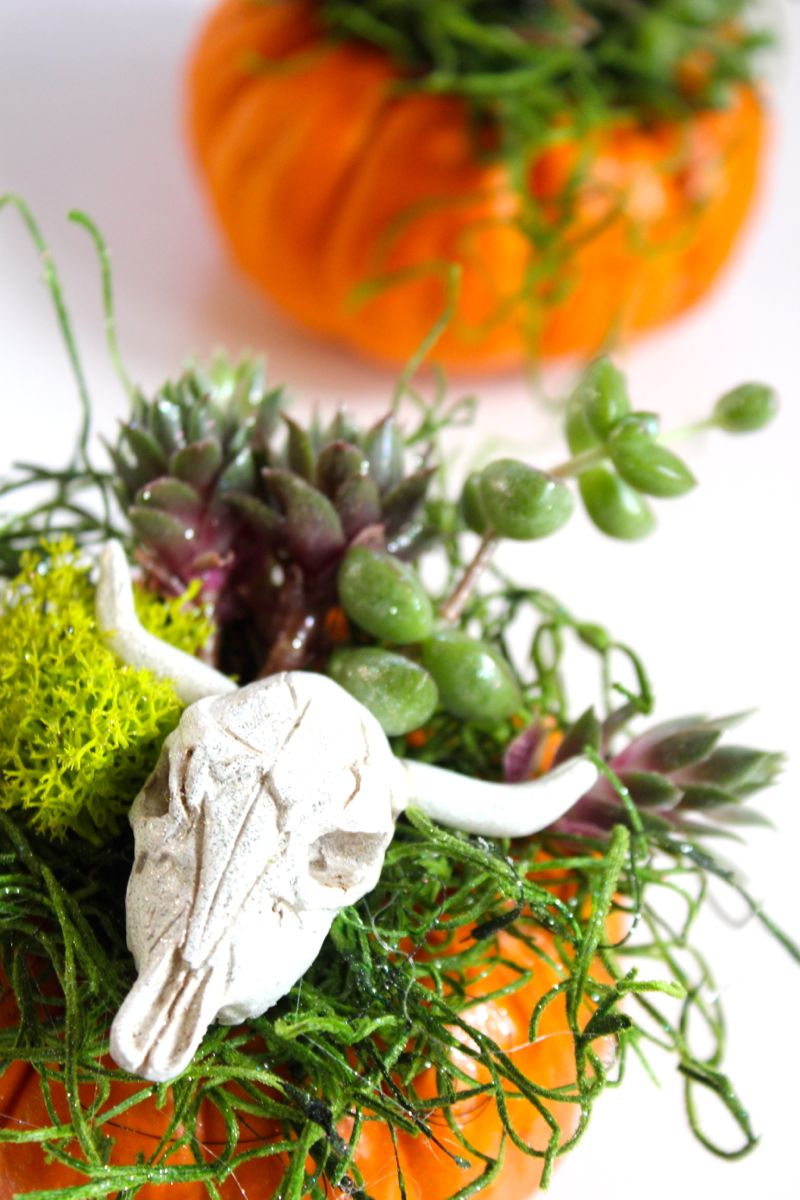
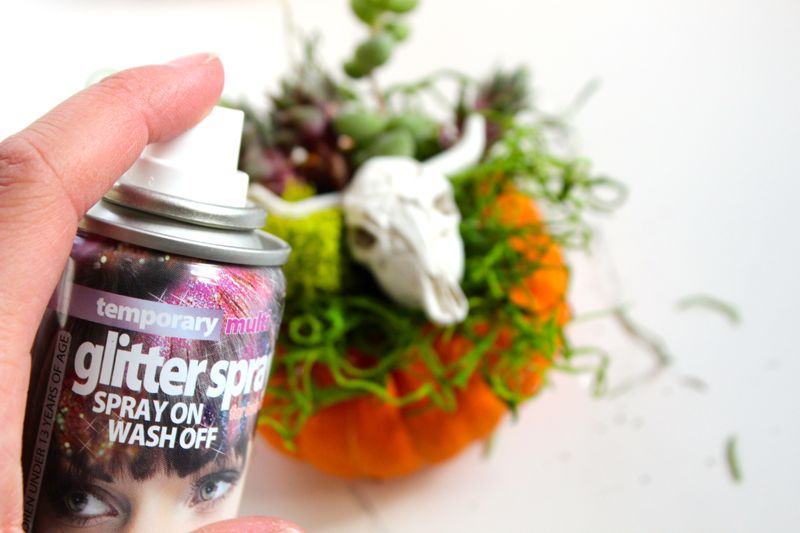
Step 4: Add any other types of moss and mini stems to the top of the pumpkin. Finally, glue a skull or fairy-garden accessory on top.

succulent-planter-skull-pumpkin

Step 5: Spray hair glitter on the arrangement. This can be wiped off later, but the sparkle is so cute!

glitter-spray-pumpkin

You’re done. To keep the succulents alive, spray them with water.

succulent-planters-pumpkin-arrangements-skull

pumpkin-succulent-planter-halloween

succulent-pumpkin-planter

pumpkin-succulent-planter

succulent-planter-pumpkin-halloween-centerpiece-diy

DIY Trolls Halloween Costume

trolls-halloween-costume-wig-kids-leaves

Can’t Stop This Feeling by Justin Timberlake is a song that’s been on repeat in our home all summer. Now with the anticipation of the movie Trolls {in theaters November 4), the song is being played even louder while simultaneously having a dance party! We’re so excited about the movie. Jessica’s kids wanted to be Poppy and Branch, two characters from the movie Trolls. Today she’s telling us how she made one Poppy costume and two Branch no-sew DIY Halloween costumes.  You still have one week to make this costume before Halloween – you can do it!

Materials:

  • Felt, 23 green sheets {about .25 cents each), 1 light green sheet, 3 white sheets
  • White acrylic paint, Plaid Crafts
  • Peel-n-Stick permanent fabric fuse tape {this worked well for me, but Hello Wonderful made amazing felt costumes with a hot glue gun, so that’s an option, too}
  • khaki pants, cut like shorts
  • Turquoise sweatshirt, Wal-Mart
  • Pink pants and long sleeve shirt, Wal-Mart
  • Pink glitter boots, The Children’s Place
  • Grey long underwear, Costco
  • Troll wigs, Wal-Mart or Amazon
  • Black spray paint
  • Vests, Carters
  • Velcro
  • Faux flowers
  • Scissors {good for fabric}

Directions:

Branch Costume

Cut out felt leaves. I used a leaf cut out as my template, and then I cut, cut and cut some more.

green-leaves

Add Peel-n-Stick to the back of the leaves, and begin to layer the leaves on the vest, from the bottom-up.

img_7469

green-leaves

img_7472

img_7479 img_7482

Cut the khaki pants to be shorts.

Cut green felt squares and rectangles to place on shorts to look like patches.

green-leaf-vest

For Branch, I needed a black wig, but couldn’t find one, so I spray painted a purple wig black.

The grey clothes underneath not only keep the kids warm, but it’s the color of the Trolls skin. Win-win!

trolls-costume-branch-leaf-vest

trolls-costume-branch-leaf-vest

Poppy Costume

Cut the sleeves off a turquoise sweatshirt. I used the Peel-n-Stick tape to ‘hem’ the cut seams.

Cut petals with white felt. I used a cut-out petal, similar to the leaf vest process. Add Peel-n-Stick to the back of the petals and add the petals to the bottom of the dress to match Poppy’s design.

Paint the bottom of Poppy’s dress to look like the real thing. I free-handed the design on the bottom.

trolls-poppy-dress

Use scraps from the sweatshirt sleeves to make Poppy’s headband. I used the Peel-n-Stick tape to make the headband edges more seamless.

Paint faux flowers turquoise and hot glue them to the headband. Cut small felt petals to glue behind the flowers.

poppy-troll

Poppy’s dress has a little wrap around the neck, so I used the hood of the sweatshirt to wrap around the neck. To keep it in place, I added a small strip of velcro to the hood and sweatshirt.

poppy-halloween-costume-pink-hair

trolls-halloween-costumes

GIMME’ MORE!
Check out all these other amazing no-sew costumes!

Fairy Costume | Design Dazzle
Bumble Bee | Sugar Bee Crafts
Cat | Paging Supermom
No Sew Ideas | Rachel Teodoro
Moana | Houseful of Homemade
Alice in Wonderland | Polka Dot Chair
Rain Cloud | Make It Love It
Dinosaur | Ginger Snap Crafts
Bubble Bath | Giggles Galore
Hades | House Wife Eclectic 

DIY Halloween Costume Contest Award

diy-halloween-best-costume-award-caution-tape-bat

And the best costume goes to……{insert drum roll}

The best Halloween costume award is always a big deal. The friendly competition among our kids and their peers is something they look forward to every year. The best costume, the cutest costume, the scariest costume, the funniest costume and the most original costume are awarded to kids in every grade. To properly reward them, they receive a small gift or acknowledgement. The DIY Halloween award that we are sharing today is not only affordable and adorable, but it is an edible {who doesn’t love a giant Hershey’s chocolate bar} medal that can be worn with pride, it can be customized with names and any costume category, plus it’s a favor bag so gift cards and notes can be easily inserted.

We can’t take full credit for this idea. Jessica’s friend Atlanta introduced us to this idea last year, and we loved it so much, we decided to make our own version. Thanks, girl.

diy-halloween-best-costume-award-caution-tape-bat

Materials:

  • Caution tape, Oriental Trading
  • Hershey’s Chocolate Bar, giant
  • Masking tape
  • Scissors
  • Double-sided tape
  • Bat cut-outs, we used our Silhouette electronic cutting machine
  • Black card stock {we used Astrobrights Papers} and gold spray paint if you want the bat to be gold
  • Chalkboard favor bag, Target $1 and $3 section
  • Chalkboard marker

Directions:

Step 1: Gather materials.

diy-halloween-best-costume-award-caution-tape-bat-chocolate-bar

Step 2: Use Silhouette software to design the bat, and then use the machine to cut out the bat, or use a template online. Spray paint the bottom of the bat {optional}.

diy-halloween-best-costume-award-caution-tape-bat-best-costume

Step 3: Write the award on the envelope with a chalkboard marker.

diy-halloween-best-costume-award-caution-tape-bat-pencil-chocolate-bar

diy-halloween-best-costume-award-caution-tape-bat-marker

diy-halloween-best-costume-award-caution-tape-bat-cutest-costume

Step 4: Use the double-sided tape to tape the bat to the envelope {above the text}.

tape-bat

Step 5: Cut the caution tape to the size you want.

zombie-caution-tape

Step 6: Flip the chocolate bar face down. Line up the caution tape evenly on each side. Use masking tape to tape the caution tape to the chocolate bar. We used two strips on each bar.

diy-halloween-best-costume-award-caution-tape-bat-scissors

diy-halloween-best-costume-award-caution-tape-bat-tape-chocolate-bar

Step 7: Insert a gift card to a favorite local spot for kids {optional}. Get a panel of judges, and once all the votes have been tallied, reward the best dressed with their DIY giant chocolate bar medal.

diy-halloween-best-costume-award-caution-tape-bat

diy-halloween-best-costume-award-caution-tape-bat

Note: When no one is home but kids during the day, and a project must get done, the kid becomes the photographer. These last two photos are property of Jessica’s youngest, Jackson {age 4}. He loved every second playing ‘photographer’ of the day. And, since no one is around or organized enough to have an actual costume ready, the plaid shirt totally plays off as the best lumberjack ever, right?!

diy-halloween-best-costume-award-caution-tape-bat-medal

diy-halloween-best-costume-award-caution-tape-bat


DIY Halloween Lights

img_7381

We really don’t like spiders. We scream when we see them in our homes, and fear them crawling on us. We have recurring nightmares after a villa experience in Tuscany {which was amazing, and we would do it all over again}. Along with the wonderful grapes, vines, greenery, olive trees and an old villa came spiders…big ones! To this day, we still dream that spiders are crawling on us, or people next to us, and although we seem to be ‘awake’ and we think we really see them, they are just a bad dream.

Despite our fears, spiders crawled their way onto our DIY Halloween balloons, and now they are shining bright for our DIY Halloween lights. The creepy spider tattoos from Oriental Trading were our source of inspiration, once again. Tis the season of Halloween.

DIY-ping-pong-ball-diy-halloween-lights-spider

Materials:

Directions:

Step 1: Gather ping-pong balls. Remove the piece of plastic from the tattoo and cut the spider tattoos into individuals spiders.

white-ping-pong-balls

halloween-spider-tattoos

Step 2: Place the spider tattoo face down onto the ping-pong ball, press down and apply water all over the back of the tattoos with a wet sponge or wash cloth. Apply it just the way you would on skin.

halloween-spider-tattoos

halloween-spider-tattoos

halloween-spider-tattoos-ping-pong-balls

halloween-spider-tattoos-ping-pong-balls

Step 3: Insert a sharp knife into the back-side of the ping-pong ball {opposite of the spider}. Make an X or a T with the knife.

halloween-spider-tattoos-ping-pong-balls

Step 4: Insert the light into each ping-pong balls.

halloween-spider-tattoos-ping-pong-balls

DIY-ping-pong-ball-diy-halloween-lights-spider

DIY-ping-pong-ball-diy-halloween-lights-spider

Step 5: Find the closest outlet, and let the spiders hang.

DIY-ping-pong-ball-diy-halloween-lights-spider

DIY-ping-pong-ball-spider-halloween-lights

DIY-ping-pong-ball-diy-halloween-lights-spider

DIY-ping-pong-ball-diy-halloween-lights-spider

DIY No-Carve Pumpkin with Customized Jean Pocket

diy-jean-pocket-pumpkin-green-bandana-country-cowboy-boots

We can hardly believe the watermelons and pool bags are being replaced with pumpkins and scarves. But, the fall season is upon us, so we dove right in with a good ‘ole DIY country pumpkin. Maybe it’s our Colorado roots, but there is something nostalgic about farms this time of year for us. The beautiful changing leaves, campfires, pumpkin patches with the kids, corn fields, bales of hay, rustic farm houses and apple picking.

As we were going through our kids closets, we found old jeans with holes in the front. So, why not upcycle an old pair of jeans for a DIY pumpkin with a customized jean pocket? And, wait, the best part was that it didn’t entail any cutting or gut removal of the pumpkin. We’ll do that closer to Halloween, but for now this no-carve pumpkin was stress and mess free, which made us happy.

We tried our new Silhouette CAMEO 3 for this project, and we are so in love with the capabilities of it. This is just a blimp on its cutting radar. But, it’s a cute blimp, and a great way to welcome fall, that’s for sure!

This customized jean pocket pumpkin is so easy, you can do it within 30 minutes. If you really get into it, add a belt through the belt loops.

white-pumpkin-happy-fall-y'all-jean-pocket

Materials:

  • White pumpkin, faux {use a fake pumpkin for this, so you can re-use it year after year}
  • Silhouette Heat Transfer, yellow
  • Old pair of jeans
  • Scissors
  • Hot glue and glue gun
  • Bandana
  • Silhouette CAMEO 3 electronic cutting machine

Directions:

Step 1: Cut the pockets and belt loops from an old pair of jeans, or the kids jeans.

Step 2: Design a fall phrase on your Silhouette software. We bought the adorable Happy Fall Y’all for a whopping .99 cents. Cut the design according to Heat Transfer instructions on the packaging. Remove the yellow ’empty space’ from one side of the heat transfer material.

yellow heat transfer craft project

happy fall y'all

Step 3Press the design onto the jean pocket.

happy fall y'all-jean pocket

Step 4: Place a cloth over the pocket with the design, and use an iron to set it. We counted to 30, and then peeled up just a corner of the design to make sure it was set onto the pocket before removing the plastic entirely. Once the design is set, remove the plastic.

happy-fall-y'all-heat-iron-transfer

Step 5: Use a hot glue gun to glue the pocket onto the pumpkin. Glue the belt loops, too.

hot-glue-gun-pumpkin-fall-craft

Step 6: Insert a bandana, wheat, cotton or whatever ‘accessory’ you want into the pocket.

diy-punpkin-with-a-jean-pocket-bandana

Step 7: Use the Silhouette CAMEO 3 to cut colorful leaves you can stick to the wall. Dust off your cowboy boots, and a hat, and you have a lovely country fall scene.

Happy Fall Y’all!

fall-bench-with-cowboy-boots-hat-pumpkin-jean-pocket-leaves

happy-fall-y'all-pumpkin-with-jean-pockets

jean-pocket-happy-fall-y'all-diy-white-pumpkin

diy-white-pumpkin-happy-fall-y'all-custom-jean-pocket

Thanks to Silhouette America for making this post possible. We loved Silhouette America since the inception of our blog, and would love them even if we didn’t receive product from them. All opinions expressed are our own. Thanks for supporting the companies that support j. sorelle.