Modern Woodland Nursery

scandinavian-nursery-girls-room-love-antlers-modern-woodland

We ran across a photo of a modern woodland nursery on Mary Gaspar’s instagram account, and found it unique and beautiful. We were intrigued to learn more about the design elements and how it all came together. Luckily she is sharing all the details with us! When we found out Mary is the mother of three girls, we were instant friends, because we know all too well what it’s like to grow up in a house full of women.

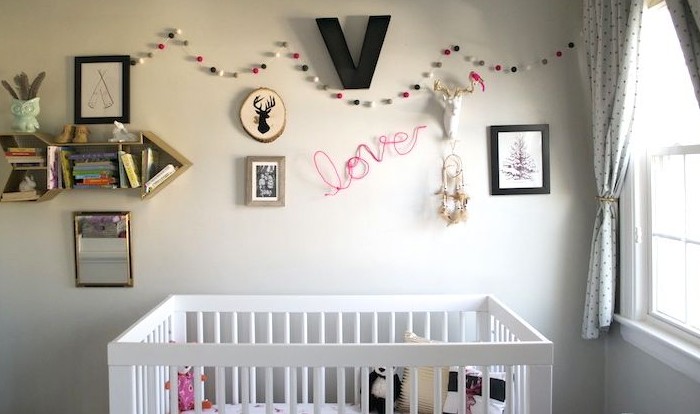
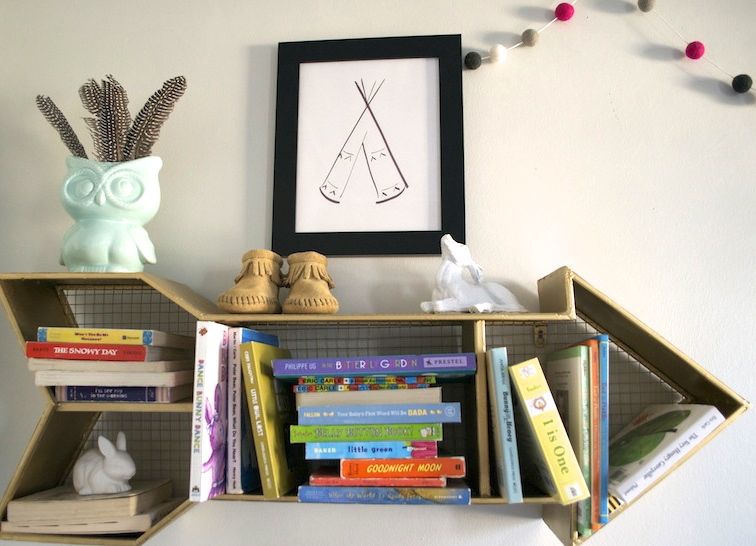
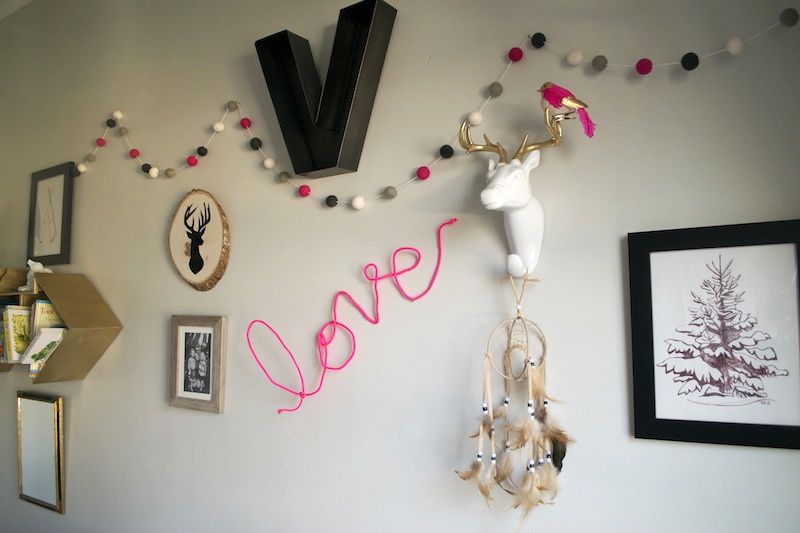
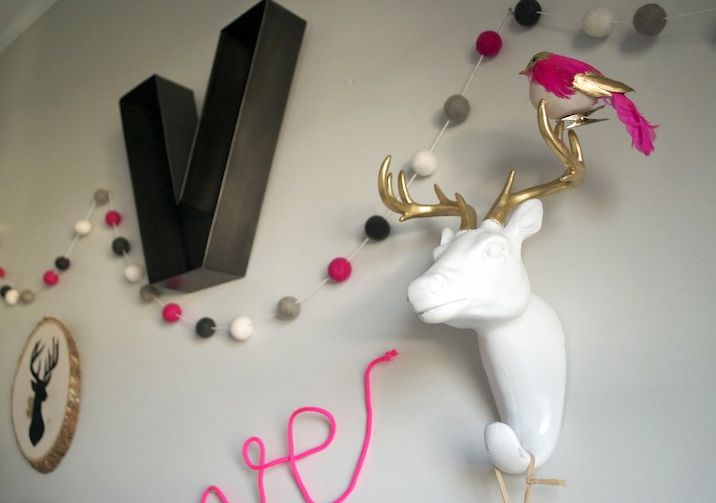
Mary is not only a mother to three amazing girls, but also an artist, and has a good eye for interior design, too. We love that she used a mix of store-bought and DIY pieces to bring the whole Scandinavian look together. It’s a cozy black, white and neon pink retreat her daughter can grow into. As moms, sometimes we get so excited to hear the words, “It’s a girl,” we use all the pink, tulle and ruffles we can, and then 4 years down the road, the room requires a makeover. This room is relevant for infants, toddlers, children and tweens.

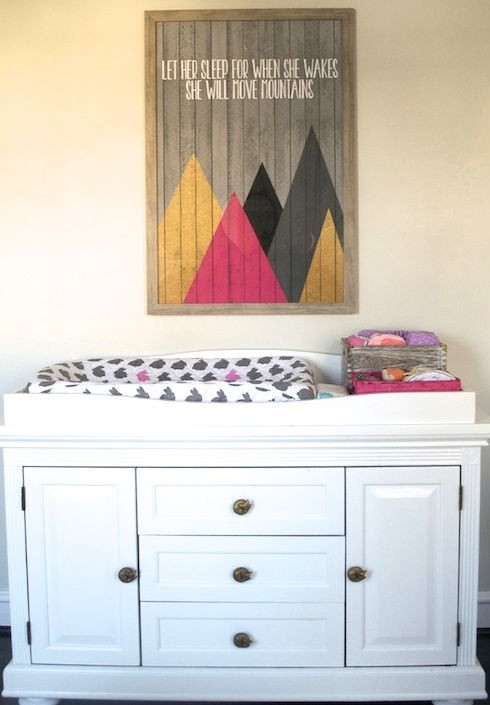
Mary shares details on her youngest daughter’s room, the inspiration and how it all came together…

Violet is my third little girl and when we found out the sex I was thrilled (again!) cause well, girls are the bomb, and as one of 4 sisters, I know how awesome a house of girls can be! I am an artist and also have a great passion for interior design, which is seen in my home (my play space for decorating)! I had done my other daughter’s room, which they share, in a very girly English Garden theme. I wanted to do something a little more modern and contemporary in feel this time around.
I took my initial inspiration from my own work. I am doing a lot of black and white painting and I draw a ton of inspiration from nature. My work also has a bit of a contemporary edge. That’s when I came up with the idea of doing a “Modern Woodland” theme with a palette of black, white, gold and neon pink. I love the look of Scandinavian inspired decor so I set out for a white crib and flokati rug to start.
scandinavian-nursery-girls-room-love-antlers-modern-woodland
scandinavian-nursery-girls-room-love-antlers-modern-woodland-crib
The walls were already painted in Benjamin Moore’s “Moonshine”, a lovely gray, that I use throughout my home. I had a green gingham glider from my other daughter’s nursery that had seen better days, so I added a slipcover in white and presto…looking brand new! I also had a large changing table in a honey brown from a prior nursery that my mom and I took on as a DIY project. We used Annie Sloan chalk paint in white and gave it 3 coats. I changed out the knobs into the sweetest little brass sleeping foxes.
scandinavian-nursery-girls-room-love-antlers-modern-woodland-dresser-fox
scandinavian-nursery-girls-room-love-antlers-modern-woodland-fox
It’s a small room (11 x 9 ft) and I knew I needed some small, stylish yet effective shelving. I found the arrow shelf and sprayed it gold. That really set the tone for the gallery wall. I framed some of my own woodland inspired drawings, and did a couple of fun DIY crafty wall hangings, like the “Love” sign, made out of wire and bungee cord. The deer silhouette I drew on velvet craft paper and mounted on an oval wooden plaque, and the Animal Head Plaque was ornaments from Land of Nod affixed to wood!
scandinavian-nursery-girls-room-love-antlers-modern-woodland-arrow-shelf
scandinavian-nursery-girls-room-love-antlers-modern-woodland
scandinavian-nursery-girls-room-love-antlers-modern-woodland-animal-heads-fox-racoon
scandinavian-nursery-girls-room-love-antlers-modern-woodland-art
The room has become my most favorite…a cozy, inspiring retreat for children and adults alike. I love that the decor I have in here will most certainly grow with her. I would use many of these pieces in any other spot in our home, as well!
scandinavian-nursery-girls-room-love-antlers-modern-woodland-dresser-fox
scandinavian-nursery-girls-room-love-antlers-modern-woodland-air-plant
scandinavian-nursery-girls-room-love-antlers-modern-woodland-dresser-fox
Vendor Love
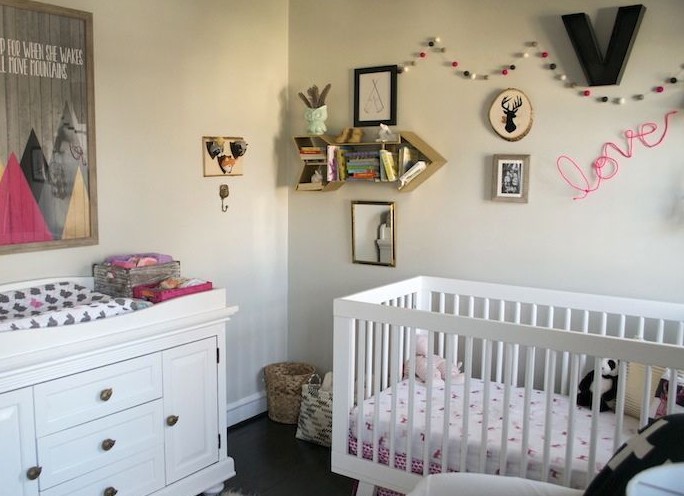
Babyletto Crib: All Modern
Blackout curtains, flokati rug, gold pouf, crib skirt, pink lucite floating shelf and changing pad cover: Land of Nod
White slipcover for glider: Wayfair 
Lamp {feathers were a DIY addition}: T.J. Maxx
Cross Blanket: Modern Burlap
Fox Brass Knobs and Owl hook: Anthropologie
Little gold mirror: vintage
Heart Mirror: Homegoods
Embroidered Deer Pillow: Etsy Shop Sweet Pea and Olive
Crib sheet: Pehr Designs
Art
Let Her Sleep art print: Samantha Ranlet, By Samantha
She Who Is Brave art print: Lisa Congdon
Gallery Wall
Felt Ball Garland: Benzie Design
Giant “V”: Land of Nod
Deer head {spray painted gold}: Homegoods
All other art: Mary Gaspar Art and Etsy shop

DIY Geometric Shelf

red-star-cowboy-boots-shelf-black-triangle-diy-mountain-toys

Maybe it’s because we are born and raised Colorado girls, but the phrase The Mountains are Calling, and I Must Go by John Muir, speaks to us. There’s something nostalgic about the mountains – the beauty, the nature and the escape – that we long for.  We spend many weekends in the mountains to get away from the hustle and bustle of the city, and Jessica is lucky enough to see the peaks in her backyard every morning from her window.

We found a triangle geometric shelf from Michaels, and it was practically begging us to be transformed into a DIY mountain shelf. Plus, we found it to be a fun display for all the knick knacks our kids like to collect.

red-star-cowboy-boots-shelf-black-triangle-diy-mountain-toys

Materials:

  • wood triangle shelf, Michaels
  • spray paint, black
  • felt, white
  • scissors
  • hot glue gun and hot glue sticks
  • kids toys

Directions:

Paint the triangle shelf black.

black-triangle-shelf

Once the shelf is dry, measure the size of the peak on all sides of the wood. We placed the white felt on top of each side of the wood triangle, and traced the outline with a pencil, and then cut it out.

black-shelf-white-felt

Apply glue to the edges of the ‘peak’ on the wood, and press the white felt down.

black-white-felt-mountain-peak-diy

Fill the shelves with all the cute little knick knacks your kids like to collect, and find a place to display.

black-white-shelf-diy-mountain-moon-men-train-car-boy-toys-diy-shelf


red-star-cowboy-boots-shelf-black-triangle-diy-mountain-toys

That’s all for now. Just as the phrase goes, The Mountains are calling, and I must Go…

DIY Typography Decanter

booze-cheers-bar-diy-decanter

Nordstrom is one of our favorite places to shop. The shoes, the fashion, the return policy, the cafe – we love all of it! We noticed a fun Booze Decanter and Stopper throughout the holidays, and we never quite stopped thinking about it. Thankfully, we were able to re-create a DIY Booze decanter with our Silhouette cutting machine, and our minds {and bar} are at peace…at least for now.

Materials:

Instructions:

Assemble empty glass bottles you can transform into DIY typography bottles.

empty-glass-bottles

Design your labels with the Silhouette software. Print according to package instructions.

Once the vinyl is cut, remove the excess vinyl around the words, and place Frog’s Tape over the words.

cheers-gold-vinyl

Pull the tape up, and the words should be attached to the tape.

booze-gold-vinyl-green-tape

Press the tape and words onto the bottle, and get all the bubbles out with a straight edge {we used a credit card}.

booze-gold-vinyl-green-tape-decanter

Pull the tape up from the bottle, and the vinyl should stay in place on the bottle. You may have to use one finger to press down on the vinyl if the font is thin and it comes up with the tape, but we didn’t have to on this project.

booze-gold-vinyl-green-tape-decanter

Once all the tape is removed, you should have a new DIY typography decanter. Fill with alcohol and say cheers!

booze-gold-vinyl-green-tape-decanter

For this project, we took it one step further and got a little Typography happy! We couldn’t do just one bottle! This DIY project makes for a really fun addition to any bar, and a great hostess gift.

tasty-cheers-booze-bottle-decanter-bar

booze-gold-vinyl-green-tape-decanter

cheer-blue-bottle-diy-decanter-water-entertaining

tasty-booze-cheers-diy-decanter-bar

Not only did we create several bottles, but we couldn’t have a bottle that holds alcohol without actual alcohol in it. With St. Patrick’s Day several days away, we ventured into making our own Bailey’s Irish Cream. My girlfriend, Kacey, made a delicious batch of our favorite Irish cocktail for a birthday brunch recently, and we couldn’t believe homemade Bailey’s could be so good. We’ve revamped a couple of recipes to make our homemade version, but most are similar.

Homemade Bailey’s Irish Cream
adapted from several recipes

Ingredients:

  • 1 cup + 1 tablespoon Jameson Whiskey
  • 1 pint half and half
  • 1 can Eagle’s Condensed Milk
  • 2 tablespoons chocolate syrup
  • 1 teaspoon Vanilla
  • 1 tsp. instant espresso mixed with 1 tsp. boiling water

Instructions:

Place all ingredients in a blender, and blend. If you don’t blend for 30 seconds or more, we found that our Bailey’s had some chunks from the cream, so continue to blend until smooth.

Keep in a sealed glass jar in the fridge for up to 2 weeks. Give it to a friend as a gift this St. Patrick’s Day, too!

homemade-baileys-irish-cream-tasty-bottle-clover


DIY Scrabble Tile Planter

One of our favorite DIY home sites is Curbly. With an abundance of great ideas and projects, they inspire us to love where we live, and update our homes with DIY details.

So, it is an honor to have a guest post on their site. We shared a DIY Scrabble Tile Planter. Good news, the plant is still alive, so it’s worth the small pile of sawdust to create.

Visit Curbly for the full tutorial.

scrabble-tile-planter-ampersand3

Personalized Book Giveaway and DIY Kite Easter Eggs

kite-easter-eggs-marker-stripes-bows-diy-

We are flying high with today’s post. Literally, we are as high as a kite in the sky! We love our newest DIY Kite Easter Eggs, and they were inspired by an I See Me! book, My Little Book of Blessings. We have always loved I See Me! products, and they remain one of our favorite newborn gifts. Recently we opened up the blessings book and found the graphics to be magical, and the words to be meaningful. A book that teaches children the golden rule, the importance of friendship and how to lend a helping hand is a book we want on our bookshelves. Plus, every page is customized with a child’s name, and a special note and photo on the front and back pages.

kite-book-i-see-me-books

The page about friendship has kite illustrations, and thus our DIY easter eggs were born. Please keep reading for a tutorial on the eggs, as well as a giveaway for a I See Me! book of your choice, just in time for Easter. The books are amazing, and the gift of reading is priceless.

diy-kite-easter-eggs-marker-coloring-bow-diy

Materials:

Directions:

Draw the kite designs with a pencil. If you mess up, you can erase it. We used free-hand to draw our designs.

pencil-egg-drawings-kite-easter

Outline the egg with a thin black Sharpie marker. Once the design is outlined, erase any pencil marks that remain on the egg.

vinny-diy-easter-eggs-black-lines

Begin to color inside the lines with Sharpie colorful markers. Continue until all kites are brightly colored.

diy-kites-easter-eggs-coloring-markers

diy-kites-easter-eggs-coloring-markers

To begin to make the kite tails, cut strands of embroidery string and cut mini bows from the card stock. You can find a template for mini bows online.

bow-string

Add glue to one side of the bow, and quickly place the string in the middle, and then cover with another bow.

glue-bow-string

string-bow

Once all the bows are in place, dab a tiny amount of glue to the bottom of the kite, and press the end of the string down on the glue.

diy-kite-easter-eggs-rainbow-markers

You’re done!

diy-kite-easter-eggs-rainbow-markers

easter-egg-kite-place-setting

Now, it’s giveaway time. Entry info below. Please make sure to leave your Instagram account name, because we will check the winner’s account. Good luck! The giveaway ends March 10, 2016.

a Rafflecopter giveaway

We received a product from I See Me! in conjunction with this post, but we would love I See Me! even if we didn’t. Thanks for supporting the companies that support our blog.