DIY Merry & Bright Ornament

diy-christmas-ornament-merry-and-bright-red-gold-confetti-tree

‘Twas the week before Christmas, and all through blogging land,
bloggers were hustling with super glue in their hand.

Ornaments were hung on the tree with care,
but one was missing from bloggers who hope to put one of their own there.

We knew in a moment, it must be #swapthatdiy time,
For those who read our first one, it was a sublime.

Lifestyle, DIY, food and fashion – not one of them the same,
A Joyful Riot, Pretty Life Girls, DIY Candy, Cut, Cut, Craft!, A Bubbly Life, The Bold Adobe, The Sweetest Occasion, Tell Love and Party and One Little Minute Blog – we called them each by name!

Happy ornament making to all, and to all a good night.

diy-christmas-ornament-merry-and-bright-red-gold-confetti-tree

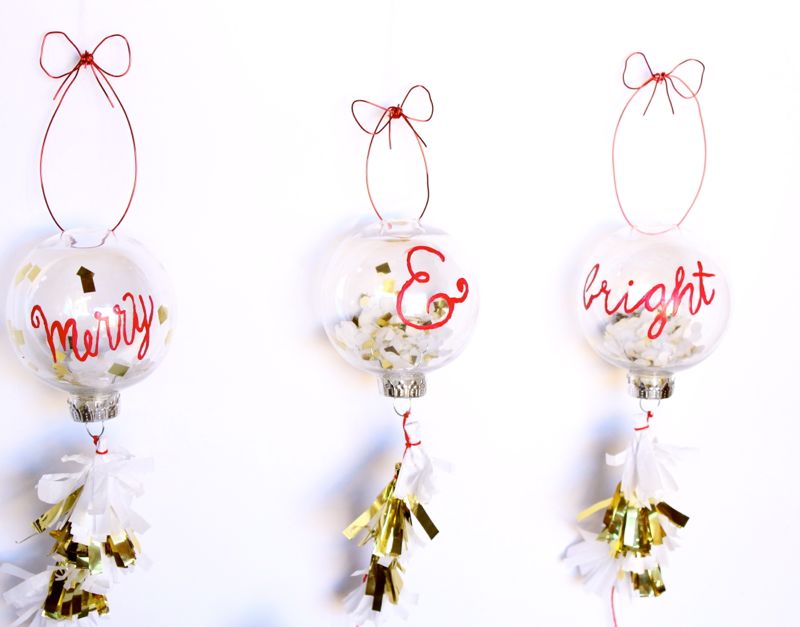
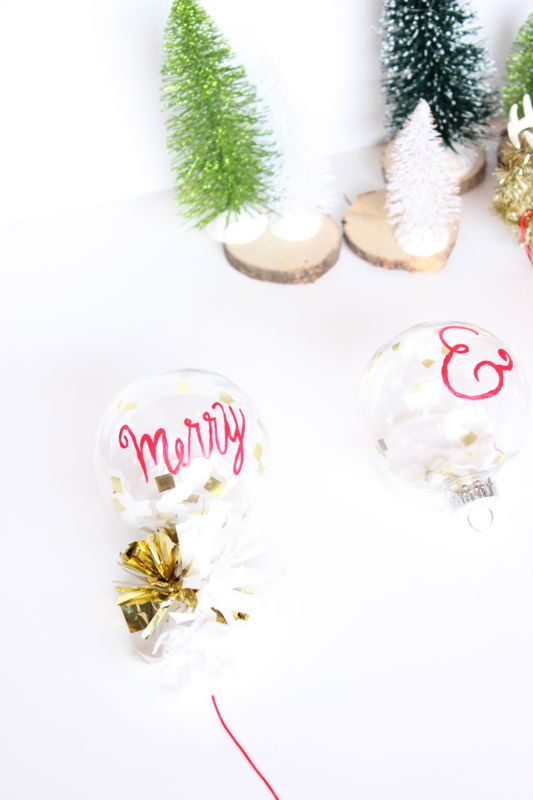
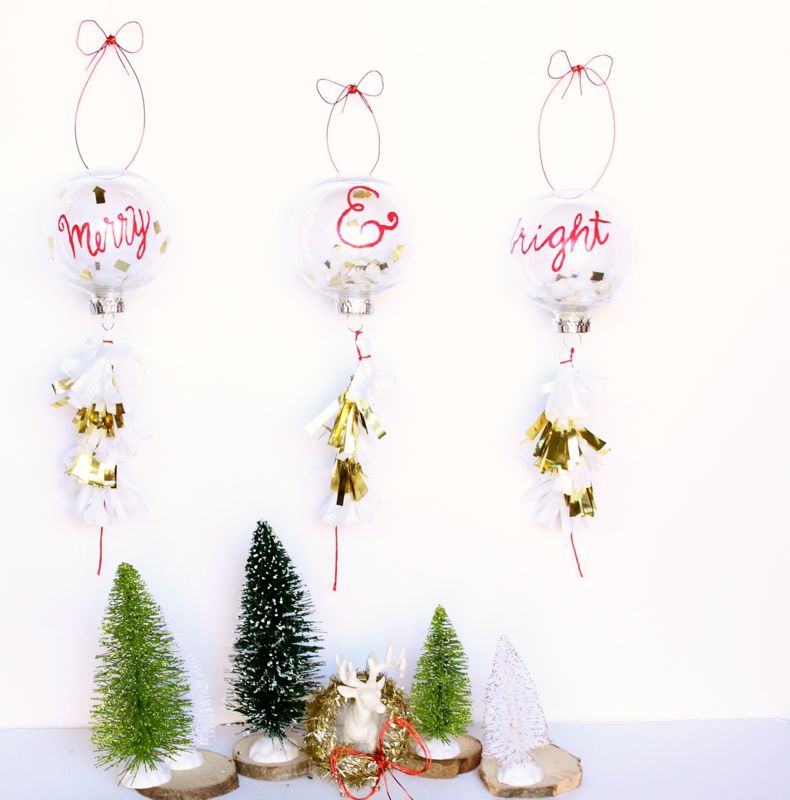
It’s our 2nd official DIY swap, and it’s a good one. We made Merry & Bright ornaments to brighten up the sisters of A Joyful Riot holidays. We couldn’t do a Merry without a Bright, so we sent all three. Our ornaments were inspired by big, 36” balloons by Big Ass Balloons, so the ornaments are meant to be 36” balloons with the string of tassels.

Merry Christmas, Malissa and Machelle, and everyone who participated.

Materials:

  • Bulb ornament, less than $1
  • Gold mylar
  • White tissue paper
  • Red acrylic paint
  • Paintbrush
  • Hot glue and hot glue gun
  • Red embroidery string
  • Red craft/jewelry wire, Michaels
  • Drill

 Directions:

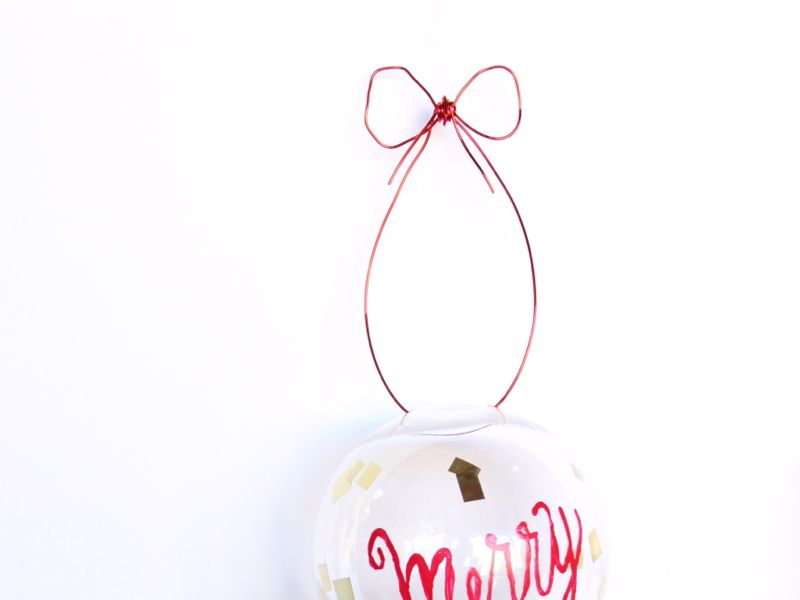
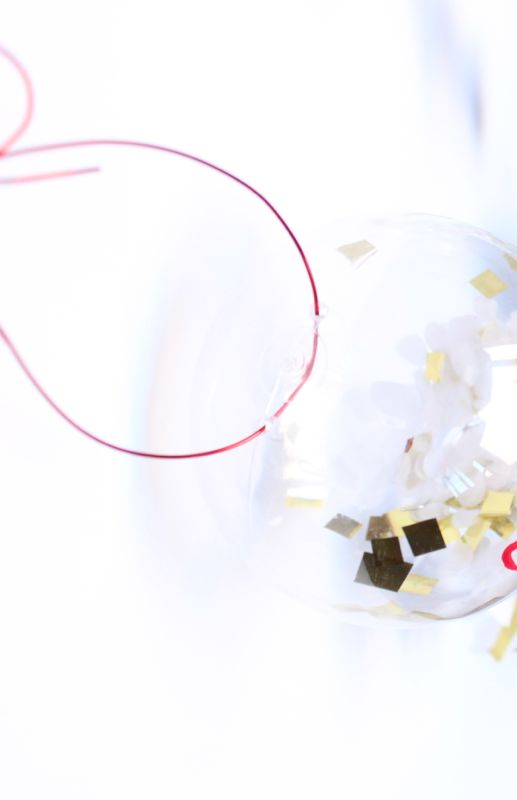
Drill two small holes on the top of the ornament, one of each side of the top of the ornament.

ornament-red-wire-gold-confetti-holiday

Trace or free-hand the word Merry & Bright on the ornaments, then paint the words with a small paintbrush and red paint.

merry-and-bright-ornaments-diy-gold-confetti

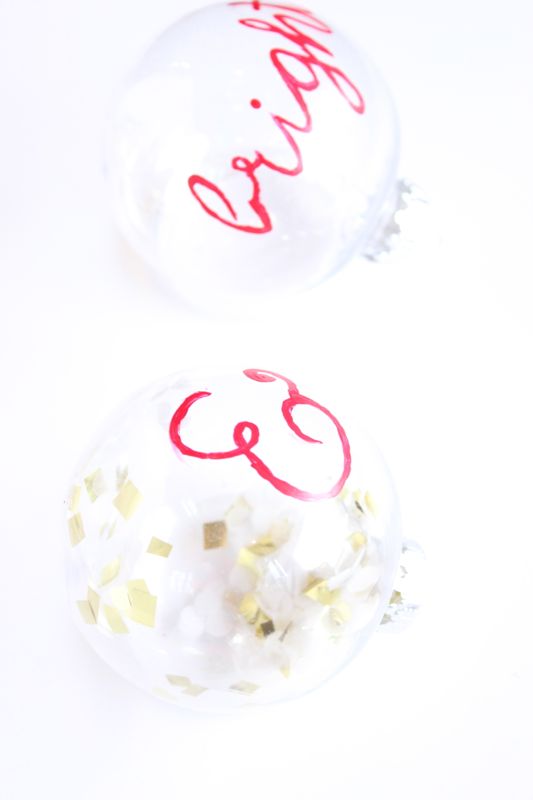
Fill the ornaments with confetti {we cut small squares of the gold mylar and hole-punched tissue paper for white confetti}. There is a natural static that occurs, so some of the confetti will stick to the sides of the ornament.

diy-christmas-ornament-merry-and-bright-red-gold-confetti-tree

Cut a piece of string about 1 foot long for the tassel string. We made little tassels from the white tissue paper and gold mylar. We tied each mini tassel to the string with a knot, one above the other. Once all the tassels were in a row, we dabbed a bit of super glue on top each one, to keep them in a straight line.

diy-christmas-ornament-merry-and-bright-red-gold-confetti-tassle

Cut a 4-inch piece of the red wire and string it through the two holes on top of the ornament. To add a touch of cuteness, make a bow out of the red wire, and wrap additional wire around center of the bow to keep it in place.

IMG_2947


diy-christmas-ornament-merry-and-bright-red-gold-confetti-tree


Honeycomb Ball Gift Toppers

white-wrapping-paper-honeycomb-balls-colors-rudolph-elf-hat-north-pole-charlie-brown-christmas-tree-diy

Unless your like our grandma who use to carefully unwrap each and every gift to save the wrapping paper, why spend the time to beautifully wrap a gift when it’s ripped off in less than a second and then thrown in the trash? We’re not exactly sure, but we will say that it’s fun to make pretty things, and just like an invite or an outfit, it’s a reflection of your style and an opporunity to get creative, which we just can’t resist.

This Christmas, we made hand-drawn and traced Christmas DIY wrapping paper, colored with the kids help, and topped with colorful mini honeycomb balls. It’s easy and fun, plus everything is cuter with a mini honeycomb ball.

white-wrapping-paper-honeycomb-balls-colors-rudolph-elf-hat-north-pole-charlie-brown-christmas-tree-diy

Honeycomb Ball Gift Toppers

You’ll Need:

Directions:

Brainstorm images you want to draw or trace. We went with some of our favorite images we associate with Christmas – an elf hat, a silhouette of a reindeer with a Rudolph nose, the North Pole pole and the droopy Charlie Brown tree. For the Rudolph we cut it from a photo online.

charlie-brown-christmas-tree-diy-christmas-wrapping-paper

diy-elf-hat-wrapping-paper-christmas-diy-honeycomb-ball

diy-rudolph-wrapping-paper-diy-red-honeycomb-ball-white

north-pole-wrapping-paper-diy-christmas-red-honeycomb-ball

Wrap gifts with white paper. If you are going to trace the images on the wrapping paper, simply print the images from the internet, and half wrap your gift, leaving the sides open to insert the paper under the wrapping paper and on top of the gift. Trace the image, then remove from the gift and completely wrap the gift.

Color the images.

white-wrapping-paper-honeycomb-balls-colors-rudolph-elf-hat-north-pole-charlie-brown-christmas-tree-diy

Use double-sided tape on the back of the mini-honeycomb balls, open them half way, and place on the wrapping paper.

charlie-brown-christmas-tree-diy-christmas-wrapping-paper

Add a name tag and place under the tree.

Wishing you happy wrapping times this holiday season.

Stay Gold DIY Pencil Pouch + Black Friday Deal

Happy Thanksgiving. May your heart be filled with gratitude today.

stay-gold-polka-dot-notebook--pen-ornament-star

It’s that holiday time of year when gold is everywhere, so start throwing gold sparkles on everything. It’s also that time of year when Silhouette America has an amazing BLACK FRIDAY sale. We couldn’t have made this DIY Stay Gold pencil pouch {nor could we have made other amazing things this year like thisthis or this} if it weren’t for our Silhouette cutting tool from Silhouette America.

black-friday-sale-silhouette-america-design-store-electronic-cutter

Shop the Black Friday sale today through Dec. 4, 2015. The amazing machine bundles are as low as $99.00 including Silhouette Mint for $99.99, Portrait and Mint for $189.99, CAMEO for $199.99 and CAMEO and Portrait for $289.99. Plus, almost everything in the Silhouette America store is up to 40% off. Use code SORELLE when you check out. For 20% off Silhouette Design Store subscription, enter BLACK at checkout. Oh my goodness, free shipping available to the contiguous United States, too.

Once you receive your amazing electronic cutting tool that will change your life for the better, make this DIY pencil pouch.

When we spotted this gold pencil pouch during back to school shopping in August, we knew it would come in handy some day.

stay-gold-diy-pencil-pouch-gift-star-headband-robert-frost-poem

The reference of “Stay Gold” comes from the book, The Outsiders. The quote in the book stems from the famous poem by Robert Frost.

Nothing Gold Can Stay
Nature’s first green is gold,
Her hardest hue to hold.
Her early leaf’s a flower,
But only so an hour.
Then leaf subsides to leaf,
So Eden sank to grief.
So Dawn goes down to day,
Nothing gold can stay.

stay-gold-robert-frost-quote-pencil-bag-diy-gift-star

This quote is powerful in our own lives. Our hope is that our children can remain young and innocent forever. As we age, our view of the world ‘hardens’ and we forget to play, imagine, and believe in the goodness in ourselves and people around us. We must always remember and teach our children to Stay Gold – stay good, and stay true!

DIY Stay Gold Pencil Pouch
Silhouette Vinyl
Gold Pencil Pouch, Target
Frog’s Tape
Credit Card or straight-edge

Directions:

Create a stay gold design on Silhouette software.
Print the vinyl according to package directions.
Remove the vinyl backing, and lay front side-down onto rows of Frog’s Tape {you can also use transfer paper, which we didn’t have handy}.
Use a credit card to make sure all bubbles are out, then pull the vinyl paper up. Your words should be face-down on the tape.
Pick up the tape, and place carefully on your pencil pouch. Your words should be legible now, right-side-up. Use a credit card to get out all the bubbles.
Carefully pull up each piece of tape. The vinyl should stay in place on the pencil pouch, and you’re done.

stay-gold-diy-pencil-pouch

stay-gold-diy-pencil-pouch-holiday-gift

Now, eat some turkey and pie. Hug family and friends. Rest. Sleep. Wake up. Shop.

YOLO DIY Cosmetic Bag

yolo-black-white-stripes-glasses-cosmetic-bag-diy-triangles

My sister-in-law and I went shopping, and I tried on a pair of designer jeans on sale for $100 from $200ish. I liked them, but didn’t really NEED them. You know, that age-old teaching we teach our children and tell ourselves – need vs. want. Do I really need this? Or, do I want this? My sister-in-law said, “Just get them. My new motto in life is YOLO.” I did a semi-smile and nod reaction, then asked, “What the heck does YOLO mean?” You may be thinking that I live under a rock, and perhaps I do, but I honestly had no idea what YOLO meant. She shared her hashtag wisdom upon me that day and told me that YOLO stands for…You Only Live Once. #YOLO

What powerful words that we often forget. You Only Live Once. We have one shot at this ONE beautiful, amazing, hard and miraculous life. Why waste it? Make the most of everyday, and live your best life…and life will give it’s best to you. YOLO!

Long story short, I bought the jeans. And, I learned what YOLO stands for.

Shortly thereafter my sister-in-law embarked on a new journey in a new city with a new job. She was nervous, but brave. I sent her off with a reminder of what she taught me that day, and some tips to go with it.

DIY YOLO Cosmetic Bag

You’ll Need:

  • Cosmetic bag {mine was $3 from Target}
  • Acrylic paint
  • Golden GAC 900 Medium, to make regular paint into fabric paint
  • Freezer paper
  • X-acto knife
  • Paintbrush
  • Gifts to go inside. I found most of my gifts {see below} from my favorite small town bookstore, The Bookworm
  • Watercolor paper
  • Watercolor paint
  • Gold sharpie or gold leaf pen

Directions:

First, I used Microsoft Word to design my YOLO to place in the middle of the bag. Print YOLO on regular computer paper, then trace it onto freezer paper.

YOLO-freezer-paper-washi-tape

 Use an X-acto knife to cut out the words and a border. Then, iron in onto the costmetic bag.

yolo-freezer-paper-trace-diy

Paint YOLO with black ink.

YOLO-black-diy

Design a pattern around YOLO. I chose to do triangles, so I randomly made a geometric triangle shape print with Frog’s Tape. Then, paint inside the triangles.

yolo-painters-tape-green-diy

yolo-bag-pink-triangles-diy-target

Shop for all your small gifts that go inside the YOLO bag.

yolo-bag-gift-diy-costmetic-bag-candle-lipstick-compass-tea-bag-chocolate

Once your YOLO bag design is complete, start to make the tags to go along with each gift. Cut watercolor paper into triangles. Freehand the words of wisdom for your friend in gold sharpie or gold leaf pen. Then, use soft watercolor over it.

pink-watercolor-tags-gold-diy

My tags read:

Wear red | red lipstick
Set your own direction | Compass button
Indulge in sweetness | Curly Girl chocolate bar
Remember to laugh | Blue Q funny chewing gum box
Celebrate | Hyrda Soap Hangover Bath Tea Bag
Stop to smell the roses | Paddywax Rose scented candle
Believe in yourself | Quotables The Sky is the Limit matchbox
Be Kind | Be Good to People chapstick

wear-red-lipstick-pink-watercolor-gold

compass-button-pink-watercolor-tags-gold-diy-gift

curly-girl-chocolate-bar-indulge-in-sweetness-pink-watercolor

remember-to-laugh-coffee-gum-pink-watercolor-diy-gift

stop-to-smell-the-roses-candle-diy-gift-pink-watercolor-tag

believe-in-yourself-pink-watercolor-tag-the-sky-is-the-limit-candle

be-kind-be-good-to-people-chapstick-pink-watercolor-tags-diy-gift

Attach the labels to each item.

YOLO-wear-red-diy-gift-watercolor-pink-tags-bath-tea-bag

YOLO-wear-red-diy-gift-watercolor-pink-tags-bath-tea-bag

Place all the fun items inside the DIY YOLO cosmetic bag and gift.

yolo-black-white-stripes-glasses-cosmetic-bag-diy-triangles

DIY Witch and Mummy Halloween Nail Polish

mummy-witch-halloween-nail-polish-diy-holiday-gift

We typically opt for a cute and fun Halloween, instead of a scary and creepy one. We’ve never loved haunted houses or frightening people. We like costumes and carving pumpkins, apple cider and trick or treating with our large Italian family.

Since we were babies our mom and aunt made our ‘themed’ Halloween costumes, and every year we celebrate together. Following the annual chaos of hello hugs, oooh’s and ahhhs over costumes and hundreds of flashing camera lights, the men grab a cigar and take the kids trick or treating. The women stay inside where its warm to chat, eat chili and hot dogs and drink our wine. It’s a special tradition, and we are grateful to share it with our own kiddos.

Being into the cute part of Halloween, this DIY is so us!

These DIY witch and mummy Halloween nail polish bottles would make for a great, non-candy Halloween party favor or a unique Halloween gift.

Witch color are you going to pick for this year’s Halloween nails? We’re going with Essie Bahama Mama.

If your rainbow-loving self is admiring the DIY spider web in the background, you can see how we did it here.

halloween-nail-polish-favor-witch-broom-mummy-spider-web-rainbow-hat-white-party-diy

You’ll Need:

  • Nail Polish
  • Paper, Astrobrights
  • White rafia paper ribbon
  • Googly eyes
  • Hot Glue
  • Nail File
  • Rafia
  • Twine

How To:

For the mummy, glue two eyes on the nail polish bottle. Dab a small amount of hot glue on the top of the bottle, then add white rafia ribbon, and start to wrap. You can do one continuous wrap, or cut, add a dab of glue and continue to wrap. When the entire bottle is covered, dab another small amount of hot glue, so the mummy’s wrap stays in place.

mummy-nail-polish-diy-halloween-favor-gift-ribbon-white-googly-eyes

mummy-nail-polish-diy-halloween-favor-gift-ribbon-white-googly-eyes

For the witch, make a small witches hat with a free mini-hat template online {or free-hand} and glue it to a black, doughnut-cut circle. Slide it over the nail polish handle. For the witches broom, place a handful of rafia around one end of the nail file, and tie twine around it to keep it in place. Use a tiny dab of hot glue to keep the twine in place.

witch-nail-polish-diy-halloween-gift-black-hat-orange-nail-file-broom-favor


witch-nail-polish-diy-halloween-gift-black-hat-orange-nail-file-broom-favor


witch-nail-polish-diy-halloween-gift-black-hat-orange-nail-file-broom-favor