Easter Watercolor Bunny Tail Cups

watercolor-bunny-tail-easter-cups-pink-blue-green-cotton-diy

One of our favorite Easter memories from childhood is the year the Easter bunny brought us chicks. Yes, real live chicks. And, they were green and pink. Sounds totally inhumane, and honestly we have no idea how they did it, or whether it was permanent or not. But, all we know is that the Easter bunny brought us colorful chicks, and we got to feed, pet and care for them for a whole week before we had to bring them back home to a local farm.

Besides our brief stint with chicks, the only real pet we had throughout our childhood was a rabbit. Sweet Thumper.

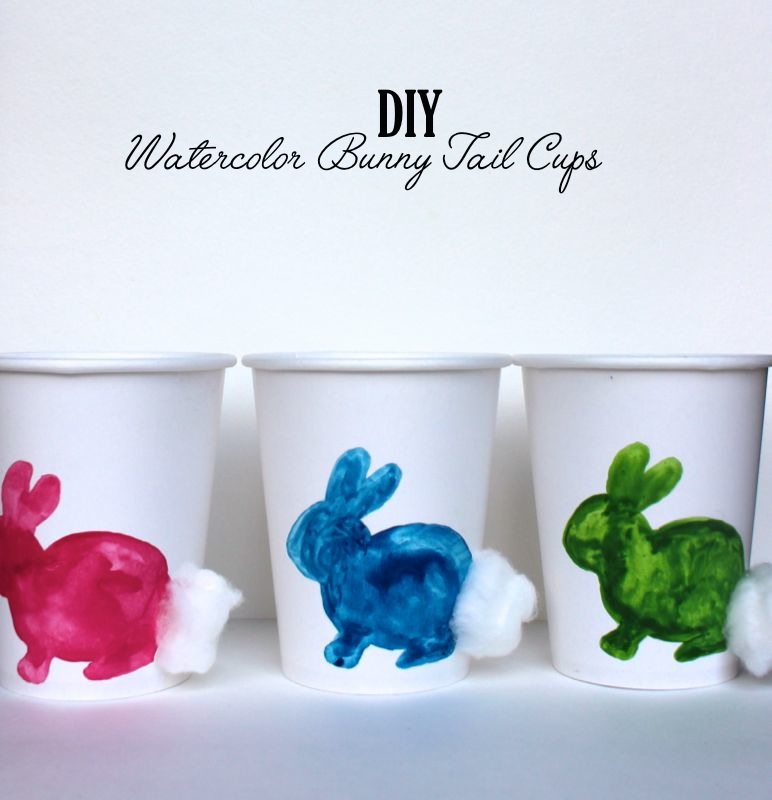
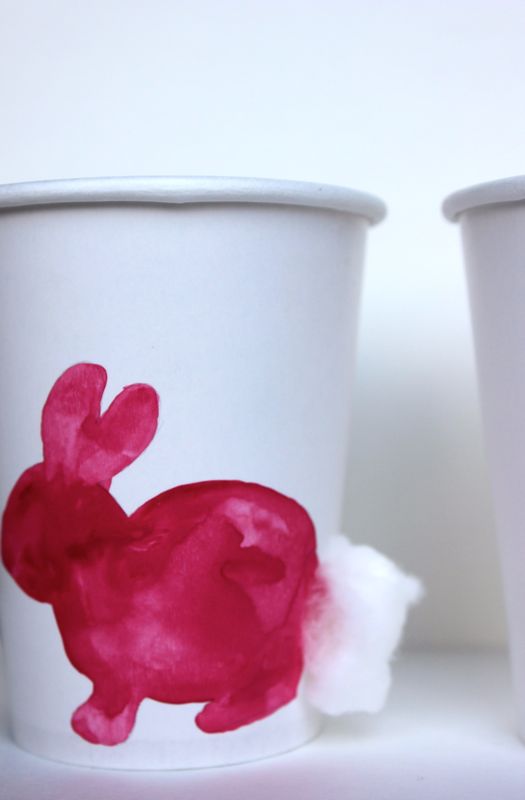
Painting these DIY bunny tail paper cups brought back memories of our pet rabbit, and the fun memories chasing him all over the yard.

These would make for a cheap and easy addition to your Easter table setting, or a lovely gift filled with candy or small gifts…so let’s hop to it.

pink-bunny-watercolor-easter-cups-cotton-ball-diy-rabbit-easter

You’ll Need:

  • paper cups {.97 cents for 10}
  • watercolor paints {quality brand like Windsor and Newton, brush and cup of water}
  • cotton balls
  • hot glue gun

How To:

  • Print and cut an outline of a rabbit you find online.
  • Place the rabbit on the cup and lightly trace around it with a pencil.
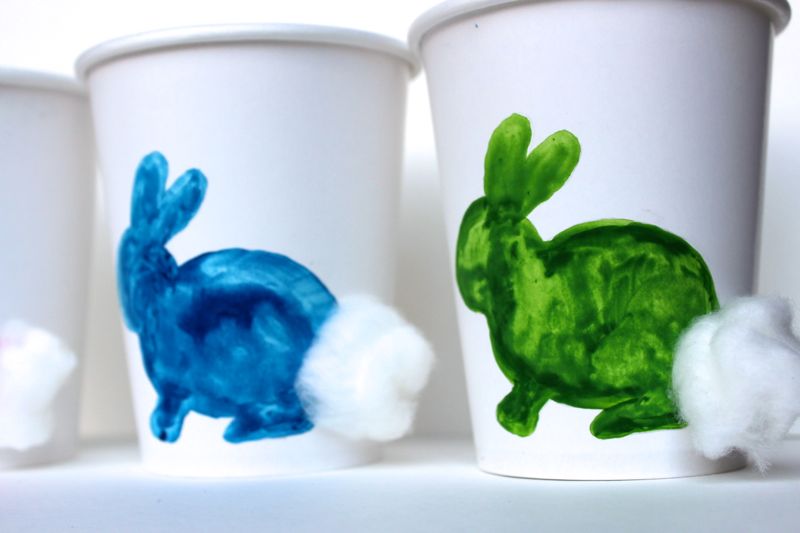
  • Dip your brush into watercolor paint, and a touch of water and paint within and just on the pencil outline {so you don’t see it} of the rabbit.
  • Let dry.
  • Glue the cotton ball on the tail of the bunny.

blue-green-easter-bunny-diy-cups-watercolor-kid

Hoppy Easter!

{images via j. sorelle}

DIY Best.Day.Ever. Confetti Banner

best day ever banner-confetti-table runner-diy-red-blue-yellow-green-dots

We consider our weddings and the birth of our children to be among our Best.Day{s}.Ever.

What was your Best.Day.Ever?

Some days will always be more special than others, and some days will be trivial, but what if we tried to make every day the Best.Day.Ever? What a wonderful world that would be! We never know what day will be our last, but we know for sure that each and every moment is truly a blessing, so every day we’re alive should be considered the Best.Day.Ever.

We created a large DIY Confetti Best.Day.Ever. sign that would make…

  • the best DIY party backdrop ever
  • the best DIY table-cloth ever
  • the best DIY birthday banner ever

You can make the DIY confetti sign for under $20, and its a fun activity to do with the kids.

You’ll Need:

How To:

  • Tape Kraft paper to the wall behind the paper tablecloth. If you choose to do a plastic tablecloth, you may not need the ‘backing,’ but if you choose to use a paper tablecloth that’s soft like linen, the markers will bleed through.
  • Tape the table-cloth to the wall using painter’s tape.
  • Use stencils or a Silhouette cutting machine to cut large Best.Day.Ever. letters.
  • Use painter’s tape to tape the letters in place on the table-cloth. You will need to roll the tape to make it double-sided.
  • Start with one color and get ‘dot happy.’ Dot the markers all over the sides and corners of the letters and all over the table-cloth in a random fashion.
  • Repeat with all the marker colors.
  • Remove the letters from the table-cloth.

best-day-ever-diy-banner-confetti-rainbow-polka dot

best-day-ever-banner-table cloth-rainbow-confetti-diy

best day ever-diy-banner-confetti-rainbow-tablecloth

confetti-rainbow-banner-dig-best-day-ever-table cloth-polka dot

diy-party-backdrop-confetti-banner-rainbow-polka-dot-best-day-ever

best-day-ever-diy-birthday-banner-confetti-party-rainbow-tablecloth

Make today the Best.Day.Ever.

{images via j. sorelle}

Bohemian Glam Birthday Party

bohemian-glam-birthday-party-teepee-black-white-polkadot

After looking at these photos of Mila’s first birthday party that Jessica shared with Momtastic, we decided 1-year-olds can have just as chic and as fabulous a birthday party as adults. Mila is one lucky little lady because her mom, Naysha Lopez, planned one dreamy bohemian glam first birthday party for her special day. It’s worth viewing all the photos.

We don’t know about you, but we want that silver pouf, dream catcher and teepee to be at our next birthday parties too…and we won’t be turning one. Special memories for a beautiful family! Happy Birthday Mila.

birthday-teepee-black-white-toddler-picnic-pouf-cupcake

{photos via Corinna Hoffman Photography}

How to Throw a Colorful NYE Party with Paper

when the clock strikes midnight

If you blinked, Christmas is over, and a new year is now upon us. The thought of throwing another party can be totally overwhelming, but what if we told you that it could be easy and cost-efficient to #ColorizeYourParty and you could do it primarily with paper?

Intrigued?

Good, because we put together a colorful and fun way to ring in the New Year with Astrobrights Papers that you, too, can put together in less than a day.

Just like Cinderella, we hope year 2015 is a fairy tale for you. However, unlike Cinderella, When the Clock Strikes Midnight, a magical spell will not be broken, but another year will begin. A new beginning. A fresh start. Another chance. A new love. An opportunity for adventure. Travel. Good times {and some bad times too}. Lessons to be learned.

To celebrate 2015 and the magic that happens When the Clock Strikes Midnight, here’s 3 ways you can #ColorizeYourParty

Countdown Clock and Wishes
Colorize Your Party with a large, colorful clock made from paper. Print and cut out numbers, as well as the big hand and little hand, then stick to a wall. You can use a Silhouette cutting tool like we did, or you don’t need a fancy program at all – you can print numbers via Microsoft Word, and then cut. We used DAP BlueStik reusable adhesive putty to stick the paper to the wall, so it’s easily removable and reusable. Every hour, you can move the ‘hands’ as the midnight hour approaches.

when the clock strikes midnight

when the clock strikes midnight

Before the clock strikes midnight, encourage your guests to write wishes for friends, family and loved ones at the party. Your guests will go home with the mason jars as favors, along with heart-felt wishes for 2015. Remember to use colorful Astrobrights Papers to add labels to the top of the mason jars, and 2015 Wishes tags with twine. For extra table height, wrap small boxes like a package with colorful paper.

when the clock strikes midnight

when the clock strikes midnight NYE party

when the clock strikes midnight NYE party

when the clock strikes midnight NYE party

NYE Essentials Wall
Whether you hope for a magical, butterflies-in-your-stomach kiss, a first kiss, an old but favorite kiss, a kiss from your children or a kiss from a friend, this NYE Essentials wall will ensure everyone will have soft lips, good breath and confetti to throw when the clock strikes midnight. We filled 98 cent plastic ornaments with DIY paper confetti {we used a good old-fashioned hole punch to create bright confetti from Astrobrights Papers}, custom labeled lip balm and pink and white tic-tacs.

NYE colorful party with Astrobrights Papers

NYE confetti

NYE party with confetti

To make the wall more eye-catching, we hung tinsel and white twinkle lights with Painter’s Tape, and strung the ornaments on the tinsel. For the big ribbon banner made entirely of paper, we simply printed our sign, added Martha Stewart glitter to NYE letters, glued 3 sheets of paper together, bent the paper and taped the ends to the wall. As for ‘tails’ of the ribbon, we cut the paper and taped it to the wall.

NYE colorful confetti party

NYE midnight ESSENTIALS

NYE party essentials

NYE party essentials

NYE party confetti

IMG_7304

Photo Booth
We thought about doing a glitter photo booth, or even a photo booth with all kinds of paper props, but a simple geometric background with the words This is How G-double-O-D I looked in 2014 seemed like the most honest and to-the-point backdrop for our NYE celebration. You have to own your hotness in 2014 to look even better in 2015, right? We think so.

photo booth this is how good i looked

For the geometric backdrop, we simply cut Astrobrights Papers into 8×8 squares, and then cut it diagonally in half. We used 4 different colors, and once all the triangles were cut, we used a glue stick to stick it to a wood board. For the words, we used a Silhouette cutting machine, but you can trace or print your own letters.

NYE photo booth

We hope you create a unique and memorable celebration using Astrobrights Papers to #ColorizeYourParty, and we wish you a happy, safe and healthy 2015!

Stay inspired all year-long with Astrobrights Papers via Facebook, Pinterest, Instagram and Twitter.

{images via j. sorelle}

side note about our model: Major props to Jessica’s hubby {the handsome model in our photo booth}, who not only took care of an entire family infected with Influenza A before, during and after Christmas, but kindly modeled for our backdrop despite lack of sleep and rest, when we were too sick to do so. 

j. sorelle received products and/or payment for this post, however we love Astrobrights Papers even if they didn’t send us product, and all opinions are ours, we promise. View all of Astrobrights vibrant colors here


Day 12: How to Make a DIY No-Sew Felt Crown

NYE no sew felt crowns

On the 12th day of Christmas, j. sorelle gave to you…DIY no-sew felt crowns for New Year’s Eve.

Our children love creative play, and Jessica’s daughter LOVES to wear crowns. And, we have NO idea how to sew. So, for our Dec. 31 New Year’s Eve celebration, we made no-sew felt crowns for the kids to wear until midnight {or their 9 o’clock midnight celebration}.

It’s an activity and party favor all in one, and it can be duplicated for future birthday parties.

how to make a no sew felt crown

No Sew Felt Crown Tips:

  • You can find the templates for the crowns here. Our inspiration came from Scattered Thoughts of a Crafty Mom and she has a template too.
  • We used a Sharpie to free-hand bubble letters and numbers on felt {CELEBRATE, PARTY and 2015}, then we cut them out with scissors, and used a hot glue gun to glue them to the hats.
  • We learned the hard way that it’s best to measure your child’s head and place the pre-cut elastic in the middle of the crown before gluing the tips of the crown together. It’s easier than inserting it once the tips of the crown are glued together.
  • Hot glue pieces of velcro to each end of the elastic, so the crown is easily removable.

{images via j. sorelle}